Advertisement
Table of Contents
- 1 First Time Installation
- 2 Tools Required
- 3 Kit Contents
- 4 Installation Onto Tradesman and Other Heavy Duty Crossbars
- 5 Installation Onto Prorack S-Wing and International T-Slot Crossbars
- 6 Installation Onto Prorack P-Bar and Other Square Crossbars
- 7 Maintenance
- 8 Warranty and Disclaimer
- Download this manual
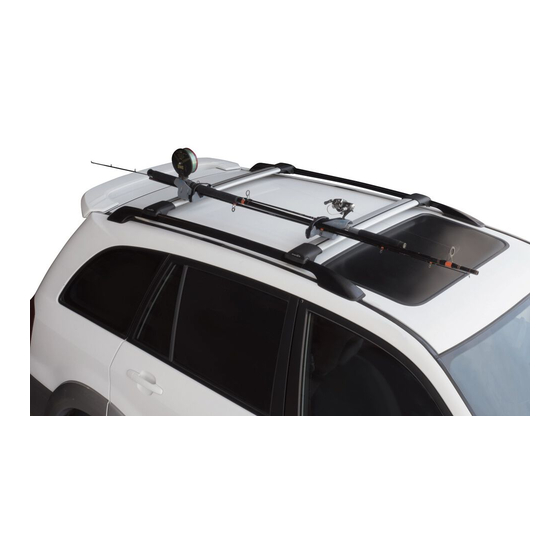
FIRST TIME INSTALLATION
•
Please read instructions carefully before installation.
•
Check the contents of kit. Contact your Prorack dealer if any parts appear to be missing or damaged.
•
Clean your roof racks prior to fitting the Fishing Rod Holder.
IMPORTANT WARNING!
IT IS CRITICAL THAT ALL PRORACK RACKS AND ACCESSORIES BE PROPERLY AND SECURELY ATTACHED TO YOUR VEHICLE. IMPROPER ATTACHMENT COULD RESULT IN
AN AUTOMOBILE ACCIDENT, AND COULD CAUSE SERIOUS BODILY INJURY OR DEATH TO YOU OR TO OTHERS. YOU ARE RESPONSIBLE FOR SECURING THE RACKS AND
ACCESSORIES TO YOUR CAR, CHECKING THE ATTACHMENTS PRIOR TO USE, AND PERIODICALLY INSPECTING THE PRODUCTS FOR ADJUSTMENT, WEAR, AND DAMAGE.
THEREFORE, YOU MUST READ AND UNDERSTAND ALL OF THE INSTRUCTIONS AND CAUTIONS SUPPLIED WITH YOUR PRORACK PRODUCT PRIOR TO INSTALLATION OR
USE. IF YOU DO NOT UNDERSTAND ALL OF THE INSTRUCTIONS AND CAUTIONS, OR IF YOU HAVE NO MECHANICAL EXPERIENCE AND ARE NOT THOROUGHLY FAMILIAR
WITH THE INSTALLATION PROCEDURES, YOU SHOULD HAVE THE PRODUCT INSTALLED BY A PROFESSIONAL INSTALLER SUCH AS A ROOF RACK SPECIALIST.
KIT CONTENTS
Item #
Component
1
M6 Spring Nut
2
M6 Slot Nut
3
M6 Nylock Nut
4
M6 Spring Washer
5
M6 Washer
6
M6 Button Head Capscrew 20mm
7
M6 Button Head Capscrew 12mm
8
Clamp Plate For P-Bar
9
M6 Button Head Capscrew 40mm
10
Fishing Rod Holder Zip Strap
11
Fishing Rod Holder Body
12
Screwdriver Allen Key 4mm
09-13-585 Rev 2
PR3217 FISHING ROD HOLDER
INSTRUCTIONS
Qty
4
4
8
4
10
8
4
4
2
8
2
11
2
1
TOOLS REQUIRED
•
10mm Spanner or Torque Wrench (for P-Bar fitment only)
2
1
3
4
5
9
8
Page 1 of 6
Advertisement
Table of Contents

Related Manuals for Prorack PR3217


Summary of Contents for Prorack PR3217
- Page 1 IMPORTANT WARNING! IT IS CRITICAL THAT ALL PRORACK RACKS AND ACCESSORIES BE PROPERLY AND SECURELY ATTACHED TO YOUR VEHICLE. IMPROPER ATTACHMENT COULD RESULT IN AN AUTOMOBILE ACCIDENT, AND COULD CAUSE SERIOUS BODILY INJURY OR DEATH TO YOU OR TO OTHERS. YOU ARE RESPONSIBLE FOR SECURING THE RACKS AND ACCESSORIES TO YOUR CAR, CHECKING THE ATTACHMENTS PRIOR TO USE, AND PERIODICALLY INSPECTING THE PRODUCTS FOR ADJUSTMENT, WEAR, AND DAMAGE.
- Page 2 Installation onto Tradesman and other Heavy Duty Crossbars Go to Page 3 Installation onto Prorack S-Wing and International T-Slot Crossbars Go to Page 4 Installation onto Prorack P-bar and other square Crossbars Go to Page 5 Page 2 of 6...
- Page 3 INSTALLATION ONTO TRADESMAN AND OTHER HEAVY DUTY CROSSBARS Insert 2 x M6 Spring Nuts at an equal distance from the ends of each crossbar. Push Position the Rod Holder Bodies on each crossbar with the strap/foam ends pointing Spring Nuts down into the crossbar channels and twist to lock into place as pictured. towards each other.
- Page 4 INSTALLATION ONTO PRORACK S-WING AND INTERNATIONAL T-SLOT CROSSBARS Push rubber infill down and slide 2 x M6 Slot Nuts into each crossbar channel at an Position the Rod Holder Bodies on each crossbar with the strap/foam ends pointing equal distance from the ends of the crossbars as pictured. The 4mm Screwdriver Alley towards each other.
- Page 5 INSTALLATION ONTO PRORACK P-BAR AND OTHER SQUARE CROSSBARS Loosely fasten the Clamp Plates to Rod Holder Bodies via the two inward facing holes Position the Rod Holder Bodies on each crossbar with the strap/foam ends pointing (next to foam) using 2 x M6 Button Head Capscrews 40mm, 2 x M6 washers and 2 x towards each other.
- Page 6 Where you become aware of defects in materials or of workmanship, and wish to make a claim under this warranty you must do the following for the warranty to be honoured by your Prorack dealer or Yakima Australia Pty Ltd ABN 58 154...
Need help?
Do you have a question about the PR3217 and is the answer not in the manual?
Questions and answers