Table of Contents
Advertisement
Available languages
Available languages
Quick Links
Advertisement
Chapters
Table of Contents

Related Manuals for Gastroback Design Dorrautomat Natural Plus


Summary of Contents for Gastroback Design Dorrautomat Natural Plus
- Page 1 DESIGN DÖRRAUTOMAT NATURAL PLUS BEDIENUNGSANLEITUNG Art.- Nr. 46600 » Design Dörrautomat Natural Plus « Bedienungsanleitung vor Gebrauch unbedingt lesen! Modell- und Zubehöränderungen vorbehalten! Nur für den Hausgebrauch!
-
Page 2: Table Of Contents
Wir legen viel Wert auf Ihre Sicherheit. Deshalb bitten wir Sie, alle Hinweise und Anleitungen, die mit dem Gerät geliefert werden, sorgfältig und vollständig durch- zulesen, bevor Sie das Gerät in Betrieb nehmen. Dadurch lernen Sie auch alle Funktionen und Eigenschaften Ihres Gerätes kennen. Bitte befolgen Sie sorgfältig alle Sicherheitshinweise! INHALTSVERZEICHNIS Sicherheitshinweise ................... - Page 3 Das Gerät erfordert nur wenig Aufwand bei Bedienung und Reinigung. Sie erhalten dadurch einen einfachen Weg, die Vielfalt Ihrer Gerichte auf köstliche Weise zu erweitern. Bitte lesen Sie diese Bedienungsanleitung sorgfältig durch. So können Sie am schnellsten alle Vorteile Ihres neuen Dörrautomaten nutzen. Ihre GASTROBACK® GmbH...
-
Page 4: Sicherheitshinweise
Wartung am Gerät oder Netzkabel dürfen nur von dafür autori- sierten Fachwerkstätten durchgeführt werden (siehe: ‚Gewährleistung / Garantie‘). Fragen zum Gerät beantwortet: Gastroback GmbH, Gewerbestr. 20, D-21279 Hollenstedt, Telefon: (04165) 22250. ALLGEMEINE HINWEISE ZUR SICHERHEIT • Dieses Gerät ist nur für den Betrieb in Innenräumen und für die Ver- wendung im Haushalt vorgesehen. - Page 5 • Überprüfen Sie das Gerät regelmäßig auf Beschädigungen. Nie- mals das Gerät betreiben, wenn Bauteile beschädigt sind oder nicht mehr erwartungsgemäß arbeiten, oder wenn das Gerät übermäßigen Belastungen ausgesetzt war (Beispiel: Sturz, Schlag, in das Gehäu- se eingedrungene Flüssigkeiten). Ziehen Sie bei Störungen während des Betriebes sofort den Netzstecker aus der Steckdose.
- Page 6 unzugänglichen Ort auf. Niemals das Gerät oder seine Bauteile unbeaufsichtigt lassen, wenn sie für kleine Kinder zugänglich sind. • Das Gerät wird elektrisch beheizt. Niemals das Gerät oder seine Bauteile in, auf oder in die Nähe von starken Wärmequellen und hei- ßen Oberflächen bringen (Beispiel: Heizung, Ofen, Feuer).
-
Page 7: Vorsichtsmaßnahmen Beim Umgang Mit Elektrizität
VORSICHTSMASSNAHMEN BEIM UMGANG MIT ELEKTRIZITÄT Das Gerät wird elektrisch beheizt und darf nur an eine Schukosteckdose mit den richtigen Nennwerten (220 - 240 V Wechselstrom, 50/60 Hz, 8 A) angeschlossen werden. Stellen Sie das Gerät in der Nähe einer geeig- neten Wandsteckdose auf und schließen Sie das Gerät dort direkt an. -
Page 8: Technische Daten
Netzstecker aus der Steckdose. Kleine Mengen Wasser (einige Trop- fen), die von den Lebensmitteln auf die Gerätebasis tropfen, sind unbe- denklich. Beachten Sie die Hinweise im Kapitel ‚Hilfe bei Problemen‘. TECHNISCHE DATEN Modell: Art.- Nr.: 46600 Design Dörrautomat Natural Plus Stromversorgung: 220 - 240 V Wechselstrom, 50/60 Hz Leistungsaufnahme:... -
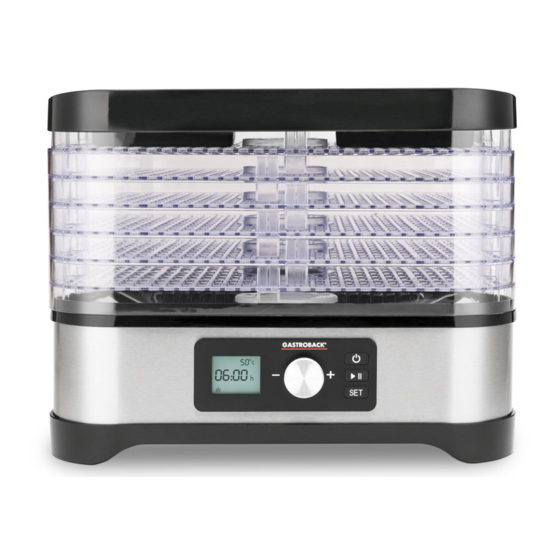
Page 9: Ihren Neuen Dörrautomaten Kennen Lernen
IHREN NEUEN DÖRRAUTOMATEN KENNEN LERNEN EIN/AUS - TASTE DECKEL MIT DAMPFÖFFNUNGEN Drücken Sie hier, um das Gerät einzuschalten oder auszuschalten Stellt eine korrekte und effiziente Funktionsweise sicher START/STOPP - TASTE 6 TRANSPARENTE TROCKENBÖDEN Bilden zusammen mit dem Deckel die Dörrkammer Hiermit können Sie den Trocknungsvorgang starten, anhalten und fortsetzen GERÄTEBASIS... -
Page 10: Tipps Für Beste Ergebnisse
TIPPS FÜR BESTE ERGEBNISSE Vor dem Trocknen müssen die Lebensmittel entsprechend vorbereitet werden. Beach- ten Sie dazu die Hinweise im folgenden Kapitel ‚Vorbereitungen‘. Wählen Sie nur einwandfreie Lebensmittel für die Verarbeitung. Die richtige Trocknungszeit hängt von der Art der Lebensmittel, der Frische, der Dicke der Scheiben und Stücke und der gewünschten Beschaffenheit ab (siehe: ‚Vorbereitungen‘). -
Page 11: Vorbereitungen
• Bewahren Sie die getrockneten Lebensmittel in einem sterilisierten, trockenen Gefäß im Kühlschrank auf. Wenn möglich, sollten Sie den Gastroback Vaku- umierer verwenden, um die Lebensmittel in evakuierten Behältern und Beuteln zu verpacken. Beachten Sie aber, dass sich die Beschaffenheit getrockneter Lebens- mittel bei der Lagerung schon nach kurzer Zeit ändern kann. -
Page 12: Gemüse Trocknen
Zeit Frucht Vorbereitung Übliche Beschaffenheit [Stunden] Kerne entfernen, schälen, in Schei- weich und biegsam 5 - 6 Apfel ben schneiden schälen, in 3-4mm dicke Scheiben Banane knusprig 8 - 38 schneiden nach Wunsch entsteinen, sobald Kirsche fest 3 - 34 die Kirschen etwas getrocknet sind im Ganzen oder ohne Steine in Dattel... - Page 13 Zeit Frucht Vorbereitung Übliche Beschaffenheit [Stunden] in ca. 2-3cm dicke Scheiben Spargel hart, zerbrechlich 6-14 schneiden anschneiden und dämpfen bis sie dicke Bohnen hart, zerbrechlich 8-26 glasing sind dämpfen, abkühlen und Spitze Rüben, Rote hart, zerbrechlich 8-30 Beete und Wurzel abschneiden anschneiden und ca.
-
Page 14: Fleisch, Geflügel Und Fisch
Zeit Frucht Vorbereitung Übliche Beschaffenheit [Stunden] äußere Haut abziehen, in dünne Rhabarber wasserfrei 8-38 Scheiben schneiden Spinat dämpfen bis die Blätter trocken sind hart, zerbrechlich 6-16 schälen, in Hälften oder Scheiben Tomate fest 8-24 schneiden schälen, in ca. 1cm dicke Scheiben Kürbis hart, zerbrechlich 6-18... -
Page 15: Vor Der Ersten Verwendung
VOR DER ERSTEN VERWENDUNG – Niemals kleine Kinder mit dem Gerät oder den Bauteilen des WARNUNG Gerätes oder dem Verpackungsmaterial spielen lassen! Ziehen Sie immer zuerst den Netzstecker aus der Steckdose und lassen Sie das Gerät abkühlen, bevor Sie das Gerät reinigen, und wenn Sie das Gerät nicht benutzen. Niemals die Geräte- basis oder das Netzkabel in Wasser oder andere Flüssigkeiten stellen oder tauchen oder Flüssigkeiten darüber gießen. - Page 16 WICHTIG - Die Lebensmittelstücke sollten nicht dicker als ca. 2 cm sein. Andernfalls lassen sich die Trockenböden nicht richtig schließen und die Luftzirkulation wird zu stark behindert. 1. Bereiten Sie Ihre Lebensmittel vor (siehe: ‚Tipps für beste Ergebnisse‘ und ‚Vorbe- reitungen‘).
- Page 17 schirm erscheint. Sie können Trocknungszeiten von 30 Minuten bis 7 Stunden in Schritten von 30 Minuten wählen. Drücken Sie die Start/Stop-Taste , um den Trocknungsvorgang zu starten. 7. Während des gesamten Trocknungsvorgangs blinkt das Betriebssymbol dem LCD-Bildschirm. Sobald die tatsächliche Temperatur die eingestellte Tempe- ratur erreicht hat, beginnt der Timer, die noch verbleibende Zeit als Count-down anzuzeigen.
-
Page 18: Pause-Funktion
10. Sie können die Trockenböden sofort mit anderen Lebensmitteln füllen und einen neuen Trocknungsvorgang starten. Drücken Sie dazu kurz die Ein/Aus-Taste, um das Gerät wieder mit den Voreinstellungen (50°C, 6:00 Stunden) einzuschalten. Wählen Sie dann die erforderlichen Werte, wie oben beschrieben. HINWEIS Lassen Sie das Gerät nicht unnötig arbeiten. -
Page 19: Müsli-Riegel Herstellen
Sie durch Anschließen einer Lampe, ob die Steckdose Strom hat. Ein ernstes Problem ist Ziehen Sie den Netzstecker aus der Steckdose. Wenden aufgetreten. Das Netz- Sie sich an Gastroback, Tel. 04165/2225-0 oder info@ kabel könnte beschädigt gastroback.de sein. - Page 20 Bedienung automatisch aus. Das ist beabsichtigt. Drücken Sie die SET-Taste, um die Hintergrundbeleuchtung des LCD-Bildschirms wieder einzuschalten. Die Hintergrundbeleuch- Wenden Sie sich an Gastroback, Tel. 04165/2225-0 tung des LCD-Bildschirms oder info@gastroback.de ist defekt. Ein Trocknungsvorgang Das ist beabsichtigt. Drücken Sie kurz die Ein/Aus-Taste, wurde beendet und das um das Gerät wieder einzuschalten (siehe: ‚Bedienung‘).
- Page 21 Wählen Sie eine höhere Trocknungszeit, stellen Sie das Gerät an einem Ort mit geringerer Luftfeuchte auf oder wählen Sie eine höhere Temperatur. Die Sicherung im Gerät hat Wenden Sie sich an Gastroback, Tel. 04165/2225-0 angesprochen oder das Hei- oder info@gastroback.de zelement ist gebrochen.
-
Page 22: Pflege Und Reinigung
PFLEGE UND REINIGUNG WARNUNG – Schalten Sie das Gerät immer zuerst AUS (Ein/Aus-Taste gedrückt halten, bis der LCD-Bildschirm dunkel wird), ziehen Sie den Netzstecker aus der Steckdose und lassen Sie das Gerät abkühlen, bevor Sie das Gerät reini- gen, und wenn Sie das Gerät nicht benutzen. Achten Sie immer darauf, dass alle Teile des Gerätes für kleine Kinder unerreichbar sind. -
Page 23: Aufbewahrung
trocknen, wo sie für kleine Kinder unerreichbar sind. Alternativ können Sie die Tro- ckenböden, den Deckel und die Müsli-Förmchen auch in der Geschirrspülmaschine reinigen. Legen Sie die Teile dazu in den oberen Korb und wählen Sie eine niedrige Temperatur. AUFBEWAHRUNG –... -
Page 24: Entsorgungshinweise
Wenn Sie das Gerät durch ein neues ersetzen, ist der Verkäufer gesetz- lich verpflichtet, das alte mindestens kostenlos zur Entsorgung entgegenzunehmen. INFORMATION UND SERVICE Weitere Informationen erhalten Sie im Internet unter www.gastroback.de. Wenden Sie sich mit Problemen, Fragen und Wünschen gegebenenfalls an: GASTROBACK Kundenservice, Tel.: 04165/2225-0... -
Page 25: Gewährleistung/Garantie
Gaststätten, Hotels und Motels. Bei gewerblichem Gebrauch verkürzt sich die Garantie auf ein Jahr. Hinweis Für die Reparatur - und Serviceabwicklung möchten wir Sie bitten, Gastroback Pro- dukte an folgende Anschrift zu senden: Gastroback GmbH, Gewerbestr. 20, 21279 Hollenstedt. - Page 27 DESIGN DÖRRAUTOMAT NATURAL PLUS OPERATING INSTRUCTIONS Art.- No. 46600 » Design Dörrautomat Natural Plus « Read all provided instructions before first usage! Model and attachments are subject to change For household use only!
- Page 28 We attach a certain importance to your safety. Thus, we ask you to read all provided instructions and information in this booklet carefully and completely, before you start running the appliance. This will help you to know all functions and properties of your new appliance.
- Page 29 These instructions for use will inform you on the various functions and features, which make it easy to take pleasure in your new Food Dehydrator. We hope that you will enjoy your new Food Dehydrator. Your GASTROBACK® GmbH...
-
Page 30: Important Safeguards
IMPORTANT SAFEGUARDS Carefully read all instructions, before operating this appliance and save for further reference. Do not attempt to use this appli- ance for any other than the intended use, described in this booklet. Any other use, especially misuse, can cause severe injuries or damage by electric shock, overheating, and fire. - Page 31 water. Always wipe off spilled liquids immediately. Do not place any clothes or tissue or other foreign objects under or on the appliance during operation, to avoid risk of fire, electric shock and overheating. Do not block the ventilation slits in the heating base and the cover. •...
-
Page 32: Important Safeguards For Electrical Appliances
directly near the appliance during operation. Beware of steam and condensate, when removing the cover and the food trays. After ope- ration, do not place the food tray and/or cover on any heat-sensitive or moisture-sensitive surfaces. • Do not place any hard and/or heavy objects on or in the appliance or any part of it. - Page 33 easily accessible so that it would be possible to unplug the appliance immediately in case of any malfunction or danger. • Always handle power cords with care. The power cord may never touch hot surfaces, sharp edges, or any moving parts. Do not let the plug or power cord hang over the edge of the table or counter.
-
Page 34: Technical Specifications
TECHNICAL SPECIFICATIONS Model: Art.- No.: 46600 Design Dörrautomat Natural Plus Power supply: 220 - 240 V AC, 50/60 Hz Power consumption: max. 65 W Length of power cord: approx. 95 cm Weight: approx. 2,85 kg approx. 300 x 250 x 300 mm (including 6 food trays) Dimensions: (width x depth x height) 6 food trays, each approx. -
Page 35: Knowing Your New Food Dehydrator
KNOWING YOUR NEW FOOD DEHYDRATOR ON/OFF BUTTON COVER WITH STEAM VENTS Press here to switch the appliance on or off Ensuring correct and efficient operation START/STOP BUTTON 6 TRANSPARENT FOOD TRAYS Building the dehydration chamber For starting, interrupting, and re-assuming operation HEATING BASE SET BUTTON press here to select the temperature or time for adjustment... -
Page 36: Tips For Best Results
TIPS FOR BEST RESULTS • Before dehydrating/drying your food, some steps of preparation are needed. Refer to the following chapter ‘Preparations’. Only use flawless food for dehydration. • The correct dehydrating time depends on the type of food, the freshness and thickness of slices or pieces and the desired consistency (see: ‘Preparations’). -
Page 37: Preparations
• After the dehydration process, store dried food within sterilized and dry vessels in the refrigerator. If possible, you should use the Gastroback Vacuum Sealer for storing your food in evacuated bags and containers. Keep in mind, that the con- sistency of dried food may change during storage. -
Page 38: Dehydrating Vegetables
Vegetables Preparation Consistency Time [hours] remove the stone when semi- limb and lithe 10-34 Peach dried, cut to halves seeds removed, peeled and sliced, Pear small ones may be cut to halves or limb and lithe 8-72 quarters DEHYDRATING VEGETABLES Wash thoroughly and remove all inedible parts (e.g. -
Page 39: Meat, Poultry And Fish
Vegetables Preparation Consistency Time [hours] perhaps peeled, sliced to approx. Cucumber tough 6-18 2 cm (1/2 inch) Eggplant sliced to approx. 1 cm (1/3 inch) fragile 6-18 Garlic cloves peeled and halved fragile 6-16 Fresh pepper in whole tough 8-14 Mushroom sliced or in whole tough... -
Page 40: Before First Use
When dehydrating vanilla pods, remove any inedible parts from the pods and • dab dry. Thereafter, spread the vanilla pods on a food tray and start the appli- ance with an dehydrating time of 2 - 6 hours. Bread slices should be dried without the crust. Use a dehydrating time of 30 •... - Page 41 During operation: Do not move the appliance during operation. The ventilation slits at the bottom of the heating base and the steam vent in the cover may not be blocked. Do not block the openings in the white fan assembly at the centre of the heating base to avoid overheating and damage to the appliance.
- Page 42 in steps of 30 minutes. Press the Start/Stop button to start the dehydration cycle. 7. The fan starts operation audibly. On the LCD display, the heating icon flashes during the complete dehydration cycle. As soon as the actual tempera- ture within the dehydration chamber reaches the set temperature, the timer starts counting down the set dehydrating time.
-
Page 43: Pause Function
NOTE Do not leave the appliance operate uselessly to avoid useless energy consumption. You may cancel any dehydration cycle at any time by holding the On/Off button pressed until the LCD display gets dark. 10. If you do not wish to operate the appliance again, ensure that the appliance is switched off (LCD display is dark and empty) and unplug the appliance. - Page 44 NOTE You may fill up the wells to the rim. On the other food trays, you may dehydrate other food in the same cycle. In this case, expect an elongated dehydration process. 3. Place the filled muesli pans onto the lowest food tray and activate the appliance with the appropriate settings, given in your recipe.
-
Page 45: Solving Problems
SOLVING PROBLEMS If any problems occur during operation, you will find the solution in the following table. Problem Reason The Solution The LCD display remains The power outlet is not Ensure that the appliance is connected to a suitable wall dark, when plugging in live. - Page 46 Problem Reason The Solution The appliance is working, The automatic shut-off of For saving energy, the backlight of the LCD display gets but the LCD display is the LCD display is active. dark after approx. 20 seconds without any input. This dark.
-
Page 47: Care And Cleaning
CARE AND CLEANING WARNING – Always switch OFF (holding the On/Off button pressed until the LCD display gets dark), unplug, and leave the appliance cool down, before cleaning the appliance. Always ensure that all parts of the appliance are out of reach of young children. -
Page 48: Storage
STORAGE WARNING – Ensure that the appliance and any part of it are out of reach of young children. Always unplug the appliance, when the appliance is not in use. Always leave the appliance cool down, before cleaning or storing the appliance. Do not place any hard or heavy objects on or in the appliance or any part of it. -
Page 49: Notes For Disposal
INFORMATION AND SERVICE Please check www.gastroback.de for further information. For technical support, please contact Gastroback Customer Care Center by phone: +49 (0)4165/22 25-0 or e-mail info@gastroback.de. Please refer to our home page for a copy of these operating instructions in pdf format. -
Page 50: Warranty
1 year. Note For repair and service, please send Gastroback products to the following address: Gastroback GmbH, Gewerbestr. 20, 21279 Hollenstedt, Germany. Please agree that we cannot bear the charge of receipt. Submission of appli- ances: Please ensure packing the appliance ready for shipment without accesso- ries and attachments. - Page 52 GASTROBACK GmbH Gewerbestraße 20 . 21279 Hollenstedt / Germany Telefon + 49 (0) 41 65 / 22 25 - 0 . Telefax + 49 (0) 41 65 / 22 25 -29 info@gastroback.de . www.gastroback.de...
Need help?
Do you have a question about the Design Dorrautomat Natural Plus and is the answer not in the manual?
Questions and answers