
Subscribe to Our Youtube Channel
Related Manuals for Gastroback Design Mincer Plus


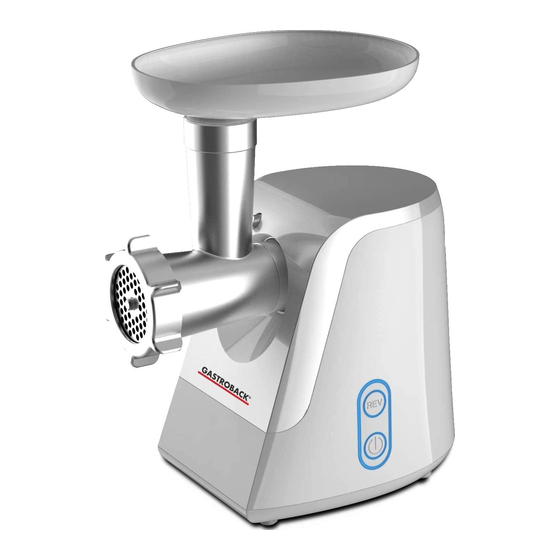
Summary of Contents for Gastroback Design Mincer Plus
- Page 1 Operating Instructions Design Mincer Plus Art.-No. 41403 Design Mincer Plus Read all provided instructions before first use! Model and attachments are subject to change! For domestic use only!
-
Page 2: Table Of Contents
Important safeguards for electrical appliances ...........30 Moving parts – risks of injuries ................31 Technical specifications ..................31 Before first use ....................31 Properties of your Design Mincer Plus ..............32 Power switch / overheat protection ..............32 The buttons ON / OFF and REVERSE ...............32 Tools ......................33 Tips for best results .....................33... - Page 3 These instructions for use will inform you about the various functions and features which makes it easy to take pleasure in your new mincer. We hope that you will enjoy your new mincer. Your Gastroback GmbH...
-
Page 4: Knowing Your Design Mincer Plus
Knowing Your Design Mincer Plus A Pusher M Separator disc Tools - accessories: B Tray N Sausage horn H Coarse grinding disc O Plastic finger C Cutter housing I Worm D Release button P Cone J Cutter blade E Motor housing... -
Page 5: Important Safeguards
Do not handle the appliance or any part of it with violence. • Do not let the motor work continuously for more than 3 minutes. Always use only one mat- ching set of tools to avoid damage. (See: ›Knowing Your Design Mincer Plus‹) For mincing,... -
Page 6: Important Safeguards For Electrical Appliances
always use only one of the provided grinding discs. Do not process bones, nuts, frozen foods or any other hard items. • Do not place the appliance or any part of it on or near hot surfaces (e.g. burner, heater or oven). Do not use any parts or tools of the appliance with any other device. • Do not attempt to grind bones, nuts or other hard items. • Do not grasp in the gear hole of the motor housing, with the appliance connected to the power supply. -
Page 7: Moving Parts - Risks Of Injuries
(e.g. stalks, hard seeds, stones) while preparing the foods. Do not push the food with your hands down the feed tube, or poke in the feed tube! Technical specifications Model: Art. No. 41403 Design Mincer Plus Power supply: 220-240 V AC, 50/60 Hz Power consumption:... -
Page 8: Properties Of Your Design Mincer Plus
2. C arefully remove all shipping materials and promotional materials, but do not remove any warning labels or the model label. Especially ensure that there are no foreign objects (e.g. packaging) in the interior of the appliance. WARNING! Always switch off completely (ON/OFF button) and unplug the appliance, before cleaning. -
Page 9: Tools
The indicator of this button illuminates blue, when the appliance is connected to the power supply and switched on via the power switch. After pressing the button the motor starts wor- king immediately. The worm shaft moves the foods to the outlet of the cutter housing. Do not let the motor work continuously for more than 3 minutes. -
Page 10: Operation
Add onions and finely grinded spices, while mincing the foods for getting an even mixture. However, hard spices (e.g. pepper, nutmeg, etc.) must be grinded in a mill, before proces- sing with the mincer. It is a good idea to fry onions for minced pork before processing. This way, onions are more flavoury and wholesome. -
Page 11: Assembling For Making Sausages
WARNING: The blades of the crossed-blade knife are very sharp. Pay attention when you han- dle the crossed-blade knife. ATTENTION: Never use the cutter blade and the grinding disc together with the attachments. How to work with the attachments is explained further back in the instructions. - Page 12 1. Take the worm housing into the right hand and insert with your left hand the worm inside the worm housing. (Picture E) The side of the worm with the plastic end has to face the worm housing when putting it inside the worm housing. The worm is correctly assembled when the plastic end of the worm stands a few millimetres out of the worm housing.
-
Page 13: Assembling For Making Kebbe
Assembling for making kebbe 1. Take the worm housing into the right hand and insert with your left hand the worm inside the worm housing (picture I). The side of the worm with the plastic end has to face the worm housing when put- ting it inside the worm housing. -
Page 14: Assembling For Making Cookies
3. Press the feed pan onto the worm housing (pic- ture K). 4. Place the pusher into the opening of the feed chute (picture L). The appliance is ready for operation. Assembling for making cookies 1. Take the worm housing into the right hand and insert with your left hand the worm inside the worm housing. -
Page 15: Mincing Meat
Note: When the worm housing is securely attached you can hear a click sound and the release button comes out of the recess again. 3. Press the feed pan onto the worm housing (picture O). Slide the cookie former into the cookie attachment and choose the desired cookie shape. -
Page 16: Making Sausages
IMPORTANT: Do not let the motor run permanently for longer then 3 minutes to avoid overheating. After 3 minutes turn off the appliance and let the motor cool down before continuing operation. In the case of overloading the motor, the overheat protection will automatically cut off the power supply. -
Page 17: Making Cookies
2. Prepare the wrapping: Mince the meat for the wrapping 3 times in total. For the first mincing procedure use the medium grinding disc then use the fine grinding disc. After mix- ing all the ingredients for the wrapping mince it one more time with the medium grinding disc. -
Page 18: Solving Problems
Solving Problems If any problems occur during operation, you will find solutions in the following table. Addi- tionally, you can contact your vendor. Solution Problem Possible Cause The motor does not work, The appliance is not live. Insert the power plug in the the indicators are dark. -
Page 19: Clearing A Blocking - Reverse Operation
Clearing a blocking – reverse operation CAUTION: Do not operate the motor in reverse direction for more than a few seconds. Reverse operation moves the foods to the motor housing. Thus, foods and juices could run into the gear hole of the motor housing. If the blockage of the worm shaft is not cleared away after a short moment of reverse ope- ration, switch off the appliance via the ON/OFF button and power switch, then unplug and clean the appliance according to the instructions in chapter ›Care and Cleaning‹. -
Page 20: Disassembling The Appliance
3. Grasp the cutter housing with one hand, then press the release button near the gear hole in the front plate of the appliance. (See: ›Knowing Your Design Mincer Plus‹) 4. With the release button pressed, unlock the cutter housing by turning it clockwise. Then pull the cutter housing out of the motor housing. -
Page 21: Storage
Storage WARNING: Always switch off completely (ON/ OFF button and power switch), unplug and clean the appliance and all its parts before storing (see: ›Care and Cleaning‹). Ensure to store the appliance where it is clean, dry and safe from frost, direct sunlight and inadmissib- le strain (mechanical or electric shock, heat, mois- ture) and where it is out of reach of young children. -
Page 22: Notes For Disposal
Information and service Please check www.gastroback.de for further information. For technical support, please contact Gastroback Customer Care Center by phone: +49 (0)4165/22 25-0 or e-mail: info@gastroback.de. Warranty We guarantee that all our products are free of defects at the time of purchase.
Need help?
Do you have a question about the Design Mincer Plus and is the answer not in the manual?
Questions and answers