Table of Contents
Advertisement
Quick Links
D6 Quick Start
•
Internal 4:4:4 processing
•
HDR compliance
•
HDMI 2.0 / DP 1.2/ HDMI 1.4/ Dual Link DVI inputs
compatible
•
12G/6G/3G/HD/SD SDI inputs compatible
•
HDMI 2.0 output
•
12G/6G/3G/HD/SD SDI outputs
•
EDID management up to 4K
•
Multiple working mode
•
Presentation Switching with 4K background + 8
layers
•
AUX outputs
•
PVW with all the inputs multiviewer and PST
•
Demountable front panel for remote control
•
Genlock for both inputs and outputs
Advertisement
Table of Contents

Related Manuals for RGBlink D6


Summary of Contents for RGBlink D6
- Page 1 D6 Quick Start • Internal 4:4:4 processing • HDR compliance • HDMI 2.0 / DP 1.2/ HDMI 1.4/ Dual Link DVI inputs compatible • 12G/6G/3G/HD/SD SDI inputs compatible • HDMI 2.0 output • 12G/6G/3G/HD/SD SDI outputs • EDID management up to 4K •...
-
Page 2: Table Of Contents
Operation Mode............................18 Preview Mode (4K2K)..........................19 Split Mode..............................24 Presentation Mode (4K2K)........................27 Presentation Mode(4K1K)........................29 Presentation Mode (8K1K)........................32 System Settings............................41 Contact Information..............................45 © Xiamen RGBlink Science & Technology Co., Ltd. 1 / 46 Ph: +86 592 5771197 | support@rgblink.com www.rgblink.com... -
Page 3: Product Introduction
D6 is based on fully optional input/output modules structure, with different optional modules to build the different range application. D6 can be set up with the local front panel or by remote controller with its remote control interfaces, including Ethernet, USB and RS 232. -
Page 4: Packing Configuration
Cable DVI Cable DB9 to RJ11 USB Cable Screw Driver Cable Note: AC Power Cable supplied as standard according to destination market. © Xiamen RGBlink Science & Technology Co., Ltd. 3 / 46 Ph: +86 592 5771197 | support@rgblink.com www.rgblink.com... -
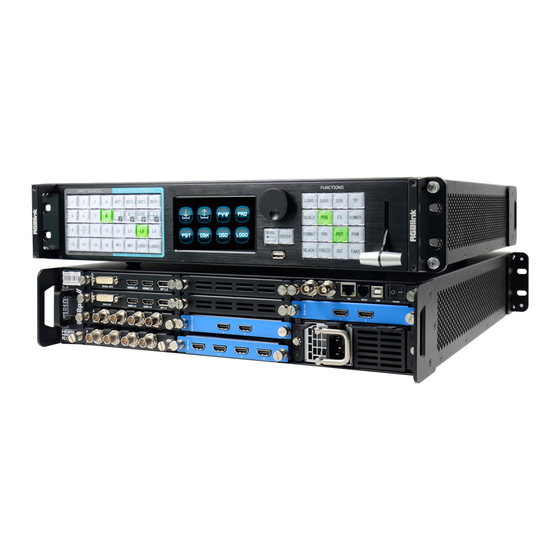
Page 5: Hardware Orientation
Switch from PST to PGM with transition effect Down streaming key T-Bar Switch from PST to PGM with transition effects at any position © Xiamen RGBlink Science & Technology Co., Ltd. 4 / 46 Ph: +86 592 5771197 | support@rgblink.com www.rgblink.com... -
Page 6: Menu Structure
Menu Instruction Input Background Output Blending Test Pattern Language View, including Save & Load Menu Layer Mask System Tech Support Factory Reset LOGO © Xiamen RGBlink Science & Technology Co., Ltd. 5 / 46 Ph: +86 592 5771197 | support@rgblink.com www.rgblink.com... - Page 7 © Xiamen RGBlink Science & Technology Co., Ltd. 6 / 46 Ph: +86 592 5771197 | support@rgblink.com www.rgblink.com...
-
Page 8: Back Panel
SDI optional modules LAN port, 1 RS232 and 1 USB-B Dedicated slot for PVW module Power switch consisting of 2 HDMI outputs Power module © Xiamen RGBlink Science & Technology Co., Ltd. 7 / 46 Ph: +86 592 5771197 | support@rgblink.com www.rgblink.com... -
Page 9: Xpose Operation
Installer Language box, select the language, for example, select “English”, and click “OK” to confirm. Click “Next” to install: © Xiamen RGBlink Science & Technology Co., Ltd. 8 / 46 Ph: +86 592 5771197 | support@rgblink.com... - Page 10 XPOSE to disk C if the system is Windows 7 or above. Click “Install”: Click “Finish” and is ready to run the XPOSE management software: © Xiamen RGBlink Science & Technology Co., Ltd. 9 / 46 Ph: +86 592 5771197 | support@rgblink.com...
-
Page 11: Xpose Operation
Double click the icon on the desktop. Log in interface will be enter after opening, the user name is Admin, and there is no password, select “D6”, and enter into the software by clicking “Login”. © Xiamen RGBlink Science & Technology Co., Ltd. - Page 12 If user want to change the language to Chinese, click the drop down arrow after “Language” and select “Chinese”, as shown in the figure below, then click “Login” to enter into the XPOSE. XPOSE management software interface is shown as follows. © Xiamen RGBlink Science & Technology Co., Ltd. 11 / 46 Ph: +86 592 5771197 | support@rgblink.com...
-
Page 13: Web Links
RGBLink’s website, as shown in the picture below: Connect with the D6 Firstly, set up the D6 IP, and make sure the IP of the computer and the D6 are on the same network range. Here is the way of how to check the device IP. - Page 14 Then, click the shortcut “Search” on the operation interface. Then it will search the D6, and show the D6 info, including the serial number and IP address, shown as the picture here: © Xiamen RGBlink Science & Technology Co., Ltd.
- Page 15 Finally, click the D6 and goes to its working mode page: The D6 will automatically synchronize after connection, as shown in the figure below: © Xiamen RGBlink Science & Technology Co., Ltd. 14 / 46 Ph: +86 592 5771197 | support@rgblink.com...
-
Page 16: Output Settings
Output Setting, DE Setting, Test pattern are included in output settings, specific as follows: Output Setting Click the “Output Setting”, and pop-up window as follows: © Xiamen RGBlink Science & Technology Co., Ltd. 15 / 46 Ph: +86 592 5771197 | support@rgblink.com... - Page 17 Content on AUX is set only need once,all operation modes are the same AUX signal. DE Setting Click the “DE Setting”, and pop-up window as follows: © Xiamen RGBlink Science & Technology Co., Ltd. 16 / 46 Ph: +86 592 5771197 | support@rgblink.com www.rgblink.com...
- Page 18 Color Choice: TP, color bar and pure color can be selected. Color: If select “Pure Color”, red, green and blue can be adjusted, the adjustment range is between 0~255. © Xiamen RGBlink Science & Technology Co., Ltd. 17 / 46 Ph: +86 592 5771197 | support@rgblink.com...
-
Page 19: Operation Mode
Click the “Operation Mode”, and enter to the interface as follows: Preview Mode (4K2K), Split Mode, Presentation Mode(4K2K), Presentation Mode(4K1K), and Presentation Mode (8K1K) are included in operation mode, specific as follows: © Xiamen RGBlink Science & Technology Co., Ltd. 18 / 46 Ph: +86 592 5771197 | support@rgblink.com... -
Page 20: Preview Mode (4K2K)
Preview Mode (4K2K) Click the “Preview Mode (4K2K)”, and enter to the interface as follows: Signal List The signal list is shown as follows: © Xiamen RGBlink Science & Technology Co., Ltd. 19 / 46 Ph: +86 592 5771197 | support@rgblink.com... - Page 21 “No Input”. Set Input Property: Right click the input and select “Input Property”, it will enter to the interface as follows: © Xiamen RGBlink Science & Technology Co., Ltd. 20 / 46 Ph: +86 592 5771197 | support@rgblink.com...
- Page 22 Layer split/merge: Right click the input, select layer split/ layer merge. Set 4K signal source: Right click the input, select “4K”, and pop-up window as follows: Click the “OK”, and pop-up window as follows: © Xiamen RGBlink Science & Technology Co., Ltd. 21 / 46 Ph: +86 592 5771197 | support@rgblink.com...
- Page 23 In the Output Setting: sliding the switch to the left is Backups , and pop-up window as follows: Click the “Operation Mode”, and enter to the interface as follows: © Xiamen RGBlink Science & Technology Co., Ltd. 22 / 46 Ph: +86 592 5771197 | support@rgblink.com...
- Page 24 In the Output Setting: sliding the switch to the right is Aux, and pop-up window as follows: Click the “Operation Mode”, and enter to the interface as follows: © Xiamen RGBlink Science & Technology Co., Ltd. 23 / 46 Ph: +86 592 5771197 | support@rgblink.com...
-
Page 25: Split Mode
Content on AUX is set only need once,all operation modes are the same AUX signal. Split Mode Click “Operation Mode” and Choose “Split Mode” © Xiamen RGBlink Science & Technology Co., Ltd. 24 / 46 Ph: +86 592 5771197 | support@rgblink.com www.rgblink.com... - Page 26 Refresh Signals: Right click the input and select “Refresh Signals”. If there is signal, it will show the input format, or it will show “No Input”. © Xiamen RGBlink Science & Technology Co., Ltd. 25 / 46 Ph: +86 592 5771197 | support@rgblink.com...
- Page 27 Setting “EDID” Capture Signal to Bank 1 as Modular 1,2,3 © Xiamen RGBlink Science & Technology Co., Ltd. 26 / 46 Ph: +86 592 5771197 | support@rgblink.com www.rgblink.com...
-
Page 28: Presentation Mode (4K2K)
Reset: Select “Reset”, the input property will be recover to factory setting. Presentation Mode (4K2K) Click “Operation Mode” and Choose “Presentation Mode (4K2K)” © Xiamen RGBlink Science & Technology Co., Ltd. 27 / 46 Ph: +86 592 5771197 | support@rgblink.com... - Page 29 It displays the input module type, the quantity of inputs and input format. Right click the input for the following settings: Change Name: Select “New Name”, and input the new name, click “OK” after setting. © Xiamen RGBlink Science & Technology Co., Ltd. 28 / 46 Ph: +86 592 5771197 | support@rgblink.com...
-
Page 30: Presentation Mode(4K1K)
Quick split: Enable or disable the quick split mode by sliding the quick split switch and set H total, V total, Top Border, Bottom Border, Left Border, Righ Border, Row and Column. Presentation Mode(4K1K) Click “Operation Mode” and Choose “Presentation Mode (4K1K)” © Xiamen RGBlink Science & Technology Co., Ltd. 29 / 46 Ph: +86 592 5771197 | support@rgblink.com... - Page 31 © Xiamen RGBlink Science & Technology Co., Ltd. 30 / 46 Ph: +86 592 5771197 | support@rgblink.com www.rgblink.com...
- Page 32 . Enable or disable the quick split mode by sliding the quick split switch and set H total, V total, Top Border, Bottom Border, Left Border, Righ Border, Row and Column. © Xiamen RGBlink Science & Technology Co., Ltd. 31 / 46 Ph: +86 592 5771197 | support@rgblink.com...
-
Page 33: Presentation Mode (8K1K)
Presentation Mode (8K1K) Click “Operation Mode” and Choose “Presentation Mode (8K1K)” Enter the interface as below: © Xiamen RGBlink Science & Technology Co., Ltd. 32 / 46 Ph: +86 592 5771197 | support@rgblink.com www.rgblink.com... - Page 34 . Enable or disable the quick split mode by sliding the quick split switch and set H total, V total, Top Border, Bottom Border, Left Border, Righ Border, Row and Column. © Xiamen RGBlink Science & Technology Co., Ltd. 33 / 46 Ph: +86 592 5771197 | support@rgblink.com...
- Page 35 . Enable or disable the quick split mode by sliding the quick split switch and set H total, V total, Top Border, Bottom Border, Left Border, Righ Border, Row and Column. EDID © Xiamen RGBlink Science & Technology Co., Ltd. 34 / 46 Ph: +86 592 5771197 | support@rgblink.com...
- Page 36 The special display project or LED display application would like to require special resolution settings to meet the requirement. Select the input or output board to read and write the EDID. As shown in the figure below: © Xiamen RGBlink Science & Technology Co., Ltd. 35 / 46 Ph: +86 592 5771197 | support@rgblink.com...
- Page 37 Click the factory reset shortcut “ ” to reset to factory settings. Output Card Click the output card shortcut “ ”, and pop-up window as follows: © Xiamen RGBlink Science & Technology Co., Ltd. 36 / 46 Ph: +86 592 5771197 | support@rgblink.com www.rgblink.com...
- Page 38 X, Y, width, height, rotate can be set. If click “Advanced Setting”, pop-up window as follow: In advanced setting, scale and crop can be set. Not recommended to use “Advanced Setting”. © Xiamen RGBlink Science & Technology Co., Ltd. 37 / 46 Ph: +86 592 5771197 | support@rgblink.com...
- Page 39 ” to switch banks immediately. Shortcut Keys Click the shortcut “ ”, and pop-up window as follows: Use shortcut keys to operate fast and easily. © Xiamen RGBlink Science & Technology Co., Ltd. 38 / 46 Ph: +86 592 5771197 | support@rgblink.com www.rgblink.com...
- Page 40 Admin Click the “Admin”, and enter the interface as follows: Role management and rights management are included in access control, specific as follows: © Xiamen RGBlink Science & Technology Co., Ltd. 39 / 46 Ph: +86 592 5771197 | support@rgblink.com...
- Page 41 Del: Select the admin or users in user’s list, then click “Del”, the selected user will be deleted. Management Click the “Rights Management”, and pop-up window as follows: © Xiamen RGBlink Science & Technology Co., Ltd. 40 / 46 Ph: +86 592 5771197 | support@rgblink.com...
-
Page 42: System Settings
Click the “System Settings”, and enter the interface as follows: Connect Setting, IP Settings, System information, Power On Setting/ Fan control, Factory Reset, and help are included in System Settings, specific as follows: © Xiamen RGBlink Science & Technology Co., Ltd. 41 / 46 Ph: +86 592 5771197 | support@rgblink.com... - Page 43 Connect Settings Click the “Connect Setting”, and pop-up window as follows: Setting the D6 with XPOSE connecting ways: Serial Connect, Net Connect and Search by this configuration. IP Settings Click the “IP Settings”, and pop-up window as follows: Default “Auto get ip address”. Users can also set IP address, mask and gateway manually. This is usually used if one computer control some devices or remote control.
- Page 44 System Information Click the “System Information”, and pop-up window as follows: Display the D6 version information. Including Model Number, Serial Number, IP Address, firmware version, etc. Power on setting Fan Control Click the “Power On Setting Fan Control”, and pop-up window as follows: Set the time-lapse recall time, Enable or disable the Auto Fan Control, set Fan Speed and click ”Set”,...
- Page 45 Factory Reset Click the “Factory Reset”, and pop-up window as follows: Click “OK”, return to factory resetting. Click “OK”, and Restart. © Xiamen RGBlink Science & Technology Co., Ltd. 44 / 46 Ph: +86 592 5771197 | support@rgblink.com www.rgblink.com...
-
Page 46: Contact Information
Warranties are effective upon delivery date to customer and are non-transferable. RGBlink warranties are only valid to the original purchase/owner. Warranty related repairs include parts and labor, but do not include faults resulting from user negligence, special modification, lighting strikes, abuse(drop/crush), and/or other unusual damages.
Need help?
Do you have a question about the D6 and is the answer not in the manual?
Questions and answers