Table of Contents
Advertisement
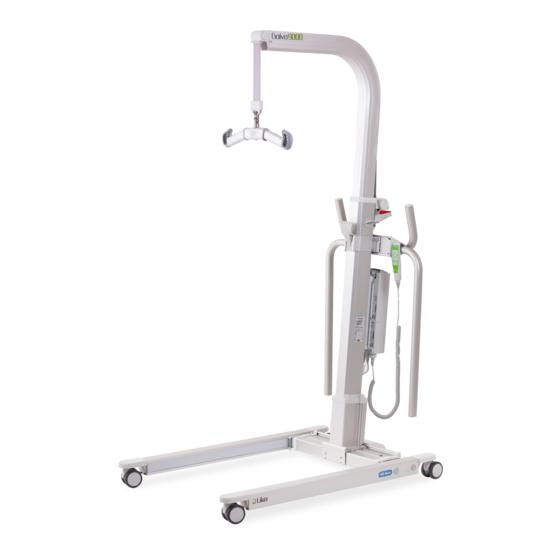
Golvo™ 9000
mobile lift
Instructions for Use
Golvo 9000
Golvo 9000 LowBase
Golvo 9000
Golvo 9000 mobile lifts have a unique design, available
in two models. Both models are an excellent aid for daily
transfer of adults and children.
The LowBase model has extra low base for use in
combination with bed frames or other equipment where
space for the lift base is limited.
In this document, the person being lifted is referred to as the patient, and the person helping them is referred to
as the caregiver.
IMPORTANT!
Lifting and transferring a patient always involves a certain level of risk. Read the instructions for use for both the patient lift and
lifting accessories before use. It is important to completely understand the contents of the instructions for use. The equipment
should only be used by trained personnel. Ensure that the lifting accessories are suitable for the lift used. Exercise care and caution
during use. As a caregiver, you are always responsible for the patient's safety. You must be aware of the patient's ability to make it
through the lifting situation. If something is unclear, contact the manufacturer or supplier.
7EN140108 Rev. 4
ENGLISH 2020
Prod. No. 2000045
Prod. No. 2000049
Product Description
Golvo 9000 LowBase
Individual fitting of Liko slings and other Liko lifting
accessories to meet the patient need is of the utmost
importance for optimal performance and safety when using
the lift.
Advertisement
Table of Contents

Related Manuals for Liko Golvo 9000 Series


Summary of Contents for Liko Golvo 9000 Series
- Page 1 Golvo 9000 Golvo 9000 LowBase Product Description Individual fitting of Liko slings and other Liko lifting Golvo 9000 mobile lifts have a unique design, available accessories to meet the patient need is of the utmost in two models. Both models are an excellent aid for daily importance for optimal performance and safety when using transfer of adults and children.
-
Page 2: Table Of Contents
Table of Contents Symbol Description .......................... 3 Safety Instructions ........................... 4 Definitions ............................5 Technical Data ..........................5 Dimensions ............................6 EMC Table ............................7 Assembly ............................9 Disassembly ............................ 12 Operation ............................12 Charging the Batteries ........................18 Maximum Load ..........................19 Recommended Lifting Accessories .................... -
Page 3: Symbol Description
Symbol Description These symbols can be found in this document and/or on the product. Symbol Description For indoor use only. The product has extra protection against electric shock (Insulation Class II). Protection level against electric shock Type B. Warning; this situation requires extra care and attention. Read instructions for use before use. -
Page 4: Safety Instructions
Safety Instructions Intended use Transferring patients (adult or children) between devices (e.g., within the room), floor lifting, horizontal lifting, supporting patient limbs, ambulating patient, bathing patient, toileting patient, weighing patient and transferring patients from car. Intended for use in following environments: health care, intensive care, emergency ward, rehabilitation, habilitation. This product is not intended to be used by the patient alone. -
Page 5: Definitions
Definitions Golvo 9000 Lift Strap Sling bar with latches Retractable armrests Parking panel for sling bar Optional; Quick reference guide Optional: Holder for Quick Reference Guide Product decal Mast with inbuilt motor Front wheels BATTERY 10. Base 11. Rear wheels with brakes 12. -
Page 6: Dimensions
Dimensions Golvo 9000 Golvo 9000 Lateral view Top view L max L min Golvo 9000 LowBase Lateral view Maximum reach Measurements Measurements in mm / in Model L max L min max. min. max. min. max. min. Golvo 9000 2090 1455 1185 1020 1100 1816... -
Page 7: Emc Table
EMC Table Guidance and manufacturer’s declaration – electromagnetic emissions The mobile lift is intended for use in the electromagnetic environment specified below. The customer or the user of the mobile lift should assure that it is used in such an environment. ”Essential performance according to the manufacturer: The hoist shall not move unintentionally while being submitted to disturbances.”... - Page 8 Guidance and manufacturer’s declaration – electromagnetic immunity The mobile lift is intended for use in the electromagnetic environment specified below. The customer or the user of the mobile lift should assure that it is used in such an environment. ”Essential performance according to the manufacturer: The hoist shall not move unintentionally while being submitted to disturbances.”...
-
Page 9: Assembly
Recommended separation distances between portable and mobile RF communications equipment and the mobile lift The mobile lift is intended for use in an electromagnetic environment in which radiated RF disturbances are controlled. The customer or the user of the mobile lift can help prevent electromagnetic interference by maintaining a minimum distance between portable and mobile RF communications equipment (transmitters) and the mobile lift as recommended below, according to the maximum output power of the communications equipment. - Page 10 4. Secure the armrest by tightening the two 3. A) Place the armrest part in the attachment on the lift mast, starting with the lower groove. pre-assembled M8 screws. B) Lower and load the armrest until it hooks onto the upper groove on the armrest part.
- Page 11 A) Connect the extension cable for the charging cable to the control box. 11. Place the charger cable on the B) Insert the extension cable in the tension clip underneath the control box. hook provided on the mast after completed charging. C) Connect the charging cable to the extension cable.
-
Page 12: Disassembly
Disassembly 1. Begin by removing the sling bar or other accessory that is fitted to the lift. 2. Remove the armrest holder as described below: A. Do not remove, just loosen the two M8 screws in the B. Remove the armrest holder using two screwdrivers. armrest holder on either side of the lift mast. - Page 13 Control Box operation and information 1. Emergency Stop button - Activate: Push the red button - Reset: Turn the red button clockwise. 2. UP (Arrow), Electrical emergency lifting. 3. DOWN (Arrow), Electrical emergency lowering. Operation of the push buttons 2 and 3 are done by pressing with a narrow object into the circle mark above each (Arrow).
- Page 14 CHARGE To activate the emergency stop: Electrical emergency lowering / lifting Mechanical Emergency Lowering Push the red Emergency Stop Use a narrow object to press into the Emergency lower by moving the button on the control box. circle mark above each (Arrow), handle up and down.
- Page 15 WRONG! support position rest position Armrest Parking the sling bar To use the armrest you need to rotate it from the (vertical) When the lift is not in use or is being moved without rest position up to the (horizontal) support position. The a load, it can be beneficial to place the sling bar in the armrest have two purposes: to help the patient feel more parking panel.
- Page 16 Position of the Lift when Lifting From/To: Chair/Toilet Seat Floor NOTE: Place a pillow under the patient’s head for increased performance and comfort. Always have the wheels locked when lifting from the floor. Transfer from car Ensure that the lift used for car transfers is always stored and charged indoors. Outdoor operation should be kept to a minimum.
- Page 17 3. Attach sling loops to the sling bar. Ensure the correct 4a. One caregiver must guide the sling bar and patient application of sling loops to the sling bar. Raise the lift to out of the car and ensure that the head of the patient is apply more tension on the sling.
-
Page 18: Charging The Batteries
Charging the Battery CHARGE CHARGE Charger information 1. "ON" - lights up green when the charger is connected to mains. 2. "CHARGE" - lights up yellow constantly during charging and will turn off when charging is completed. NOTE! Charging a deep discharged Li-ION battery When charging a deep discharged Li-ION battery the charger will start charging at a low charging rate to protect the battery. -
Page 19: Maximum Load
For additional guidance in selecting a sling, study the Instruction for use for the respective sling models. There you will also find guidance for combining Liko™ sling bars with Liko slings. Contact your Hill-Rom representative for advice and information on Liko’s product range. this product is also available in a version with Quick-Release Hook. - Page 20 Quick-Release Hook Liko’s Quick-Release Hooks are a system for quick change of lifting accessories on Liko’s mobile and stationary lifts. The Golvo mobile lift must be equipped with Q-link in order to be used with the Quick-release Hook. Quick-Release Hook...
-
Page 21: Recycling Instructions
Prod. No 2000400 Mobile lift towards: Chair / Wheelchair Mobile lift towards: Bed Mobile lift towards: Patient on the floor Quick Guide Liko® mobile lift system English Liko Mobile lift system Note! When lifting from floor Safety instructions use locked wheels and a pillow under the patient’s head. -
Page 22: Simple Troubleshooting
Simple Troubleshooting The lift cannot be operated 1. Check that the emergency stop button has not been pressed. with the hand control. Check the battery capacity. Check if the Li-ION battery has been set in to sleep mode, see chapter "Operation". 3. -
Page 23: Cleaning And Disinfection
Cleaning and Disinfection Safety recommendations Cleaning and disinfecting procedures for Liko™ Mobile lifts. This instructions do not replace the facility’s own cleaning and disinfection policies. • Wear protective equipment according to manufacturer’s instruction and per facility protocol throughout the cleaning operations, such as: rubber gloves, goggles, apron, face mask and shoe covers. - Page 24 7EN140108 Rev. 4 • 2020 www.hillrom.com...
-
Page 25: Inspection And Maintenance
20-80% humid., pressure 700-1060 hPa. Product Changes Liko products undergo continuous development, which is why we reserve the right to make product changes without prior notice. Contact your Hill-Rom representative for advice and information about product upgrades. Design and Quality by Liko in Sweden The management system for both manufacturing and development of the product is certified in accordance with ISO9001 and its equivalent for the medical device industry, ISO13485. - Page 26 Liko AB Nedre vägen 100 975 92 Luleå, Sweden +46 (0)920 474700 Liko AB is a subsidiary of Hill-Rom Holdings Inc.
Need help?
Do you have a question about the Golvo 9000 Series and is the answer not in the manual?
Questions and answers