Table of Contents
Advertisement
Quick Links
gaitway-3D Service manual
Ref.:TM-MAN-0005-ARS
gaitway-3D instrumentation
gaitway-3D treadmill manufacturer:
h/p/cosmos: sports & medical gmbh
Am Sportplatz 8
DE 83365 Nussdorf-Traunstein
Germany
phone +49 86 69 86 42 0
fax +49 86 69 86 42 49
service@hpcosmos.com
www.hpcosmos.com
gaitway-3D Instrumentation manufacturer:
Arsalis SRL
Chemin du Moulin Delay, 6
B-1473 Glabais
Belgium
phone +32 10 474425
fax +32 10 473106
arsalis@arsalis.com
www.arsalis.com
Iss.: A
Rev.: 9
Service manual
Date: 07/12/2020
gaitway-3D treadmill firmware: MCU5-v1.08.3
gaitway-3D software: 1.6
gaitway-3D[Service] software: 1.6
gaitway-3D force amplifier firmware: 1.3
Page : I
Version:
MCU6-v1.2.0176
Version:
Advertisement
Table of Contents

Subscribe to Our Youtube Channel
Related Manuals for h/p/cosmos Arsalis Gaitway 3D


Summary of Contents for h/p/cosmos Arsalis Gaitway 3D
- Page 1 Rev.: 9 Date: 07/12/2020 Page : I gaitway-3D instrumentation Service manual gaitway-3D treadmill manufacturer: h/p/cosmos: sports & medical gmbh Am Sportplatz 8 DE 83365 Nussdorf-Traunstein Germany phone +49 86 69 86 42 0 fax +49 86 69 86 42 49 Version: service@hpcosmos.com...
- Page 2 Throughout this manual, the sign below indicates instances where you should consult the gaitway-3D treadmill service manual.
-
Page 3: Table Of Contents
gaitway-3D Service manual Ref.:TM-MAN-0005-ARS Iss.: A Rev.: 9 Date: 07/12/2020 Page : III TABLE OF CONTENTS Model overview ....................1 1.1. Options and accessories ................2 Introduction ......................4 2.1. Description ....................4 2.2. Device components, including software and accessories ......4 2.2.1. - Page 4 gaitway-3D Service manual Ref.:TM-MAN-0005-ARS Iss.: A Rev.: 9 Date: 07/12/2020 Page : IV Load cell replacement checklist ..............84 16.1. Load cell dismounting ................84 16.2. Load cell mounting .................. 91 16.3. Load cell replacement summary sheet ........... 99 gaitway-3D amplifier fuse replacement checklist.......... 100 17.1.
-
Page 5: Model Overview
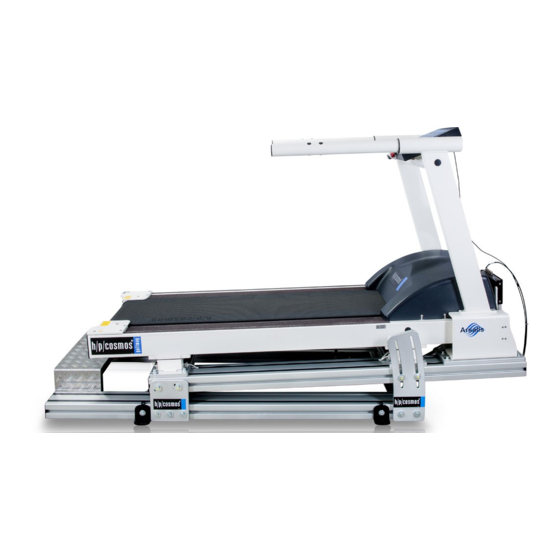
gaitway-3D Service manual Ref.:TM-MAN-0005-ARS Iss.: A Rev.: 9 Date: 07/12/2020 Page : 1 1. Model overview This service manual is applicable to the instrumentation of the gaitway-3D 150/50 (Figure 1), gaitway-3D 170/65 (Figure 2) and gaitway-3D 190/65 (Figure 3) instrumented treadmills. Figure 1. -
Page 6: Options And Accessories
3d with wheels for gaitway 150/50 cos103752va01 available in the instructions for use of the h/p/cosmos treadmill e gaitway 3d with wheels for gaitway 170/65 cos103752va02 ergometer. Please refer to the manual available at the address below:... - Page 7 100 Hz for FDM platform stand alone cos103300 zebris® SC-PP Sync-cable cos103301 USB 3.0 glass fiber cable A/A 20 m cos103312 h/p/cosmos satellite PC med cos14970-03 "Science port" speed output TTL cos101277 Connection cable RS232 5 m cos00097010034...
-
Page 8: Introduction
Arsalis TM-SW-0015-ARS V1.6 More information on the gaitway-3D treadmill description is available in the instructions for use of the h/p/cosmos treadmill ergometer. Please refer to the manual available at the address below: http://www.h-p-cosmos.com/en/company/downloads.htm 2.2. Device components, including software and accessories 2.2.1. -
Page 9: Treadmill Supports
gaitway-3D Service manual Ref.:TM-MAN-0005-ARS Iss.: A Rev.: 9 Date: 07/12/2020 Page : 5 Figure 5: Treadmill. 2.2.2. Treadmill supports The treadmill is supported by two longitudinal supports. Each support is composed of a foot plate (blue) on which are two sensor units (green) and a handrail support (brown). -
Page 10: Force Sensor Units
gaitway-3D Service manual Ref.:TM-MAN-0005-ARS Iss.: A Rev.: 9 Date: 07/12/2020 Page : 6 2.2.3. Force sensor units The force sensor unit is presented in Figure 7. The load cell (red) is fixed with two countersunk screws (orange): one to the foot plate (not shown) at the bottom and one to the Flat-support (green) at the top. -
Page 11: Gaitway-3D Software
More information on the gaitway-3D treadmill safety equipment is available in the instructions for use of the h/p/cosmos treadmill ergometer. Please refer to the manual available at the address below: http://www.h-p-cosmos.com/en/company/downloads.htm... -
Page 12: Safety Notes, Warnings, Precautions
More information on the gaitway-3D treadmill safety equipment is available in the instructions for use of the h/p/cosmos treadmill ergometer. Please refer to the manual available at the address below: http://www.h-p-cosmos.com/en/company/downloads.htm... -
Page 13: Transport And Installation
30 % to 70 % non-condensing, air pressure of 700 to 1060 hPa (maximum 3000m altitude). More information on room conditions for the gaitway-3D treadmill is available in the instructions for use of the h/p/cosmos treadmill ergometer. Please refer to the manual available at the address below: http://www.h-p-cosmos.com/en/company/downloads.htm 3.3. -
Page 14: Storage
Never put containers with liquid on the device as this may cause electric shock or short circuit when the liquid is spilled. More information on transport and installation for the gaitway-3D treadmill is available in the instructions for use of the h/p/cosmos treadmill ergometer. Please refer to the manual available at the address below: http://www.h-p-cosmos.com/en/company/downloads.htm... -
Page 15: Service Safety Aspects
More information on the gaitway-3D treadmill service safety aspects is available in the instructions for use of the h/p/cosmos treadmill ergometer. Please refer to the manual available at the address below: http://www.h-p-cosmos.com/en/company/downloads.htm 4. -
Page 16: Gaitway-3D Unpacking
gaitway-3D Service manual Ref.:TM-MAN-0005-ARS Iss.: A Rev.: 9 Date: 07/12/2020 Page : 12 5.1. gaitway-3D unpacking The gaitway-3D is delivered on a palette as shown in Figure 10. The fixation belts and plastic protection are removed. The parts are manipulated without shock to avoid any damage to the load cells. - Page 17 gaitway-3D Service manual Ref.:TM-MAN-0005-ARS Iss.: A Rev.: 9 Date: 07/12/2020 Page : 13 gaitway-3D 150/50 with stratos or mercury legacy treadmill, SN: cos30000va gaitway-3D 150/50 with stratos or mercury treadmill, SN: cos30000-02 gaitway-3D 170/65 with stellar or quasar treadmill, SN: cos30003...
-
Page 18: Gaitway-3D Final Assembly
gaitway-3D Service manual Ref.:TM-MAN-0005-ARS Iss.: A Rev.: 9 Date: 07/12/2020 Page : 14 gaitway-3D 190/65 with pulsar treadmill, SN: cos30004 Figure 11. Floor pattern 5.4. gaitway-3D final assembly The force amplifier, hand rails and optional safety arch are installed. The power supply and speed sensor cable are routed to the amplifier. - Page 19 gaitway-3D Service manual Ref.:TM-MAN-0005-ARS Iss.: A Rev.: 9 Date: 07/12/2020 Page : 15 For the calibration of the fore-afterward ground reaction force channels, a calibration gauge is fixed at different positions behind the treadmill. A rope is used to pull on the calibration gauge.
-
Page 20: Gaitway-3D On-Site Check-Out
gaitway-3D Service manual Ref.:TM-MAN-0005-ARS Iss.: A Rev.: 9 Date: 07/12/2020 Page : 16 7. gaitway-3D on-site check-out This procedure contains the standard verifications to do in order to verify the functions of the device. The connection to the device is verified. The control of the treadmill speed and the readout of the treadmill indicators are verified. -
Page 21: Installation Equipment
gaitway-3D Service manual Ref.:TM-MAN-0005-ARS Iss.: A Rev.: 9 Date: 07/12/2020 Page : 17 11. Installation equipment The test equipment for the service and maintenance of the gaitway-3D instrumentation are: Equipment Cutter/scissors/knife Torque screwdriver (0.1 - 3Nm) Torque wrench (2 - 20Nm) Torque wrench (10 - 50Nm) - Page 22 gaitway-3D Service manual Ref.:TM-MAN-0005-ARS Iss.: A Rev.: 9 Date: 07/12/2020 Page : 18 Equipment Floor anchorage (mechanical anchorage) Hole-pattern board Hilti drill Hilti 12mm drill bit Hand brush Hole blowing pump Hilti tool for M10 anchorages ...
-
Page 23: Installation And Commissioning Checklist
gaitway-3D Service manual Ref.:TM-MAN-0005-ARS Iss.: A Rev.: 9 Date: 07/12/2020 Page : 19 12. Installation and commissioning checklist Date: Name: Time: Test Step Measurements/Test Results Seq. Description Required/No Measured/ Remarks/Calculations Pass/ minal (incl. Calculated tolerance) pass Test Readiness Review: Device name, type: ... -
Page 24: Treadmill Support Assembly
gaitway-3D Service manual Ref.:TM-MAN-0005-ARS Iss.: A Rev.: 9 Date: 07/12/2020 Page : 20 Test Step Measurements/Test Results Seq. Description Required/No Measured/ Remarks/Calculations Pass/ minal (incl. Calculated tolerance) pass Remove the 4 feet of the treadmill. 12.2. Treadmill support assembly Date: Name: Time: Test Step... - Page 25 gaitway-3D Service manual Ref.:TM-MAN-0005-ARS Iss.: A Rev.: 9 Date: 07/12/2020 Page : 21 Test Step Measurements/Test Results Seq. Description Required/No Measured/ Remarks/Calculations Pass/ minal (incl. Calculated tolerance) pass 4x Capteur-Mini3D-Case Place the sensor cases on the base plate. Torque = ...
- Page 26 gaitway-3D Service manual Ref.:TM-MAN-0005-ARS Iss.: A Rev.: 9 Date: 07/12/2020 Page : 22 Test Step Measurements/Test Results Seq. Description Required/No Measured/ Remarks/Calculations Pass/ minal (incl. Calculated tolerance) pass While treadmill elevated Sensors 1&4: Sensors 1&4: supported two wheel boards, place the two LEFT side treadmill-supports under...
- Page 27 gaitway-3D Service manual Ref.:TM-MAN-0005-ARS Iss.: A Rev.: 9 Date: 07/12/2020 Page : 23 Test Step Measurements/Test Results Seq. Description Required/No Measured/ Remarks/Calculations Pass/ minal (incl. Calculated tolerance) pass If the treadmill has wooden-board wheels Torque = 8x DIN912-M10x45 option, screw the 4 wheels to the wooden 15Nm ...
-
Page 28: Gaitway-3D Floor Fixation
gaitway-3D Service manual Ref.:TM-MAN-0005-ARS Iss.: A Rev.: 9 Date: 07/12/2020 Page : 24 12.3. gaitway-3D floor fixation Date: Name: Time: Test Step Measurements/Test Results Seq. Description Required/No Measured/ Remarks/Calculations Pass/ minal (incl. Calculated tolerance) pass Place two Treadmill-spacer-back (height of Spacers at: Spacers at: ... - Page 29 gaitway-3D Service manual Ref.:TM-MAN-0005-ARS Iss.: A Rev.: 9 Date: 07/12/2020 Page : 25 Test Step Measurements/Test Results Seq. Description Required/No Measured/ Remarks/Calculations Pass/ minal (incl. Calculated tolerance) pass Check that the Treadmill-spacer-back parts Spacers at: Spacers at: are in place at the BACK of the treadmill and BACK lift the treadmill to place it on the wheel boards.
- Page 30 gaitway-3D Service manual Ref.:TM-MAN-0005-ARS Iss.: A Rev.: 9 Date: 07/12/2020 Page : 26 Test Step Measurements/Test Results Seq. Description Required/No Measured/ Remarks/Calculations Pass/ minal (incl. Calculated tolerance) pass Check that the Treadmill-spacer-back parts Spacers at: Spacers at: are present at the BACK of the treadmill and BACK lay down the treadmill on the holes, BACK side first.
-
Page 31: Gaitway-3D Final Assembly
gaitway-3D Service manual Ref.:TM-MAN-0005-ARS Iss.: A Rev.: 9 Date: 07/12/2020 Page : 27 12.4. gaitway-3D final assembly Date: Name: Time: Test Step Measurements/Test Results Seq. Description Required/No Measured/ Remarks/Calculations Pass/ minal (incl. Calculated tolerance) pass 4x DIN6798A-M10 Mount the handrail supports to the foot Torque = ... - Page 32 gaitway-3D Service manual Ref.:TM-MAN-0005-ARS Iss.: A Rev.: 9 Date: 07/12/2020 Page : 28 Test Step Measurements/Test Results Seq. Description Required/No Measured/ Remarks/Calculations Pass/ minal (incl. Calculated tolerance) pass Speed sensor cable installation Pass the speed sensor cable through the RIGHT grommet of the treadmill front panel. Leave 10 ±...
- Page 33 gaitway-3D Service manual Ref.:TM-MAN-0005-ARS Iss.: A Rev.: 9 Date: 07/12/2020 Page : 29 Test Step Measurements/Test Results Seq. Description Required/No Measured/ Remarks/Calculations Pass/ minal (incl. Calculated tolerance) pass Connect the speed sensor cable to the speed sensor that is free.
- Page 34 gaitway-3D Service manual Ref.:TM-MAN-0005-ARS Iss.: A Rev.: 9 Date: 07/12/2020 Page : 30 Test Step Measurements/Test Results Seq. Description Required/No Measured/ Remarks/Calculations Pass/ minal (incl. Calculated tolerance) pass Tie the speed sensor cable with ONE tie 3x Tie-wrap wrap to the bracket and with TWO tie wraps to the cable of the other speed sensor: one before and one after the bracket.
- Page 35 gaitway-3D Service manual Ref.:TM-MAN-0005-ARS Iss.: A Rev.: 9 Date: 07/12/2020 Page : 31 Test Step Measurements/Test Results Seq. Description Required/No Measured/ Remarks/Calculations Pass/ minal (incl. Calculated tolerance) pass Make a loop with the excessive cable length and tie the loops ...
- Page 36 gaitway-3D Service manual Ref.:TM-MAN-0005-ARS Iss.: A Rev.: 9 Date: 07/12/2020 Page : 32 Test Step Measurements/Test Results Seq. Description Required/No Measured/ Remarks/Calculations Pass/ minal (incl. Calculated tolerance) pass Instrumentation power cable installation Pass the power cable through the RIGHT grommet of the treadmill front. Then pass the cable end through the hole of the main rib of the motor compartment with the other cables of the treadmill.
- Page 37 gaitway-3D Service manual Ref.:TM-MAN-0005-ARS Iss.: A Rev.: 9 Date: 07/12/2020 Page : 33 Test Step Measurements/Test Results Seq. Description Required/No Measured/ Remarks/Calculations Pass/ minal (incl. Calculated tolerance) pass Tie the power cable to the speed cable with ONE tie wrap ...
- Page 38 gaitway-3D Service manual Ref.:TM-MAN-0005-ARS Iss.: A Rev.: 9 Date: 07/12/2020 Page : 34 Test Step Measurements/Test Results Seq. Description Required/No Measured/ Remarks/Calculations Pass/ minal (incl. Calculated tolerance) pass Tie the power cable to the cables inside the treadmill such as ...
- Page 39 gaitway-3D Service manual Ref.:TM-MAN-0005-ARS Iss.: A Rev.: 9 Date: 07/12/2020 Page : 35 Test Step Measurements/Test Results Seq. Description Required/No Measured/ Remarks/Calculations Pass/ minal (incl. Calculated tolerance) pass Tie the power cable to the cables inside the treadmill such as ...
- Page 40 gaitway-3D Service manual Ref.:TM-MAN-0005-ARS Iss.: A Rev.: 9 Date: 07/12/2020 Page : 36 Test Step Measurements/Test Results Seq. Description Required/No Measured/ Remarks/Calculations Pass/ minal (incl. Calculated tolerance) pass Connect power cable to power supply: 3x Tie-wrap V- = blue wire V+ =brown wire Tie the Earth wire (green/yellow), the shielding wire (grey) and the supply return...
- Page 41 gaitway-3D Service manual Ref.:TM-MAN-0005-ARS Iss.: A Rev.: 9 Date: 07/12/2020 Page : 37 Test Step Measurements/Test Results Seq. Description Required/No Measured/ Remarks/Calculations Pass/ minal (incl. Calculated tolerance) pass Measure impedance between the backshell R < 1ohm of the power connector on the force amplifier and the treadmill PE.
- Page 42 gaitway-3D Service manual Ref.:TM-MAN-0005-ARS Iss.: A Rev.: 9 Date: 07/12/2020 Page : 38 Test Step Measurements/Test Results Seq. Description Required/No Measured/ Remarks/Calculations Pass/ minal (incl. Calculated tolerance) pass Before connecting the amplifier power cable, Force amplifier switch on treadmill and measure the power supply (V): 11.88 ≤...
- Page 43 gaitway-3D Service manual Ref.:TM-MAN-0005-ARS Iss.: A Rev.: 9 Date: 07/12/2020 Page : 39 Test Step Measurements/Test Results Seq. Description Required/No Measured/ Remarks/Calculations Pass/ minal (incl. Calculated tolerance) pass 3x Tie-mount FOR THE GAITWAY-3D 150/50: Loctite 401 Glue two tie-mount under the plate under the motor, in position (2) and (3).
- Page 44 gaitway-3D Service manual Ref.:TM-MAN-0005-ARS Iss.: A Rev.: 9 Date: 07/12/2020 Page : 40 Test Step Measurements/Test Results Seq. Description Required/No Measured/ Remarks/Calculations Pass/ minal (incl. Calculated tolerance) pass 2x Tie-mount FOR THE GAITWAY-3D 150/50: Loctite 401 Glue two tie-mount under the plate under the motor, in position (2) and (3)
- Page 45 gaitway-3D Service manual Ref.:TM-MAN-0005-ARS Iss.: A Rev.: 9 Date: 07/12/2020 Page : 41 Test Step Measurements/Test Results Seq. Description Required/No Measured/ Remarks/Calculations Pass/ minal (incl. Calculated tolerance) pass Tie-mount FOR THE GAITWAY-3D 170/65 and 190/65: Loctite 401 Glue a Tie-mount on the treadmill beam under the motor on the left side of the bottom face (2).
- Page 46 gaitway-3D Service manual Ref.:TM-MAN-0005-ARS Iss.: A Rev.: 9 Date: 07/12/2020 Page : 42 Test Step Measurements/Test Results Seq. Description Required/No Measured/ Remarks/Calculations Pass/ minal (incl. Calculated tolerance) pass 3x Tie-mount FOR THE GAITWAY-3D 170/65 and 190/65: Loctite 401 Glue a tie-mount under the bottom plate of the motor compartment, in front of the hole on the right side (2), a second tie-mount on the top face of the beam under the motor...
- Page 47 gaitway-3D Service manual Ref.:TM-MAN-0005-ARS Iss.: A Rev.: 9 Date: 07/12/2020 Page : 43 Test Step Measurements/Test Results Seq. Description Required/No Measured/ Remarks/Calculations Pass/ minal (incl. Calculated tolerance) pass Stick the serial number label in the center of Serial number label the back side of the amplifier.
- Page 48 gaitway-3D Service manual Ref.:TM-MAN-0005-ARS Iss.: A Rev.: 9 Date: 07/12/2020 Page : 44 Test Step Measurements/Test Results Seq. Description Required/No Measured/ Remarks/Calculations Pass/ minal (incl. Calculated tolerance) pass Measure the impedance of the load cell R1 < 1ohm cable shielding backshell) R2 <...
- Page 49 gaitway-3D Service manual Ref.:TM-MAN-0005-ARS Iss.: A Rev.: 9 Date: 07/12/2020 Page : 45 Test Step Measurements/Test Results Seq. Description Required/No Measured/ Remarks/Calculations Pass/ minal (incl. Calculated tolerance) pass FOR THE GAITWAY-3D 150/50: 6x Tie-wrap Route both left load cell cables to the amplifier through the treadmill motor compartment: ...
- Page 50 gaitway-3D Service manual Ref.:TM-MAN-0005-ARS Iss.: A Rev.: 9 Date: 07/12/2020 Page : 46 Test Step Measurements/Test Results Seq. Description Required/No Measured/ Remarks/Calculations Pass/ minal (incl. Calculated tolerance) pass FOR THE GAITWAY-3D 150/50: 6x Tie-wrap Route both right load cell cables to the amplifier through the treadmill motor compartment: ...
- Page 51 gaitway-3D Service manual Ref.:TM-MAN-0005-ARS Iss.: A Rev.: 9 Date: 07/12/2020 Page : 47 Test Step Measurements/Test Results Seq. Description Required/No Measured/ Remarks/Calculations Pass/ minal (incl. Calculated tolerance) pass FOR THE GAITWAY-3D 170/65 and 190/65: 6x Tie-wrap Route both left load cell cables to the amplifier through the motor compartment: 1) one tie-wrap in the tie-mount next to the front left load cell.
- Page 52 gaitway-3D Service manual Ref.:TM-MAN-0005-ARS Iss.: A Rev.: 9 Date: 07/12/2020 Page : 48 Test Step Measurements/Test Results Seq. Description Required/No Measured/ Remarks/Calculations Pass/ minal (incl. Calculated tolerance) pass...
- Page 53 gaitway-3D Service manual Ref.:TM-MAN-0005-ARS Iss.: A Rev.: 9 Date: 07/12/2020 Page : 49 Test Step Measurements/Test Results Seq. Description Required/No Measured/ Remarks/Calculations Pass/ minal (incl. Calculated tolerance) pass Insert the cable of load cell 1 into the grommet located at the left on the front view of the treadmill.
- Page 54 gaitway-3D Service manual Ref.:TM-MAN-0005-ARS Iss.: A Rev.: 9 Date: 07/12/2020 Page : 50 Test Step Measurements/Test Results Seq. Description Required/No Measured/ Remarks/Calculations Pass/ minal (incl. Calculated tolerance) pass FOR THE GAITWAY-3D 170/65 and 190/65: 5x Tie-wrap Route both right load cell cables to the force amplifier through the motor compartment.
- Page 55 gaitway-3D Service manual Ref.:TM-MAN-0005-ARS Iss.: A Rev.: 9 Date: 07/12/2020 Page : 51 Test Step Measurements/Test Results Seq. Description Required/No Measured/ Remarks/Calculations Pass/ minal (incl. Calculated tolerance) pass Insert the cable of load cell 2 into the grommet located at the left on the front view of the treadmill.
- Page 56 gaitway-3D Service manual Ref.:TM-MAN-0005-ARS Iss.: A Rev.: 9 Date: 07/12/2020 Page : 52 Test Step Measurements/Test Results Seq. Description Required/No Measured/ Remarks/Calculations Pass/ minal (incl. Calculated tolerance) pass Connect the 4 load cell cables to the amplifier. Adjust the length of the four load cell cables. Roll the cable excess into the cable trays on the foot plates.
- Page 57 gaitway-3D Service manual Ref.:TM-MAN-0005-ARS Iss.: A Rev.: 9 Date: 07/12/2020 Page : 53 Test Step Measurements/Test Results Seq. Description Required/No Measured/ Remarks/Calculations Pass/ minal (incl. Calculated tolerance) pass Connect the power cable (P) and the speed sensor cable (S) to the amplifier. Close the motor-cover.
-
Page 58: Gaitway-3D Startup
gaitway-3D Service manual Ref.:TM-MAN-0005-ARS Iss.: A Rev.: 9 Date: 07/12/2020 Page : 54 12.5. gaitway-3D startup Date: Name: Time: Test Step Measurements/Test Results Seq. Description Required/No Measured/ Remarks/Calculations Pass/ minal (incl. Calculated tolerance) pass Switch on the operator computer and login with administrator rights. - Page 59 gaitway-3D Service manual Ref.:TM-MAN-0005-ARS Iss.: A Rev.: 9 Date: 07/12/2020 Page : 55 Test Step Measurements/Test Results Seq. Description Required/No Measured/ Remarks/Calculations Pass/ minal (incl. Calculated tolerance) pass Connect Ethernet cable from Ethernet cable gaitway-3D force amplifier to one router LAN port.
- Page 60 gaitway-3D Service manual Ref.:TM-MAN-0005-ARS Iss.: A Rev.: 9 Date: 07/12/2020 Page : 56 Test Step Measurements/Test Results Seq. Description Required/No Measured/ Remarks/Calculations Pass/ minal (incl. Calculated tolerance) pass From the USB stick (provided by Arsalis), TM-SOC-xxxx- Document TM-SOC-xxxx-ARS provided start gaitway-3D[Service] software.
-
Page 61: Installation And Commissioning Summary Sheet
gaitway-3D Service manual Ref.:TM-MAN-0005-ARS Iss.: A Rev.: 9 Date: 07/12/2020 Page : 57 12.6. Installation and commissioning summary sheet Technician identification: Date: Name: Company: Customer identification: Contact: Company: Device identification: Model, type: Treadmill S/N: Instrumentation S/N: Standard notes: O successful installation and commissioning Remarks: Technician: Customer:... -
Page 62: Gaitway-3D Sensors Calibration Checklist
gaitway-3D Service manual Ref.:TM-MAN-0005-ARS Iss.: A Rev.: 9 Date: 07/12/2020 Page : 58 13. gaitway-3D sensors calibration checklist Date: Name: Time: Test Step Measurements/Test Results Seq. Description Required/No Measured/ Remarks/Calculations Pass/ minal (incl. Calculated tolerance) pass Test Readiness Review: Device name, type: ... - Page 63 gaitway-3D Service manual Ref.:TM-MAN-0005-ARS Iss.: A Rev.: 9 Date: 07/12/2020 Page : 59 Test Step Measurements/Test Results Seq. Description Required/No Measured/ Remarks/Calculations Pass/ minal (incl. Calculated tolerance) pass Turn on the power then wait for 1hour for temperature stabilization before starting the calibration measurements.
- Page 64 gaitway-3D Service manual Ref.:TM-MAN-0005-ARS Iss.: A Rev.: 9 Date: 07/12/2020 Page : 60 Test Step Measurements/Test Results Seq. Description Required/No Measured/ Remarks/Calculations Pass/ minal (incl. Calculated tolerance) pass The treadmill will start moving at different speeds up to the max speed. Ensure that nothing touches the treadmill and that nothing is on the treadmill.
- Page 65 gaitway-3D Service manual Ref.:TM-MAN-0005-ARS Iss.: A Rev.: 9 Date: 07/12/2020 Page : 61 Test Step Measurements/Test Results Seq. Description Required/No Measured/ Remarks/Calculations Pass/ minal (incl. Calculated tolerance) pass Ensure that all criterions are passed and press “Validate”. Otherwise repeat the steps of a given position that show the largest errors or repeat all steps from the beginning.
- Page 66 gaitway-3D Service manual Ref.:TM-MAN-0005-ARS Iss.: A Rev.: 9 Date: 07/12/2020 Page : 62 Test Step Measurements/Test Results Seq. Description Required/No Measured/ Remarks/Calculations Pass/ minal (incl. Calculated tolerance) pass Follow the instructions of the gaitway- 3D[Service] software. To pull on the calibration gauge, use a rope and a lever.
- Page 67 gaitway-3D Service manual Ref.:TM-MAN-0005-ARS Iss.: A Rev.: 9 Date: 07/12/2020 Page : 63 Test Step Measurements/Test Results Seq. Description Required/No Measured/ Remarks/Calculations Pass/ minal (incl. Calculated tolerance) pass Position 2 is with gauge axis at ¼ of belt width from the right side. Position 3 is in the center of the belt.
- Page 68 gaitway-3D Service manual Ref.:TM-MAN-0005-ARS Iss.: A Rev.: 9 Date: 07/12/2020 Page : 64 Test Step Measurements/Test Results Seq. Description Required/No Measured/ Remarks/Calculations Pass/ minal (incl. Calculated tolerance) pass Fix the calibration gauge in position 1: gauge axis in front of the rear load cell. Use two F- clamps of 80mm.
- Page 69 gaitway-3D Service manual Ref.:TM-MAN-0005-ARS Iss.: A Rev.: 9 Date: 07/12/2020 Page : 65 Test Step Measurements/Test Results Seq. Description Required/No Measured/ Remarks/Calculations Pass/ minal (incl. Calculated tolerance) pass Follow the instructions of the gaitway- 3D[Service] software. To pull on the calibration gauge, use a rope and a lever.
- Page 70 gaitway-3D Service manual Ref.:TM-MAN-0005-ARS Iss.: A Rev.: 9 Date: 07/12/2020 Page : 66 Test Step Measurements/Test Results Seq. Description Required/No Measured/ Remarks/Calculations Pass/ minal (incl. Calculated tolerance) pass Position 2 is with the gauge axis in between the rear load cell and the center of the belt. Position 3 is with the gauge axis close to the center of the belt.
-
Page 71: Sensors Calibration Summary Sheet
gaitway-3D Service manual Ref.:TM-MAN-0005-ARS Iss.: A Rev.: 9 Date: 07/12/2020 Page : 67 13.1. Sensors calibration summary sheet Technician identification: Date: Name: Company: Customer identification: Contact: Company: Device identification: Model, type: Treadmill S/N: Instrumentation S/N: Standard notes: O successful calibration Remarks: Technician: Customer:... -
Page 72: Gaitway-3D On Site Check-Out Checklist
gaitway-3D Service manual Ref.:TM-MAN-0005-ARS Iss.: A Rev.: 9 Date: 07/12/2020 Page : 68 14. gaitway-3D on site check-out checklist Date: Name: Time: Test Step Measurements/Test Results Seq. Description Required/No Measured/ Remarks/Calculations Pass/ minal (incl. Calculated tolerance) pass Test Readiness Review: Device name, type: ... - Page 73 gaitway-3D Service manual Ref.:TM-MAN-0005-ARS Iss.: A Rev.: 9 Date: 07/12/2020 Page : 69 Test Step Measurements/Test Results Seq. Description Required/No Measured/ Remarks/Calculations Pass/ minal (incl. Calculated tolerance) pass In the gaitway-3D[Service] software, select “Checkout: RMS noise at all speeds” and follow the instructions.
- Page 74 gaitway-3D Service manual Ref.:TM-MAN-0005-ARS Iss.: A Rev.: 9 Date: 07/12/2020 Page : 70 Test Step Measurements/Test Results Seq. Description Required/No Measured/ Remarks/Calculations Pass/ minal (incl. Calculated tolerance) pass In the gaitway-3D[Service] software, select See test related data “Checkout: Force verification” and follow the instructions.
- Page 75 gaitway-3D Service manual Ref.:TM-MAN-0005-ARS Iss.: A Rev.: 9 Date: 07/12/2020 Page : 71 Test Step Measurements/Test Results Seq. Description Required/No Measured/ Remarks/Calculations Pass/ minal (incl. Calculated tolerance) pass In the gaitway-3D[Service] software, select “Checkout: Export Flash & data” and follow the instructions to save a zip package with the calibration and checkout data and results.
- Page 76 gaitway-3D Service manual Ref.:TM-MAN-0005-ARS Iss.: A Rev.: 9 Date: 07/12/2020 Page : 72 Test Step Measurements/Test Results Seq. Description Required/No Measured/ Remarks/Calculations Pass/ minal (incl. Calculated tolerance) pass Set treadmill speed at 10km/h and confirm Set speed: TM control that the selected speed is correctly indicated 10 km/h panel within 5%:...
- Page 77 gaitway-3D Service manual Ref.:TM-MAN-0005-ARS Iss.: A Rev.: 9 Date: 07/12/2020 Page : 73 Test Step Measurements/Test Results Seq. Description Required/No Measured/ Remarks/Calculations Pass/ minal (incl. Calculated tolerance) pass With a subject on the gaitway-3D, record a trace of 10 seconds at 1 kHz at the following speeds of walking: 3 and 6 km/h.
-
Page 78: On-Site Checkout Summary Sheet
gaitway-3D Service manual Ref.:TM-MAN-0005-ARS Iss.: A Rev.: 9 Date: 07/12/2020 Page : 74 14.1. On-site checkout summary sheet Technician identification: Date: Name: Company: Customer identification: Contact: Company: Device identification: Model, type: Treadmill S/N: Instrumentation S/N: Standard notes: O successful on-site checkout Remarks: Technician: Customer:... -
Page 79: Amplifier Replacement Checklist
gaitway-3D Service manual Ref.:TM-MAN-0005-ARS Iss.: A Rev.: 9 Date: 07/12/2020 Page : 75 15. Amplifier replacement checklist 15.1. Force amplifier dismounting and packing Date: Name: Time: Test Step Measurements/Test Results Seq. Description Required/No Measured/ Remarks/Calculations Pass/ minal (incl. Calculated tolerance) pass Test Readiness Review: Device name, type:... - Page 80 gaitway-3D Service manual Ref.:TM-MAN-0005-ARS Iss.: A Rev.: 9 Date: 07/12/2020 Page : 76 Test Step Measurements/Test Results Seq. Description Required/No Measured/ Remarks/Calculations Pass/ minal (incl. Calculated tolerance) pass Disconnect the power cable (P) and the speed sensor cable (S) from the amplifier.
- Page 81 gaitway-3D Service manual Ref.:TM-MAN-0005-ARS Iss.: A Rev.: 9 Date: 07/12/2020 Page : 77 Test Step Measurements/Test Results Seq. Description Required/No Measured/ Remarks/Calculations Pass/ minal (incl. Calculated tolerance) pass Disconnect the 4 load cell cables from the amplifier. Disconnect, if applicable, any other cable connected to the amplifier.
- Page 82 gaitway-3D Service manual Ref.:TM-MAN-0005-ARS Iss.: A Rev.: 9 Date: 07/12/2020 Page : 78 Test Step Measurements/Test Results Seq. Description Required/No Measured/ Remarks/Calculations Pass/ minal (incl. Calculated tolerance) pass Disconnect any connector caps from the amplifier and set them aside. Dismount amplifier from support bracket and re-insert screws washers on brackets.
-
Page 83: Force Amplifier Installation
gaitway-3D Service manual Ref.:TM-MAN-0005-ARS Iss.: A Rev.: 9 Date: 07/12/2020 Page : 79 15.2. Force amplifier installation Date: Name: Time: Test Step Measurements/Test Results Seq. Description Required/No Measured/ Remarks/Calculations Pass/ minal (incl. Calculated tolerance) pass Verify that the mains plug is disconnected. Remove protective packaging carefully. - Page 84 gaitway-3D Service manual Ref.:TM-MAN-0005-ARS Iss.: A Rev.: 9 Date: 07/12/2020 Page : 80 Test Step Measurements/Test Results Seq. Description Required/No Measured/ Remarks/Calculations Pass/ minal (incl. Calculated tolerance) pass Connect the 4 load cell cables to the amplifier.
- Page 85 gaitway-3D Service manual Ref.:TM-MAN-0005-ARS Iss.: A Rev.: 9 Date: 07/12/2020 Page : 81 Test Step Measurements/Test Results Seq. Description Required/No Measured/ Remarks/Calculations Pass/ minal (incl. Calculated tolerance) pass Connect the power cable (P) and the speed sensor cable (S) to the amplifier.
- Page 86 gaitway-3D Service manual Ref.:TM-MAN-0005-ARS Iss.: A Rev.: 9 Date: 07/12/2020 Page : 82 Test Step Measurements/Test Results Seq. Description Required/No Measured/ Remarks/Calculations Pass/ minal (incl. Calculated tolerance) pass Ethernet cable Connect Ethernet cable from gaitway-3D force amplifier to one router LAN port (if a router is used) or to the operator computer (if a direct connection is used).
-
Page 87: Amplifier Replacement Summary Sheet
gaitway-3D Service manual Ref.:TM-MAN-0005-ARS Iss.: A Rev.: 9 Date: 07/12/2020 Page : 83 15.3. Amplifier replacement summary sheet Technician identification: Date: Name: Company: Customer identification: Contact: Company: Device identification: Model, type: Treadmill S/N: Amplifier identification: Uninstalled amplifier S/N: Installed amplifier S/N: Standard notes: O successful amplifier replacement Remarks:... -
Page 88: Load Cell Replacement Checklist
gaitway-3D Service manual Ref.:TM-MAN-0005-ARS Iss.: A Rev.: 9 Date: 07/12/2020 Page : 84 16. Load cell replacement checklist 16.1. Load cell dismounting Date: Name: Time: Test Step Measurements/Test Results Seq. Description Required/No Measured/ Remarks/Calculations Pass/ minal (incl. Calculated tolerance) pass Test Readiness Review: Device name, type: ... - Page 89 gaitway-3D Service manual Ref.:TM-MAN-0005-ARS Iss.: A Rev.: 9 Date: 07/12/2020 Page : 85 Test Step Measurements/Test Results Seq. Description Required/No Measured/ Remarks/Calculations Pass/ minal (incl. Calculated tolerance) pass Remove the optional left and right safety arch. Keep the screws. Dismount the motor cover. Open the cable tray cover on the side of the load cell to replace.
- Page 90 gaitway-3D Service manual Ref.:TM-MAN-0005-ARS Iss.: A Rev.: 9 Date: 07/12/2020 Page : 86 Test Step Measurements/Test Results Seq. Description Required/No Measured/ Remarks/Calculations Pass/ minal (incl. Calculated tolerance) pass Dismount both, left and right, handrail supports from foot plates and set screws and washers aside.
- Page 91 gaitway-3D Service manual Ref.:TM-MAN-0005-ARS Iss.: A Rev.: 9 Date: 07/12/2020 Page : 87 Test Step Measurements/Test Results Seq. Description Required/No Measured/ Remarks/Calculations Pass/ minal (incl. Calculated tolerance) pass Lift the FRONT of the treadmill with a jack Lift side: and place it on wheel board. FRONT Lift BACK of treadmill with a jack and place it on wheel board.
- Page 92 gaitway-3D Service manual Ref.:TM-MAN-0005-ARS Iss.: A Rev.: 9 Date: 07/12/2020 Page : 88 Test Step Measurements/Test Results Seq. Description Required/No Measured/ Remarks/Calculations Pass/ minal (incl. Calculated tolerance) pass Dismount 4x DIN933-M8 hex-head treadmill fixation screws under both Flat-supports of the side of the load cell to replace. Support the foot plate while unscrewing the Flat- supports and avoid any shock on the load cells.
- Page 93 gaitway-3D Service manual Ref.:TM-MAN-0005-ARS Iss.: A Rev.: 9 Date: 07/12/2020 Page : 89 Test Step Measurements/Test Results Seq. Description Required/No Measured/ Remarks/Calculations Pass/ minal (incl. Calculated tolerance) pass Unscrew the flat-support of the Load cell to dismount. Keep the screw. Untighten the load cell cables from cable gland of the Load cell case.
- Page 94 gaitway-3D Service manual Ref.:TM-MAN-0005-ARS Iss.: A Rev.: 9 Date: 07/12/2020 Page : 90 Test Step Measurements/Test Results Seq. Description Required/No Measured/ Remarks/Calculations Pass/ minal (incl. Calculated tolerance) pass Remove the Load cell case from the foot plate around the load cell to replace. Keep 4x screws, 4x washers and 1x tie- holder.
-
Page 95: Load Cell Mounting
gaitway-3D Service manual Ref.:TM-MAN-0005-ARS Iss.: A Rev.: 9 Date: 07/12/2020 Page : 91 16.2. Load cell mounting Date: Name: Time: Test Step Measurements/Test Results Seq. Description Required/No Measured/ Remarks/Calculations Pass/ minal (incl. Calculated tolerance) pass Verify that the mains plug is disconnected. Remove protective packaging carefully. - Page 96 gaitway-3D Service manual Ref.:TM-MAN-0005-ARS Iss.: A Rev.: 9 Date: 07/12/2020 Page : 92 Test Step Measurements/Test Results Seq. Description Required/No Measured/ Remarks/Calculations Pass/ minal (incl. Calculated tolerance) pass 1x DIN7991-M12x30 Screw the load cell on the foot plate, from Torque = the bottom of the foot plate, with the cable 50Nm...
- Page 97 gaitway-3D Service manual Ref.:TM-MAN-0005-ARS Iss.: A Rev.: 9 Date: 07/12/2020 Page : 93 Test Step Measurements/Test Results Seq. Description Required/No Measured/ Remarks/Calculations Pass/ minal (incl. Calculated tolerance) pass 4x ISO7380 M4x10, Screw the Load cell case on the base plates. Torque = ...
- Page 98 gaitway-3D Service manual Ref.:TM-MAN-0005-ARS Iss.: A Rev.: 9 Date: 07/12/2020 Page : 94 Test Step Measurements/Test Results Seq. Description Required/No Measured/ Remarks/Calculations Pass/ minal (incl. Calculated tolerance) pass 1x DIN7991-M12x25 Screw the flat-support on the sensors. Torque = 50Nm While treadmill elevated...
- Page 99 gaitway-3D Service manual Ref.:TM-MAN-0005-ARS Iss.: A Rev.: 9 Date: 07/12/2020 Page : 95 Test Step Measurements/Test Results Seq. Description Required/No Measured/ Remarks/Calculations Pass/ minal (incl. Calculated tolerance) pass Lift the supports and insert screws to Torque = 16x DIN933-M8x30, Fabory suspend them to the treadmill.
- Page 100 gaitway-3D Service manual Ref.:TM-MAN-0005-ARS Iss.: A Rev.: 9 Date: 07/12/2020 Page : 96 Test Step Measurements/Test Results Seq. Description Required/No Measured/ Remarks/Calculations Pass/ minal (incl. Calculated tolerance) pass Remove the Treadmill-spacer-back. 26x DIN933-M10x30 Screw the treadmill to the floor. Torque: Torque: ...
- Page 101 gaitway-3D Service manual Ref.:TM-MAN-0005-ARS Iss.: A Rev.: 9 Date: 07/12/2020 Page : 97 Test Step Measurements/Test Results Seq. Description Required/No Measured/ Remarks/Calculations Pass/ minal (incl. Calculated tolerance) pass Measure the impedance of the load cell R1 < 1ohm cable shielding cable connector R2 <...
- Page 102 gaitway-3D Service manual Ref.:TM-MAN-0005-ARS Iss.: A Rev.: 9 Date: 07/12/2020 Page : 98 Test Step Measurements/Test Results Seq. Description Required/No Measured/ Remarks/Calculations Pass/ minal (incl. Calculated tolerance) pass Inspect that the load cell cables cannot touch any sharp part. Screw the optional left and right safety arch Torque = to the handrail supports and to the handrails.
-
Page 103: Load Cell Replacement Summary Sheet
gaitway-3D Service manual Ref.:TM-MAN-0005-ARS Iss.: A Rev.: 9 Date: 07/12/2020 Page : 99 16.3. Load cell replacement summary sheet Technician identification: Date: Name: Company: Customer identification: Contact: Company: Device identification: Model, type: Treadmill S/N: Instrumentation S/N: Load cells identification: Uninstalled load cell position: Uninstalled load cell S/N: Installed load cell S/N: Standard notes:... -
Page 104: Gaitway-3D Amplifier Fuse Replacement Checklist
gaitway-3D Service manual Ref.:TM-MAN-0005-ARS Iss.: A Rev.: 9 Date: 07/12/2020 Page : 100 17. gaitway-3D amplifier fuse replacement checklist Date: Name: Time: Test Step Measurements/Test Results Seq. Description Required/No Measured/ Remarks/Calculations Pass/ minal (incl. Calculated tolerance) pass Test Readiness Review: Device name, type: ... - Page 105 gaitway-3D Service manual Ref.:TM-MAN-0005-ARS Iss.: A Rev.: 9 Date: 07/12/2020 Page : 101 Test Step Measurements/Test Results Seq. Description Required/No Measured/ Remarks/Calculations Pass/ minal (incl. Calculated tolerance) pass Measure the impedance of the amplifier > > power connector 12V (pin1) to 100ohm - the connector ground (pin3) - the connector backshell...
- Page 106 gaitway-3D Service manual Ref.:TM-MAN-0005-ARS Iss.: A Rev.: 9 Date: 07/12/2020 Page : 102 Test Step Measurements/Test Results Seq. Description Required/No Measured/ Remarks/Calculations Pass/ minal (incl. Calculated tolerance) pass Measure the impedance of the load cell 1 GND1 GND1 power supply on the load cell cable (pin1) to 333.3ohm - the load cell ground (pin6) ±5ohm...
- Page 107 gaitway-3D Service manual Ref.:TM-MAN-0005-ARS Iss.: A Rev.: 9 Date: 07/12/2020 Page : 103 Test Step Measurements/Test Results Seq. Description Required/No Measured/ Remarks/Calculations Pass/ minal (incl. Calculated tolerance) pass Measure the impedance of the load cell 4 GND4 GND4 power supply on the load cell cable (pin1) to 333.3ohm - the load cell ground (pin6) ±5ohm...
-
Page 108: Fuse Replacement Summary Sheet
gaitway-3D Service manual Ref.:TM-MAN-0005-ARS Iss.: A Rev.: 9 Date: 07/12/2020 Page : 104 17.1. Fuse replacement summary sheet Technician identification: Date: Name: Company: Customer identification: Contact: Company: Device identification: Model, type: Treadmill S/N: Instrumentation S/N: Standard notes: O successful fuse replacement Remarks: Technician: Customer:...
Need help?
Do you have a question about the Arsalis Gaitway 3D and is the answer not in the manual?
Questions and answers