Table of Contents
Advertisement
Available languages
Available languages
Quick Links
Advertisement
Chapters
Table of Contents

Subscribe to Our Youtube Channel
Related Manuals for Promac PBD-3069


Summary of Contents for Promac PBD-3069
- Page 1 11-2018 Metal Lathe PBD-3069 Metalldrehbank Tour à métaux Schweiz / Suisse France JPW (TOOL) AG TOOL FRANCE SARL, 9 Rue des Pyrénées, Ackerstrasse 45, 91090 LISSES, France CH-8610 Uster, Switzerland www.promac.fr www.promac.ch...
- Page 2 Brand / Marke / Marque: PROMAC Manufacturer / Hersteller / Fabricant: Tool France PROMAC, JPW Industries-Europe 9 Rue des Pyrénées ZI du Bois Chaland, 91090 LISSES / EVRY, France We hereby declare that this product complies with the regulations Wir erklären hiermit, dass dieses Produkt der folgenden Richtlinie entspricht Par la présente, nous déclarons que ce produit correspond aux directives suivantes...
-
Page 3: Table Of Contents
EN Operating Instructions 1.0 About this Manual This manual is provided by PROMAC, covering the safe operation and maintenance procedures for a PROMAC Model PBD- 3069 Metal Lathe. This manual contains instructions on installation, safety precautions, general operating procedures, maintenance instructions and parts breakdown. The machine has been designed and constructed to provide consistent, long- term operation if used in accordance with the instructions as set forth in this document. -
Page 4: Important Safety Instructions
Do not use this machine for other than its intended use. If non-glare, overhead lighting. used for other purposes, PROMAC disclaims any real or implied warranty and holds itself harmless from any injury 18. Keep the floor around the machine clean and free of scrap that may result from that use. - Page 5 31. Remove loose items and unnecessary work pieces from 32. Pull the mains plug if the machine is not in use. the area before starting the machine. 33. Make sure the workpiece is securely clamped. Familiarize yourself with the following safety notices used in this manual: WARNING: This means that if precautions are not heeded, it may result in serious, or possibly even fatal, injury.
-
Page 6: Designated Use And Limitations To Use
The machine is intended for indoor use. The protection rating of the electrical installation is IP 54. To avoid tipping, the machine must be bolted down with four anchor bolts. If used for other purposes, PROMAC disclaims any real or implied warranty and holds itself harmless from any injury that may result from that use. -
Page 7: Specifications
L = length; W = width; H= height; D= depth The specifications in this manual were current at time of publication, but because of our policy of continuous improvement, PROMAC reserves the right to change specifications at any time and without prior notice, without incurring obligations. - Page 8 4.1 Spindle nose mounting: Figure 4-1: Spindle nose mounting 4.2 Anchor bolt hole pattern: Figure 4-2: Lathe Bed (left) & Stand (right) anchor bolt pattern WARNING: To avoid tipping, the machine must be bolted down with four anchor bolts (not provided).
-
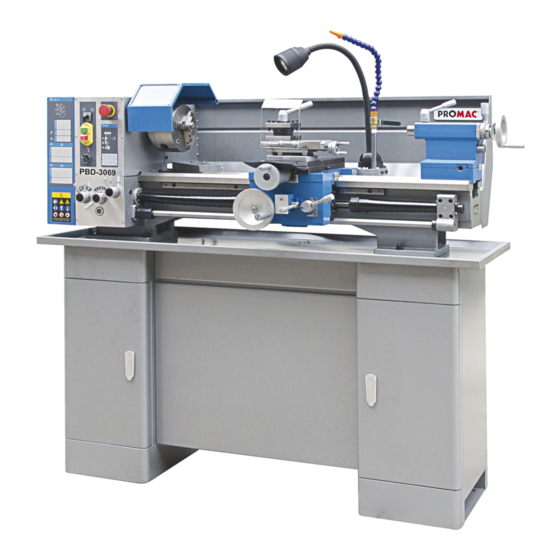
Page 9: Machine Description
5.0 Machine Description Figure 5-2: Machine description R ..........Feed speed select knob S ........Feed forward/ off/ reverse T ............Coolant ON/OFF U ..........Spindle power ON/OFF Figure 5-1: Machine description V .......... Spindle forward/reverse A ..........Machine cabinet stand W ............Emergency Stop B ..............Gear box AA .......... -
Page 10: Setup And Assembly
Failure to comply may result in serious injury. 59500112) Coolant facility (Optional, Machine lamp The PBD-3069 Metal Lathes are rated at 1~230V, PE, 50Hz 160mm 3-jaw universal chuck (PBD3069-125) power supply. The machines come with a plug designed for 160mm 4-jaw chuck (Optional, PBD3069-165) use on a circuit with a grounded outlet. -
Page 11: Extension Cords
8.2 Change gear setup the outlet is properly grounded. Do not modify the plug provided with the tool. Remove the pulley cover. The green/yellow conductor is the equipment-grounding The rotational speed of the lead screw, and hence the rate of conductor. -
Page 12: Taper Turning With Tailstock
8.5 Three jaw universal chuck With this universal chuck, cylindrical, triangular and hexagonal 8.3 Taper turning with tailstock stock may be clamped (Fig 8-5). Mount the work piece fitted with the drive dog between centres. The drive dog is driven by the face plate. Lubricate the tailstock centre with grease to prevent tip from overheating. -
Page 13: Live Centre
8.7 Live centre The live centre (Fig 8-7) is mounted in ball bearings. Its use is highly recommended for speeds above 500 RPM. Figure 8-7: Live centre To eject the live centre, fully retract the tailstock quill. Figure 8-9: Follow rest Note: 8.8 Steady rest ,and follow rest (Optional) Set the fingers (2) snug but not overly tight. -
Page 14: Operating Controls
9.0 Operating Controls 10.2 Chucking Refer to Figure 9-1: Do not exceed the max speed of the work holding device. R ........Feed speed select lever (I, II, III) Jaw teeth and scroll must always be fully engaged. Otherwise chuck jaws may break and fly off in rotation (Fig 10-1). S .......... -
Page 15: Cutting Tool Setup
10.5 Manual turning 10.3 Cutting Tool Setup Apron travel (AA, Fig 10-6), cross travel (BB) and top slide The cutting angle is correct when the cutting edge is in line travel (DD) can be operated for longitudinal and cross feeding. with the centre axis of the work piece. -
Page 16: Thread Cutting
Example for longitudinal turning: - When the tool approaches the end of cut, stop the motor and at the same time back the tool out, so that it clears the thread Operation feed/rev feed select knob diameter. Stock removal 0,34mm......III - Start the motor in reverse direction, let the cutting tool travel back to the starting point. -
Page 17: Drilling Operation
10.8 Drilling operation 11.0 User-Maintenance Use a drill chuck with MT3 arbor (option) to clamp centre drills and twisted drills in the tailstock (Fig 10-11) WARNING: Before any intervention on the machine, disconnect it from electrical supply, pull the mains plug. Failure to comply may cause serious injury. -
Page 18: Readjustments
B) Cross slide and Top slide adjustment: Each slide is fitted with a gib (C, Fig 11-3) and can be adjusted with screws (E) fitted with lock nuts (D). Figure 11-1: Gearbox oil fill-up Change the oil in the gearbox every 1000 operating hours. Drain oil by removing drain plug (K). -
Page 19: Troubleshooting
Dispose all packaging material in an environmental friendly manner. Dispose coolant in an environmentally friendly manner. Your appliance contains valuable materials which can be recovered or recycled. Please leave it at a specialized institution. 14.0 Available Accessories Refer to the PROMAC price list. -
Page 20: Replacement Parts
15.0 Replacement Parts PBD-3069 Assembly Breakdown -1... - Page 21 PBD-3069 Parts List for Breakdown -1 Index Part Description Size Qty. 101..PBD3069-1-01......LABEL......................1 102..PBD3069-1......SOCKET HD SCREW..........DIN912 Φ 4×10..... 6 103..PBD3069-1-03......BOLT....................... 2 104..PBD3069-2......NUT ................. DIN439-M10....4 105..PBD3069-3......KNURL NUT.............. M10.......2 106..PBD3069-1-06......SPINDLE......................1 107..PBD3069-4......KEY ................DIN 6885-8×45....1 108..PBD3069-1-08......
- Page 22 PBD-3069 Parts List for Breakdown -1 Index Part Description Size Qty. 153..PBD3069-153......CHUCK GUARD....................1 154..GB87986-3-20......ROLL PIN..............3 x 20 mm..... 1 155..PBD3069-155......SHAFT......................1 156..GB7085-5-12......SOCKET HEAD SCREW..........M5 x 12 mm....2 157..PBD3069-157......BRACKET......................1 158..PBD1830V-151....... MICRO SWITCH (SQ2)..................1 159..GB617286-4......
- Page 23 PBD-3069 Assembly Breakdown -2...
- Page 24 PBD-3069 Parts List for Breakdown -2 Index Part Description Size Qty. 201..PBD3069-2-01......GEAR SHAFT....................1 202..PBD3069-2-02......BEARING..............16170......2 203..PBD3069-19......O-RING..............18001400...... 2 204..PBD3069-2-04......NUT DIN 1804............M16×1.5......2 205..PBD3069-20......PIN DIN 1481............Φ3×22......2 206..PBD3069-2-06......COLLAR......................1 207..PBD3069-21......SOCKET HD SCREW..........DIN912M5×8....10 208..PBD3069-2-08......
- Page 25 PBD-3069 Parts List for Breakdown -2 Index Part Description Size Qty. 250..PBD3069-37......O-RING..............1800690......3 251..PBD3069-2-51......FORK......................1 252..PBD3069-2-52......GEAR......................1 253..PBD3069-38......SNAP RING............... Φ10....... 1 254..PBD3069-2-54......BEARING..............1010......2 255..PBD3069-2-55......GEAR......................1 256..PBD3069-2-56......RIGHT PLUG....................1 257..PBD3069-2-57......
- Page 26 PBD-3069 Assembly Breakdown -3...
- Page 27 PBD-3069 Parts List for Breakdown -3 Index Part Description Size Qty. 301..PBD3069-3-01......SCREW..............DIN912 M8×30....8 302..PBD3069-3-02......HANDLE BASE....................1 303..PBD3069-3-03......HANDLE......................1 305..PBD3069-3-05......WASHER......................1 306..PBD3069-3-06......POST BASE..................... 1 307..PBD3069-3-07......STOP....................... 1 308..PBD3069-3-08......SPRING..............7×0.8×11....... 1 309..PBD3069-3-09......TOP SLIDE....................... 1 310..PBD3069-3-10......
- Page 28 PBD-3069 Parts List for Breakdown -3 Index Part Description Size Qty. 350..PBD3069-3-50......HANDWHEEL....................1 351..PBD3069-3-51......WASHER......................1 352..PBD3069-59......SOCKET HD SCREW..........DIN 912 M5×10.....1 353..PBD3069-3-53......SPRING......................1 354..PBD3069-60......SOCKET HD SCREW..........DIN 912 M5×20.....3 355..PBD3069-3-55......KEY................DIN 6885 4X8....1 356..PBD3069-3-56......
- Page 29 PBD-3069 Assembly Breakdown -4...
- Page 30 PBD-3069 Parts List for Breakdown -4 Index Part Description Size Qty. 401..PBD3069-4-01......GEAR......................1 402..PBD3069-69......PIN................DIN 1481 Φ 5×24..1 403..PBD3069-4-03......GEAR......................1 404..PBD3069-4-04......WASHER......................1 405..PBD3069-70......SOCKET HD SCREW..........DIN912 M4×8....7 406..PBD3069-4-06......GEAR SHAFT....................1 407..PBD3069-71......KEY................DIN 6885 4X8....1 408..PBD3069-4-08......
- Page 31 PBD-3069 Parts List for Breakdown -4 Index Part Description Size Qty. 450..PBD3069-4-50......BASE....................... 1 451..PBD3069-86......SOCKET HD SCREW..........DIN 912-M5×10.....6 452..PBD3069-4-52......SHAFT HANDLE....................1 453..PBD3069-4-53......SHAFT FORX....................1 454..PBD3069-87......PIN................DIN 1481-Φ5×20...1 455..PBD3069-4-55......BASE....................... 1 456..PBD3069-88......SOCKET HD SCREW..........DIN912-M6X20..... 1 457..PBD3069-89......
- Page 32 PBD-3069 Assembly Breakdown -5...
- Page 33 PBD-3069 Parts List for Breakdown -5 Index Part Description Size Qty. 501..PBD3069-5-01......QUILL......................1 502..PBD3069-97......KEY......................... 1 503..PBD3069-5-03......NUT........................ 1 504..PBD3069-98......SOCKET HD SCREW..........DIN912-M6×10..... 1 505..PBD3069-5-05......SCREW......................1 506..PBD3069-99......KEY ................DIN 6885-4×10....1 507..PBD3069-5-07......PIVOT BLOCK....................1 508..PBD3069-5-08......
- Page 34 PBD-3069 Parts List for Breakdown -5 Index Part Description Size Qty. 556..PBD3069-5-556...... LEAD SCREW GUARD..................2 557..PBD3069-5-557...... SHAFT......................1 558..GB7085-6-70......HEX SOCKET SCREW..........M6 x 70......1 559..PBD3069-5-559...... DISORDERLY BUCKLE PLATE HOLDER............1 560..PBD3069-5-560...... GEAR......................1 561..GB5287-8....... WASHER ......................1 562..GB617086-8......
- Page 35 PBD-3069 Assembly Breakdown -6...
- Page 36 PBD-3069 Parts List for Breakdown -6 Index Part Description Size Qty. 601..PBD3069-119......BALL OILER............... Φ6......... 2 602..PBD3069-120......SOCKET HD SCREW..........M8 × 35 mm....1 603..PBD3069-6-03......RAIL........................ 1 604..PBD3069-6-04......BRACKET......................1 605..PBD3069-121......SOCKET HD SCREW..........M5 × 10 mm....3 607..PBD3069-6-07......
- Page 37 PBD-3069 Assembly Breakdown -7 PBD-3069 Parts List for Breakdown -7 Index Part Description Size Qty. 701..PBD2870-701......SCREW......................5 702..PBD2870-702......TIGHTENING SCREW..................5 703..PBD2870-703......SLIDE JAW...................... 5 704..PBD2555V-704....... SPRING WASHER (STD)..........10........5 705..PBD3069-705......FOLLOW REST....................1 706..GB617086-10......
- Page 38 PBD-3069 Assembly Breakdown -8 PBD-3069 Parts List for Breakdown -8 Index Part Description Size Qty. 801..PBD3069-801......LEFT STAND....................1 802..PBD3069-802......CONNECTING PLATE..................1 803..GB617086-8......HEX NUT..............M8.......10 804..GB7085-8-16......SOCKET HD SCREW..........M8 x 16 mm....10 805..GB97185-8......WASHER..............8........10 806..PBD3069-806......RIGHT STAND....................1...
- Page 39 PBD-3069 Assembly Breakdown -9 PBD-3069 Parts List for Breakdown -9 Index Part Description Size Qty. 901..PBD1830V-901....... NOZZLE......................1 902..PBD1830V-902....... OUTLET PIPE....................1 903..PBD1830V-903....... RETURNING PIPE.................... 1 904..PBD1830V-904....... WATER TANK....................1 905..PBD1830V-905....... ELECTRICAL BOX.................... 1 906..PBD1830V-906....... ELECTRICAL BOX COVER................1 907..GB7085-5-30......
- Page 40 PBD-3069 Assembly Breakdown -10 PBD-3069 Parts List for Breakdown -10 Index Part Description Size Qty. 601..PBD1830V-601....... SUPPORT......................1 602..GB7085-5-12......SOCKET HD SCREW..........M5 × 12 mm....2 603..PBD1830V-603....... SHAFT......................1 604..GB81985-5-6......CROSS RECESSED FLAT HD SCREW......M5 × 6 mm....2 605..PBD1830V-605....... HEX SLEEVE....................1 606..GB7085-3-8......
-
Page 41: Wiring Diagrams
16.0 Wiring Diagrams PBD-3069 ……………….1~230V, PE, 50Hz... - Page 42 PBD-3069 Electrical Parts List DESCRIPTION TYPE Qty. Spare Part No. Magnetic Contactor KJD17GF PBD2870V-E1 Fwd/0/Rev - Switch ZH-A PBD2870V-E2 Contactor LC1K0910 PBD2870V-E3 Transformer 230V/24V/20VA PBD2870V-E4 Transformer (Optional) 230V-24V/20VA PBD2870V-E5 Emergency stop LAY5 PBD2870V-E6 Gear Guard Switch QKS8 PBD2870V-E7 Chuck Guard Switch...
- Page 43 (Übersetzung der Originalbedienungsanleitung) 1.0 Informationen zur vorliegenden Anleitung Das vorliegende Handbuch wird von PROMAC bereitgestellt und enthält die Anweisungen für den sicheren Betrieb der Metalldrehbank Modell PBD-3069 von PROMAC sowie für die an diesem Produkt auszuführenden Wartungsvorgänge. Die Anleitung enthält Anweisungen zu Montage, Sicherheitsmaßnahmen, allgemeinen Bedienschritten und Wartungsvorgängen sowie die Teilelisten.
-
Page 44: Wichtige Sicherheitshinweise
Wartungsarbeiten lassen und für blendfreie Beleuchtung von bestimmungsgemäßen Gebrauch gedacht. Sollte sie für oben sorgen. andere Zwecke eingesetzt werden, lehnt PROMAC jegliche 18. Den Boden rund um das Gerät sauber und frei von ausdrückliche oder stillschweigende Gewährleistung ab und Ausschussmaterial, Öl oder Schmierfett halten. - Page 45 30. Die Maschine niemals unbeaufsichtigt laufen lassen. Die 32. Den Netzstecker ziehen, wenn die Maschine außer Betrieb Stromversorgung ausschalten und die Maschine nicht eher genommen wird. verlassen, als bis sie zum Stillstand gekommen ist. 33. Sicherstellen, dass das Werkstück sicher eingespannt ist. 31.
-
Page 46: Bestimmungsgemäße Verwendung Und Einsatzbeschränkungen
Damit die Maschine nicht umkippt, muss sie mit vier Ankerschrauben am Boden verschraubt werden. Sollte sie für andere Zwecke eingesetzt werden, lehnt PROMAC jegliche ausdrückliche oder stillschweigende Gewährleistung ab und hält sich schadlos von etwaigen Verletzungen, die aus einem solchen Missbrauch entstehen können. -
Page 47: Technische Daten
L = Länge; W = Breite; H = Höhe; D = Tiefe Die technischen Daten in diesem Handbuch waren zum Zeitpunkt der Veröffentlichung aktuell. Aufgrund unserer Politik fortwährender Verbesserung behält sich PROMAC das Recht vor, technische Daten jederzeit und ohne Vorankündigung sowie ohne jegliche damit einhergehende Verpflichtung zu ändern. - Page 48 4.1 Spindelkegelanbringung: Abb. 4-1: Spindelkegelanbringung 4.2 Schema der Ankerschraubenbohrungen: Abb. 4-2: Schema der Ankerschraubenbohrungen des Drehmaschinenbattes (links) und des Ständers (rechts) WARNUNG: Damit die Maschine nicht umkippt, muss sie mit vier Ankerschrauben (nicht mitgeliefert) am Boden verschraubt werden.
-
Page 49: Beschreibung Der Maschine
5.0 Beschreibung der Maschine Abb. 5-2: Beschreibung der Maschine R ....Wahlknopf für Vorschubgeschwindigkeit S ........Vorschub vorwärts/rückwärts T ........Kühlmittelzufuhr EIN/AUS Abb. 5-1: Beschreibung der Maschine U ............Spindel EIN/AUS V ........Spindel vorwärts/rückwärts A ..........Maschinenschranksockel W ..............Not-Aus B ................. -
Page 50: Einrichtung Und Montage
Elektriker gemäß allen am Einsatzort geltenden Vorschriften und Verordnungen durchgeführt werden. Bei Nichtbeachtung kann es zu schwerwiegenden Verletzungen kommen. 6.2 Lieferumfang Die Metalldrehbank PBD-3069 ist für eine Einphasen- Maschine Stromversorgung mit 230 V, PE, 50 Hz bemessen. Die Schrankgestell Maschinen werden mit einem Stecker geliefert, der für die Kühlmittelsystem... -
Page 51: Verlängerungskabel
qualifizierten Elektriker oder dem Wartungspersonal zu halten. 8.2 Einrichten der Zahnradkombination Keine Änderungen am Netzstecker der Maschine vornehmen. Die Riemenscheibenabdeckung entfernen. Der Leiter mit grün-gelber Isolierung ist der Schutzleiter (Erdungsleiter). Drehzahl Leitspindel somit Sollte eine Reparatur oder Auswechslung des Netzkabels oder des Vorschubgeschwindigkeit des Bearbeitungswerkzeugs wird über Steckers erforderlich sein, darauf achten, dass der Schutzleiter nicht mit die Zahnradanordnung und durch Betätigung des Wählhebels für... -
Page 52: Kegeldrehen Mit Reitstock
8.3 Kegeldrehen mit Reitstock 8.5 Dreibacken-Universalspannfutter Das Werkstück mit zwischen den Spitzen angebrachtem Mit diesem Universalspannfutter kann zylindrisches, dreieck- Mitnehmer montieren. Der Mitnehmer wird über die und sechskantförmiges Stangenmaterial aufgespannt werden. Planscheibe angetrieben. Die Reitstockspitze mit Fett schmieren, damit die Spitze nicht überhitzt. -
Page 53: Umlaufende Spitze
8.7 Umlaufende Spitze (Option) Die umlaufende Spitze (Abb. 8-7) ist unter Verwendung von Kugellagern montiert. Ihr Einsatz wird bei Drehzahlen über 500 min-1 empfohlen. Abb. 8-7: Umlaufende Spitze Abb. 8-9: Mitlaufende Lünette Ausstoßen umlaufenden Spitze muss Reitstockpinole ganz zurückbewegt werden. Hinweis: Die Finger (2) fest, aber nicht auf zu starken Druck einstellen. -
Page 54: Bedienelemente
10.2 Aufspannen 9.0 Bedienelemente Die maximale Drehzahl der Werkstückaufspannvorrichtung nicht überschreiten. Siehe Abb. 9-1: Spannbacken-Zähne und -Zahnkränze müssen stets voll im Eingriff sein. Anderenfalls können die Spannfutterbacken brechen und R ..Wahlhebel für Vorschubgeschwindigkeit (I, II, III) infolge der Rotationskraft weggeschleudert werden (Abb. 10-1). S ........ -
Page 55: Einrichten Der Bearbeitungswerkzeuge
10.3 Einrichten der Bearbeitungswerkzeuge 10.5 Manuelles Drehen Der Schnittwinkel ist korrekt, wenn die Schneide in einer Linie Schlosskastenverstellweg (AA, Abb. 10-6), Querverfahrweg mit der Mittelachse des Werkstücks ausgerichtet ist. Die (BB) und Oberschlittenverfahrweg (DD) können auf Längs- und äußerste Spitze der Reitstockspitze als Ausrichthilfe benutzen. Planvorschub eingestellt werden. -
Page 56: Gewindeschneiden
Beispiel für Längsdrehen: - Wenn sich das Werkzeug dem Schnittende nähert, den Motor stoppen und gleichzeitig das Werkzeug abrücken, so dass in Vorgang Vorschub/UWahlknopf für Vorschub diesem Abschnitt kein Gewinde eingearbeitet wird. Materialabtrag 0,34 mm ........III - Den Motor starten und auf die andere Drehrichtung umschalten und Schlichten 0,17 mm ........ -
Page 57: Wartung Seitens Des Anwenders
10.8 Bohrvorgang 11.0 Wartung seitens des Anwenders Ein Bohrfutter mit MT3-Dorn (Option) verwenden, um Zentrierbohrer und Spiralbohrer im Reitstock einzuspannen (Abb. 10-11). WARNUNG: Vor allen Arbeiten an der Maschine muss sie von der Stromversorgung getrennt werden. Dazu den Netzstecker ziehen. Bei Nichtbeachtung kann es zu schwerwiegenden Verletzungen kommen. -
Page 58: Nachjustieren
B) Querschlitten und Oberschlitten einstellen: Jeder Schlitten ist mit einer Einstellleiste versehen (C, Abb. 11- 3). Mithilfe der Schrauben (E), an denen Sicherungsmuttern angebracht sind, können Einstellungen vorgenommen werden. Abb. 11-1: Getriebeöl nachfüllen Das Öl im Getriebe alle 1000 Betriebsstunden wechseln. Den Ablassstopfen (K) entfernen. -
Page 59: Störungsbeseitigung
13.0 Umweltschutz Schützen Sie die Umwelt. Sämtliche Verpackungsmaterialien umweltfreundlich entsorgen. Kühlmittel umweltfreundlich entsorgen. Ihre Maschine enthält wertvolle Materialien, die zurückgewonnen bzw. wiederverwertet werden können. Bitte die Entsorgung von einem Fachunternehmen ausführen lassen. 14.0 Verfügbares Zubehör Siehe die Preisliste von PROMAC. -
Page 60: Ersatzteile
15.0. Ersatzteile PBD-3069 Explosionszeichnung - 1... - Page 61 PBD-3069 Teileliste Explosionszeichnung - 1 Index Teil Beschreibung Größe Anz. 101 ..PBD3069-1-01 ......AUFKLEBER ....................1 102 ..PBD3069-1 ......INNENSECHSKANTSCHRAUBE ......... DIN 912 Φ 4 x 10 ..6 103 ..PBD3069-1-03 ......SCHRAUBE ....................2 104 ..
- Page 62 PBD-3069 Explosionszeichnung - 2...
- Page 63 PBD-3069 Teileliste Explosionszeichnung - 2 Index Teil Beschreibung Größe Anz. 201 ..PBD3069-2-01 ......GETRIEBEWELLE ....................... 1 202 ..PBD3069-2-02 ......LAGER ................16170 ........ 2 203 ..PBD3069-19 ........ O-RING ................18001400 ......2 204 ..PBD3069-2-04 ......MUTTER DIN 1804 ............M16 x 1,5 ......2 205 ..
- Page 64 PBD-3069 Teileliste Explosionszeichnung - 2 Index Teil Beschreibung Größe Anz. 250 ..PBD3069-37 ........ O-RING ................1800690 ......3 251 ..PBD3069-2-51 ......GABEL ........................1 252 ..PBD3069-2-52 ......ZAHNRAD ........................1 253 ..PBD3069-38 ........ SPRENGRING ..............Φ10 ........1 254 ..
- Page 65 PBD-3069 Explosionszeichnung - 3...
- Page 66 PBD-3069 Teileliste Explosionszeichnung - 3 Index Teil Beschreibung Größe Anz. 301 ..PBD3069-3-01 ......SCHRAUBE ............... DIN 912 M8 x 30 ..8 302 ..PBD3069-3-02 ......GRIFFSOCKEL ....................1 303 ..PBD3069-3-03 ......GRIFF ......................1 305 ..PBD3069-3-05 ......UNTERLEGSCHEIBE ..................1 306 ..
- Page 67 PBD3069 Teileliste Explosionszeichnung - 3 Index Teil Beschreibung Größe Anz. 350 ..PBD3069-3-50 ......HANDRAD ..................... 1 351 ..PBD3069-3-51 ......UNTERLEGSCHEIBE ..................1 352 ..PBD3069-59 ......INNENSECHSKANTSCHRAUBE ......... DIN 912 M5 x 10 ..1 353 ..PBD3069-3-53 ......FEDER ......................1 354 ..
- Page 68 PBD-3069 Explosionszeichnung - 4...
- Page 69 PBD-3069 Teileliste Explosionszeichnung - 4 Index Teil Beschreibung Größe Anz. 401 ..PBD3069-4-01 ......ZAHNRAD ........................1 402 ..PBD3069-69 ........ STIFT ................DIN 1481 Φ5 x 24 ....1 403 ..PBD3069-4-03 ......ZAHNRAD ........................1 404 ..PBD3069-4-04 ......UNTERLEGSCHEIBE ....................1 405 ..
- Page 70 Teileliste PBD-3069 Explosionszeichnung - 4 Index Teil Beschreibung Größe Anz. 450 ..PBD3069-4-50 ......SOCKEL ........................1 451 ..PBD3069-86 ........ INNENSECHSKANTSCHRAUBE ......... DIN 912-M5 x 10 ....6 452 ..PBD3069-4-52 ......GRIFF WELLE ......................1 453 ..PBD3069-4-53 ......GABEL WELLE ......................1 454 ..
- Page 71 PBD-3069 Explosionszeichnung - 5...
- Page 72 PBD-3069 Teileliste Explosionszeichnung - 5 Index Teil Beschreibung Größe Anz. 501 ..PBD3069-5-01 ......PINOLE........................1 502 ..PBD3069-97 ........ KEIL ..........................1 503 ..PBD3069-5-03 ......MUTTER ........................1 504 ..PBD3069-98 ........ INNENSECHSKANTSCHRAUBE ......... DIN 912-M6 x 10 ....1 505 ..
- Page 73 PBD-3069 Explosionszeichnung - 6...
- Page 74 PBD-3069 Teileliste Explosionszeichnung - 6 Index Teil Beschreibung Größe Anz. 601 ..PBD3069-119 ......KUGELÖLER ............. Φ6 ........ 2 602 ..PBD3069-120 ......INNENSECHSKANTSCHRAUBE ......... M8 x 35 mm ....1 603 ..PBD3069-6-03 ......SCHIENE ....................... 1 604 ..PBD3069-6-04 ......HALTERUNG ....................1 605 ..
-
Page 75: Schaltplan
16.0 Schaltplan PBD-3069 ……………….1~230 V, PE, 50 Hz Signal... - Page 76 PBD-3069 Elektrik-Teileliste GEGEN- BESCHREIBUNG SPEZIFIKATION Anz. Hinweis STAND IP-55 AC-1 18A Ue250V Magnetschütz KJD17GF AC-3 15A CE Ue 250V IEN 12A 5E4 Schalter ZH-A Vorwärts/0/Rückwärts UI 690V IEN 20A Schütz LC1K0910 20 VA 230 VAC Transformator 230V/24V/20VA 20 VA 230 VAC...
- Page 77 1.0 Concernant ce manuel Ce manuel est fourni par PROMAC et traite les procédures de fonctionnement et d'entretien sures du tour à métaux PROMAC, modèle PBD-3069. Ce manuel contient des instructions sur l'installation, les précautions de sécurité, les procédures générales de fonctionnement, les instructions d'entretien et la défaillance des pièces.
-
Page 78: Instructions De Sécurité Importantes
N'utilisez pas cette machine à une fin autre que son des cadenas, des interrupteurs principaux ou en retirant les utilisation prévue. Si elle est utilisée à d'autres fins, PROMAC clés de contact. renonce à toute garantie réelle ou implicite et se dégage de 21. - Page 79 Familiarisez-vous avec les consignes de sécurité suivantes utilisées dans ce manuel : AVERTISSEMENT : Cela signifie qu'il y a risque de blessures graves voire mortelles si les précautions ne sont pas respectées. PRECAUTION : Cela signifie qu'il y a risque de blessures mineures et/ou de dommages éventuels de la machine si les précautions ne sont pas respectées.
-
Page 80: Utilisation Prévue Et Limites D'utilisation
Pour éviter tout basculement, la machine doit être boulonnée avec quatre boulons d'ancrage. Si elle est utilisée à d'autres fins, PROMAC renonce à toute garantie réelle ou implicite et se dégage de toute responsabilité en cas de blessure résultant d'une utilisation inadéquate de la scie à ruban. -
Page 81: Spécifications
Les spécifications de ce manuel entrent en vigueur au moment de la publication, mais en raison de notre politique d'amélioration continue, PROMAC se réserve le droit de modifier les spécifications à tout moment et sans préavis, sans aucune obligation de sa part. - Page 82 4.1 Montage du nez de la broche : Figure 4-1 : Montage du nez de la broche 4.2 Configuration du trou du boulon d'ancrage : Figure 4-2 : Configuration du boulon d'ancrage du banc du tour (gauche) & du support (droite) AVERTISSEMENT : Pour éviter tout basculement, la machine doit être boulonnée avec quatre boulons d'ancrage (non fournis).
-
Page 83: Description De La Machine
5.0 Description de la machine Figure 5-2 : Description de la machine R .....Bouton de sélection de la vitesse d'avance S .... Vitesse marche avant/arrêt/marche arrière Figure 5-1 : Description de la machine T ....Activation/Désactivation du réfrigérant U ..Activation/Désactivation de la puissance de broche A ...... -
Page 84: Réglage Et Montage
Le non-respect de cette obligation peut causer 6.2 Contenu d'expédition de graves blessures. Machine Les tours à métaux PBD-3069 ont une tension d'alimentation Support de l'armoire de 1 ~ 230 V, PE, 50 Hz. Les machines sont livrées avec une Installation du réfrigérant prise conçue pour être branchée à... -
Page 85: Rallonges Électriques
cas de doutes concernant la mise à la terre correcte de la 8.2Réglage de l'engrenage à changement de vitesse prise. Ne modifiez pas la fiche fournie avec l'outil. Le fil vert/jaune est le fil du câble d'alimentation. Si le cordon Enlevez le couvercle de la poulie. -
Page 86: Tournage Conique Avec Contre-Poupée
8.3 Tournage conique avec contre-poupée 8.5 Mandrin à trois mors universels Montez la pièce ajustée sur le toc d'entraînement entre les contre-pointes. Le toc d'entraînement est entraîné par la Avec ce mandrin universel, des matériaux hexagonaux, plaque frontale. cylindriques et triangulaires peuvent être serrés (Fig 8-5). Lubrifiez les contre-pointes avec de la graisse pour empêcher toute surchauffe des pointes. -
Page 87: Contre-Pointe Tournante
8.7 Contre-pointe tournante (en option) La contre-pointe tournante (Fig 8-7) est montée dans les roulements à billes. Son utilisation est vivement recommandée pour les vitesses supérieures à 500 tr/min. Figure 8-9 : Lunette mobile Figure 8-7 : Contre-pointe tournante Remarque : Pour éjecter contre-pointe... -
Page 88: Commandes De Fonctionnement
10.2 Mandrinage 9.0 Commandes de fonctionnement Ne dépassez pas la vitesse maximale du dispositif de maintien de la pièce. Voir la figure 9-1 : Les dents des mors et la couronne dentée doivent toujours être entièrement engagées. Sinon, les mors de mandrin R .. -
Page 89: Réglage De L'outil De Coupe
10.3 Réglage de l'outil de coupe 10.5 Tournage manuel L'angle de coupe est correct lorsque l'arête tranchante est La course du tablier (AA, Fig 10-6), la course de la glissière conforme à l'axe central de la pièce. Utilisez le point des transversale (BB) et de la glissière supérieure (DD) peut être contre-pointes comme une jauge et des rondelles sous l'outil effectuée sur l'avance longitudinale et transversale. -
Page 90: Filetage
- Lorsque l'outil atteint la fin de la coupe, arrêtez le moteur et Exemple de tournage longitudinal : en même temps sortez l'outil de sorte que le diamètre de Fonctionnement Avance/trBouton de sélection de l'avance filetage soit supprimé. Dépose du matériau 0,34mm......... -
Page 91: Opération De Perçage
10.8 Opération de perçage 11.0 Entretien par l'utilisateur Utilisez un mandrin de perçage avec un arbre MT3 (option) pour serrer les forets à centrer et les forets hélicoïdaux dans la contre-poupée (Fig 10-11). AVERTISSEMENT : Avant toute intervention sur la machine, débranchez-la de l'alimentation électrique et retirez la fiche de la prise de courant. -
Page 92: Réajustements
B) Réglage de la glissière transversale et de la glissière supérieure : Chaque glissière est équipée d'une glissière de guidage (C, Fig 11-3) et peut être réglée avec les vis (E) équipées de contre- écrous (D). Figure 11-1 : Remplissage d'huile de la boîte de vitesses Changez l'huile dans la boîte de vitesses toutes les 1 000 heures de fonctionnement. -
Page 93: Dépannage
Mettez l'emballage au rebut en respectant les consignes environnementales. Mettez au rebut le réfrigérant en respectant les consignes environnementales. Votre appareil contient des matériaux précieux pouvant être récupérés ou recyclés. Veuillez les laisser à un institut spécialisé. 14.0 Accessoires disponibles Reportez-vous à la liste de prix PROMAC. -
Page 94: Pièces De Rechange
15.0 Pièces de rechange PBD-3069 Vue explosée -1... - Page 95 PBD-3069 Liste de pièces de la vue explosée -1 Index Pièce N° N° Description Taille Qté 101 ..PBD3069-1-01......ETIQUETTE ....................1 102 ..PBD3069-1 ......VIS A SIX PANS CREUX ..........DIN 912 Φ4 × 10... 6 103 ..PBD3069-1-03......BOULON ....................... 2 104 ..
- Page 96 PBD-3069 Vue explosée -2...
- Page 97 PBD-3069 Liste de pièces de la vue explosée -2 Index Pièce N° N° Description Taille Qté 201..PBD3069-2-01......ARBRE DE TRANSMISSION..................1 202..PBD3069-2-02......PALIER ................16170........ 2 203..PBD3069-19 ........JOINT TORIQUE ............... 18001400......2 204..PBD3069-2-04......ECROU DIN 1804 ............. M16 × 1,5......2 205..
- Page 98 PBD-3069 Liste de pièces de la vue explosée -2 Index Pièce N° N° Description Taille Qté 250..PBD3069-37 ........JOINT TORIQUE ............... 1800690......3 251..PBD3069-2-51......FOURCHETTE ......................1 252..PBD3069-2-52......ENGRENAGE ......................1 253..PBD3069-38 ........CIRCLIP ................Φ10........1 254..PBD3069-2-54......PALIER ................1010........2 255..
- Page 99 PBD-3069 Vue explosée -3...
- Page 100 PBD-3069 Liste de pièces de la vue explosée -3 Index Pièce N° N° Description Taille Qté 301 ..PBD3069-3-01......VIS ................DIN 912 M8 × 30 ..8 302 ..PBD3069-3-02......BASE POIGNEE....................1 303 ..PBD3069-3-03......POIGNEE....................... 1 305 ..PBD3069-3-05......RONDELLE ....................1 306 ..
- Page 101 PBD-3069 Liste de pièces de la vue explosée -3 Index Pièce N° N° Description Taille Qté 350 ..PBD3069-3-50......ROUE A MAIN....................1 351 ..PBD3069-3-51......RONDELLE ....................1 352 ..PBD3069-59 ......VIS A SIX PANS CREUX ..........DIN 912 M5 × 10 ..1 353 ..
- Page 102 PBD-3069 Vue explosée -4...
- Page 103 PBD-3069 Liste de pièces de la vue explosée -4 Index Pièce N° N° Description Taille Qté 401..PBD3069-4-01......ENGRENAGE ......................1 402..PBD3069-69 ........GOUPILLE ................ DIN 1481 Φ5 × 24 ..... 1 403..PBD3069-4-03......ENGRENAGE ......................1 404..PBD3069-4-04......RONDELLE ......................... 1 405..
- Page 104 PBD-3069 Liste de pièces de la vue explosée -4 Index Pièce N° N° Description Taille Qté 450..PBD3069-4-50......BASE .......................... 1 451..PBD3069-86 ........VIS A SIX PANS CREUX ............. DIN 912-M5 × 10....6 452..PBD3069-4-52......POIGNEE DE L'ARBRE ....................1 453..
- Page 105 PBD-3069 Vue explosée -5...
- Page 106 PBD-3069 Liste de pièces de la vue explosée -5 Index Pièce N° N° Description Taille Qté 501..PBD3069-5-01......FOURREAU ........................ 1 502..PBD3069-97 ........CLAVETTE ........................1 503..PBD3069-5-03......ECROU ........................1 504..PBD3069-98 ........VIS A SIX PANS CREUX ............. DIN 912-M6 × 10....1 505..
- Page 107 PBD-3069 Vue explosée -6...
- Page 108 PBD-3069 Liste de pièces de la vue explosée -6 Index Pièce N° N° Description Taille Qté 601 ..PBD3069-119 ......HUILEUR DE BILLES..........Φ6 ........ 2 602 ..PBD3069-120 ......VIS A SIX PANS CREUX ..........M8 × 35 mm....1 603 ..PBD3069-6-03......RAIL ......................1 604 ..
-
Page 109: Schémas De Câblage
16.0 Schémas de câblage PBD-3069 ……………….1~230V, PE, 50Hz... - Page 110 PBD-3069 Liste des pièces électriques ELEMENT DESCRIPTION TYPE SPECIFICATION Qté Remarque IP-55 AC-1 18A Ue250V Contacteur magnétique KJD17GF AC-3 15A CE Ue 250 V IEN 12 A 5E4 Interrupteur ZH-A avant/0/arrière UI 690 V IEN 20 A Contacteur LC1K0910 20 VA 230 V CA...
- Page 111 PBD-3069 - Detailed content of delivery / Detaillierter Lieferumfang / Contenu détaillé de la livraison Part no./Sach-Nr./Réf. Description Bezeichnung Description Size/Größe/Dim. Qty/Qté. Menge PBD-3069 Machine Maschine Machine Operating instructions and parts Manuel Utilisateur et Betriebsanleitung und Stückliste manual Nomenclature Chip tray Spänewanne...
- Page 112 Quadruple Tool Holder Spanner Werkzeughalterschlüssel Clé du porte-outils Thread dail Ritzel mit Gewinde u. Keilnut Pignon fileté cannelé HSS Cutting tools HSS-Schneidwerkzeuge Outils coupants HSS Special accessory / Sonderzubehör / Accessoires spéciaux PBD3069-715 Follow rest Mitlaufende Lünette Lunette à suivre PBD3069-166 Face plate Stahlplatte...
- Page 113 Vous pouvez trouver de plus amples détails sur la garantie dans les conditions générales (CG). Les CG peuvent être envoyées sur demande par poste ou par e-mail . Tool France PROMAC, JPW Industries-Europe se réserve le droit d'effectuer des changements sur le produit et les accessoires à tout moment.
Need help?
Do you have a question about the PBD-3069 and is the answer not in the manual?
Questions and answers