Advertisement
INSTALLATION INSTRUCTIONS C-VS-2000-DUR-1
2018-2020 Dodge Durango with Standard Shifter
TOOLS REQUIRED:
Phillips Screw Driver T-20 Torx bit
Metric Socket set
INSTALLATION PARTS AND MOUNTING HARDWARE:
QTY
DESCRIPTION
1
Main Console housing
1
Top console Bezel
1
Main floor mount bracket
1
Gear shift stand
1
Shifter mount bracket
1
Driver side trim panel
1
Passenger side trim panel
2
Retaining bracket
1
Gear shift boot spacer
1
Gear shift boot plate
1
2" x 2 ½" x 8" foam block
8
# 8 x 3/8" Torx head screw
2
12 volt socket
2
10-32 Nylock nut
6
10-32 Keps nut
12
1/4 serrated nut
20
1/4 Flat washer
6
1/4 Lock washer
4
1/4 x 1/2" Carriage bolt
6
1/4 x 1/2" Hex head bolt
10
1/4 x 3/4" Hex head bolt
4
1/4" x 1" Hex head bolt
2
10-32 x 1/2" Phillips pan head machine screw
4
8-32 x 3/8" Phillips pan head machine screw
4
# 8 x 1/4" Flat head sheet metal screw
Check for obstructions (Wires, brake lines, fuel tank, etc.) before drilling any holes!
20" VEHICLE SPECIFIC CONSOLE for
Standard Socket set
Wire crimping tool
Wire cutters
Read all instructions before installing any Havis, Inc. products.
Use hardware provided with install kit
PART#
CM008968
CM010022
CM008969
CM008994
CM008995
CM008996
CM005270
CM008970
CM008971
CM007533
CM86508
CM216560
GSM30015
GSM30028
GSM30023
GSM31005
GSM31026
GSM31999
GSM33000
GSM33001
GSM33002
GSM33118
GSM33137
GSM33178
Always
!
9/64"Allen wrench
Trim removal tool
C-VS-2000-DUR-1_INST_8-17
Advertisement
Table of Contents

Related Manuals for Havis C-VS-2000-DUR-1


Summary of Contents for Havis C-VS-2000-DUR-1
- Page 1 # 8 x 1/4” Flat head sheet metal screw GSM33178 Always Read all instructions before installing any Havis, Inc. products. Check for obstructions (Wires, brake lines, fuel tank, etc.) before drilling any holes! Use hardware provided with install kit...
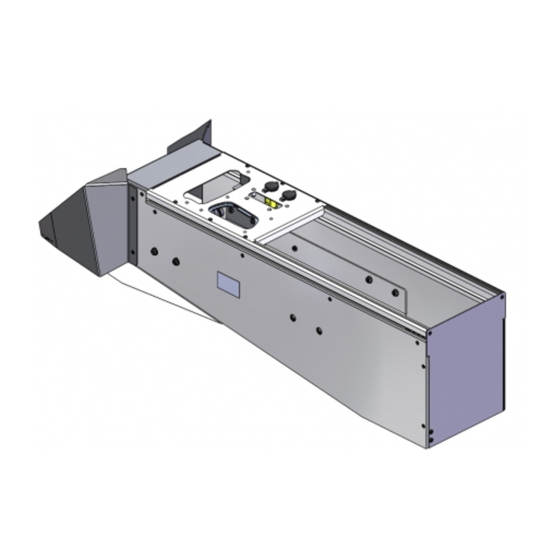
- Page 2 C-VS-2000-DUR-1 CM008996 Passenger side trim panel (Main Housing Assembly) CM005270 CM008995 Retaining brackets Driver side trim panel CM008968 Top console bezel CM005005 Floor mount bracket CM008970, CM008971 Gear shift boot spacer, Gear shift boot plate CM008969 Gear shift stand (Inside console not shown)
- Page 3 View of OEM console prior to Loosen Allen head bolt and remove Carefully pop up shifter boot and removal. shifter handle from stalk. unplug sensor from rear of boot. (9/64” Allen wrench) Carefully unclip and remove top Unbolt shifter assembly from center Carefully pop out coin tray from console top panel.
- Page 4 Remove bolt cover at lower rear Remove bolts at lower front of Remove screws for the rear side end of console. (one each side). console and the screws at forward trim panels. Remove bolts and save. lower dash. (save hardware) (Phillips screwdriver) (10 mm socket) (10 mm and 7 mm sockets)
- Page 5 Attach gear shift stand to shifter Insert 2” x 2.5” x 8” foam block into Bolt the main floor bracket to OEM mount bracket using four (4) 1/4" x lower dash air duct to prevent air mount locations with the previously 1/2"...
- Page 6 View of OEM top console assembly Attach passenger side trim panel to Attach driver side trim panel to console housing with # 8 x 1/4" flat previously removed. console housing with # 8 x 1/4" flat head sheet metal screws. head sheet metal screws.
- Page 7 Reattach O.E.M. harnesses and Tighten Allen head bolt to OEM Carefully place top faceplate onto plugs. shifter stalk. (9/64” Allen wrench) console and attach with # 8 x 3/8” Snap shifter boot down into shifter Torx head screws. Slide shifter back boot plate on and plug in shifter boot to OEM harness...
Need help?
Do you have a question about the C-VS-2000-DUR-1 and is the answer not in the manual?
Questions and answers