Advertisement
C‐DMM‐3006 Flip up Dash Monitor Mount
2017‐2020 F‐250, 350, 450 Pickup, F‐450 and 550 Cab Chassis,
2015‐2020 Ford F‐150 Retail, Responder & SSV,
**Does NOT work with OEM top center dash speaker.
OEM top Tray and speaker assembly must be removed and not used. **
TOOLS REQUIRED:
Ratchet Wrench
Socket Set
HARDWARE and PARTS:
QTY DESCRIPTION
1
Main F‐Series frame bracket
1
Forward support bracket
1
Main tray replacement bracket
1
Side mounting bracket
1
1.0625" Dome plug
1
1/4" Serrated nut
2
M6 Hex nut
1
1/4" x 3/4" Bolt
2
#10 Phillips pan head sheet metal screw
3
10‐32 x 1/2" Machine screw
5
#10 Flat washer
1
VESA rotator plate
1
PVC washer
2
1/4" Plastic washer
3
1/4" Steel washer
2
1/4" Nylock nut
The C‐DMM‐3000 swivel plate accepts C‐MM‐301 offset bracket used with C‐MM‐2XX adaptors.
C‐MM‐2XX series adaptor brackets are not needed for most VESA 75 and other Havis Docking Station
CM009068 VESA rotator plate gives additional positioning options, but is not required depending on
INSTALLATION INSTRUCTIONS
2018‐2020 Expedition Retail & SSV
Dash panel removal tool
Phillips screwdriver
mounting applications.
mounting preference.
Read all instructions before installing any Havis, Inc. products.
Use hardware provided with install kit
Open End Wrench ‐ 7/16"
Plastic cutting tool (optional)
PART#
CM009455
CM009514
CM009510
CM009454
GSM20017‐1
GSM30023
GSM30201
GSM33001
GSM33196
GSM33118
GSM31003
CM009068
CM008582
CM86600
GSM31005
GSM30016
Notes:
Always
!
C‐DMM‐3006_INST_9‐18
Advertisement
Table of Contents

Related Manuals for Havis C-DMM-3006


Summary of Contents for Havis C-DMM-3006
-
Page 1: Installation Instructions
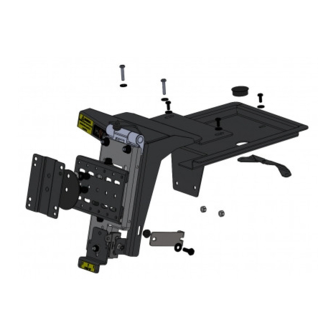
PVC washer CM008582 2 1/4" Plastic washer CM86600 3 1/4" Steel washer GSM31005 2 1/4" Nylock nut GSM30016 Notes: The C‐DMM‐3000 swivel plate accepts C‐MM‐301 offset bracket used with C‐MM‐2XX adaptors. C‐MM‐2XX series adaptor brackets are not needed for most VESA 75 and other Havis Docking Station mounting applications. CM009068 VESA rotator plate gives additional positioning options, but is not required depending on mounting preference. Always ! Read all instructions before installing any Havis, Inc. products. Use hardware provided with install kit C‐DMM‐3006_INST_9‐18 ... - Page 2 C‐DMM‐3006 Assembly GSM20017‐1 CM009510 GSM33196 1.0625” Dome plug Main tray #10 Sheet metal screw replacement bracket GSM31003 #10 Flat washer GSM33118 10‐32 x 1/2" screw GSM31003 GSM33118 #10 Flat washer GSM31005 – Flat washer 10‐32 x 1/2" screw CM86600 – Nylon flat washer GSM31003 GSM30016 – Nylock nut #10 Flat washer CM009514 Forward support bracket GSM30201 M6 Hex nut CM009454 Side mounting CM009068 bracket VESA rotator CM008582 GSM33001 GSM30023 plate PVC washer 1/4" x 3/4 bolt 1/4" Serrated nut ...
- Page 3 Remove two (2) fasteners from the forward section of the tray. (7mm socket) View of the dash before installation Note: If equipped with center channel speaker, simply pop up grill to access screws. Speaker will not be reused. Lift up and remove OEM plastic tray. Remove two (2) fasteners from upper display area. This tray will not be reused. (7mm socket) Carefully remove center HVAC and radio Loosen (2) OEM fasteners on the right of the control trim bezel. display and attach side mounting bracket. C‐DMM‐3006_INST_9‐18 ...
- Page 4 The side trim inner flange can be notched if Re‐install side mounting bracket. desired for a better fit. Re‐install center HVAC and radio control trim. Mark and notch area for bracket clearance. Using previously removed 7mm head hardware. Attach Tighten hardware. If you desire to run wiring up forward mounting bracket to factory speed clips. through dash, it should be done prior to next steps. Place main tray replacement bracket in opening and line Install (2) M6 hex nuts over factory studs and tighten. up to factory studs in dash. Run wires through hole or cover hole with supplied plug. C‐DMM‐3006_INST_9‐18 ...
- Page 5 Place main hinge frame on top and loosely attach to tray with Attach forward end of tray with 10‐32 x 1/2" 10‐32 x 1/2" machine screws and flat washers. Attach to OEM machine screw and #10 flat washer. speed nuts with #10 sheet metal screws and flat washers. Double check and tighten all hardware. Line up the lower frame to the side support bracket Make sure latching is working properly. and attach with 1/4" bolt, flat washer and serrated nut. Attach VESA swivel plate to the back of Dock or Dock bracket. Run wire harness and test computer. Determine desired position for your specific computer and attach Installation is now complete. to DMM swivel plate using nylon washers, steel washers, and nylock nuts. Tighten so dock is snug, but rotates smoothly. C‐DMM‐3006_INST_9‐18 ...
Need help?
Do you have a question about the C-DMM-3006 and is the answer not in the manual?
Questions and answers