Table of Contents
Advertisement
Quick Links
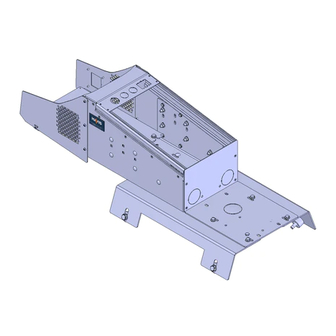
INSTALL INSTRUCTIONS C-VS-1500-TAH-1
2015-2018 Chevy Tahoe Police Pursuit Vehicle (PPV)
Vehicle Specific Console (9" inches wide) 15" inches of Equipment mounting space
Note:
Console only includes an additional 13" inches of customer specified equipment brackets
Tools Required:
Phillips Screw Driver
Metric Socket set
Parts and Mounting Hardware:
1 – Main console housing
CM007918 Sub Assembly
2 – Floor bracket
2 – 1/2" Aluminum spacer for floor bracket (rear)
2 – 3/4" Aluminum spacer for floor bracket (front)
1 – Driver side trim panel
1 – Passenger side trim panel
1 – Electrical accessory mounting plate
1
– Rear mounting plate
1 – 2" inch panel for OEM 12 volt socket and Aux module
2 – 7/8" hole plug (included with C-EB20-USD1-1P)
1 – 2" Dome plug for rear mounting plate
16 - #8 x 3/8 Torx head sheet metal screws
8 - 1/4" serrated nut
2 - 1/4" Flat washer
8 – 1/4" x 3/4" Carriage bolt
10 - 1/4" x 3/4" Hex bolt
4 – 3/8" Flat washer
4 – 10mm x 45mm Hex bolts (if floor is already threaded)
4 – 3/8 x 1.75" Hex bolt (if floor mount location is not threaded) GSM33303
• Read all instructions before installing any Havis, Inc products.
2" inches of mounting space is for the supplied Aux panel.
and filler panels.
Standard Socket set
Wire Cutters
ALWAYS!
• Use hardware provided with install kit
T-20 Torx Bit
Wire Crimping tool
CM007917
CM006193
CM003200
CM003216
CM008222
CM009197
CM006415
CM006831
C-EB20-USD1-1P
CM86430
GSM20068
CM86508
GSM30023
GSM31005
GSM32000
GSM33001
GSM31149
GSM33733
C‐VS‐1500‐TAH‐1_INST_11‐18
Advertisement
Table of Contents

Subscribe to Our Youtube Channel
Related Manuals for Havis C-VS-1500-TAH-1


Summary of Contents for Havis C-VS-1500-TAH-1
- Page 1 4 – 10mm x 45mm Hex bolts (if floor is already threaded) GSM33733 4 – 3/8 x 1.75” Hex bolt (if floor mount location is not threaded) GSM33303 ALWAYS! • Read all instructions before installing any Havis, Inc products. • Use hardware provided with install kit C‐VS‐1500‐TAH‐1_INST_11‐18...
- Page 2 C-VS-1500-TAH-1 (Assembly) CM009197 Passenger side trim panel Electrical Accessory mounting plate Between trim panels CM006415 2” inch panel # C-EB20-USD1-1P For OEM 12 volt socket and Aux module. Also has two (2) 7/8” holes for optional 12 volts sockets. Order 12 volts socket kit...
- Page 3 Install CM006193 floor brackets to existing OEM mount points. Use View of 2015 Tahoe transmission hump 10mm x 45mm bolts and 3/8” flat washers if the vehicle had a factory center console or seat installed. Use 3/8” x 1.75” self-threading bolts and between front seats washers if vehicle does not have the center seat or console.
- Page 4 Note: This photo shows the OEM 120 volt socket mounted in the side Attach driver side trim panel to console with trim after metal knockout plate has been removed. OEM wire ties and four (4) #8 x 3/8 Torx head sheet metal screws. tape may need to be cut in order to have enough wire to extend to this Attach passenger side trim panel the same location.
- Page 5 Optional C-1000 enclosed console provides an Installation complete additional 10” of mounting space. View of C-HDM-204 mounted to the console View of C-HDM-204 mounted to the outside of housing with C-MD-302, PKG-KB- 106, and console housing with C-MD-302, PKG-KB- DS-GTC-201. 106, and DS-GTC-201.
Need help?
Do you have a question about the C-VS-1500-TAH-1 and is the answer not in the manual?
Questions and answers