Advertisement
Quick Links
INSTALL INSTRUCTIONS for PT-A-502
FORD ECONOLINE VAN REAR AIR VENT ADAPTER KIT
TOOLS REQUIRED:
Ratcheting wrench
Standard & Metric Socket Set
HARDWARE:
QTY DESCRIPTION
1
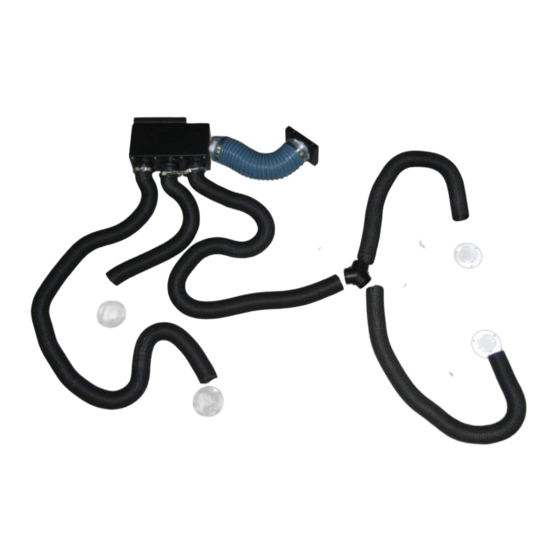
Heat/Cool Adaptor box assembly
1
Ford Rear Air Hose Adapter
1
Ford Heat/Cool Box mounting channel
Hose Clamps 3"
10
4" Hose Clamps
2
4'
4" Diameter Hose
4
Vent cover w/ hose adapter assembly
1
2 ½" "Y" Duct Connector
29
2 ½" Air Duct Hose
#10 X ¾" Sheet Metal Screws
20
20
#10 Star Washers
20
#10 x ¾" Flat Head Sheet Metal Screws
15" Wire Tie
20
Read all instructions before installing any Havis, Inc. products.
Check for obstructions (Wire, brake lines, fuel tank, etc.) before drilling any holes!
Use hardware provided with install kit
Screwdriver set
Wire cutters
PART #
KKM01152
KKM01153
KKM99071
GSM20045
GSM20042
GSM40100
KKM0403-001
PRM97483
PRM97475
GSM33185
GSM31134
GSM34151
GSM20036
Always
!
Advertisement

Subscribe to Our Youtube Channel
Related Manuals for Havis PT-A-502


Summary of Contents for Havis PT-A-502
- Page 1 #10 x ¾” Flat Head Sheet Metal Screws GSM34151 15” Wire Tie GSM20036 Always Read all instructions before installing any Havis, Inc. products. Check for obstructions (Wire, brake lines, fuel tank, etc.) before drilling any holes! Use hardware provided with install kit...
- Page 2 Remove the hex head screw on Remove the upper vent cover Remove the hex head lag bolt the vent cover completely. It will not be re-used. located above the blower motor of the OEM rear HVAC unit Remove the hex head lag bolt Remove the hex head screws on Remove the vent cover.
- Page 3 Attach the (2) #10 x ¾” sheet Align the assembly so the hole in At the lower vent side of the the assembly lines up with the “J metal screws at the location OEM unit, attach the hose plate as clip”.
- Page 4 During main insert installation you will be Align the three mount holes of the vent adapter prompted to return to the PT-A-502 instruction cover with the pre-punched holes in ceiling. Attach each vent to ceiling using #8 x 3/8” flat head to attach the hose to the vent adapter brackets.
Need help?
Do you have a question about the PT-A-502 and is the answer not in the manual?
Questions and answers