Table of Contents
Advertisement
Available languages
Available languages
Quick Links
Advertisement
Chapters
Table of Contents

Related Manuals for ProLights SMARTOWER


Summary of Contents for ProLights SMARTOWER
- Page 1 SMARTOWER SMARTOWERPACK LED BATTERY LIGHTING USER MANUAL MANUALE UTENTE EN - IT...
- Page 2 All rights reserved by Music & Lights S.r.l. No part of this instruction manual may be reproduced in any form or by any means for any commercial use. In order to improve the quality of products, Music&Lights S.r.l. reserves the right to modify the characteristics stated in this instruction manual at any time and without prior notice.
-
Page 3: Table Of Contents
3. 13 Pattern 3. 14 Manual mode 3. 15 DMX Control Battery Guide SMARTOWER: SMARTOWERPACK: • SMARTOWER • 6 pz SMARTOWER Packing content • M10 ring for security • Flight case with integrated battery cable charger kit • Single charger •... -
Page 4: General Instructions
SMARTOWER - SMARTOWERPACK WARNING! Before carrying out any operations with the unit, carefully read this instruction manual and keep it with cure for future reference. It contains important information about the installation, usage and maintenance of the unit. SAFETY General instruction •... -
Page 5: Introduction
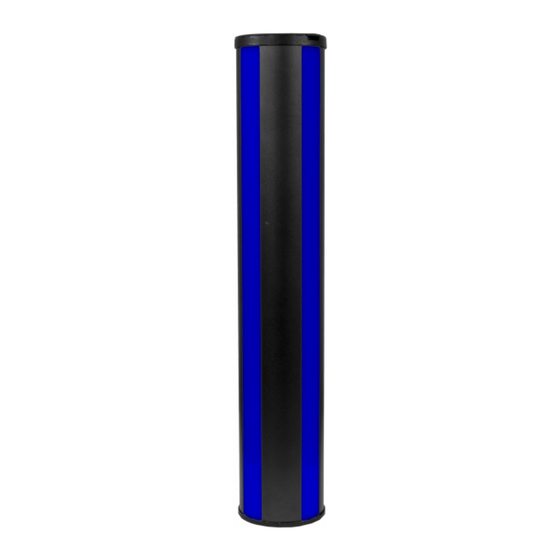
- 1 - INTRODUCTION 1.1 DESCRIPTION SMARTOWER is a new concept of outdoor portable pixel and decor luminaire, featuring a full cable-free operation and delivering a multitude of visual effects projecting a full 360°. SMARTOWER consists of a vertical tubular housing with pixel battens on 4 sides delivering both colourful accent lighting as well as eye-catching visual effects through the many built-in pixel macros which can be easily individually customised. - Page 6 SMARTOWER - SMARTOWERPACK • Operating temperature: -20° ~ +40° • Flicker: flicker free operation BATTERY • Battery: 14.8V Lithium batteryV • Estimated battery life in colour change mode up to: 12h • Estimated battery life in single colour mode up to: 18h •...
-
Page 7: Smartowerpack (Optional)
SMARTOWER - SMARTOWERPACK 1.3 SMARTOWERPACK (optional) The pack includes: • 6 pcs SMARTOWER • 1 Flight case with integrated battery charger kit • 1 IR controller • 1 PowerCON power cable Technical drawing NOTE Always charge with flight-case open Fig.2... -
Page 8: Operating Elements And Connections
SMARTOWER - SMARTOWERPACK 1.4 OPERATING ELEMENTS AND CONNECTIONS 1. ON/OFF SWITCH 2. IR RECEIVER SIGNAL 3. CONTROL PANEL with LCD display and 4 button used to access the control panel functions and manage them. 4. TOP COVER 5. HOLE for tripode stand. -
Page 9: Installation
- 2 - INSTALLATION 2.1 MOUNTING The SMARTOWER can be placed on a solid plane. Moreover, thanks to the (optional) extendable stand, it can exceed a height of 1.6m (fig.4). As you can see in the illustration, you have to insert the coupling system in the appropriate seat of the plate where it is locked with a clockwise rotation (until the stop). -
Page 10: Functions And Settings
- 3 - FUNCTIONS AND SETTINGS 3.1 OPERATION Switch on the SMARTOWER with the power switch. The unit is ready for operation and can be operated via a DMX controller or it independently performs its show program in succession. After operation, switch off the unit with the power switch. -
Page 11: Menu Structure
SMARTOWER - SMARTOWERPACK 3.4 MENU STRUCTURE MENU ð ð ð CONTROL Address W-DMX Value (1-512) Defautl: ð ð DMX Mode Mode 8CH/15CH/18CH 18CH ð ð Wireless Reset Connect YES/NO Defautl: No Defautl: ð ð ð Screen Backlight Off-99m (02m) ð... -
Page 12: Dmx Configuration
For operation via light control unit with DMX512 protocol, is sufficient connect the controller to SMARTOW- ER. To able to operate the SMARTOWER with a light controller, adjust the DMX start address for the first a DMX channel. If e. g. address 33 on the controller is provided for controlling the function of the first DMX channel, adjust the start address 33 on the SMARTOWER. -
Page 13: Display Settings
SMARTOWER - SMARTOWERPACK 3.7 DISPLAY SETTINGS You can change the following parameters related to the display, following the same procedure: • Press the ENTER button to access the main menu. • Press the UP / DOWN keys to scroll the menu, select the Set icon, then press the ENTER button to enter the next menu. -
Page 14: Controller Ir
SMARTOWER - SMARTOWERPACK 3.9 CONTROLLER IR Make sure to point the controller directly at the IR receiver near the switch to turn on/off the SMARTOWER. Use the keys as below to access the functions. FUNCTION ISTRUCTIONS POWER Press this button for one time, the fixture will be power on and all LED will be red.The fixture will be power off if you press it twice. -
Page 15: Fixture Information
SMARTOWER - SMARTOWERPACK 3.10 FIXTURE INFORMATION To view all the information on the device, proceed as follows: • Press the ENTER button to access the main menu. • Press the UP/DOWN button to scroll the menu, select the icon Information, then press the ENTER button to enter the next menu. -
Page 16: Dmx Control
SMARTOWER - SMARTOWERPACK 3.15 DMX CONTROL SMARTOWER SMARTOWER FUNCTION Value 15CH 18CH LED STRIP SHUTTER Shutter closed 000 - 010 Strobe effect slow to fast 011 - 082 No function (shutter open) 083 - 093 Pulse-effect in sequences 094 - 163... - Page 17 SMARTOWER - SMARTOWERPACK SMARTOWER Value FUNCTION 15CH 18CH LED STRIP VIRTUAL COLOR2 (Only On Color Bounce) Black 000 - 000 001 - 013 014 - 027 Green Blue 028 - 041 042 - 055 White Pastel red 056 - 069...
- Page 18 SMARTOWER - SMARTOWERPACK SMARTOWER Value FUNCTION 15CH 18CH LED STRIP BACKGROUND No Function 000 - 003 Foreground Color 004 - 255 LED STRIP BACKGROUND DIMMER Dimmer 0% ~ 100% 000 - 255 LED STRIP BACKGROUND SHUTTER Shutter closed 000 - 010...
-
Page 19: Battery Guide
SMARTOWER - SMARTOWERPACK Battery Guide New Lithium Battery Initialisation Any new fixture containing a Lithium battery should be initialised when first purchased to maximise its battery life. To do this: 1. Fully charge the unit for a minimum of 5 to 6 hours. - Page 20 Music & Lights S.r.l. si riserva ogni diritto di elaborazione in qualsiasi forma delle presenti istruzioni per l’uso. La riproduzione - anche parziale - per propri scopi commerciali è vietata. Al fine di migliorare la qualità dei prodotti, la Music&Lights S.r.l. si riserva la facoltà di modificare, in qualunque momento e senza preavviso, le specifiche menzionate nel presente manuale di istruzioni.
- Page 21 3. 14 Modalità Manual 3. 15 Canali DMX Guida all'uso della batteria SMARTOWER: SMARTOWERPACK: • SMARTOWER • 6 pcs SMARTOWER Contenuto dell'imballo: • M10 Ring per cavo di sicurezza • flight case with integrated bat- • Carica-batterie tery charger kit •...
-
Page 22: Avvertenze Generali
SMARTOWER - SMARTOWERPACK ATTENZIONE! Prima di effettuare qualsiasi operazione con l’unità, leggere con attenzione questo manuale e conservarlo accuratamente per riferimenti futuri. Contiene informazioni importanti riguardo l’installazione, l’uso e la manutenzione dell’unità. SICUREZZA Avvertenze generali • I prodotti a cui questo manuale si riferisce sono conformi alle Direttive della Comunità Europea e per- tanto recano la sigla . -
Page 23: Introduzione
- 1 - INTRODUZIONE 1.1 DESCRIZIONE SMARTOWER is a new concept of outdoor portable pixel and decor luminaire, featuring a full cable-free operation and delivering a multitude of visual effects projecting a full 360°. SMARTOWER consists of a vertical tubular housing with pixel battens on 4 sides delivering both colourful accent lighting as well as eye-catching visual effects through the many built-in pixel macros which can be easily individually custo- mised. - Page 24 SMARTOWER - SMARTOWERPACK • Strobo / shutter: 1-25 Hz, elettronico • Temperatura d’esercizio: -20° ~ +40° • Flicker: funzionamento senza sfarfallio BATTERIA • Batteria: 14.8V Lithium batteryV • Autonomia in modalità cambia colori, fino a: 12h • Autonomia in modalità singolo colori, fino a: 18h •...
-
Page 25: Smartpowerpack (Opzionale)
SMARTOWER - SMARTOWERPACK 1.3 SMARTOWERPACK (opzionale) Il pack include: • 6 pz SMARTOWER • 1 flight case con kit ricarica-batterie incluso • 1 controller IR • 1 cavo di alimentazione PowerCON Disegno tecnico NOTA Ricaricare sempre con flight-case aperto Fig.2... -
Page 26: Elementi Di Comando E Di Collegamento
SMARTOWER - SMARTOWERPACK 1.4 ELEMENTI DI COMANDO E DI COLLEGAMENTO 1. PULSANTE ON/OFF 2. SEGNALE RICEVITORE IR 3. PANNELLO DI CONTROLLO con display LCD e 4 pulsanti per l'accesso e gestione delle diverse funzioni. 4. TOP COVER 5. FORO per connessione a stativo 6. -
Page 27: Installazione
- 2 - INSTALLAZIONE 2.1 MONTAGGIO Lo SMARTOWER può essere collocato su un piano solido. Inoltre grazie a allo stativo (optional) estendibile può superare un’altezza di 1,6m (fig.4). Come si vede nell’ illustrazione, bisogna inserire il sistema di aggan- cio nell’apposita sede della piastra dove viene bloccata con una rotazione in senso orario (fino all’arresto). -
Page 28: Funzioni E Impostazioni
DMX di comando luce oppure svolgere autonomamente il suo programma. Dopo l’uso spegnere l’unità attraverso il medesimo interruttore. 3.3 IMPOSTAZIONE BASE Il SMARTOWER dispone di un display OLED e di 4 pulsanti per l’accesso alle funzioni del pannello di con- trollo e la loro gestione (fig.5). 3.2 PROCESSO DI RICARICA Per ricaricare lo SMARTOWER, utilizzare il flight-case oppure servirsi del connettore IP per il caricatore rapido magnetico. -
Page 29: Struttura Menu
SMARTOWER - SMARTOWERPACK 3.4 STRUTTURA MENU MENU ð ð ð CONTROL Address W-DMX Value (1-512) Defautl: ð ð DMX Mode Mode 8CH/15CH/18CH 18CH ð ð Wireless Reset Connect YES/NO Defautl: No Defautl: ð ð ð Screen Backlight Off-99m (02m) ð... -
Page 30: Indirizzamento Dmx
Un esempio con indirizzo 33 di start in fig.6. 3.6 MODALITÀ DMX SMARTOWER dispone di 3 configurazioni dei canali DMX a cui si può accedere dal pannello di controllo. • Premere il tasto ENTER per accedere al menu principale. -
Page 31: Impostazioni Display
SMARTOWER - SMARTOWERPACK quindi premere il tasto ENTER per confermare la scelta. • Premere il tasto ESC per tornare indietro o attendere alcuni secondi per uscire dal menu di impostazione. 3.7 IMPOSTAZIONI DISPLAY È possibile modificare i seguenti parametri, relativi al display, seguendo la medesima procedura: •... -
Page 32: Controller Ir
SMARTOWER - SMARTOWERPACK 3.9 CONTROLLER IR Assicurarsi di puntare il telecomando direttamente verso il ricevitore IR posto vicino l’interruttore per ac- cendere/spegnere lo SMARTOWER. Utilizzare i tasti come di seguito per accedere alle funzioni. FUNZIONE ISTRUZIONI Premendo questo pulsante per una volta, il dispositivo sarà acceso POWER e tutti i LED saranno rossi. -
Page 33: Informazioni Sul Dispositivo
SMARTOWER - SMARTOWERPACK 3.10 INFORMAZIONI SUL DISPOSITIVO Per visualizzare tutte le informazioni sul dispositivo procedere nel seguente modo: • Premere il tasto ENTER per accedere al menu principale. • Premere il tasto UP/DOWN per selezionare l’icona Information, quindi premere il tasto ENTER per acce- dere al menu successivo. -
Page 34: Canali Dmx
SMARTOWER - SMARTOWERPACK 3.15 CANALI DMX SMARTOWER SMARTOWER FUNCTION Value 15CH 18CH LED STRIP SHUTTER Shutter closed 000 - 010 Strobe effect slow to fast 011 - 082 No function (shutter open) 083 - 093 Pulse-effect in sequences 094 - 163... - Page 35 SMARTOWER - SMARTOWERPACK SMARTOWER Value FUNCTION 15CH 18CH LED STRIP VIRTUAL COLOR2 (Only On Color Bounce) Black 000 - 000 001 - 013 014 - 027 Green Blue 028 - 041 042 - 055 White Pastel red 056 - 069...
- Page 36 SMARTOWER - SMARTOWERPACK SMARTOWER Value FUNCTION 15CH 18CH LED STRIP BACKGROUND No Function 000 - 003 Foreground Color 004 - 255 LED STRIP BACKGROUND DIMMER Dimmer 0% ~ 100% 000 - 255 LED STRIP BACKGROUND SHUTTER Shutter closed 000 - 010...
-
Page 37: Guida All'uso Della Batteria
SMARTOWER - SMARTOWERPACK Guida all’uso della batteria Inizializzazione di una nuova batteria Ogni nuovo faro contenente una batteria al litio, dovrebbe essere inizializzata al primo utilizzo per massimizzarne l’efficienza. Per fare questo: 1. Caricare completamente l’unità per un minimo di 5-6 ore. - Page 40 MUSIC & LIGHTS S.r.l. - Phone +39 0771 72190 - www.musiclights.it...
Need help?
Do you have a question about the SMARTOWER and is the answer not in the manual?
Questions and answers