Table of Contents
Advertisement
User Documentation - CG2400
User Documentation - CG2400
Table of Content
Table of Content
User Documentation - CG2400
Product description
Overview
Specifications
Platform components
Product architecture
Description of system access methods
Recommended technical expertise
Getting started
Getting started - Application installation and performance benchmarking
Planning
Environmental considerations
Power consumption and power budget
MAC addresses
PCI mapping
Platform, modules and accessories
Material, information and software required
Hardware compatibility list
www.kontron.com
// 1
Advertisement
Chapters
Table of Contents

Related Manuals for Kontron CG2400


Summary of Contents for Kontron CG2400
- Page 1 User Documentation - CG2400 User Documentation - CG2400 Table of Content Table of Content User Documentation - CG2400 Product description Overview Specifications Platform components Product architecture Description of system access methods Recommended technical expertise Getting started Getting started - Application installation and performance benchmarking...
- Page 2 Factory default Support information Knowledge base Raid Controller SNMP Application notes Secure Erase StorCLI utility Software RAID (VRoC) CG2400 in 10/100Mbps infrastructure Provisioning custom secure boot keys Generating custom secure boot keys Reference guides Supported IPMI commands www.kontron.com // 2...
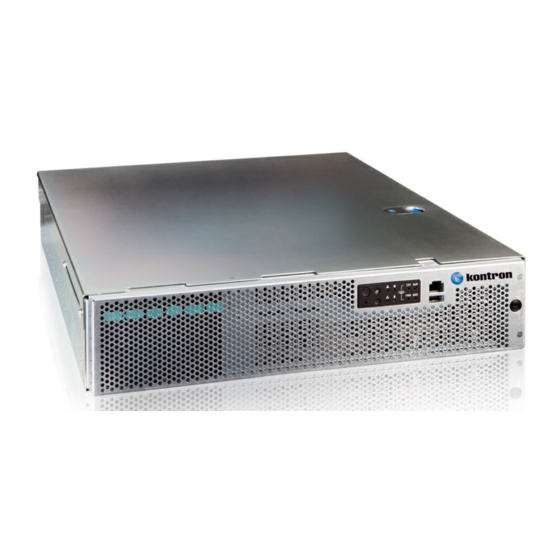
- Page 3 CG2400 Carrier Grade Server The Kontron CG2400 carrier grade 2U server is the 8th generation of Kontron platforms designed to meet NEBS-3/ETSI certification. This ruggedized yet sophisticated server has evolved to support more than your classic telco system used by communications service providers.
- Page 4 Specifications {This article details dimensions, shipping weights, environmental specifications and power consumption and lists key hardware and software features.} Table of contents CG2400 key hardware features CG2400 key software features CG2400 physical dimensions CG2400 packaging physical dimensions CG2400 shipping weights...
- Page 5 VGA port, one TAM dry relay connector * Right or left-side orientation as looking from the front of the chassis Server Integrated BMC, see details in CG2400 key software features management IPMI 2.0 WebUI with KVM and Media Redirection are included in base system NOTE : No need for additional module (e.g.
- Page 6 HDDs. 2. Drives can consume up to 12W of power each. Drives used in this system must be specified to run at a maximum ambient temperature of 40ºC. CG2400 k ey software features CG2400 k ey software features www.kontron.com...
- Page 7 LAN interface that supports the IPMI over LAN protocol (RMCP, RMCP+) Operating Refer to Validated operating systems system Thermal Platform Environment Control Interface (PECI) for thermal management support management CPU thermal management CG2400 p hysical dimensions CG2400 p hysical dimensions www.kontron.com // 7...
- Page 8 Between rack mounting points Front clearance 76 [2] Recommended Rear clearance 92 [3.6] Recommended CG2400 packaging physical dimensions CG2400 packaging physical dimensions Depth (mm [in]) Depth (mm [in]) Width (mm [in]) Width (mm [in]) Height (mm [in]) Height (mm [in]) 675 [26.57]...
- Page 9 Platform rear panel Platform fan module Power supply units AC power subsystem Voltage and current requirements DC power subsystem Voltage and current requirements Platform button and LED behavior Front panel Rear panel Platform front panel Platform front panel www.kontron.com // 9...
- Page 10 Front panel control buttons, status indicator and telco alarm LEDs Drive slot 4 RJ45 serial port Drive slot 3 USB 2.0 port Drive slot 2 SD flash card slots Drive slot 1 SD flash module LED Drive slot 0 ESD ground strap attachment www.kontron.com // 10...
- Page 11 System reset button Power alarm (amber) System status LED Drive activity LED Fan status LED NIC activity LED Critical alarm (amber or red) Chassis ID button Major alarm (amber or red) NMI button Platform rear panel Platform rear panel www.kontron.com // 11...
- Page 12 Platform fan module Platform fan module The CG2400 platform is equipped with a module containing 6 hot - swappable fan s. N o service interruption is usually required t o replace the fans. Follow the instructions below to service a fan.
- Page 13 PMBus 1.2 interface for server management functions Integrated handle for hot-swappable insertion/extraction The power supply module contains one 40-mm fan Voltage and current requirements Voltage and current requirements The AC power supply input connector is an IEC320 C14 standard AC inlet connector. www.kontron.com // 13...
- Page 14 DC_OK circuitry for brownout protection and recovery Built-in load sharing capability Built-in overload protection capability Onboard field replaceable unit (FRU) information PMBus 1.2 interface for server management functions Integrated handle for hot-swappable insertion/extraction The power supply module contains one 40-mm fan www.kontron.com // 14...
- Page 15 30 A at -40 VDC , 15 A at -72 VDC The minimum steady-state DC input voltage at which the equipment remains fully operational is -40 VDC . Platform button and LED behavior Platform button and LED behavior Front panel Front panel www.kontron.com // 15...
- Page 16 LAN link for NIC1 and NIC2 Green Blinking LAN activity for NIC1 and NIC2 Idle / no link Chassis ID (on White Chassis identification active via command or button) button Chassis identification inactive NMI button Button only, no LED www.kontron.com // 16...
- Page 17 2.5-in SSD Green SSD present Blinking SSD activity Amber Solid SSD fault RJ45 serial port No LED Serial over RJ45 port SD flash module Green No SD card activity Blinking SD card activity Rear panel Rear panel www.kontron.com // 17...
- Page 18 DC present/only standby output on 1 Hz blinking green Power supply DC output on and OK Green Power supply failure Power supply warning 0.5 Hz blinking red/green* * Blinking frequency: 1 Hz (0.5 s red / 0.5 s green) www.kontron.com // 18...
- Page 19 {This article provides visual representations of the system's architecture and network interconnections as well as block diagrams.} Table of contents Internal connections Network planes Block diagram Internal connections Internal connections Network planes Network planes The CG2400 platform provides 2 network planes. Network planes Network planes Description Description Speed (GbE) Speed (GbE) Component Component Default network...
- Page 20 For any type of connection to a server, an operating system (OS) must be installed. Redirection to the serial port must be configured in the OS. If the system delivered has an OS installed by Kontron, console redirection will be enabled by default.
- Page 21 Serial console (physical connection) Serial console (physical connection) Initial OS network interface configuration No configuration performed on BMCs Fail-safe path to access all server components when elements Troubleshooting (OS, BMC, BIOS) get misconfigured. Accessible from the physical port. www.kontron.com // 21...
- Page 22 (OS, BMC, BIOS) get misconfigured. Accessible from the physical port. Redfish Redfish Basic BIOS configuration This is the ideal path for automated monitoring/control script once the platform has been configured for the first time. Accessible from the management plane. www.kontron.com // 22...
- Page 23 This will facilitate the process down the road. IP addresses will also need to be assigned based on known MAC addresses, so appropriate IT expertise is required. Getting started Getting started www.kontron.com // 23...
- Page 24 Processor location Adding a processor in a PHM Preparing the processor for assembly with the PHM Installing the processor Installing a PHM in the platform Installing memory DIMMs Locating the DIMMs DIMM population guidelines for optimal performance www.kontron.com // 24...
- Page 25 Use of other products/components will void the CSA certification and other regulatory approvals of the product and will most likely result in non-compliance with product regulations in the region(s) in which the product is sold. Introduction Introduction www.kontron.com // 25...
- Page 26 This getting started section describes the network integration, platform access and operating system installation steps required to start operating a CG2400 platform equipped with two CPU, one or two power supply units, HDD or SSD drives and PCIe add-in cards provided by the customer, and used to leverage two segregated network links (one for the management plane and one for the data plane).
- Page 27 One manual extraction tool Item_10 One 8 AWG ground cable based on the length required item_11 One ground lug right angle, 8 AWG (Kontron P/N 1064-4226) Item_12 10 mm wrench or equivalent tool Item_13 One hand crimp tool, Panduit CT-1700...
- Page 28 This product usually has more than one power supply cord. Disconnect all power supply cords before servicing to avoid electric shock. Opening the enclosure Opening the enclosure www.kontron.com // 28...
- Page 29 (B). Step_2 Using the two blue touch points (C), lift the riser card assembly out of the chassis (D). Removing the left riser card assembly Removing the left riser card assembly www.kontron.com // 29...
- Page 30 Installing the processors and heat sinks Installing the processors and heat sinks Socket and processor handling and ESD precautions Socket and processor handling and ESD precautions Handling precautions Handling precautions www.kontron.com // 30...
- Page 31 . Kontron expects users and system integrators to use the Intel-designed methodology at all points in the procedures in this section where a processor is being removed or inserted in a socket.
- Page 32 Hardware compatibility list for a list of components. Kontron recommends performing a CPU socket inspection before adding or replacing a processor to ensure there is nothing wrong with the fragile socket pins. Preparing the processor for assembly with the PHM Preparing the processor for assembly with the PHM Step_1 Remove the cover of the processor packing tray.
- Page 33 Step_2 Gradually (in a star pattern) and equally tighten each of the four screws in a diagonal pattern until each one is firmly tightened (12.0 i n-Lb torque) . Installing memory DIMMs Installing memory DIMMs Locating the DIMMs Locating the DIMMs www.kontron.com // 33...
- Page 34 For a configuration with 8 DIMMs – populate all DIMM slots. Configuration with 8 DIMMs per CPU will reduce DIMMs speed one step under its nominal value (ex. 2933MHz → 2666 MHz) Installing memory DIMMs Installing memory DIMMs www.kontron.com // 34...
- Page 35 Getting Started. Locating the SAS cables Locating the SAS cables Disconnecting the SAS cables Disconnecting the SAS cables Step_1 Disconnect the two SAS cables (SFF-8643 ends) from the motherboard. Installing the controller Installing the controller www.kontron.com // 35...
- Page 36 4 filler. Step_5 Secure the slot 3 faceplate by attaching it with the screw previously removed (Step_1). Installing the SuperCap battery backup module Installing the SuperCap battery backup module www.kontron.com // 36...
- Page 37 PCIe card in slot 4 or 5 Motherboard PCIe slots available depends on the number of CPUs. For details, see CG2400 PCIe mapping NOTE : For the example in this Getting Started, it is assumed that the platform is populated with two CPUs to permit the NOTE use of slot 4.
- Page 38 The air duct is secured when the right riser card assembly is mounted on the support cross-brace above it. Reinstalling the left riser card assembly Reinstalling the left riser card assembly www.kontron.com // 38...
- Page 39 Step_3 Align and then tighten the blue captive retention screws at the front of the assembly with the holes on the support cross-brace (D) and on the rear of the chassis (C). Closing the enclosure Closing the enclosure www.kontron.com // 39...
- Page 40 The equipment rack must be installed according to the manufacturer’s instructions. You must also consider the weight of any other device installed in the rack. www.kontron.com // 40...
- Page 41 5°C (41°F) or rise above 40°C (104°F). Extreme fluctuations in temperature can cause a variety of problems in the server. NOTE: The platform shown in the installation instructions below is different from the CG2400 server and is used for NOTE: demonstration purposes only.
- Page 42 Step_2 Attach the 2 mounting ears (item 3) to the chassis using 2 screws (item 10) per mounting ear. Mounting ears (item 3) can be flipped to position the equipment further forward in the rack. Building the outer rail assembly Building the outer rail assembly www.kontron.com // 42...
- Page 43 If installing in a 4-post rack with EIA wide hole spacing, the EIA wide adapter (item 9) must be installed on top of the front L-brackets using 2 screws (item 11) per L-bracket as shown in the figure. www.kontron.com // 43...
- Page 44 NOTE: equipment out, slide it forward until you can access the locks. Depress the locks on both sides and continue to pull out the equipment, while fully supporting the system weight. Securing the equipment Securing the equipment www.kontron.com // 44...
- Page 45 Connect the network cables according to the image below: 1. Connect one RJ45 cable to the MNGT port for the management plane. 2. Connect one RJ45 cable to the left data port (NIC1) for the data plane. www.kontron.com // 45...
- Page 46 Installation of this product must be performed in accordance with national wiring codes and conform to local regulations. To build the power cables (ends that will be plugged in the CG2400), the material, tools and wires specified below are required.
- Page 47 DMC AF8 data sheet Manual extraction tool 9081-0-0-0 Molex extraction tool catalog Application tooling specification sheet Refer to the Cabling section for a link to a video showing how to crimp pins and assemble them into the connector. www.kontron.com // 47...
- Page 48 . Confirming network links are established Confirming network links are established Once the CG2400 power LED is green ON green ON (normal blink or ON), confirm LAN connection with the management plane and data plane: The right LED on the server management NIC (MNGT) should be green ON...
- Page 49 Prerequisites Prerequisites A physical connection to the VGA display port of the device is required. A mouse and/or keyboard is connected. Port location Port location Accessing the BMC network configuration menu Accessing the BMC network configuration menu www.kontron.com // 49...
- Page 50 Step_3 If applicable, download the ISO file of the OS to be installed. For a list of known compatible operating systems , refer to Validated operating systems For information on components, refer to the PCI mapping Installing an operating system Installing an operating system Prerequisites Prerequisites www.kontron.com // 50...
- Page 51 Web browser's documentation. NOTE: The procedure may vary depending on the browser used. Examples provided use Firefox. NOTE: Connecting to the Web UI of the BMC Connecting to the Web UI of the BMC www.kontron.com // 51...
- Page 52 Step_4 Log in to the BMC Web UI using the appropriate credentials. NOTE: Default Web UI user name and password is NOTE: admin/admin. Step_5 You now have access to the management Web UI of the BMC. You can use the interface. www.kontron.com // 52...
- Page 53 NOTE: The first and second users are reserved NOTE: fields, therefore, their usernames can't be modified. Step_3 Change field Username Username if required. Step_4 Check the Change Password Change Password box. Step_5 Create a new password. Step_6 Confirm the password. www.kontron.com // 53...
- Page 54 Step_7 Press Save Save . Launching the KVM Launching the KVM The Web UI allows remote control of the server through a KVM (Keyboard, Video, Mouse) interface. www.kontron.com // 54...
- Page 55 Step_3 A new browser window opens and displays the server screen. NOTE: If an OS is installed, the image displayed NOTE: might be that of the OS. Mounting the operating system image via virtual media Mounting the operating system image via virtual media www.kontron.com // 55...
- Page 56 Step_2 Once the ISO file is loaded, click on Start Start Media at the top right of the screen. Media NOTE: Once clicked, the Start Media button NOTE: becomes the Stop Media Stop Media button. Accessing the BIOS setup menu Accessing the BIOS setup menu www.kontron.com // 56...
- Page 57 HID Queue is about to get full. Kindly hold on a second(s).. second(s).. Kontron suggests modifying the Setup Prompt Timeout Setup Prompt Timeout parameter to give users more time to react. Keeping the focus (single-tasking) on the KVM window is also a good practice to enter the BIOS setup menu each time it is needed.
- Page 58 NOTE: If there are any messages or warnings displayed, refer to the operating system's documentation to NOTE: fix them. Step_3 Verify that the DIMMs are detected. LocalServer_OSPrompt:~# free free -h -h Step_4 Verify that all the storage devices are detected. LocalServer_OSPrompt:~# lsblk lsblk www.kontron.com // 58...
- Page 59 | grep [KEYWORD] NOTE: The keyword is a unique NOTE: word helping to identify the hardware component. The product PCI mapping may help with this validation. Step_10 Verify communication between the operating system and the BMC. www.kontron.com // 59...
- Page 60 Install your application and proceed with benchmarking. Monitoring platform sensors Monitoring platform sensors NOTE: Refer to NOTE: Accessing a BMC to access the BMC Web UI. The key sensors to look at are the following: Temperature sensors Power sensors www.kontron.com // 60...
- Page 61 Step_4 Scroll down to see the list of sensors. Step_5 Click on a sensor to see more details. For a list of all the sensors, refer to Sensor list For more monitoring methods refer to Monitoring sensors www.kontron.com // 61...
- Page 62 -5°C to +55°C (23°F to +131°F) and to withstand non-condensing humidity levels up to 95%. If you are installing the CG2400 in a hot environment, i.e. 30°C to 55°C, it is recommended to take additional measures to maximize the cooling and air circulation as a constant exposure to high temperatures reduces the life expectancy of electronic equipment.
- Page 63 Power supply output power based on temperature derating General power information The nominal output power of the CG2400 is 850 W. This means t he system must consume less than 850 W at all times during operation. In a two (redundant) PSU configuration, the current will automatically be shared between both PSUs. If a power feed or PSU becomes defective, the entire load will be carried by the healthy PSU.
- Page 64 Power supply output power based on temperature derating Temperature derating only applies when the CG2400 is powered by a single PSU. In single PSU configurations, the nominal output power is affected by the inlet temperature at the PSU (50°C and above).
- Page 65 1 A community version of ipmitool is installed on a remote computer to enable remote monitoring—it is recommended to use ipmitool version 1.8.18. A MAC address can be discovered using IPMI with the following commands: lan print fru print Procedure via ipmitool lan print Procedure via ipmitool lan print www.kontron.com // 65...
- Page 66 There are two methods for discovering a MAC address from the BIOS: Using the VGA display port (physical connection) Using a serial console (physical connection) Accessing the BIOS using the VGA display port (physical connection) Accessing the BIOS using the VGA display port (physical connection) www.kontron.com // 66...
- Page 67 IP address. In this case, the BIOS menu information will need to be refreshed by restarting the server and re-entering the BIOS. Accessing the BIOS using a serial console (physical connection) Accessing the BIOS using a serial console (physical connection) www.kontron.com // 67...
- Page 68 If this is the case, reset the server as recommended for the operating system. NOTE: When a server reset command is sent, it NOTE: may take a few seconds for the BIOS sign on screen to display. www.kontron.com // 68...
- Page 69 BIOS setup menu. Step_5 The BIOS setup menu is displayed. Accessing the BMC network configuration menu Accessing the BMC network configuration menu Step_1 From the BIOS menu, use the arrow keys to select Server Mgmt . Server Mgmt www.kontron.com // 69...
- Page 70 UEFI initialization and also which PCIe slots are available. PCI bus PCI bus PCIe slot numbers (on the KMB- PCIe slot numbers (on the KMB- Slot numbers shown on CG2400 Slot numbers shown on CG2400 presence presence number...
- Page 71 Port #3 (rev f9) (prog-if 00 [Normal decode]) 00:1c.4 8086 a194 PCI bridge Intel Corporation Lewisburg PCI Express Root Port #5 (rev f9) NVMe NOTE: NOTE: Will be present if a card is present in the J47 - Rear M.2 connector. www.kontron.com // 71...
- Page 72 208d System peripheral Intel Corporation Sky Lake-E CHA Registers (rev 04) 17:09.5 8086 208d System peripheral Intel Corporation Sky Lake-E CHA Registers (rev 04) 17:09.6 8086 208d System peripheral Intel Corporation Sky Lake-E CHA Registers (rev 04) www.kontron.com // 72...
- Page 73 208e System peripheral Intel Corporation Sky Lake-E CHA Registers (rev 04) 17:10.6 8086 208e System peripheral Intel Corporation Sky Lake-E CHA Registers (rev 04) 17:10.7 8086 208e System peripheral Intel Corporation Sky Lake-E CHA Registers (rev 04) www.kontron.com // 73...
- Page 74 NOTE: Will be present if there is an expansion card of type (x4x4x4x4) and a card in the 4th slot. 3a:05.0 8086 2034 System peripheral Intel Corporation Sky Lake-E VT-d (rev 04) 3a:05.2 8086 2035 System peripheral Intel Corporation Sky Lake-E RAS Configuration Registers (rev www.kontron.com // 74...
- Page 75 Intel Corporation Sky Lake-E LMS Channel 2 (rev 04) 3a:0d.3 8086 204b System peripheral Intel Corporation Sky Lake-E LMDP Channel 2 (rev 04) -- depending on PCIe expansion card – 3b:00.x XXXX XXXX Card in expansion " Slot 6 " or " Slot 6 www.kontron.com // 75...
- Page 76 8086 2059 System peripheral Intel Corporation Sky Lake-E UPI Registers (rev 04) 5d:12.0 8086 204c Performance Intel Corporation Sky Lake-E M3KTI Registers (rev 04) counters 5d:12.1 8086 204d Performance Intel Corporation Sky Lake-E M3KTI Registers (rev 04) www.kontron.com // 76...
- Page 77 Intel Corporation Sky Lake-E Ubox Registers (rev 04) counters 80:08.2 8086 2016 System peripheral Intel Corporation Sky Lake-E Ubox Registers (rev 04) 85:00.0 8086 2030 PCI bridge Intel Corporation Sky Lake-E PCI Express Root Port A (rev 04) www.kontron.com // 77...
- Page 78 208d System peripheral Intel Corporation Sky Lake-E CHA Registers (rev 04) 85:0a.3 8086 208d System peripheral Intel Corporation Sky Lake-E CHA Registers (rev 04) 85:0a.4 8086 208d System peripheral Intel Corporation Sky Lake-E CHA Registers (rev 04) www.kontron.com // 78...
- Page 79 208e System peripheral Intel Corporation Sky Lake-E CHA Registers (rev 04) 85:1d.0 8086 2054 System peripheral Intel Corporation Sky Lake-E CHA Registers (rev 04) 85:1d.1 8086 2055 System peripheral Intel Corporation Sky Lake-E CHA Registers (rev 04) www.kontron.com // 79...
- Page 80 System peripheral Intel Corporation Sky Lake-E Integrated Memory Controller (rev ae:0a.4 8086 2044 System peripheral Intel Corporation Sky Lake-E Integrated Memory Controller (rev ae:0a.5 8086 2045 System peripheral Intel Corporation Sky Lake-E LM Channel 1 (rev 04) www.kontron.com // 80...
- Page 81 8086 2058 Performance Intel Corporation Sky Lake-E KTI 0 (rev 04) counters d7:10.1 8086 2059 System peripheral Intel Corporation Sky Lake-E UPI Registers (rev 04) d7:12.0 8086 204c Performance Intel Corporation Sky Lake-E M3KTI Registers (rev 04) www.kontron.com // 81...
- Page 82 : Entry will be present if there is a card present in the M.2 J47(Rear) and/or J49(Front) connector. Platform, modules and accessories Platform, modules and accessories {This article provides the complete list of compatible parts and components that can be ordered from Kontron .} Table of contents Serviceable items (spare)
- Page 83 Kontron P/N Kontron P/N Description Description CG2200-FANSET Fan assembly (6 fans) HDD/SSD carrier HDD/SSD carrier Kontron P/N Kontron P/N Description Description NSNSASHDDCARQ SAS HDD/SATA SSD carrier Contents: Carrier, black plastic filler, screws (4) Front bezel Front bezel Kontron P/N Kontron P/N...
- Page 84 Kontron P/N Kontron P/N Description Description 1056-8389 850 W AC PSU 1056-8385 850 W DC PSU K00837-001 PSU filler panel 1061-0410 C13 to CEE 7/7 European AC power cord, 10A/250Vac, 1.8m long 1-340000-0 C13 to NEMA 5-15P AC power cord, 10A/125Vac, 2m long...
- Page 85 1065-8218* Triple-slot, PCIe x4 and x8, Gen3 riser for slot 5 (left side) * * The CG2200-RISER2SPCIX and 1065-8218 riser cards are specialty items. Contact your Kontron representative if you wish to use them or get supplementary information. Rackmount kits Rackmount kits www.kontron.com...
- Page 86 Maximum rack depth when using: TMLPMOUNT41 –> 36 inches TMLPMOUNT51 –> 34 inches 1061-2890 23-in rail extension kit Use with TMLPMOUNT52 Accessories Accessories Kontron P/N Kontron P/N Description Description 1066-0224 Thermal probe K00740-001 Mounting bracket for Battery Backup unit 1065-5409 TPM 2.0 module...
- Page 87 Software required Material and information required Material and information required Optional adapter Optional adapter Item_1 RJ45 to DB9 serial adapter (Kontron P/N: 1015-9404) Component installation and assembly Component installation and assembly Relevant section: Relevant section: Components installation and assembly Item_1...
- Page 88 One manual extraction tool Item_10 One 8 AWG ground cable based on the length required item_11 One ground lug right angle, 8 AWG (Kontron P/N 1064-4226) Item_12 10 mm wrench or equivalent tool Item_13 One hand crimp tool, Panduit CT-1700...
- Page 89 High acoustic level MTBF reduction Please contact your Kontron sales representative if you are targeting a CPU consuming more than 125 W (i.e. 140 W, 150 W or 165 W). The CG2400 does not support 200 W and 205 W CPUs (in single or dual CPU configuration)
- Page 90 M.2 SSD (SATA or NVMe) Vendor Vendor Vendor P/N Vendor P/N Type Type Size Size Dimension Dimension DWPD DWPD Status Status Kontron P/N Kontron P/N Innodisk DEM28-32GM41BC1DC SATA 32 GB 2280 Active Intel SSDSCKKB240G801 SATA 240 GB 2280 Active 1065-5634...
- Page 91 Vendor Vendor Description Description Type Type Status Status Kontron P/N Kontron P/N LSI/Broadcom MegaRAID SAS 9361-8i RAID/SAS Active 1065-5999 LSI/Broadcom CacheVault LSICVM02 Cache Vault Active 1065-7732 LSI/Broadcom SAS 9300-8i Host Bus Adapter Active 1065-7730 PCIe NIC cards PCIe NIC cards...
- Page 92 The platform features a Trusted Platform Module (TPM). Determine your requirement with regards to hardware- based, security-related functions. Refer to Configuring TPM For more information on security features, contact Kontron. Installing Installing {This section provides Information about installing the platform hardware components, operating systems and softwares.}...
- Page 93 When handling components, follow the precautions described in section ESD protections What's in the box What's in the box The CG2400 platform box includes: One CG2400 2U, 20-inch deep, carrier grade rackmount server Two heat sink boxes, one labeled "Front" and one labeled "Rear" www.kontron.com // 93...
- Page 94 Reinstalling the right riser card assembly Processor air duct Removing the processor air duct Reinstalling the processor air duct SuperCap battery backup Removing the SuperCap battery backup Reinstalling the SuperCap battery backup Support cross-brace Removing the support cross-brace www.kontron.com // 94...
- Page 95 Before working with the server product, pay close attention to the safety instructions provided in this manual. All references to left, right, front, rear, top, and bottom assume that you are facing the front of the server, as it would be positioned for normal operation. www.kontron.com // 95...
- Page 96 Material, information and software required Compatible parts and components Compatible parts and components For the complete list of compatible parts and components that can be ordered from Kontron, consult Platform, modules and accessories. Cable management Cable management When adding, removing or replacing components in the platform, pay close attention to the cable management before proceeding.
- Page 97 Before removing the top cover, always power down the server and unplug all peripheral devices and the power cable(s). The CG2400 server must be operated with the top cover in place to ensure proper cooling. A non-skid surface or a stop behind the server may be needed to prevent the server from sliding on the work surface.
- Page 98 Step_2 Remove the drive carrier by pressing the green button to open the lever that engages the drive with the backplane (A). Step_3 Pull the drive carrier out of the chassis. Installing a drive in a carrier Installing a drive in a carrier www.kontron.com // 98...
- Page 99 If the top cover has been removed to access components internal to the system other than the hot-swappable fans, you must power off the server and unplug the power cords. www.kontron.com // 99...
- Page 100 PSU and have a redundant PSU in your system, power will switch over to the redundant unit while you replace the main unit. Inserting or replacing a power supply unit Inserting or replacing a power supply unit www.kontron.com // 100...
- Page 101 Step_3 Plug the power cord. The PSU LED should be solid green. Riser card assemblies Riser card assemblies Before you can remove and reinstall a riser card assembly , you must first remove (and afterwards put back in place): chassis top cover www.kontron.com // 101...
- Page 102 Step_2 Using the two blue touch points (C), lift the riser card assembly out of the chassis (D). Reinstalling a riser card assembly Reinstalling a riser card assembly Reinstalling the left riser card assembly Reinstalling the left riser card assembly www.kontron.com // 102...
- Page 103 (D) and on the rear of the chassis (C). Processor air duct Processor air duct Before you can remove and reinstall processor air duct , you must first remove (and afterwards put back in place): chassis top cover riser card assemblies www.kontron.com // 103...
- Page 104 To detach and reattach the SuperCap battery backup from the cross-brace , it does not need to be disconnected or connected from the hardware RAID controller . For more information on the hardware RAID controller , refer to the Raid www.kontron.com // 104...
- Page 105 (along with all the components attached to it). This procedure is necessary in order to have enough space to access these front chassis www.kontron.com // 105...
- Page 106 Step_2 Remove the three small flat screws that fasten the cross-brace to the sides of the chassis: One on the left side Two on the right side Step_3 Remove the support cross-brace from the chassis. www.kontron.com // 106...
- Page 107 Before you can remove and reinstall the HSBP board , you must first remove (and afterwards put back in place): chassis top cover front bezel Removing the SAS hot-swap backplane (HSBP) board Removing the SAS hot-swap backplane (HSBP) board www.kontron.com // 107...
- Page 108 One SAS 2 cable One HSBP I C/HDD LED cable Step_6 Lift the backplane board and air duct up and out of the chassis (C). Reinstalling the SAS hot-swap backplane (HSBP) board Reinstalling the SAS hot-swap backplane (HSBP) board www.kontron.com // 108...
- Page 109 Step_5 Lock in all the drives so they engage with the backplane. Memory DIMMs Memory DIMMs Before you can remove or install memory DIMMs , you must first remove (and afterwards put back in place): chassis top cover the right side riser card assembly processor air duct www.kontron.com // 109...
- Page 110 For a configuration with 8 DIMMs – populate all DIMM slots. Configuration with 8 DIMMs per CPU will reduce DIMMs speed one step under its nominal value (ex. 2933MHz → 2666 MHz) Removing memory DIMMs Removing memory DIMMs www.kontron.com // 110...
- Page 111 Before you can remove, add or replace a processor or heat sink, you must first remove (and afterwards put back in place): chassis top cover the right side riser card assembly processor air duct Socket and processor handling and ESD precautions Socket and processor handling and ESD precautions Handling precautions Handling precautions www.kontron.com // 111...
- Page 112 . Kontron expects users and system integrators to use the Intel-designed methodology at all points in the procedures in this section where a processor is being removed or inserted in a socket.
- Page 113 Disassembling the processor heat sink module (PHM) Disassembling the processor heat sink module (PHM) www.kontron.com // 113...
- Page 114 Step_4 Using your thumb, pull on the tab and flip the processor to release it from the processor carrier. Store the processor in an anti-static package. Adding or replacing a processor in a PHM Adding or replacing a processor in a PHM www.kontron.com // 114...
- Page 115 Hardware compatibility list for a list of components. Kontron recommends performing a CPU socket inspection before adding or replacing a processor to ensure there is nothing wrong with the fragile socket pins. Preparing the processor for assembly with the PHM Preparing the processor for assembly with the PHM Step_1 Remove the cover of the processor packing tray.
- Page 116 (and afterwards put back in place): chassis top cover the left side riser card assembly Disconnecting the two SAS cables from the motherboard Disconnecting the two SAS cables from the motherboard Locating the SAS cables Locating the SAS cables www.kontron.com // 116...
- Page 117 Disconnecting the SAS cables Disconnecting the SAS cables Step_1 Disconnect the two SAS cables (SFF-8643 ends) from the motherboard. Installing a hardware RAID controller Installing a hardware RAID controller www.kontron.com // 117...
- Page 118 This module is a flash-based battery backup module for SAS drives. It comes as a part of the Intel RS3DC080 RAID controller kit and may not be compatible with other RAID products. The mounting bracket for the module must be ordered separately, see Platform, modules and accessories www.kontron.com // 118...
- Page 119 Step_2 Insert the PCIe add-in card in the motherboard's PCIe slot and press down to mate it with the header. Step_3 Secure the PCIe add-in card to the chassis using the screw removed at step 1. www.kontron.com // 119...
- Page 120 Before you can remove or add a PCIe add-in card , you must first remove (and afterwards put back in place): chassis top cover Removing a PCIe add-in card Removing a PCIe add-in card www.kontron.com // 120...
- Page 121 Before you can install a PCIe add-in card for the first time , the riser card must be assembled . If a PCIe add-in card is already in place, consult the removing PCIe add-in cards section for instructions on how to remove it (perform steps 1 to 3 only). www.kontron.com // 121...
- Page 122 Before you can remove or install an M.2 storage, you must first remove (and afterwards put back in place): chassis top cover the left side riser card assembly NOTE: Images show two M.2 storage drives. The procedures are described for one M.2 storage. NOTE: Locating the M.2 storage Locating the M.2 storage www.kontron.com // 122...
- Page 123 Removing an M.2 storage Removing an M.2 storage www.kontron.com // 123...
- Page 124 Remove the clip from the post to release the M.2 storage. Step_2 Remove the M.2 card from the connector. Step_3 Insert the clip back in the post to secure the M.2 storage. Installing an M.2 storage Installing an M.2 storage www.kontron.com // 124...
- Page 125 Step_2 Insert one end of the M.2 card in the connector and seat the other end around the post on the motherboard. Step_3 Secure the M.2 storage by inserting the clip in the post. www.kontron.com // 125...
- Page 126 Consideration_4 If no PCIe cards are installed in slots 4 and 5, filler panels must be installed on the rear of the chassis. Rack installation Rack installation {This article provides instructions on how to install and ground a platform in a rack . } Table of contents Selecting a rail kit Rack mount kits TMLCMOUNT21 www.kontron.com // 126...
- Page 127 TMLCMOUNT21 is only compatible with 2-post, 19" wide racks and anchors the chassis in place. Therefore, it is recommended for lab use only. To select between TMLPMOUNT51 and TMLPMOUNT52, use the following diagram. www.kontron.com // 127...
- Page 128 EIA Wide spacing doesn't have the interstitial hole that is present in EIA Universal spacing. TMLPMOUNT51 contains an EIA Wide Adapter to overcome issue. Rack mount kits Rack mount kits TMLCMOUNT21 TMLCMOUNT21 Refer to TMLCMOUNT21 installation instructions for details. TMLPMOUNT51 TMLPMOUNT51 www.kontron.com // 128...
- Page 129 2U EIA BARNUT M4x0.7 SCREWS FOR MS1300 NOTE : 2U barnuts allow the installation of a rail kit into a 1U rack slot when equipment is already installed both above and NOTE below that open slot. TMLPMOUNT52 TMLPMOUNT52 www.kontron.com // 129...
- Page 130 Bracket and extender kits Bracket and extender kits 1059-8187 extender kit 1059-8187 extender kit Item Item Description Description 24″ to 34″ EIA L-BRACKET FOR 19″ RACK RETAINER BRACKET 1061-2890 extender kit 1061-2890 extender kit www.kontron.com // 130...
- Page 131 5°C (41°F) or rise above 40°C (104°F). Extreme fluctuations in temperature can cause a variety of problems in the server. NOTE: The platform shown in the installation instructions below is different from the CG2400 server and is used for NOTE: demonstration purposes only.
- Page 132 Step_4 Perform steps 1 to 3 again to build a total of 2 outer rail assemblies. Four-post installation – racks 24- to 31 ⅞ -inches deep Four-post installation – racks 24- to 31 -inches deep www.kontron.com // 132...
- Page 133 Step_3 Loosely screw on 2 nuts (item 12) per L- bracket. Step_4 Adjust the L-brackets to the required length and tighten the nuts. Step_5 Perform steps 1 to 4 again to build a total of 2 outer rail assemblies. Two-post installation Two-post installation www.kontron.com // 133...
- Page 134 If installing in a 4-post rack with EIA wide hole spacing, the EIA wide adapter (item 9) must be installed on top of the front L-brackets using 2 screws (item 11) per L-bracket as shown in the figure. www.kontron.com // 134...
- Page 135 For a 4-post rack, go to Securing the equipment to a 4-post rack For a 2-post rack, go to Securing the equipment to a 2-post rack Securing the equipment to a 4-post rack Securing the equipment to a 4-post rack www.kontron.com // 135...
- Page 136 Securing the equipment to a 2-post rack Step_1 Fasten each mounting ear (item 3) to a 2-post mounting bracket (item 8) using a total of 2 screws (item 11) as shown in the first figure. Using TMLPMOUNT21 Using TMLPMOUNT21 www.kontron.com // 136...
- Page 137 {This article provides all necessary details to safely connect the platform: connection types, required cables, prerequisites, connection sequences.} Table of contents AC power supply Power cord usage guidelines AC power supply connection DC power supply DC power supply input connector Building the power cables DC power supply connection www.kontron.com // 137...
- Page 138 Step_2 Check each power supply LED to make sure they are blinking green (payload off) or steady green (payload on). If this is not the case, refer to Platform components for a description of LED behavior. www.kontron.com // 138...
- Page 139 Installation of this product must be performed in accordance with national wiring codes and conform to local regulations. To build the power cables (ends that will be plugged in the CG2400), the material, tools and wires specified below are required.
- Page 140 Molex extraction tool catalog Application tooling specification sheet Below is a link to a video showing how to crimp pins and assemble them into the connector. NOTE: The process is valid for both the CG2300 and CG2400 connectors. NOTE: www.kontron.com // 140...
- Page 141 Software installation and deployment Software installation and deployment {This section provides detailed software installation instructions and the steps required to prepare and to validate the deployment.} Children Preparing for installation Installing an operating system on a server www.kontron.com // 141...
- Page 142 Selecting the boot order from boot override Completing operating system installation Installing an OS on a server using PXE (Boot from LAN) Completing operating system installation Installing an OS on a server using a USB storage device Preparing the USB storage device www.kontron.com // 142...
- Page 143 Web browser's documentation. NOTE: The procedure may vary depending on the browser used. Examples provided use Firefox. NOTE: Connecting to the Web UI of the BMC Connecting to the Web UI of the BMC www.kontron.com // 143...
- Page 144 Step_4 Log in to the BMC Web UI using the appropriate credentials. NOTE: Default Web UI user name and password is NOTE: admin/admin. Step_5 You now have access to the management Web UI of the BMC. You can use the interface. www.kontron.com // 144...
- Page 145 NOTE: The first and second users are reserved NOTE: fields, therefore, their usernames can't be modified. Step_3 Change field Username Username if required. Step_4 Check the Change Password Change Password box. Step_5 Create a new password. Step_6 Confirm the password. www.kontron.com // 145...
- Page 146 Step_7 Press Save Save . Launching the KVM Launching the KVM The Web UI allows remote control of the server through a KVM (Keyboard, Video, Mouse) interface. www.kontron.com // 146...
- Page 147 Step_3 A new browser window opens and displays the server screen. NOTE: If an OS is installed, the image displayed NOTE: might be that of the OS. Mounting the operating system image via virtual media Mounting the operating system image via virtual media www.kontron.com // 147...
- Page 148 Step_2 Once the ISO file is loaded, click on Start Start Media at the top right of the screen. Media NOTE: Once clicked, the Start Media button NOTE: becomes the Stop Media Stop Media button. Accessing the BIOS setup menu Accessing the BIOS setup menu www.kontron.com // 148...
- Page 149 HID Queue is about to get full. Kindly hold on a second(s).. second(s).. Kontron suggests modifying the Setup Prompt Timeout Setup Prompt Timeout parameter to give users more time to react. Keeping the focus (single-tasking) on the KVM window is also a good practice to enter the BIOS setup menu each time it is needed.
- Page 150 NOTE: Using Boot from LAN requires a PXE server architecture. NOTE: Step_1 Access the BIOS menu. Refer to Accessing the BIOS. Step_2 Select the Advanced Advanced tab and then the Network Stack Configuration submenu. Network Stack Configuration Step_3 Enable Network Stack Network Stack . www.kontron.com // 150...
- Page 151 > You are now ready to complete operating system installation according to your application requirements. requirements. Completing operating system installation Completing operating system installation Step_1 Complete the installation by following the on-screen prompts of the specific OS installed. www.kontron.com // 151...
- Page 152 Step_6 In the " Test this media & install CentOS 7 Test this media & install CentOS 7 " entry replace the " quiet quiet " argument with " console=ttyS0,115200n81 ". console=ttyS0,115200n81 Step_7 Save the file and eject the USB key. Configuring Boot Override Configuring Boot Override www.kontron.com // 152...
- Page 153 Complete the installation by following the on-screen prompts of the specific OS installed. Installing a legacy OS Installing a legacy OS Installing RHEL/CentOS 7.3 and preparing for AST driver installation Installing RHEL/CentOS 7.3 and preparing for AST driver installation Prerequisites Prerequisites www.kontron.com // 153...
- Page 154 Port 60/64 Emulation . Step_2 Press F4 to save and exit. Installing RHEL/CentOS 7.3 and preparing for AST driver installation Installing RHEL/CentOS 7.3 and preparing for AST driver installation The procedure described below is applicable to versions 7.3 or lower. www.kontron.com // 154...
- Page 155 Step_7 Press CTRL+X or F10 to boot the OS. Installing the AST driver Installing the AST driver Relevant links: Relevant links: The driver package can be downloaded from: https://www.aspeedtech.com/support.php The AST driver package version used in this procedure is: http://upload.aspeedtech.com/BIOS/v11003_linux.zip www.kontron.com // 155...
- Page 156 Step_8 (Optional) After updating the auto-update file with your kernel, you can perform the update. LocalServer_OSPrompt:~# ./auto-update.sh ./auto-update.sh Installing the network driver in RHEL/CentOS 7.3 Installing the network driver in RHEL/CentOS 7.3 The i40e network driver must be installed for 10GbE ports. www.kontron.com // 156...
- Page 157 - Updates name=CentOS-7.3 - Updates baseurl= baseurl=http://vault.centos.org/centos/7.3.1611/updates/\$basearch/ http://vault.centos.org/centos/7.3.1611/updates/\$basearch/ gpgcheck=1 gpgcheck=1 gpgkey= gpgkey=file:///etc/pki/rpm-gpg/RPM-GPG-KEY-CentOS-7 file:///etc/pki/rpm-gpg/RPM-GPG-KEY-CentOS-7 yum repolist yum repolist yum clean all yum clean all rm -rf /var/cache/yum yum update rm -rf /var/cache/yum yum update cat /etc/centos-release cat /etc/centos-release www.kontron.com // 157...
- Page 158 NOTE: You should discover two NOTE: 10GbE NIC. Step_6 Confirm that all the network interfaces are detected. LocalServer_OSPrompt:~# ip ip address address NOTE: You should see two NIC NOTE: interfaces. Step_7 Configure network interface controllers based on your requirements. www.kontron.com // 158...
- Page 159 BMC. LocalServer_OSPrompt:~# ipmitool mc info ipmitool mc info Common software installation Common software installation {This article provides a list of required and recommended software tools for platform configuration, operation and troubleshooting.} Table of contents www.kontron.com // 159...
- Page 160 From a command prompt: LocalServer_OSPrompt:~# yum install ./ yum install ./ ksnmpd ksnmpd Kontron Linux sub-agent. kontron-snmp-agent-1.2.2-1.x86_64.rpm kontron-snmp-agent-1.2.2-1.x86_64.rpm NOTE: This software is provided by Kontron. NOTE: snmp snmp Net-SNMP default package. From a command prompt: RemoteComputer_OSPrompt:~# yum install yum install...
- Page 161 Enabling IOL on a LAN channel using IPMI Accessing the BMC Enabling IOL on a LAN channel Configuring Serial over LAN parameters using IPMI Accessing the BMC Viewing and configuring SOL parameters Creating the Redfish root URL Prerequisites Procedure Configuring SNMP www.kontron.com // 161...
- Page 162 The architecture of the CG2400 platform offers many entry points, including one LAN channel to the BMC. Use caution when configuring network accesses. Your access to the system could be interrupted should you Use caution when configuring network accesses. Your access to the system could be interrupted should you disable the access point you entered through.
- Page 163 Accessing a BMC using IPMI (KCS) method, but some configurations can also be performed using IOL. To use IOL, add the IOL parameters to the command: -I lanplus -H [BMC MNGMT_IP] - -I lanplus -H [BMC MNGMT_IP] - www.kontron.com // 163...
- Page 164 2 An HTTP client tool is installed on the remote computer. A JSON parsor command-line tool such as jq jq is installed. Relevant sections: Relevant sections: Baseboard management controller - BMC Common software installation Default user names and passwords Procedure Procedure www.kontron.com // 164...
- Page 165 Enabling SNMP for a user using the BMC Web UI Enabling SNMP for a user using the BMC Web UI Relevant section: Relevant section: Configuring and managing users Refer to Accessing a BMC using the Web UI for access instructions. www.kontron.com // 165...
- Page 166 From a remote computer that has access to the management network subnet , install SNMP. RemoteComputer_OSPrompt:~# yum install snmp yum install snmp Step_2 (Optional) To be able to see human-readable MIBs (instead of seeing the OID), also install snmp-mibs- downloader. RemoteComputer_OSPrompt:~# yum install snmp-mibs-downloader yum install snmp-mibs-downloader www.kontron.com // 166...
- Page 167 A [SNMP_PASSWORD] - x [PRIVACY_PROTOCOL] - x [PRIVACY_PROTOCOL] - X [SNMP_PASSWORD] [BMC MNGMT_IP] X [SNMP_PASSWORD] [BMC MNGMT_IP] Disabling an SNMP access Disabling an SNMP access Refer to Accessing a BMC using the Web UI for access instructions. www.kontron.com // 167...
- Page 168 Configuring Kontron linux snmp-agent on the platform Configuring Kontron linux snmp-agent on the platform The Kontron linux snmp-agent works only with RedHat/CentOS Linux operating systems. The following procedure will be performed under CentOS. Commands may vary depending on the operating system installed.
- Page 169 SNMP agent is up and running. Refer to Configuring and managing users for more instructions . Running the Kontron linux snmp-agent Running the Kontron linux snmp-agent and verifying installation and configuration and verifying installation and configuration www.kontron.com // 169...
- Page 170 Proceed with the following procedure to fix the problem. NOTE: Instead of entirely disabling the security mechanism, the SELinux configuration could be modified to enable SNMP NOTE: on 1705 ports, but it is not documented here. www.kontron.com // 170...
- Page 171 Deleting or disabling a BMC user Configuring privilege level for BMC users Configuring SNMP users Configuring SNMP users using BMC SNMP Configuring SNMP users using the Kontron linux snmp-agent Managing Redfish users Configuring Redfish user names and passwords Adding a Redfish user...
- Page 172 Step_2 Select the user to manage. NOTE: The first and second users are reserved NOTE: fields, therefore, their usernames can't be modified. Step_3 Change field Username Username if required. Step_4 Check the Change Password Change Password box. www.kontron.com // 172...
- Page 173 Step_2 Identify the ID number of the user to be changed. Step_3 Change the user name. RemoteComputer_OSPrompt:~$ ipmitool -I lanplus -H [BMC MNGMT_IP] -U [administrator IPMI user ipmitool -I lanplus -H [BMC MNGMT_IP] -U [administrator IPMI user www.kontron.com // 173...
- Page 174 [IPMI user ID] [new IPMI user name] set name [IPMI user ID] [new IPMI user name] NOTE: The first and second user names of the user list are reserved fields and therefore can't be modified. NOTE: www.kontron.com // 174...
- Page 175 Settings in the left side menu and click on User User Management . Management Step_3 Select the ID of the user to enable . NOTE: The first and second NOTE: users are reserved fields and therefore can't be modified. www.kontron.com // 175...
- Page 176 RemoteServer_OSPrompt:~# ipmitool ipmitool -I lanplus -H [BMC MNGMT_IP] -U [administrator IPMI user -I lanplus -H [BMC MNGMT_IP] -U [administrator IPMI user name] -P [administrator IPMI password] user enable name] -P [administrator IPMI password] user enable [USER_ID] [USER_ID] www.kontron.com // 176...
- Page 177 Accessing a BMC using the Web UI for access instructions. Step_1 Access the BMC Web UI of the server. Step_2 Click on Settings Settings in the left side menu and click on User User Management . Management www.kontron.com // 177...
- Page 178 OS through SSH, RDP or the platform serial port, print the list of users and select the ID of the user to disable. LocalServer_ OSPrompt:~# ipmitool user ipmitool user list [LAN_CHANNEL] list [LAN_CHANNEL] Step_2 Disable the selected user. www.kontron.com // 178...
- Page 179 Step_3 Select the ID of the user to manage. NOTE: The first and second NOTE: users are reserved fields and therefore can't be overwritten. Step_4 Configure the privilege level for each channel according to the application's requirements. Step_5 Press on Save Save to exit. www.kontron.com // 179...
- Page 180 NOTE: The first and second user names of the user list are reserved fields and therefore can't be modified. NOTE: Co Co nfiguring SNMP users nfiguring SNMP users Relevant sections: Relevant sections: Accessing a BMC using SNMP BMC Accessing a BMC using the Kontron linux snmp-agent www.kontron.com // 180...
- Page 181 To enable or disable SNMP access, refer to Configuring SNMP BMC Configuring SNMP users using the Kontron linux snmp-agent Configuring SNMP users using the Kontron linux snmp-agent NOTE : The current implementation supports version 3 of the SNMP protocol. For the commands to work, snmpwalk NOTE : version 5.8 or higher must be installed.
- Page 182 NOTE: the ROOT_URL. Step_7 Verify that the credentials updated correctly by opening a new session in the Redfish API. Adding a Redfish user Adding a Redfish user Refer to Accessing a BMC using Redfish for access instructions. www.kontron.com // 182...
- Page 183 Step_3 Verify that the user has been deleted properly. RemoteComputer_OSPrompt:~# curl -k -s curl -k -s [ROOT_URL]AccountService/Accounts | jq [ROOT_URL]AccountService/Accounts | jq Configuring Redfish privilege level Configuring Redfish privilege level Refer to Accessing a BMC using Redfish for access instructions. www.kontron.com // 183...
-
Page 184: Table Of Contents
Configuring a static IP address Configuring a static IP address using the BIOS setup menu Accessing the BIOS setup menu Accessing the BMC network configuration menu Configuring a static IP address Configuring a static IP address using IPMI www.kontron.com // 184... -
Page 185: Bmc Architecture
Configuring a dynamic IP address BMC architecture BMC architecture One management IP address can be configured for the CG2400 platform (LAN channel 1). By default, the IP addresses of the network interfaces of the BMC are obtained through the DHCP protocol. Refer to Product architecture for more information on network connectivity. -
Page 186: Discovering The Platform Management Ip Address Using The Bios
DHCP server is configured for Dynamic DNS update, an entry will be added for a host name that is made up of the “CG2400” prefix and the BMC MAC address. For example, if we use the MAC address discovered for the MGMT port of the CG2400 (i.e. 00:a0:a5:d2:e9:0a 00:a0:a5:d2:e9:0a , refer to... - Page 187 A serial console tool is installed on the external computer. Speed (Baud): 115200 Data bits: 8 Stop bits: 1 Parity: None Flow Control: None Recommended emulation mode: VT100+ NOTE: NOTE: PuTTY is recommended. Port location Port location www.kontron.com // 187...
- Page 188 Access procedure Access procedure www.kontron.com // 188...
- Page 189 Step_4 The BIOS sign on screen displays “Entering Setup…”. NOTE: It will take several seconds to display and NOTE: enter the BIOS setup menu. Step_5 The BIOS setup menu is displayed. Accessing the BMC network configuration menu Accessing the BMC network configuration menu www.kontron.com // 189...
-
Page 190: Discovering The Platform Management Ip Address Using Dhcp Server Logs
The following example illustrates a command prompt method for use with a Linux based DHCP server. This may need to be adjusted to reflect a specific DHCP infrastructure (this action can generally also be done through a DHCP server Web interface). www.kontron.com // 190... -
Page 191: Configuring A Static Ip Address
Accessing the BMC network configuration menu Accessing the BMC network configuration menu Step_1 From the BIOS menu, use the arrow keys to select Server Mgmt . Server Mgmt Step_2 Use the arrow keys to select BMC network BMC network configuration . configuration www.kontron.com // 191... -
Page 192: Configuring A Static Ip Address
Step_3 Change the Station IP address Station IP address . NOTE: This is the management IP address ( BMC NOTE: MNGMT_IP ). MNGMT_IP Step_4 Change the Subnet mask Subnet mask . Step_5 (Optional) Change the Router IP address Router IP address . www.kontron.com // 192... -
Page 193: Configuring A Static Ip Address Using Ipmi
IOL. To use IOL, add the IOL parameters to the command: -I lanplus -H [BMC MNGMT_IP] - -I lanplus -H [BMC MNGMT_IP] - U [IPMI user name] -P [IPMI password] . U [IPMI user name] -P [IPMI password] Configuring a static IP address Configuring a static IP address www.kontron.com // 193... - Page 194 A dynamic IP address can be configured: Using the BIOS setup menu Using IPMI Configuring a dynamic IP address using the BIOS setup menu Configuring a dynamic IP address using the BIOS setup menu www.kontron.com // 194...
- Page 195 IP address. In this case, the BIOS menu information will need to be refreshed by restarting the server and re-entering the BIOS. Configuring a dynamic IP address using DHCP Configuring a dynamic IP address using DHCP www.kontron.com // 195...
- Page 196 IOL. To use IOL, add the IOL parameters to the command: -I lanplus -H [BMC MNGMT_IP] - -I lanplus -H [BMC MNGMT_IP] - U [IPMI user name] -P [IPMI password] . U [IPMI user name] -P [IPMI password] Configuring a dynamic IP address Configuring a dynamic IP address www.kontron.com // 196...
- Page 197 NOTE: The system time is not set after powering up the unit. Resetting the server is sufficient to set it automatically once the BMC NTP server is configured. Configuring the NTP using the Web UI Configuring the NTP using the Web UI Prerequisites Prerequisites www.kontron.com // 197...
- Page 198 NOTE: It may take several seconds or NOTE: minutes before the BMC synchronizes the time with the NTP server. Configuring the NTP u sing IPMI (IOL or KCS) Configuring the NTP u sing IPMI (IOL or KCS) Prerequisites (IOL) Prerequisites (IOL) www.kontron.com // 198...
- Page 199 Step_2 Verify that the local time and date match the server's time and date. LocalServer_OSPrompt:~# ipmitool sel time get ipmitool sel time get Setting the BMC time and date Setting the BMC time and date Relevant section: Relevant section: Decoding NTP raw configuration data www.kontron.com // 199...
- Page 200 Step_2 Verify that the BMC time and date match with the local time and date. NOTE: It may take several seconds or minutes before the BMC synchronizes time with the NTP server. NOTE: Decoding NTP raw configuration data Decoding NTP raw configuration data www.kontron.com // 200...
- Page 201 Enter the BIOS menu on the next boot using IPMI Enabling Retry Boot Order when CSM is disabled Configuring Secure Erase Enabling Secure Boot Configuring the TPM Changing the boot order Changing the boot order Refer to Accessing the BIOS for access instructions. www.kontron.com // 201...
- Page 202 IOL. To use IOL, add the IOL parameters to the command: -I lanplus -H [BMC MNGMT_IP] - -I lanplus -H [BMC MNGMT_IP] - U [IPMI user name] -P [IPMI password] . U [IPMI user name] -P [IPMI password] www.kontron.com // 202...
- Page 203 Step_1 To be able to retry the boot sequence indefinitely the EFI shell must be disabled in the list of boot options. Configuring Secure Erase Configuring Secure Erase Refer to Accessing the BIOS for access instructions. www.kontron.com // 203...
- Page 204 Enter to confirm and save the new boot order. Step_3 Use the following application note to Secure Secure Erase Erase the applicable drive. Enabling Secure Boot Enabling Secure Boot Refer to Accessing the BIOS for access instructions. www.kontron.com // 204...
- Page 205 Using the keyboard arrows, select the Save & Save & Exit Exit menu, go to Save Changes and Exit Save Changes and Exit and press Enter Enter to confirm. Configuring the TPM Configuring the TPM Refer to Accessing the BIOS for access instructions. www.kontron.com // 205...
- Page 206 Save Changes and Exit and press Enter Enter to confirm. Customizing platform data Customizing platform data {This article describes how to customize field replaceable unit data.} Table of contents Customizing platform FRU data using IPMI FRU customizing commands www.kontron.com // 206...
- Page 207 LocalServer_OSPrompt:~# ipmitool fru ipmitool fru edit [FRU_ID] field edit [FRU_ID] field [FRU_COMMAND] [VALUE] [FRU_COMMAND] [VALUE] NOTE: Refer to NOTE: FRU commands for available commands. Step_3 Confirm changes were properly applied. LocalServer_OSPrompt:~# ipmitool fru ipmitool fru print print www.kontron.com // 207...
- Page 208 CSM (Compatibility Support Module) legacy support is activated). If UEFI network services are not active, they must be enabled before VLANs can be configured. Enabling the UEFI Network Stack and configuring CSM Enabling the UEFI Network Stack and configuring CSM www.kontron.com // 208...
- Page 209 VLAN Configuration VLAN Configuration (MAC:xxxxxxxxxxxx) section. (MAC:xxxxxxxxxxxx) Select Enter Configuration Menu Enter Configuration Menu . NOTE: The MAC address will be the one o f NOTE: the X722 10GbE port for which you want to configure VLANs. www.kontron.com // 209...
- Page 210 VLANs. Step_5 Repeat steps 1 to 4 to set VLANs in the other X722 10GbE port, as needed. Step_6 Press F4 to save and exit. Removing VLANs Removing VLANs Refer to Accessing the BIOS for access instructions. www.kontron.com // 210...
- Page 211 Configuring the BMC when in non-redundant PSU configuration Configuring the BMC when in non-redundant PSU configuration The default configuration of the CG2400 platform includes two redundant power supply units (PSU). If the final system configuration uses only one PSU, the BMC must be reconfigured.
- Page 212 Operating system User interface User interface User name User name Password Password Operating system Application specific Application specific Kontron linux snmp- Application specific Application specific agent Refer to Configuration of system access Refer to Configuration of system access methods methods www.kontron.com...
- Page 213 The BMC can be accessed using SNMP. However, before configuring SNMP, the default user name and password must be changed as a minimum of 8 characters are required for both. Refer to Configuring BMC user names and passwords using the Web UI The CG2400 platform includes one BMC. User User User name...
- Page 214 2 The BMC IP address is known (refer to section Configuring/Baseboard management controller - BMC to obtain the BMC MNGMT_IP). 3 The remote computer has access to the management network subnet. Relevant section: Relevant section: Baseboard management controller - BMC Browser considerations Browser considerations www.kontron.com // 214...
- Page 215 Accessing the BMC of the server for which you want to access the OS Accessing the BMC of the server for which you want to access the OS To obtain the list of default user names and passwords, refer to Default user names and passwords www.kontron.com // 215...
- Page 216 Step_4 Log in to the BMC Web UI using the appropriate credentials. NOTE: Default Web UI user name and password is NOTE: admin/admin. Step_5 You now have access to the management Web UI of the BMC. You can use the interface. www.kontron.com // 216...
- Page 217 Accessing an OS using the display port (VGA) Accessing an OS using the display port (VGA) Prerequisites Prerequisites An OS is installed. A physical connection to the VGA display port of the device is required. A mouse and/or keyboard is connected. www.kontron.com // 217...
- Page 218 1.8.18. Relevant sections: Relevant sections: Baseboard management controller - BMC Common software installation Access procedure Access procedure To obtain the list of default user names and passwords, refer to Default user names and passwords www.kontron.com // 218...
- Page 219 Recommended emulation mode: VT100+ NOTE: PuTTY is recommended. NOTE: Redirection to the serial port is configured in the OS. NOTE: If the OS was installed by Kontron, console redirection is enabled by default. NOTE: Relevant section: Relevant section: Baseboard management controller - BMC www.kontron.com...
- Page 220 Step_2 The OS start screen will be displayed. NOTE : If the OS is not displayed, perform a server reset. Refer to NOTE : Platform power management www.kontron.com // 220...
- Page 221 The BMC IP address is known (refer to section Configuring/Baseboard management controller - BMC to obtain the BMC MNGMT_IP). 2 The remote computer has access to the management network subnet. Relevant section: Relevant section: Baseboard management controller - BMC Browser considerations Browser considerations www.kontron.com // 221...
-
Page 222: Access Procedure
Accessing the BMC of the server for which you want to access the BIOS Accessing the BMC of the server for which you want to access the BIOS To obtain the list of default user names and passwords, refer to Default user names and passwords www.kontron.com // 222... - Page 223 Step_4 Log in to the BMC Web UI using the appropriate credentials. NOTE: Default Web UI user name and password is NOTE: admin/admin. Step_5 You now have access to the management Web UI of the BMC. You can use the interface. www.kontron.com // 223...
-
Page 224: Launching The Kvm
Step_3 A new browser window opens and displays the server screen. NOTE: If an OS is installed, the image displayed NOTE: might be that of the OS. Accessing the BIOS setup menu Accessing the BIOS setup menu www.kontron.com // 224... - Page 225 HID Queue is about to get full. Kindly hold on a second(s).. second(s).. Kontron suggests modifying the Setup Prompt Timeout Setup Prompt Timeout parameter to give users more time to react. Keeping the focus (single-tasking) on the KVM window is also a good practice to enter the BIOS setup menu each time it is needed.
-
Page 226: Accessing The Bios Using The Display Port (Vga)
-H [BMC MNGMT_IP] -U [IPMI user name] -P [IPMI password] sol deactivate name] -P [IPMI password] sol deactivate Step_2 Activate an SOL session. RemoteComputer_OSPrompt:~# ipmitool -I ipmitool -I lanplus -H [BMC MNGMT_IP] -U [IPMI user lanplus -H [BMC MNGMT_IP] -U [IPMI user www.kontron.com // 226... - Page 227 “Entering Setup…”. Step_5 The BIOS sign on screen displays “Entering Setup…”. NOTE: It will take several seconds to display and NOTE: enter the BIOS setup menu. Step_6 The BIOS setup menu is displayed. www.kontron.com // 227...
- Page 228 If this is the case, reset the server as recommended for the operating system. NOTE: When a server reset command is sent, it NOTE: may take a few seconds for the BIOS sign on www.kontron.com // 228...
- Page 229 Accessing the BIOS using Redfish Prerequisites Prerequisites The Redfish root URL is known (refer to Configuring/Configuring system access methods). An HTTP client tool is installed on the remote computer. A JSON parsor command-line tool such as jq jq is installed. www.kontron.com // 229...
- Page 230 , .DisplayName, ""' | grep "[WORD]" -B 1 , .DisplayName, ""' | grep "[WORD]" -B 1 Step_5 Read the configuration value. RemoteComputer_OSPrompt:~$ curl -k -s curl -k -s [ROOT_URL ]Systems/Self/Bios | jq [ROOT_URL ]Systems/Self/Bios | jq '.Attribute. [ATTRIBUTE_TAG '.Attribute. [ATTRIBUTE_TAG ] ] ' ' www.kontron.com // 230...
-
Page 231: Relevant Section: Baseboard Management Controller - Bmc
Prerequisites Access procedure Accessing a BMC using SNMP Accessing a BMC using BMC SNMP Prerequisites Access procedure Accessing a BMC using the Kontron linux snmp-agent Prerequisites Access procedure Accessing a BMC using Redfish Prerequisites Access procedure A BMC can be accessed through various methods:... - Page 232 Web browser's documentation. NOTE: The procedure may vary depending on the browser used. Examples provided use Firefox. NOTE: Access procedure Access procedure To obtain the list of default user names and passwords, refer to Default user names and passwords www.kontron.com // 232...
- Page 233 Step_4 Log in to the BMC Web UI using the appropriate credentials. NOTE: Default Web UI user name and password is NOTE: admin/admin. Step_5 You now have access to the management Web UI of the BMC. You can use the interface. www.kontron.com // 233...
- Page 234 OS through SSH, RDP or the platform serial port, e nter the desired command. LocalServer_OSPrompt:~# ipmitool [IPMI ipmitool [IPMI command] command] For a list of supported IPMI commands, refer to Supported IPMI commands For a list of all the sensors, refer to Sensor list www.kontron.com // 234...
- Page 235 An OS is installed. The OS IP address is known. The remote computer has access to the OS subnet. The latest snmp-agent rpm package provided by Kontron is installed on the server. Relevant section: Relevant section: Configuration of system access methods...
-
Page 236: Remotecomputer_Osprompt:~$ Curl -K -S Curl -K -S
Platform power management {This article provides instructions to safely power on, power off or reboot a component.} Table of contents Available power commands Power off Power on Reset (warm boot) Power cycle (cold boot) ACPI shutdown (clean shutdown) www.kontron.com // 236... -
Page 237: Available Power Commands
Available power commands Available power commands The power states of the CG2400 platform can be managed using various commands sent through the platform Web UI or an IPMI client (IOL or KCS). It is recommended to use the Web UI, and automation of power management tasks requires an IPMI access . -
Page 238: Power Off
[ROOT_URL]Chassis/Self | jq .PowerState Power on Power on Using the Web UI Using IPMI (IOL) Using Redfish Power on using IPMI (IOL) Power on using IPMI (IOL) Refer to Accessing a BMC using IPMI over LAN (IOL) for access instructions. www.kontron.com // 238... -
Page 239: Reset (Warm Boot)
Using the Web UI Using IPMI (IOL) Using IPMI (KCS Using Redfish Reset (warm boot) using IPMI (IOL) Reset (warm boot) using IPMI (IOL) Refer to Accessing a BMC using IPMI over LAN (IOL) for access instructions. www.kontron.com // 239... -
Page 240: Power Cycle (Cold Boot)
'{"ResetType":"ForceRestart"}' -H "Content-Type: application/json" d '{"ResetType":"ForceRestart"}' -H "Content-Type: application/json" Step_3 Verify the power status. RemoteComputer_OSPrompt:~$ curl -k -s curl -k -s [ROOT_URL ]Chassis/Self | [ROOT_URL ]Chassis/Self | jq .PowerState jq .PowerState Power cycle (cold boot) Power cycle (cold boot) www.kontron.com // 240... -
Page 241: Acpi Shutdown (Clean Shutdown)
ACPI shutdown (clean shutdown) Using the Web UI Using IPMI (IOL) Using IPMI (KCS Using Redfish ACPI shutdown using IPMI (IOL) ACPI shutdown using IPMI (IOL) Refer to Accessing a BMC using IPMI over LAN (IOL) for access instructions. www.kontron.com // 241... - Page 242 [ROOT_URL ]Chassis/Self | [ROOT_URL ]Chassis/Self | jq .PowerState jq .PowerState Sending a power command using the Web UI Sending a power command using the Web UI Refer to Accessing a BMC using the Web UI for access instructions. www.kontron.com // 242...
- Page 243 It is possible to configure how a system behaves in terms of power management in case of power loss or outage. This feature was named Resume on AC Power Loss Resume on AC Power Loss in Kontron’s previous CG generation (CG2200, CG2300). This setting can be set using IPMI or using the BIOS menu.
- Page 244 Monitoring using the BMC Web UI Accessing sensor details Configuring sensors Monitoring using IPMI Viewing sensor details Configuring sensors Monitoring using SNMP Monitoring using BMC SNMP Monitoring using the Kontron linux snmp-agent Monitoring using Redfish Creating URL extensions Viewing sensor details www.kontron.com // 244...
- Page 245 For instructions on how to access the BMC, refer to Accessing a BMC Monitoring using the BMC Web UI Monitoring using the BMC Web UI Accessing sensor details Accessing sensor details Refer to Accessing a BMC using the Web UI for access instructions. www.kontron.com // 245...
- Page 246 Step_3 The sensor list will be displayed. Step_4 Scroll down to see the list of sensors. Step_5 Click on a sensor to see more details. Configuring sensors Configuring sensors NOTE: Sensor thresholds are set to factory default when resetting the platform. NOTE: www.kontron.com // 246...
- Page 247 OS through SSH, RDP or the platform serial port , e nter the command. LocalServer_OSPrompt:~# ipmitool sensor ipmitool sensor Step_2 Use the sdr sdr command to see more details about a specific sensor. LocalServer_OSPrompt:~# ipmitool sdr ipmitool sdr get [SENSOR_ID] get [SENSOR_ID] www.kontron.com // 247...
- Page 248 Using BMC SNMP Using the Kontron linux snmp-agent Each method is independent. When monitoring the platform, there are multiple factors to consider for each method. Each method gives access to different information. For instance, threshold values can only be read using the...
- Page 249 Monitoring using the Kontron linux snmp-agent Refer to Configuring Kontron linux snmp-agent on the platform for configuration instructions. See also Configuring SNMP users using the Kontron linux snmp-agent to manage SNMP users. Kontron linux snmp-agent OIDs Kontron linux snmp-agent OIDs Group...
- Page 250 -v3 - l [AUTH_LEVEL] -u [USER_NAME] -a l [AUTH_LEVEL] -u [USER_NAME] -a [AUTH_PROTOCOL] -A [PASSWORD] [AUTH_PROTOCOL] -A [PASSWORD] [SERVER_IP] KONTRON-SERVER-BASEBOARD:: [SERVER_IP] KONTRON-SERVER-BASEBOARD:: [OID_SUB_GROUP] | grep "[SENSOR_NAME]" [OID_SUB_GROUP] | grep "[SENSOR_NAME]" Step_2 Set the value of the desired threshold. RemoteComputer_OSPrompt:~# snmpset -v3 -...
- Page 251 Various PCI/PCIe errors detected by BIOS (GenId:21) Memory Error Various Memory errors detected by BIOS (GenId:21) Processor Error Various Processor errors detected by BIOS (GenId:21) Direct Memory Various DMA errors Access (DMA) Error detected by BIOS (GenId:21) www.kontron.com // 251...
- Page 252 CPU Zone Temp Temperature of CPU Zone PCH Temp Temperature of BMC Temp BMC Temperature PCIe A Temp PCIe A Temperature (J33 Extension cable) Managing extension probe PCIe B Temp PCIe B Temperature (J37 Extension cable) Managing extension probe www.kontron.com // 252...
- Page 253 P2 DIMME1 Temp Temp CPU2 DIMM Channel P2 DIMMF1 Temp Temp CPU2 DIMM Channel P1 DIMMA1 T Mrgn Temp Margening CPU1 DIMM Channel P1 DIMMA2 T Mrgn Temp Margening CPU1 DIMM Channel P1 DIMMB1 T Mrgn Temp Margening www.kontron.com // 253...
- Page 254 Channel P2 DIMMF1 T Mrgn Temp Margening CPU2 DIMM Channel Fan Failure Indicates a defective fan Fan1 Speed Speed of fan #1 (RPM) Fan2 Speed Speed of fan #2 (RPM) Fan3 Speed Speed of fan #3 (RPM) www.kontron.com // 254...
- Page 255 Temperature of Power supply 2 CPU ERR2 Catastrophic error sensor CATERR Catastrophic error sensor CPU Missing Processor presence state P1 Status Processor 1 status P2 Status Processor 2 status P1 DTS Thrm Mrgn Thermal margin before Processor 1 www.kontron.com // 255...
- Page 256 HDD2 Status HDD2 Presence status HDD3 Status HDD3 Presence status HDD4 Status HDD4 Presence status HDD5 Status HDD5 Presence status CPU Error Interpreting sensor data Interpreting sensor data {This article describes how to interpret sensor data.} www.kontron.com // 256...
- Page 257 The third column writes discrete discrete for discrete sensors or a unit type for non-discrete sensors. Step_3 Refer to Interpreting non-discrete sensor data Interpreting discrete sensor data depending on the sensor's event/reading type. Interpreting non-discrete sensor data Interpreting non-discrete sensor data www.kontron.com // 257...
- Page 258 BMC Web UI Using IPMI A A ccessing event data byte 2 using the BMC Web UI ccessing event data byte 2 using the BMC Web UI Refer to Accessing a BMC using the Web UI for access instructions. www.kontron.com // 258...
- Page 259 Accessing a BMC using IPMI via KCS ). To use KCS, remove the IOL parameters from the command: -I lanplus -H [BMC MNGMT_IP] -U [IPMI user name] -P [IPMI password] -I lanplus -H [BMC MNGMT_IP] -U [IPMI user name] -P [IPMI password] . www.kontron.com // 259...
- Page 260 For a list of all the platform sensors, refer to Sensor list Sensor type Sensor type The sensor type attribute defines what the sensor is monitoring. The following table lists all the IPMI sensor types present on the platform. www.kontron.com // 260...
- Page 261 Threshold based event/reading type This type of sensor creates events as the numerical reading of a sensor reaches a pre-established threshold value. Threshold-based sensors on this platform can either report a voltage, a temperature or a fan speed. www.kontron.com // 261...
- Page 262 Correctable ECC / other correctable memory error logging limit event data reached table below for more information. 25h Processor 07h (Processor) Configuration Error Error NOTE: See NOTE: SMI Handler generated event data table below for more information. www.kontron.com // 262...
- Page 263 Timer expired Watchdog Hard reset NOTE: See NOTE: BIOS Power down generated Power Cycle event data table below Timer interrupt for more information. 07h System 10h(Event System event log cleared Event Log Logging System event log full www.kontron.com // 263...
- Page 264 P1 Status 07h (Processor) Thermal trip P2 Status Throttled 50h HDD0 0Dh(Drive Slot / Drive Presence Status Bay) HDD1 Status 52h HDD2 Status 53h HDD3 Status 54h HDD4 Status 55h HDD5 Status Other event/reading types Other event/reading types www.kontron.com // 264...
- Page 265 When a sensor triggers an event in the system event log, event data byte 2 might contain additional information about the event. This event data byte must be read solely on the specific offset listed in the following tables. www.kontron.com // 265...
- Page 266 0x1 = DIMM 2 25h Processor [7:4] - CPU Socket [7:4] - Processor Error Type: Error (Processor) Number: 0x0 = UNKNOWN 0x0 = CPU1 0x1 = Cache 0x1 = CPU2 0x2 = TLB (Translation Look aside Buffer) www.kontron.com // 266...
- Page 267 0x1 = Last Boot 66h = Master abort 67h = Multicast target error for ITC 68h = ECC corrected error in the OTC dat_dword RF 69h = Misc block request overflow 6Ah = IOAPIC RTE parity error www.kontron.com // 267...
- Page 268 NOTE: The following procedure is a typical configuration of SNMP trap and therefore may require additionnal NOTE: customization. Step_1 Enable Platform Event Filtering (PEF). LocalServer_OSPrompt:~# ipmitool raw ipmitool raw 0x04 0x12 0x1 0x03 0x04 0x12 0x1 0x03 www.kontron.com // 268...
- Page 269 0xff 0x0 0x0 0x0 0x0 0x0 0x0 0x0 0x0 0xff 0x0 0x0 0x0 0x0 0x0 0x0 0x0 0x0 NOTE: A maximum of 16 event filter can be NOTE: configured. Alarm setup examples Alarm setup examples Detecting an HDD removal Detecting an HDD removal www.kontron.com // 269...
- Page 270 0xff 0x0 0x0 0x0 0x0 0x0 0x0 0x0 0x0 0x0 System Inventory System Inventory The System Inventory provides information about the CPUs, memory DIMMS, storage, sensors, etc. Accessing Inventory Accessing Inventory Refer to Accessing a BMC using the Web UI for access instructions. www.kontron.com // 270...
- Page 271 BIOS backup and restore Upgrading [Content under creation] Scaling System event log System event log {This article gives step-by-step instructions to view and manage system event logs.} Table of contents Accessing the SEL using the BMC Web UI www.kontron.com // 271...
- Page 272 Accessing the SEL using the BMC Web UI Accessing the SEL using the BMC Web UI Accessing the system event log Accessing the system event log Refer to Accessing a BMC using the Web UI for access instructions. www.kontron.com // 272...
- Page 273 NOTE: Depending on the event, there may not be an associated sensor attribute. However, if this attribute is present, NOTE: refer to Interpreting sensor data for further interpretation instructions. Clearing the system event log Clearing the system event log www.kontron.com // 273...
- Page 274 Associated sensor - 4th column (optional) Description - 5th column NOTE: Depending on the event, there may not be an associated sensor attribute. However, if this attribute is present, NOTE: refer to Interpreting sensor data for further interpretation instructions. www.kontron.com // 274...
- Page 275 -H<BMC IP> -U admin -P admin -I lanplus sel time set "11/14/2018 17:06:57" -N 5 Accessing the SEL using Redfish Accessing the SEL using Redfish Accessing the system event log Accessing the system event log Refer to Accessing a BMC using Redfish for access instructions. www.kontron.com // 275...
- Page 276 RemoteComputer_OSPrompt:~# curl -k -s [ROOT_URL]Managers/Self/LogServices/SEL/Entries | jq curl -k -s [ROOT_URL]Managers/Self/LogServices/SEL/Entries | jq Components replacement Components replacement {This article gives detailed instructions to safely replace components.} To replace a component on a CG2400 platform, refer to Components installation and assembly www.kontron.com // 276...
- Page 277 In the image, the status of the snapshot creation is In-progress , the current step is Snapshot MTD In-progress Snapshot MTD Flash erase and the progress is 4 4 % completed. Flash erase Restoring the BIOS Restoring the BIOS www.kontron.com // 277...
- Page 278 [BYTE6] Status [BYTE7-BYTE10] Unix timestamp In the image, the version is 1.33.00000000 1.33.00000000 , the status is 0x00 0x00 and the timestamp is 1325381880 1325381880 . Description of creation and restoration steps Description of creation and restoration steps www.kontron.com // 278...
- Page 279 General considerations General considerations You may have been informed by Kontron that your running system would benefit from the latest firmware upgrades. Furthermore, n ewer versions of firmware components were possibly released between the platform manufacturing date and the delivery date.
- Page 280 Downloading the latest firmware versions Downloading the latest firmware versions Go to https://symkloud.com to download the latest firmware versions available for the CG2400. Then, proceed with the desired upgrade: Upgrading the BMC and the FPGA using ipmitool – recommended Upgrading the...
- Page 281 -z 7000 -I lanplus -H [BMC MNGMT_IP] -U -U 7000 -I lanplus -H [BMC MNGMT_IP] [IPMI_USER_NAME] -P -P [IPMI_USER_NAME] [IPMI_PASSWORD] hpm check [IPMI_PASSWORD] hpm check Upgrading the BIOS and 10GbE LAN Upgrading the BIOS and 10GbE LAN www.kontron.com // 281...
- Page 282 Step_1 Transfer the latest upgrade package compressed file (zip or tar.gz) to an installed Linux residing on a storage device (M.2, HDD/SSD) of the CG2400. Step_2 From an OS command prompt, uncompress the zip file. NOTE: NOTE: To uncompress a zip file, you might need to install an additional Linux package.
- Page 283 Step_1 Uncompress and copy files to the root of a USB key formatted as FAT32. Step_2 Insert the USB key in the CG2400, using the front or rear USB port of the CG2400 platform. Step_3 Reset the system. See Platform power management for reset methods.
- Page 284 The CG2400 platform has six 80 mm x 38 mm fans, configured as three redundant pairs. There are three cooling zones delimited by the colored dotted lines in the figure above. Zone 1 (green dotted lines) contains fans 1 and 2, which cool both CPUs, half of the DIMMs and all the other components in this zone.
- Page 285 NOTE: For a tailored thermal management solution, it is possible to include up to two additional optional probes in the NOTE: cooling algorithm to monitor customer specific zones. See Optional thermal probe for more details. CG2400 aggregated temperature sensors CG2400 aggregated temperature sensors ID(hex) ID(hex) Sensor Sensor...
- Page 286 Temperature of Processor 2 DIMM Channel Temperature 0x01 (Threshold Temp (0x01) Based) P2 DIMMD1 Temperature of Processor 2 DIMM Channel Temperature 0x01 (Threshold Temp (0x01) Based) P2 DIMMD2 Temperature of Processor 2 DIMM Channel Temperature 0x01 (Threshold Temp (0x01) Based) www.kontron.com // 286...
- Page 287 The OTP circuit features built-in hysteresis to prevent the power supply from oscillating on and off because of temperature recovering conditions. The OTP trip level is set for a minimum of 4°C of ambient temperature hysteresis. www.kontron.com // 287...
- Page 288 Description Description The CG2400 platform offers the flexibility to add up to two specific temperature measurement points by connecting optional temperature probes to the platform's motherboard. The probes have to be installed or affixed near thermal measurement points of interest. For example, a measurement point can be a specific chip or a known hot zone found on a PCIe card.
- Page 289 Including thermal probes into the platform's cooling algorithm The thermal management of the CG2400 platform is handled by the motherboard's integrated BMC. The BMC uses information collected from on-board temperature sensors to adjust the speed of the fans and to regulate the temperature of the platform according to a PID algorithm.
- Page 290 FRU information can be collected: Using the BMC Web UI Using IPMI Collecting FRU information using the BMC Web UI Collecting FRU information using the BMC Web UI Refer to Accessing a BMC using the Web UI for access instructions. www.kontron.com // 290...
-
Page 291: Collecting Fru Information Using Ipmi
Using the BMC Web UI Using IPMI Collecting the firmware version using the BMC Web UI Collecting the firmware version using the BMC Web UI Refer to Accessing a BMC using the Web UI for access instructions. www.kontron.com // 291... -
Page 292: Collecting The Firmware Version Using Ipmi
Collecting the system event logs System event logs can be collected: Using the BMC Web UI Using IPMI Collecting the system event logs using the BMC Web UI Collecting the system event logs using the BMC Web UI www.kontron.com // 292... -
Page 293: Accessing The System Event Log
Step_4 The system event log is displayed. Step_5 Click on an event and collect the following information: 1. Event ID 2. Associated sensor 3. Description 4. Time asserted Downloading the system event log Downloading the system event log www.kontron.com // 293... - Page 294 Normal BIOS upgrade process did not completed successfully, BIOS is now corrupted. Normal BIOS upgrade process did not completed successfully, BIOS is now corrupted. Corrupted BIOS can be recovered if a BIOS backup has been generated. BIOS backup and restore for details. www.kontron.com // 294...
-
Page 295: Using Ipmi
Accessing a BMC using IPMI over LAN (IOL) ). To use IOL, add the IOL parameters to the command: -I -I lanplus -H [BMC MNGMT_IP] -U [IPMI user name] -P [IPMI password] . lanplus -H [BMC MNGMT_IP] -U [IPMI user name] -P [IPMI password] www.kontron.com // 295... - Page 296 Power down the CG2400. Step_2 Put a jumper between pins 11-12 of connector J36 (designated "Clear BIOS or BIOS Default" on the CG2400). Step_3 Power up the CG2400. The BIOS will reset BIOS settings to "Optimized defaults" (default options are saved at the end of POST, before OS booting).
- Page 297 Step_6 Confirm the factory default restoration by clicking on NOTE: The platform will reset. NOTE: Restoring default BMC settings using Redfish Restoring default BMC settings using Redfish Refer to Accessing a BMC using Redfish for access instructions . www.kontron.com // 297...
- Page 298 Step_3 After reset, the BMC settings should have been restored to their default values. Support information Support information {This article provides a list of additional support resources.} Kontron's technical support team can be reached through the following means: By phone: 1-888-835-6676 By email: support-kci@kontron.com Via the websites: www.symkloud.com...
- Page 299 Some tools may not be required depending on the functionalities supported for the platform. Prerequisites Prerequisites Kontron linux snmp-agent is installed and running on the platform. Refer to Configuring Kontron linux snmp-agent on the platform 2. The net-snmp-utils package is installed. Refer to...
- Page 300 [RPM_PACKAGE] Step_2 Restart the snmpd and th ksnmpd service using the following commands: LocalServer_OSPrompt:~# service snmpd service snmpd restart restart LocalServer_OSPrompt:~# service ksnmpd service ksnmpd restart restart Using the RAID controller SNMP Using the RAID controller SNMP www.kontron.com // 300...
- Page 301 SAS version is installed, this OID needs to be used to get the data: 1.3.6.1.4.1.3582. 1.3.6.1.4.1.3582. If the SAS-IR SAS-IR version is installed, this OID needs to be used to get the data: 1.3.6.1.5.1.3582. 1.3.6.1.5.1.3582. Application notes Application notes What is this section about? Step-by-step procedures to execute specific use cases www.kontron.com // 301...
- Page 302 3 The hdparm command line tool is installed on the local server — it is recommended to use hdparm version 9.58. Relevant sections: Relevant sections: Basic BIOS - Secure Erase Common software installation Procedure Procedure Refer to Accessing the operating system of a server for access instructions. www.kontron.com // 302...
- Page 303 The nvme-cli command line tool is installed on the local server . Relevant sections: Relevant sections: Basic BIOS - Secure Erase Common software installation Procedure Procedure Refer to Accessing the operating system of a server for access instructions. www.kontron.com // 303...
- Page 304 {This article covers the basic instructions to configure and operate the StorCLI utility.} Table of contents References StorCLI documentation Software download URL Vocabulary Command arguments Abbreviations Installing StorCLI Prerequisites Compatibility list Installation Installing StorCLI on CentOS / RHEL www.kontron.com // 304...
- Page 305 /fall Foreign configuration specific commands Phy specific commands /bbu or /cv Battery Backup Unit or Cachevault commands /jbodx JBOD drive specific commands NOTE: The x x in an argument represents the ID of a specific element. NOTE: www.kontron.com // 305...
- Page 306 Interface Media Type Self Encryptive Drive Protection Info SeSz Sector Size Spun Down/PowerSave Transition Foreign UGUnsp Unsupported UGShld UnConfigured Shielded HSPShld Hotspare Shielded CFShld Configured Shielded Cpybck Copyback CBShld Copyback Shieled Installing StorCLI Installing StorCLI Prerequisites Prerequisites www.kontron.com // 306...
- Page 307 3 The Intel StorCLI package has been downloaded from the Software download URL Compatibility list Compatibility list Vendor Vendor Manufacturer P/N and description Manufacturer P/N and description Kontron P/N Kontron P/N Intel RS3DC080 1061-7348 SCM x8 PCIe 3.0 LSI SAS3108 RAID-On-Chip Intel RS3DC040...
- Page 308 Using the StorCLI utility Using the StorCLI utility Commands Commands The commands described in this section are: Help Show Delete Insert Help Help NOTE: For detailed explanations, refer to the NOTE: StorCLI documentation - Chapter 2.5, pages 9 to 11. www.kontron.com // 308...
- Page 309 LocalServer_OSPrompt:~# storcli /c0 show all storcli /c0 show all Shows all details about the first controller. LocalServer_OSPrompt:~# storcli /c0 /v0 show storcli /c0 /v0 show Shows all details about the first virtual drive of the first all all controller. www.kontron.com // 309...
- Page 310 The delete commands described in this section are: Deleting a virtual drive Deleting a hot spare drive from a virtual drive Deleting a virtual drive Deleting a virtual drive NOTE: The drive will automatically be removed from the OS after executing this procedure. NOTE: www.kontron.com // 310...
- Page 311 LocalServer_OSPrompt:~# storcli /[CX]/[EX] storcli /[CX]/[EX] show show Insert Insert The insert insert command replaces the configured drive that is identified as missing. NOTE: For detailed explanations, refer to the NOTE: StorCLI documentation - Chapter 2.6.3.2, pages 28 and 29. www.kontron.com // 311...
- Page 312 The set commands described in this section are: Set drive state Set alarm actions Set EGHS configuration Set drive state Set drive state NOTE: For detailed explanations, refer to the NOTE: StorCLI documentation - Chapter 2.6.3.3, pages 29 and 30. www.kontron.com // 312...
- Page 313 When a drive already contains a configuration from another controller, the controller will identify it as a foreign configuration. NOTE: For detailed explanations, refer to the NOTE: StorCLI documentation - Chapter 2.6.6, pages 51 and 52. The foreign configuration commands described in this section are: Display foreign configuration www.kontron.com // 313...
- Page 314 Removing a drive from a RAID Removing a drive from a RAID Step_1 Remove a drive from a RAID. LocalServer_OSPrompt:~# storcli /[CX]/[VX] storcli /[CX]/[VX] start migrate type=[RAID_TYPE] start migrate type=[RAID_TYPE] option=remove drives=[DRIVES] option=remove drives=[DRIVES] Possible RAID configurations Possible RAID configurations www.kontron.com // 314...
- Page 315 /[CX]/[VX]/[SX] delete hotsparedrive hotsparedrive Software RAID (VRoC) Software RAID (VRoC) Introduction Supported RAID How to enable the RAID options UEFI VROC SATA Driver Main Menu Create RAID Delete RAID Legacy VRoC Option ROM Acceding the Management Console www.kontron.com // 315...
- Page 316 Go into the BIOS Setup Utility, Advanced will have an entry called "Intel(R) VROC SATA Controller" UEFI UEFI VROC SATA Driver VROC SATA Driver Main Menu Main Menu Create RAID Create RAID Choose the RAID RAID Type Type (0 or 1) www.kontron.com // 316...
- Page 317 The VROC Module allow to create up to two Different RAID using the same Drives. Delete RAID Delete RAID Choose the RAID from the main menu list, then choose Delete Delete and apply the change. www.kontron.com // 317...
- Page 318 WARNING : CTRL+I only works via the Serial Console Redirection Hardware Specification Hardware Specification The CG2400M system is limited to six drives connected in the front bay. VRoC Option ROM & Dashboard VRoC Option ROM & Dashboard www.kontron.com // 318...
- Page 319 Convert a raid array to non-raid (Restore the configuration to default). This is the equivalent of a JBOD option. To select select a drive, use SPACE. SPACE. To complete complete the process, Press ENTER. ENTER. How the OS manage the RAID ? How the OS manage the RAID ? www.kontron.com // 319...
- Page 320 The installation works and the entire system is running on the RSTE RAID. (During the installation, the root / has been set to the RAID volume) Centos 7.4 Centos 7.4 Using a kickstart installation script, the process go through automatically and the installation work successfully. www.kontron.com // 320...
- Page 321 CG2400 Built-in 10GbE ports can operate at 1 or 10GbE. Kontron recommends the use of an additional PCIe (NIC) card to deploy the CG2400 in a 10 or 100Mbps only infrastructure. Intel I350, 2 or 4 ports, is a good example of such a compatible product since ports are 10,100 and 1000 Mbps capable.
- Page 322 This document assumes the reader has some knowledge about the Secure Boot process, and that the required set of keys and certificates has been properly generated. The following link provides guidelines on creating and managing such keys and certificates: www.kontron.com // 322...
- Page 323 Access the UEFI Setup Utility by pressing F2 or DEL when the sign-on screen is displayed during boot. Step_2 Access the Secure Boot Secure Boot submenu from the Security Security tab. Step_3 Access the Key Management page by selecting the Key Management menu item. Management www.kontron.com // 323...
- Page 324 CDROM. Step_8 From the list of files, select the Public Certificate file for the Platform Key (PK.cer in this example). Step_9 Specify that the file format is Public Key Certificate Public Key Certificate . www.kontron.com // 324...
- Page 325 Follow steps 6 to 11 to add a new db entry. If the certificate was appended to the database, the key source will be Mixed Mixed . Step_15 Select Save Changes and Exit Save Changes and Exit from the Setup Utility. www.kontron.com // 325...
- Page 326 To provision custom secure boot keys, keys may have to be generated. This article describes an example using Centos 7. Prerequisites Prerequisites Packages efitools and sbsigntools must be available. These packages are not official Centos packages. Procedure Procedure www.kontron.com // 326...
- Page 327 IPM device commands Watchdog timer commands BMC device and messaging commands IPMI 2.0 specific commands Chassis commands Bridge commands Bridge management commands Bridge discovery commands Bridging commands Bridge event commands Sensor event commands Storage commands FRU information commands www.kontron.com // 327...
- Page 328 Command name Command name Supported / Unsupported Supported / Unsupported 0x06 0x22 Reset Watchdog Timer Supported 0x06 0x24 Set Watchdog Timer Supported 0x06 0x25 Get Watchdog Timer Supported BMC device and messaging commands BMC device and messaging commands www.kontron.com // 328...
- Page 329 Get User Name Command Supported 0x06 0x47 Set User Password Command Supported 0x06 0x52 Master Write-Read Supported 0x06 0x58 Set System Info Parameters Supported 0x06 0x59 Get System Info Parameters Supported IPMI 2.0 specific commands IPMI 2.0 specific commands www.kontron.com // 329...
- Page 330 Set System Boot Options Supported 0x00 0x09 Get System Boot Options Supported 0x00 0x0A Set Front Panel Button Enables Supported 0x00 0x0B Set Power Cycle Interval Supported 0x00 0x0F Get POH Counter Supported Bridge commands Bridge commands www.kontron.com // 330...
- Page 331 0x30 Get Event Count Unsupported 0x02 0x31 Set Event Destination Unsupported 0x02 0x32 Set Event Reception Unsupported State 0x02 0x33 SendICMB Event Unsupported Message 0x02 0x34 Get Event Destination Unsupported 0x02 0x35 Get Event Reception Unsupported State www.kontron.com // 331...
- Page 332 0x04 0x2D Get Sensor Reading Supported 0x04 0x2E Set Sensor Type Supported 0x04 0x2F Get Sensor Type Supported 0x04 0x30 Set Sensor Reading And Event Status Supported Storage commands Storage commands FRU information commands FRU information commands www.kontron.com // 332...
- Page 333 0x0a 0x25 Partial Add SDR Supported 0x0a 0x27 Clear SDR Supported Repository 0x0a 0x28 Get SDR Supported Repository Time 0x0a 0x2C Run Initialization Supported Agent 0x0a 0x26 Delete SDR Supported Repository SEL device commands SEL device commands www.kontron.com // 333...
- Page 334 Command name Supported / Unsupported Supported / Unsupported 0x0c 0x22 Get SOL Configuration Supported Parameters 0x0c 0x21 Set SOL Configuration Supported Parameters AMI commands AMI commands AMI restore factory default settings command AMI restore factory default settings command www.kontron.com // 334...
- Page 335 Collection of memories for this system | -GET | /redfish/v1/Systems/[SYSTEM_INSTANCE]/Memory Collection of processors | -GET | /redfish/v1/Systems/[SYSTEM_INSTANCE]/Processors Collection of ethernet interfaces for this system | -GET /redfish/v1/Systems/[SYSTEM_INSTANCE]/EthernetInterfaces Collection of simple storage for this system | -GET | /redfish/v1/Systems/[SYSTEM_INSTANCE]/SimpleStorage www.kontron.com // 335...
- Page 336 Information about the metric report log service | -GET | /redfish/v1/TelemetryService/LogServices/MetricReportLog Metric report log service entries | -GET | /redfish/v1/TelemetryService/LogServices/MetricReportLog/Entries Information about the telemetry service | -GET | /redfish/v1/TelemetryService Generates a test metric report | -POST | /redfish/v1/TelemetryService/Actions/ www.kontron.com // 336...
- Page 337 SNMPv2-MIB::sysContact.0 The textual identification of the contact person for this managed node, together with information on how to contact this person. If no contact information is known, the value is the zero-length string. www.kontron.com // 337...
- Page 338 In entities which do not act as IP Gateways, this counter will include only those packets which were Source- Routed via this entity, and the Source- Route option processing was successful. www.kontron.com // 338...
- Page 339 Table of addressing information relevant to this entity's IP addresses. TABLE TABLE 1.3.6.1.2.1.4.21 IP Routing table. IP-MIB::ipNetToMediaTable IP Address Translation table used for mapping from IP addresses to physical addresses. TABLE TABLE IP-MIB::ipRoutingDiscards The number of routing entries which were chosen to be www.kontron.com // 339...
- Page 340 More information can be found here http://oidref.com/1.3.6.1.2.1.4.33 IP-MIB::ipAddressTable This table contains addressing information relevant to the entity's interfaces. TABLE TABLE More information can be found here http://oidref.com/1.3.6.1.2.1.4.34 www.kontron.com // 340...
- Page 341 ICMP layer such as the inability of IP to route the resultant datagram. In some implementations there may be no types of error which contribute to this counter's value. IP-MIB::icmpOutDestUnreachs The number of ICMP Destination Unreachable messages sent. IP-MIB::icmpOutTimeExcds The number of ICMP Time Exceeded messages sent. www.kontron.com // 341...
- Page 342 The number of times that TCP connections have made a direct transition to the CLOSED state from either the SYN-SENT state or the SYN-RCVD state, plus the number of times that TCP connections have made a direct transition to the LISTEN state from the SYN-RCVD state. www.kontron.com // 342...
- Page 343 SNMPv2-MIB::snmpInBadCommunityUses The total number of community-based SNMP messages (for example, SNMPv1) delivered to the SNMP entity which represented an SNMP operation that was not allowed for the SNMP community named in the message. The precise www.kontron.com // 343...
- Page 344 SNMP protocol entity and for which the value of the error-status field was `tooBig.' SNMPv2-MIB::snmpOutNoSuchNames The total number of SNMP PDUs which were generated by the SNMP protocol entity and for which the value of the error-status was `noSuchName'. www.kontron.com // 344...
- Page 345 HOST-RESOURCES- This object contains the parameters (e.g. a pathname and MIB::hrSystemInitialLoadParameters parameter) supplied to the load device when requesting the initial operating system configuration from that device. www.kontron.com // 345...
- Page 346 DISMAN-EVENT-MIB::mteTriggerFailures The minimum mteTriggerFrequency this system will accept. A system may use the larger values of this minimum to lessen the impact of constant sampling. For larger sampling intervals the system samples less often and suffers less www.kontron.com // 346...
- Page 347 The current status of this particular cache entry. Acceptable values for Set requests are 'enabled(1)', 'disabled(2)' or 'empty(3)' (to clear all cached data). Requests to read the value of such an object will return 'disabled(2)' through to 'expired(5)'. www.kontron.com // 347...
- Page 348 SNMPv2-SMI::enterprises.20974.554.1 AMI SNMP Hostname Extension SNMPv2-SMI::enterprises.20974.554.2 AMI SNMP MIB library to return the system health status like power and sensor status. SNMPv2-SMI::enterprises.20974.554.3 AMI SNMP Platform Info Extension www.kontron.com // 348...
- Page 349 /cpwd <current admin password> , where /cpwd is the admin password of type Unicode and <current admin password> is your password. NOTE: Kontron releases the BIOS Setup in English and this is specified in AMISCE using the "/lang en-US" attribute. NOTE: www.kontron.com...
- Page 350 AMISCE download AMISCE download AMISCE tools are available at www.symkloud.com , under the CG2400 page. BIOS default values BIOS default values The BIOS Setup option values are preset with default values. Each new BIOS release may have different default values.
- Page 351 Extracting only modified BIOS options Extracting only modified BIOS options The goal is to create a script file with only the required setup questions needed and remove any setup questions that you do not wish to update. www.kontron.com // 351...
- Page 352 /lang - An optional CMD line option that enables mapping language mode which will import questions with the specified lang codes. Lang code indicates the code for a particular language like English(en-US), AMI(x- AMI), etc. Step_2 Validate that the tool does not produce errors. NOTES: NOTES: www.kontron.com // 352...
- Page 353 Modify the content of the "Options" fields for questions that you want to change by moving "*" to the desired option. Some "Setup Question" fields may not have a "Map String" defined in the current BIOS source code. These setup questions will not be imported/changed by this tool. www.kontron.com // 353...
- Page 354 Step_3 Note the BIOS Setup option and proceed to set it if required (see next section). Getting one BIOS Setup option without Map String value Getting one BIOS Setup option without Map String value Relevant section: Relevant section: BIOS configuration of CG2300 compared to CG2400 www.kontron.com // 354...
- Page 355 Restore Defaults (or use F3: Optimized Defaults). Use IPMI command described in Factory default to reset the new default options. However, the Boot menu device order may also reset. Refer to examples below for additional AMISCE commands to adjust Boot order. www.kontron.com // 355...
- Page 356 This section describes how to change the boot order using indexes in an option list. It p rovides one typical use cases for using the AMISCE tool. The Map String to define the Boot Order device list is "SETUP006". www.kontron.com // 356...
- Page 357 [ [ AMISCE AMISCE ] ] /apwdf <file having new admin password> <file having new admin password> /upwdf <file having new user password> <file having new user password> /lang en-US en-US /hb Modifying a password Modifying a password www.kontron.com // 357...
- Page 358 [/hb] [/hb] Optional command-line option to hide the tool information banner. CG2400 SNMP - BMC User guide CG2400 SNMP - BMC User guide SNMP is a protocol used to exchange management information between different devices connected on a network. This guide will walk you through the process to get basic access to the BMC.
- Page 359 To access sensors of the BMC, use the following command: $ snmpwalk -v3 -l authPriv -u admin -a SHA -A "superuser" -x DES -X "superuser" <host_IP> SNMPv2- SMI::enterprises.20974.554 you can also grep the sensor of your choice: www.kontron.com // 359...
- Page 360 $ snmpwalk -v3 -l authPriv -u admin -a SHA -A "superuser" -x DES -X "superuser" <host_IP> SNMPv2- SMI::enterprises.20974.554 | grep 2\.1\..\.21 SNMPv2-SMI::enterprises.20974.554.2.1.1.21 = INTEGER: 21 SNMPv2-SMI::enterprises.20974.554.2.1.2.21 = STRING: "Fan1 Speed" SNMPv2-SMI::enterprises.20974.554.2.1.3.21 = INTEGER: 45 SNMPv2-SMI::enterprises.20974.554.2.1.4.21 = Opaque: Float: 1640.00000 The following MIBs are supported on CG2400: SNMPv2-MIB 1.3.6.1.6.3.1 DISMAN-EVENT-MIB 1.3.6.1.2.1.88 IF-MIB 1.3.6.1.2.1.31...
- Page 361 The total number of IP datagrams which local IP user- protocols (including ICMP) supplied to IP in requests for transmission. Note that this counter does not include any datagrams counted in ipForwDatagrams. IP-MIB::ipOutDiscards The number of output IP datagrams for which no problem www.kontron.com // 361...
- Page 362 IPv6 routers forward datagrams. IPv6 hosts do not (except those source-routed via the host). When this object is written, the entity SHOULD save the change to non-volatile storage and restore the object from non-volatile storage upon re- www.kontron.com // 362...
- Page 363 For those objects that have names rather than numbers, the names were chosen to coincide with the names used in the IPv6 address architecture document. IP-MIB::ipDefaultRouterTable The table used to describe the default routers known to this entity. TABLE TABLE www.kontron.com // 363...
- Page 364 The number of ICMP Timestamp Reply messages sent. IP-MIB::icmpOutAddrMasks The number of ICMP Address Mask Request messages sent. IP-MIB::icmpOutAddrMaskReps The number of ICMP Address Mask Reply messages sent. IP-MIB::icmpStatsTable The table of generic system-wide ICMP counters. TABLE TABLE www.kontron.com // 364...
- Page 365 The total number of segments retransmitted - that is, the number of TCP segments transmitted containing one or more previously transmitted octets. TCP-MIB::tcpConnTable A table containing TCP connection-specific information. TABLE TABLE TCP-MIB::tcpInErrs The total number of segments received in error (e.g., bad TCP checksums). www.kontron.com // 365...
- Page 366 SNMP protocol entity and for which the value of the error- status field was `tooBig'. SNMPv2-MIB::snmpInNoSuchNames The total numb er of SNMP PDUs which were delivered to the SNMP protocol entity and for which the value of the error- status field was `noSuchName'. www.kontron.com // 366...
- Page 367 SNMP protocol entity. SNMPv2-MIB::snmpOutSetRequests The total number of SNMP Set-Request PDUs which have been generated by the SNMP protocol entity. SNMPv2-MIB::snmpOutGetResponses The total number of SNMP Get-Response PDUs which have been generated by the SNMP protocol entity. www.kontron.com // 367...
- Page 368 The indication of whether this entity is acting as an IPv6 router in respect to the forwarding of datagrams received by, but not addressed to, this entity. IPv6 routers forward datagrams. IPv6 hosts do not (except those source-routed via www.kontron.com // 368...
- Page 369 The maximum number of notification entries that may be held MIB::nlmConfigGlobalEntryLimit in nlmLogTable for all nlmLogNames added together. A particular setting does not guarantee that much data can be held. More information can be found here https://oidref.com/1.3.6.1.2.1.92.1.1.1 www.kontron.com // 369...
- Page 370 The maximum priority level for which this logging entry should be applied. NET-SNMP-AGENT-MIB::nsLogStatus Whether to generate logging output for this entry. Note that is valid for an instance to be left with the value notInService(2) indefinitely - i.e. the meaning of 'abnormally www.kontron.com // 370...
- Page 371 Tool Tool snmptranslate command is useful to translate numeric OID to the MIB module name $ snmptranslate 1.3.6.1.4.1.2021 UCD-SNMP-MIB::ucdavis BIOS configuration of CG2300 compared to CG2400 BIOS configuration of CG2300 compared to CG2400 Table of contents Boot configuration Networking Network interface availability...
- Page 372 The following tables provide menu paths for the CG2300 and the CG2400. This is a partial list that includes the most common configuration parameters. Since the CG2300 uses the Intel EFI code base and the CG2400 uses the AMI EFI code base, the setup menus are referred to as the INTEL SETUP and the AMI SETUP.
- Page 373 Notes Notes Menu → Advanced → PCI Configuration Menu → Socket Configuration → IIO On the CG2400, both → NIC Configuration → Nic1 Controller [ Configuration → Socket0 Configuration → Socket controllers are 0 PcieBr1D02F0 - Port 1C (PCIe Uplink) → PCI-E...
- Page 374 Enabled / Disabled] Disabled] Menu → Advanced → PCI Configuration Menu → Advanced → Network Stack On the CG2400, t his → UEFI Network Stack → IPv4 PXE Configuration → Ipv4 PXE Support [ Enabled Enabled / option is only available if...
- Page 375 Password Menu → Security → Set User Password Menu → Security → User Password Menu → Security → Power On Not present in AMI SETUP On the CG2400, User Password Password serves as the Power On Password. Power management Power management...
- Page 376 Restore / Unspecified Unspecified ] Last State = Last Power State Power On = Power Restore On CG2400, the Unspecified value means that the policy stays as it was. The current value can be seen on the previous line. Menu → Server Management → Power...
- Page 377 Support [Enabled / Disabled Disabled ] Menu → Boot Maintenance Manager → Menu → Advanced → CSM Configuration → Boot On CG2400, this option is Advanced Boot Options → Boot option filter [ UEFI and Legacy UEFI and Legacy / Legacy only /...
- Page 378 On both platforms, TPM Update [Enabled / Disabled Disabled ] has to be inserted to see the menu. On CG2400, only the current firmware version is shown. Menu → Advanced → PCI Configuration Menu → Advanced → Trusted Computing →...
- Page 379 CG2400 CG2400 Notes Notes Menu → Server Management → Not present in AMI SETUP On CG2400, when SOL is Console Redirection → SOL for activated with IPMI, Baseboard Mgmt [Enabled / Disabled Disabled ] serial console redirection is deactivated on the front panel serial connector.
- Page 380 / 10 10 ] Menu → Server Management → Reset Not present in AMI SETUP on CATERR [ Enabled Enabled / Disabled] Menu → Server Management → Reset Not present in AMI SETUP on ERR2 [ Enabled Enabled / Disabled] www.kontron.com // 380...
- Page 381 This symbol also indicates detailed information about the specific product configuration. This symbol precedes helpful hints and tips for daily use. Acronyms Acronyms For a complete list of acronyms used in Kontron documentation, go to: LINK TO COME. Safety and regulatory information Safety and regulatory information Table of contents...
- Page 382 Do not attempt to modify or use the supplied AC power cord if it is not the exact type required. A product with more than one power supply will have a separate AC power cord for each supply. www.kontron.com // 382...
- Page 383 Provided with sufficient space to access the power supply cord(s), because they serve as the product’s main power disconnect This product usually has more than one power supply cord. Disconnect all power supply cords before servicing to avoid electric shock. www.kontron.com // 383...
- Page 384 25 A rating . The DC source must be electrically isolated from any hazardous AC source by double or reinforced insulation. Th e DC source must be capable of providing up to 1000 watts of continuous power per feed pair. www.kontron.com // 384...
- Page 385 This product complies with UL 60950-1 2nd Edition and CSA C22.2 No. 60950-1-07 2nd Edition. Europe Europe This CE marked product complies with the Low Voltage Directive 2014/35/EU and EN 62368-1. International International This product has a CB report and certificate to IEC 62368-1. www.kontron.com // 385...
- Page 386 Dispose of this product according to the appropriate local rules, regulations and laws. WEEE directive logo WEEE directive logo Warranty and support Warranty and support Table of contents Limited warranty www.kontron.com // 386...
- Page 387 Customer service Customer service Kontron, a trusted technology innovator and global solutions provider, uses its embedded market strengths to deliver a service portfolio that helps companies break the barriers of traditional product lifecycles. Through proven product expertise and collaborative, expert support, Kontron provides unparalleled peace of mind when it comes to building and maintaining successful products.
Need help?
Do you have a question about the CG2400 and is the answer not in the manual?
Questions and answers