Table of Contents
Advertisement
Quick Links
Advertisement
Table of Contents

Related Manuals for MICRO-EPSILON MD6-22


Summary of Contents for MICRO-EPSILON MD6-22
- Page 1 Operating Instructions MD6-22...
- Page 2 Mobile, Capacitive Measuring Gauge MICRO-EPSILON MESSTECHNIK GmbH & Co. KG Koenigbacher Str. 15 94496 Ortenburg / Germany Tel. +49 (0) 8542 / 168-0 Fax +49 (0) 8542 / 168-90 e-mail info@micro-epsilon.com www.micro-epsilon.com...
-
Page 3: Table Of Contents
Holding magnet ............................. 20 Ground Connection, Earthing ........................20 Sensor Connection ............................20 Operation ..........................21 Overview of Measured Values ........................21 Software Operation ............................22 5.2.1 Operating Elements on the Touch Display .................. 22 5.2.2 Status Headline ..........................22 MD6-22... - Page 4 Calculation ........................... 59 6.4.3 Single-value measurement with math function ................61 Device Information, Date and Time ....................... 62 Measurement with Reference Gap ........................ 63 Relative Measurement ........................... 65 Maintenance ........................... 67 Liability for Material Defects ....................68 Decommissioning, Disposal ....................68 MD6-22...
-
Page 5: Safety
Avoid shocks and impacts to the sensor and controller. > Damage to or destruction of the sensor and controller. The charging voltage must not exceed or continuously fall below the specified limits. > Damage to or destruction of the sensor and/or controller MD6-22 Page 5... -
Page 6: Notice On Ce Marking
ATM cards, among other things. > Damage or destruction possible Notice on CE Marking The following apply to the capaNCDT MD6-22: - EU Directive 2014/30/EU - EU Directive 2011/65/EU, „RoHS“ category 9 Products which carry the CE mark satisfy the requirements of the EU directives cited and the European har- monized standards (EN) listed therein. -
Page 7: Intended Use
Safety Intended Use - The capaNCDT MD6-22 is designed for use in industrial, laboratory and residential applications. It is used for mobile distance and gap measurements. - The measuring system must only be operated within the limits specified in the technical data, see Chap. -
Page 8: Functional Principle
The linear characteristic of the measuring signal is achie- ved for electrically conductive target materials (metals) without any additional electronic linearization. Slight changes in the conductivity or magnetic properties do not affect the sensitivity or linearity. Measurement direction MD6-22 Page 8... -
Page 9: Structure
Functional Principle Structure The non-contact MD6-22 dual-channel handheld gauge installed in a plastic housing consists of: - Controller - Sensor - Sensor cable The signal processing electronics with oscillator and integrated preamplifier is in the controller. 9 ... 30 V... -
Page 10: Sensors
Usually, a damaged cable can not be repaired. Switch of the device when plugging and removing connectors. Do not crush the sensor cable. Do not modify to the sensor cable. > Loss of functionality MD6-22 Page 10... -
Page 11: Controller Operating Elements And Connections
6 MicroSD card (max. 32 GB) MicroSD or microSDHC card to store the protocol 7 Supply Power supply unit for battery charging or for operation without batteries 8 Split ferrite Braid-breaker for interference suppression Fig. 4 Characteristics MD6-22 MD6-22 Page 11... -
Page 12: Technical Data
Functional Principle Technical Data Model Controller MD6-22 Resolution (dynamic 100 Hz) 0.02 % FSO Frequency response (-3dB) 100 Hz Linearity < ±0.2 % FSO Temperature stability < 200 ppm FSO / K Sensitivity ≤ ±0.2 % FSO Long-term stability < 0.04 % FSO / month... - Page 13 Protection class (DIN-EN 60529) IP40 hard tissue (GFRP) Material 75 g 77 g 80 g Weight incl. cable and plug 1) Valid when operated with MD6-22 2) Valid when system is not installed 3) Non-condensing 4) With locked connector MD6-22 Page 13...
- Page 14 Vibration (DIN-EN 60068-2-6) Protection class (DIN-EN 60529) IP40 hard tissue (GFRP) Material 77 g Weight incl. cable and plug 1) Measuring range per measurement direction 2) Valid with operation with reference configuration 3) Non-condensing 4) With locked connector MD6-22 Page 14...
-
Page 15: Delivery
Delivery Delivery Unpacking, Included in Delivery 1 Handheld gauge MD6-22 1 capaNCDT sensor with integrated cable (optional) 1 CD with operating instructions 1 Assembly instructions 1 Robust carry case 1 Power supply unit / international 24 VDC, 1A 1 Magnetic holder incl. Allen wrench for installation on cover of battery compartment... -
Page 16: Handling Magnets
Transport and store the holding magnet solely with the shielding disc on the holding magnet. Caution! Risk of trapping! Caution! Strong magnetic field! Warning! Keep back! Improper use of magnets can result in injuries and damage to property. Read the warnings, see Chap. 1.2. MD6-22 Page 16... -
Page 17: Dimensional Drawing
During measurement, take care that the active measuring area is not scratched. 8.8 (.35) 3.0 (.12) Measuring area 1.2 (.05) CSG0,5-CAm2,0 8.8 (.35) Guard ring 4.2 (.17) Active measuring area 200 (7.87) (.63) 216 (8.50) Fig. 5 Dimensional drawing CSGx-CAm2,0 Measuring area 1.2 (.05) CSG1,0-CAm2,0 MD6-22 Page 17... - Page 18 The connector locks automatically. The tight fit can be checked by pulling the connector housing (cable bushing). The lock can be released and the connector can be opened by pulling the knurled housing sleeve of the cable bushing. MD6-22 Page 18...
-
Page 19: Controller
Damage to the controller by falling down. Uneven ground, product residues and rust layers reduce the holding force at the attachment point. (.75) Fig. 7 Dimensional drawing Controller, dimensions in mm (inches), not to scale MD6-22 Page 19... -
Page 20: Holding Magnet
Connect controller and measured object using the supplied connecting cable, see Fig. sible. Only push the Do not extend the cable for the ground connection! shielding disc off the holding magnet from Sensor Connection the side. Ground connection Fig. 10 Sensor cable connection MD6-22 Page 20... -
Page 21: Operation
Raw Data Measure, see Chap. x Standard o Optional If the sensor is tilted in the measuring gap, measurements might be inaccurate. Therefore, insert the sensor as parallel as possible into the measuring gap. MD6-22 Page 21... -
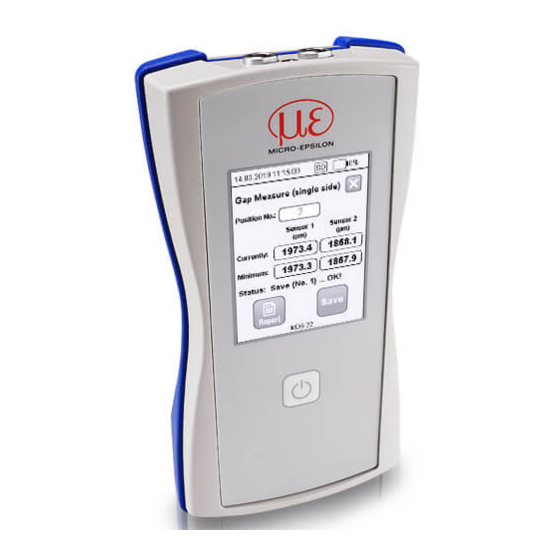
Page 22: Software Operation
Fig. 11 Meaning of the operating elements on the touch display Cancel measured value or analysis 5.2.2 Status Headline Data/Time Battery state of charge Battery operation Charging operation Status SD Card No SD card available SD card recognized, check SD card is ready MD6-22 Page 22... -
Page 23: Measuring Programs
Select a file name in the File name (e.g. machine) field. This name is also used for the file name of the log. Type the current temperature in the Temperature (°C) field. Confirm your entry with 1) File: <File name>_yyyy-mm-dd_hhmmss.csv Folder: .\data\<Datum(yyyy-mm-dd)>\gap_1sided\ MD6-22 Page 23... -
Page 24: Instant Measurement
The Instant measurement program immediately saves the current measured value. The Report function determines the smallest (Min. gap) and lar- gest (Max. gap) gap width based on the derived values. Switch to the menu for setting the offset. Touch the Offset field. MD6-22 Page 24... - Page 25 Enter the thickness of the sensor used in the Offset field. Confirm your entry with Confirm the entry with Save your entry with The controller starts the measurement. Return to the Presets menu. To do so, touch twice. MD6-22 Page 25...
- Page 26 (Max. gap) gap width in a value. series of measurements for Each touch of the Save both sensors. button updates the value in the Minimum field and increases the counter in the Position No. field by one. MD6-22 Page 26...
-
Page 27: Manual Gap Detection
The Manual gap detection program determines the local mini- mum during an analysis period between Start and Stop. Touch the Offset The Report function determines the smallest (Min. gap) and largest field. (Max. gap) gap width based on the derived values. MD6-22 Page 27... - Page 28 Enter the thickness of the sensor used in the Offset field. Confirm your entry with Confirm the entry with Save your entry with The controller starts the measurement. Return to the Presets menu. To do so, touch twice. MD6-22 Page 28...
- Page 29 Start The detected minimum can search for the mini- subsequently be saved or mum. discarded by touching the Cancel button. Each touch of the Save but- ton increases the counter in the Position No. field by one. MD6-22 Page 29...
- Page 30 The Report function lists all minimum values saved so far. Touch to switch to Report the Report menu. The report lists the smallest (Min. gap) and largest (Max. gap) gap width in a series of measurements for both sensors. MD6-22 Page 30...
-
Page 31: Automatic Gap Detection
- a measured value is within the measuring range. When you leave the measuring range, the current minimum is automatically saved. The Report function determines the smallest (Min. gap) and largest (Max. gap) gap width based on the derived values. MD6-22 Page 31... - Page 32 Enter the thickness of the sensor used in the Offset field. Confirm your entry with Confirm the entry with Save your entry with Touch to start the Auto measurement. Return to the Presets menu. To do so, touch twice. MD6-22 Page 32...
- Page 33 The counter in the Position No. field is increased by one when the measured value leaves the measuring range. Touch to end the Stop series of measure- ments. MD6-22 Page 33...
-
Page 34: Double-Sided Gap Measurement (Minimum)
Select a file name in the File name(e.g. machine) field. This name is also used for the file name of the log. Type the current temperature in the Temperature (°C) field. Confirm your entry with 1) File: <File name>_yyyy-mm-dd_hhmmss.csv Folder: .\data\<Datum(yyyy-mm-dd)>\gap_2sided\ MD6-22 Page 34... -
Page 35: Instant Measurement
The Instant measurement program immediately saves the current measured value. The Report function determines the smallest (Min. gap) and largest (Max. gap) gap width based on the derived values. Switch to the menu for setting the offset. Touch the Offset field. MD6-22 Page 35... - Page 36 Enter the thickness of the sensor used in the Offset field. Confirm your entry with Confirm the entry with Save your entry with The controller starts the measurement. Return to the Presets menu. To do so, touch twice. MD6-22 Page 36...
- Page 37 (Max. gap) gap width in a series of measurements for Each touch of the Save the sensor. button updates the value in the Gap Result field and increases the counter in the Position No. field by one. MD6-22 Page 37...
-
Page 38: Manual Gap Detection
The Manual gap detection program determines the local minimum during an analysis period between Start and Stop. Touch the Offset The Report function determines the smallest (Min. gap) and field. largest (Max. gap) gap width based on the derived values. MD6-22 Page 38... - Page 39 Enter the thickness of the sensor used in the Offset field. Confirm your entry with Confirm the entry with Save your entry with The controller starts the measurement. Return to the Presets menu. To do so, touch twice. MD6-22 Page 39...
- Page 40 Cancel button. width. Each touch of the Save but- The Position No. field ton increases the counter displays the values that in the Position No. field have been recorded so far. by one. MD6-22 Page 40...
- Page 41 Measuring Programs | Double-Sided Gap Measurement (Minimum) The Report function offers a statistical function for all minimum values saved so far. Touch to switch to Report the Report menu. The report lists the spread of minimum values for the sensor. MD6-22 Page 41...
-
Page 42: Automatic Gap Detection
- and stopped early with Stop. A minimum found must be saved with the Save function or dis- carded with the Cancel function. The Report function determines the smallest (Min. gap) and largest (Max. gap) gap width based on the derived values. MD6-22 Page 42... - Page 43 Enter the thickness of the sensor used in the Offset field. Confirm your entry with Confirm the entry with Save your entry with The controller starts the measurement. Return to the Presets menu. To do so, touch twice. MD6-22 Page 43...
- Page 44 Auto search for a minimum Touch to interrupt with automatic start- Stop a measurement. stop. The search starts when both sensors’ measured values become smaller than the end of the measuring range (offset and measuring range). MD6-22 Page 44...
- Page 45 The Report function offers a statistical function for all minimum values saved so far. Touch to switch to Report the Report menu. The report lists the spread of minimum values for the sensor. MD6-22 Page 45...
-
Page 46: Double-Sided Gap Measurement (Maximum)
Select a file name in the File name(e.g. machine) field. This name is also used for the file name of the log. Type the current temperature in the Temperature (°C) field. Confirm your entry with 1) File: <File name>_yyyy-mm-dd_hhmmss.csv Folder: .\data\<Date(yyyy-mm-dd)>\gap_2sided\ MD6-22 Page 46... -
Page 47: Instant Measurement
The Instant measurement program saves measured values. The Report function determines the smallest (Min. gap) and largest (Max. gap) gap width based on the derived values. Switch to the menu for setting the offset. Touch the Offset field. MD6-22 Page 47... - Page 48 Enter the thickness of the sensor used in the Offset field. Confirm your entry with Confirm the entry with Save your entry with The controller starts the measurement. Return to the Presets menu. To do so, touch twice. MD6-22 Page 48...
- Page 49 Save button updates the value in the Gap result field and increases the The report lists the mini- counter in the Position mum and maximum values No. field by one. in a series of measurements for both sensors. MD6-22 Page 49...
-
Page 50: Manual Gap Detection
Start and Stop. The Report function determines the smallest (Min. gap) and Touch the Offset largest (Max. gap) gap width based on the derived values. field. 1) During Start, the sensor is located in the measuring gap. MD6-22 Page 50... - Page 51 Enter the thickness of the sensor used in the Offset field. Confirm your entry with Confirm the entry with Save your entry with Insert the sensor into the gap. Return to the Presets menu. To do so, touch twice. MD6-22 Page 51...
- Page 52 The calculated gap is valid and can be used only when both sensors’ measured values are smaller than Each touch of the Save but- the end of the measuring ton increases the counter range. in the Position No. field by one. MD6-22 Page 52...
- Page 53 Measuring Programs | Double-Sided Gap Measurement (Maximum) The Report function offers a statistical function for all minimum values saved so far. Touch to switch to Report the Report menu. The report lists the spread of maximum values for the sensor. MD6-22 Page 53...
-
Page 54: Automatic Gap Detection
An analysis period starts when a local minimum was detected and is limited to a period of at most 5 seconds. The program detects insertion of the sensor into the measuring gap. MD6-22 Page 54... - Page 55 Touch the Offset field. The program routine now Return to the Presets switches to the Master menu. To do so, touch Measurement menu. twice. Enter the thickness of the sensor used in the Offset field. Confirm your entry with MD6-22 Page 55...
- Page 56 - the current maximum Auto matic measurement. value (Gap result) is discarded. The controller automatically detects insertion of the sen- sor into the measuring gap and waits until that point to start the measurement. MD6-22 Page 56...
- Page 57 Position No. field by one. Touch to end a se- Stop ries of measurements. The Report function offers a statistical function for all maximum values saved so far. Touch to switch to Report the Report menu. MD6-22 Page 57...
-
Page 58: Single-Value Measurement With Math Function
Select a file name in the File name (e.g. machine) field. This name is also used for the file name of the log. Type the current temperature in the Temperature (°C) field. Confirm your entry with 1) File: <File name>_yyyy-mm-dd_hhmmss.csv Folder: .\data\<Date (yyyy-mm-dd)>\raw:data\ MD6-22 Page 58... -
Page 59: Calculation
Measurement menu. with the sensor set- Touch the Offset tings. field. Enter the thickness of the sensor used in the Offset field. Confirm your entry with Switch to the menu for setting the offset. Touch the Offset field. MD6-22 Page 59... - Page 60 The two sensor signals can be calculated at will using a mathematical function. Result = Offset + Factor x Sensor 1 + Factor x Sensor 2 Confirm your entry with The program switches to the measurement view. MD6-22 Page 60...
-
Page 61: Single-Value Measurement With Math Function
Touch to end the Stop measurement. The analysis period can be specified in the Interval (1 ... 3600 s) field. Insert the sensor into the gap. MD6-22 Page 61... -
Page 62: Device Information, Date And Time
Measuring Programs | Device Information, Date and Time Device Information, Date and Time Touch the field that is to be changed and enter the corresponding infor- Touch the MICRO-EPSILON button. mation. This menu view provi- des information about general device and SD card data. -
Page 63: Measurement With Reference Gap
Master Switch to the menu Measurement menu. with the sensor set- Enter the gap width of tings. the reference gap in the Master Value field. Confirm your entry with Insert the sensor into the gap. MD6-22 Page 63... - Page 64 Offset field. Save the new value of the offset with Return to the Presets menu. To do so, touch twice. Select the desired program and start the measurement. MD6-22 Page 64...
-
Page 65: Relative Measurement
- Gap Measure (2-sided) Max. Proceed as follows: Insert the sensor into the gap. The program routine now switches to the Master Measurement menu. Touch the field. Switch to the menu Auto with the sensor set- tings. MD6-22 Page 65... - Page 66 Offset field. measurement. Confirm the entry with The controller applies the new offset value and uses it to calculate the current absolute gap width. Save the new value for the offset with This ends relative measu- rement. MD6-22 Page 66...
-
Page 67: Maintenance
> Static discharge > Risk of injury If the controller, sensor or sensor cable is defecti- MICRO-EPSILON MESSTECHNIK ve, please send us the affected parts for repair or GmbH & Co. KG exchange. If the cause of a fault cannot be clearly Koenigbacher Str. -
Page 68: Liability For Material Defects
The liability for material defects is 12 months from delivery. Within this period, defective parts, except for wearing parts, will be repaired or replaced free of charge, if the device is returned to MICRO-EPSILON with shipping costs prepaid. Any damage that is caused by improper handling, the use of force or by repairs or modifications by third parties is not covered by the liability for material defects. - Page 70 MICRO-EPSILON MESSTECHNIK GmbH & Co. KG X9751396-A012050SWE Koenigbacher Str. 15 · 94496 Ortenburg / Germany Tel. +49 (0) 8542 / 168-0 · Fax +49 (0) 8542 / 168-90 MICRO-EPSILON MESSTECHNIK info@micro-epsilon.com · www.micro-epsilon.com *X9751396-A01* www.micro-epsilon.com/contact/worldwide/ Your local contact:...
Need help?
Do you have a question about the MD6-22 and is the answer not in the manual?
Questions and answers