Table of Contents
Advertisement
Advertisement
Table of Contents

Related Manuals for Hubsan H122D X4 STORM


Summary of Contents for Hubsan H122D X4 STORM
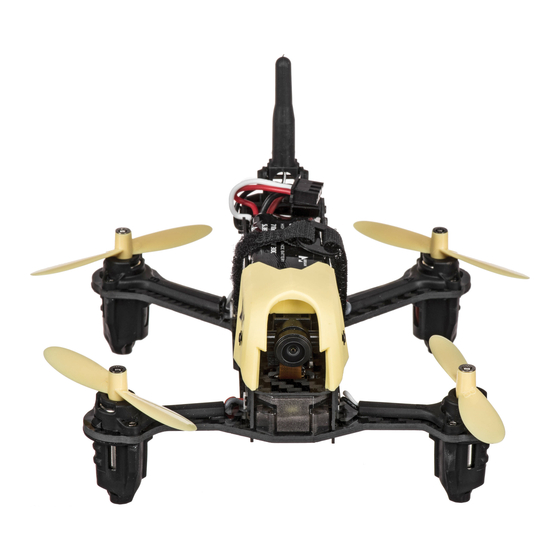
- Page 1 ® H122D X4 STORM 《H122D User Manual》 Version 1.0...
- Page 2 2 Different Ways to Fly, 2 Configurations 1. Aircraft + HT015 Transmitter H122D HT015 2. Aircraft + HS001+ HT015 Transmitter+HV002 Video glasses H122D HT015 HV002 HS001...
-
Page 3: Symbol Explanation
Maintenance: Do not try to open or repair the units by yourself. Please contact Hubsan or Hubsan authorized dealers for service. For more information, please visit the official website at www.hubsan.com. - Page 4 ● If you do not plan to fly the quad for a long time, store the battery ~50% charged to maintain battery performance and life. ● Please use Hubsan chargers for battery charging. ● Discharge the battery at 5C current or below. To avoid discharge related battery damage, do not prolong the discharge time.
-
Page 5: Table Of Contents
Table of Contents Important safety information 2.2.4 Installing the TF (Micro-SD) card Symbol Explanation 2.3 HV002 Video glasses Usage Advice 3. Getting ready to fly 1. The H122D Aircraft 3.1 Flight environment 1.1 Aircraft component requirements breakdown 3.2 Preflight checklist 1.2 Charging and Installing the aircraft battery 3.3 The first flight configuration: Aircraft... -
Page 6: The H122D Aircraft
1.2 Charging and Installing the aircraft battery The H122D aircraft is paired with a rechargeable 7.6v, 710mAh Li-Po. Be sure to use the provided Hubsan dedicated charger for charging. Fully charge the battery before flight. Connect the charger’s USB adapter to a PC terminal and then the battery to the charger. -
Page 7: Installing And Removing The Propellers
Installation: Push the battery into its compartment with its lines facing away from the unit. Connect it to the drone’s power line and coil the power line into the compartment. careful avoid entangling the power line with the propellers. Make sure the battery is fully charged before each flight. Please do not leave unattended while charging. -
Page 8: Aircraft Led Indicators
Installation Removal Counterclockwise to install Clockwise to remove “D” shaped shaft F i g u r e 1 Counterclockwise to remove Clockwise to install Note: Mind the differing colors of the A and B propeller screws! 1.4 Aircraft LED indicators LED Status Function and/or Aircraft status During normal flight, the headlight is a solid white. -
Page 9: Adjusting The Aircraft Camera Angle
1.5 Adjusting the aircraft camera angle To change the aircraft’s camera angle, use a screwdriver to loosen the screws holding the camera head in place. Manually adjust the camera head accordingly as desired (downwards 8 degrees max, upwards 45 degrees max) and firmly tighten the screws afterwards. -
Page 10: Hs001 Key Functions
Battery compartment Aileron trim Photo key Video key 2.1.2 HT015 key functions Key/button/Switch Function Push the stick forward or backward and the quadcopter will ascend or descend (respectively). Push the stick left or right and the quadcopter will Throttle/Rudder stick rotate counterclockwise or clockwise (respectively). -
Page 11: Installing The Transmitter Batteries
2.1.3 Installing the transmitter batteries PULL PUSH Unscrew the battery door Install 4 AAA batteries Slide the battery door back onto the and open the battery compartment. (be sure to match polarities correctly). compartment and fasten with the screw. There are two ports located in the battery compartment, used for upgrades. Please DO NOT use or connect these ports to any kind of device whatsoever! 2.2 HS001 LCD Display 2.2.1 Main interface... -
Page 12: Hs001 Key Functions
5.8 Antenna Sunshade recess Photo/Video mode switch button Record button LCD screen Main Menu Binding/Clear screen button Charging status LED Speaker 2.2.3 HS001 key functions Key/button/Switch Function Push up/ON to turn on the transmitter. Push down/OFF to turn off. Power Switch Photo/Video mode Photo/Video mode switch button switch button... -
Page 13: Hv002 Video Glasses
2.3 HV002 Video glasses Face panel release 3 G et t in g ready t o fly After all set up is complete, the aircraft is ready to fly. It is recommended that users implement some kind of flight training (i.e using a simulator for flight practice, seeking professional guidance, etc.) before flying the H122D. -
Page 14: Preflight Checklist
High pressure lines Airports Magnetic interference Rain 3.2 Pre-flight checklist (1) Make sure the aircraft battery and mobile device are charged and have adequate power. (2) Confirm that propellers and screws are properly installed. (3) If you are taking pictures, insert the Micro-SD card required for taking pictures and videos. (4) Verify that the motors arm and spin smoothly. -
Page 15: Horizontal Calibration
3.3.2 Horizontal calibration Horizontal calibration is required when the aircraft drifts on the horizontal plane during flight. When this happens, land the aircraft and disarm its motors. Follow the below steps to do a horizontal/gyro calibration. 1. Place the aircraft on a completely flat surface and then follow the below calibration procedure. Hold the left stick to the right side of its socket. -
Page 16: Basic Flight Operation
Landing Slowly and gently pull the throttle joystick down until the copter has completed its descent on the ground. Simultaneously pull the transmitter joysticks diagonally down-out to disarm the motors (as shown in the right figure). After all motors have come to a complete stop, release the joysticks. -
Page 17: Expert Mode And Normal Mode
The elevator controls the aircraft’s forward and backward movement. Forward Mode 2 (American hand) Mode 1 (Japanese hand) Backward The aileron controls the aircraft’s left and right movement. Right Left Mode 2 (American hand) Mode 1 (Japanese hand) 3.3.5 Expert mode and Normal mode Short press on the non-throttle joystick (you should feel and hear a click) to enter or exit Expert mode. -
Page 18: Acrobatics
3.3.6 Acrobatics The H122D is capable of 360° rollovers and flips; you may use this capability by following the below steps. To better perform flips and rolls, please ensure that the aircraft is at a safe height from the ground. It is best to roll and flip the aircraft while it is ascending, so that it more easily maintains its height after flipping or rolling. -
Page 19: The Second Flight Configuration: Aircraft + Hs001+ Ht015 Transmitter +Hv002 Video Glasses
3. Front flip Short press on the throttle (you should feel and hear a click) and push the aileron stick forward. The aircraft will perform a front flip. Mode 2 Mode 1 (American hand) (Japanese hand) 4. Back flip Short press on the throttle (you should feel and hear a click) and push the aileron stick backward. -
Page 20: Horizontal Calibration
All illustrations are shown in Mode 2 (American hand) 2. Power the HS001 on by pushing the power switch up. Long press the display’s binding button (shown below) to allow the HS001 to enter binding mode. The display will beep three times. 3.Connect the drone to its battery. -
Page 21: Installing The Hs001 Display
1. Place the aircraft on a completely flat surface and then follow the below calibration procedure. Hold the left stick to the right side of its socket. Rapidly and continuously wiggle the right stick left and right until the rear red LEDS flash alternately. 2. -
Page 22: Motor Stall Protection
Option 2 (with the HV002 video goggles): Press the release key on the HV002 goggles to release its face panel. Install the HS001 into the exposed compartment and shut the panel. After the installation, one may put the goggles on and adjust to fit with the adjustable head strap. -
Page 23: H122D Frequently Asked Questions
H12 2D Fre quent ly A sk ed Qu e s t i on s 1. Aircraft and remote control are not pairing (1) Check that the aircraft and remote control are both powered on. (2) Turn off both the aircraft and remote control. Rebind the aircraft to the remote control by following the rebind directions on page 7 of this guide. -
Page 24: H122D Accessories
H1 2 2D A cce ssories H122D-04 H122D-05 H122D-01 H122D-02 H122D-03 Antenna base+ Adjustable camera Front canopy Headlight cover+ Motor case+ Antenna tube sheath+ mount Rear lamp lens Motor mount Rear canopy H122D-06 H122D-09 H122D-07 H122D-08 H122D-10 Carbon Fiber Screw set Camera head H122D PCB motherboard Propeller A/B... - Page 25 This is not a toy and is not suitable for children under 14. www. HUBSA N. co m Product Name:X4 STORM Company:Shenzhen Hubsan Technology Co., Ltd. Address:13th Floor, Block 1, Tower C, Software Industry Base, Xuefu Road, Nanshan District, Shenzhen, China. Factory:Dongguan Tengsheng Industrial Co., Ltd.
Need help?
Do you have a question about the H122D X4 STORM and is the answer not in the manual?
Questions and answers