Table of Contents
Advertisement
Quick Links
Advertisement
Table of Contents

Subscribe to Our Youtube Channel
Related Manuals for Hubsan ACE PRO


Summary of Contents for Hubsan ACE PRO
- Page 1 HUBSAN ACE PRO 《 User Manual 》 V22.05.21...
- Page 3 HUBSAN may make available. Users agree to comply with these terms and conditions, along with any and all relevant policies / guidelines set forth by HUBSAN. Part of the details of this document may change with the upgrade of the product software version. Please read the upgrade details carefully before upgrading the software version.
-
Page 4: Important Safety Information
MAINTENANCE Do not try to open or repair the units by yourself. Contact HUBSAN or HUBSAN authorized dealers for service. For more information, please visit the official website at www.hubsan.com BATTERY Do not disassemble, squeeze, impact, burn, drop or trample the battery. - Page 5 Maintaining and storing the battery voltage with 11.7V can increase battery life. ● Please use only HUBSAN chargers or HUBSAN Charging Hub for battery charging. ● Discharge the battery at 5C current or below. To avoid discharge related battery damage, do not discharge for longer period of time than advised.
-
Page 6: Table Of Contents
2.4 Remote Control Diagram 2.5 Remote Control Antenna Angle Limitation Of Liability 2.6 Transmitter Calibration Fcc Information 3 Flight 3.1 Download The X-HUBSAN 2.0 APP 3.2 Main Interface Guide 3.3 Pairing The Aircraft 3.4 Compass Calibration 3.5 Staring / stopping The Motors... -
Page 7: Aircraft
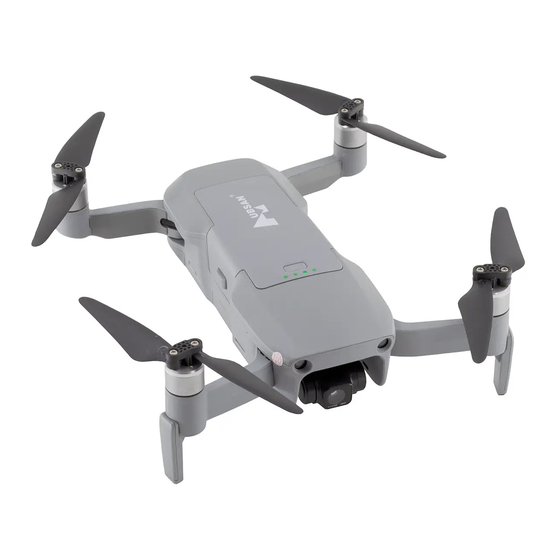
1.Aircraft 1.1 Aircraft Spare Part Propeller A Gimbal Protection Guard Propeller B Micro-USB Port Motor Image indicator Tripod (With Antenna) Battery level indicator Body shell Intelligent Battery Battery power switch Forward Vision System 4K HD Camera rear camera 3-axis gimbal... - Page 8 Bind button TF Slot Video transmission indicator Battery buckle Cooling fan Downward Vision System Auxiliary Light Infrared Assisted Altitude System Note: The aircraft generates heat during operation. Please avoid direct touch the ventilated rib on the bottom of the aircraft after the flight.
-
Page 9: Aircraft Battery
1.2 Aircraft Battery 1.2.1 Aircraft Battery Charging Aircraft Lithium Battery Capacity: 3800mAh, 11.4V lithium 3S intelligent battery equipped with a standard charger, charging time is about 2.5 hours. ① Connect the power adapter to AC power (100V-240V, 50-60Hz), insert the adapter's DC head into the DC female port marked "IN"... -
Page 10: Intelligent Battery Functions
(7) Short Circuit Protection: The power supply is automatically cut if a short circuit is detected. (8) Battery Cell Damage Protection: HUBSAN App displays a warning message when a damaged battery cell is detected. (9) Hibernation Mode: When the battery is in the on state, if there is no connected device, the battery will automatically shut down within 3 minutes;When the power is less than 1%, short press the battery switch at... -
Page 11: Precautions For Battery
If the blade is damaged or needs to be replaced, unscrew the screw counter-clockwise to remove the propeller. Use only HUBSAN original Propellers, because it comes with loctite applied screws to prevent accidental screw and propellers loose. (HUBSAN Standard... -
Page 12: Camera
1.4 Camera The HUBSAN ACE PRO camera uses a Type 1/1.3 CMOS Sensor, supports 2.4um fusion large pixels, and f/1.85 super larger aperture. (1.) When using the camera for the first time, please tear off the protective film of the camera lens before use. -
Page 13: Remote Controller Features
2.2 Remote Controller Features S/N Key / Switch Function Move the stick forward or backward to ascend Throttle / Rudder or descend the drone. Move the stick left or Stick right to rotate the drone Clockwise or counter clockwise. Move the stick forward or backward to fly the drone Elevator / Aileron forward or backward. - Page 14 S/N Key / Switch Function Long press the Fn+ wheel to adjust the zoom function. Press and hold the Photo+ wheel to adjust the bright- ness of the remote control screen. When the drone is not taking off, press the Fn button and the Video button for more than 3 seconds to activate the remote control code pairing operation.
-
Page 15: Charging The Transmitter Battery
2.3 Charging The Transmitter Battery The remote is charged using the Micro USB cable as shown: The remote control charging time is about 2.5 hours.The r e m o t e c o n t r o l b a t t e r y indicator light flashes during charging. -
Page 16: Remote Control Antenna Angle
2.5 Remote Control Antenna Angle (1) Adjust the angle of the remote control antenna and try to face the flight direction of the aircraft as much as possible. (2) Long-distance state, the distance between the two antennas is properly tightened to maintain the antenna directivity. (3) Closer Sate, the two antennas are properly separated to maintain a wide receiving range. -
Page 17: Flight
B e f o r e f l y i n g , d o w n l o a d a n d i n s t a l l t h e X-HUBSAN 2.0 APP. Download the APP for free by scanning the code at right or search in APP Store (IOS) Or Goggle Play. -
Page 18: Pairing The Aircraft
② Press the remote control switch to connect to the mobile phone, and wait for the remote control to connect the aircraft in success. ③ Open the mobile phone X-HUBSAN 2.0 APP, it will automatically jump out of the activation interface. -
Page 19: Compass Calibration
3.4 Compass Calibration When using the drone for the very first time, the compass calibration message will pop up before takeoff. Follow the instructions on your screen, rotate the drone horizontally, then point the drone nose to ground and rotate it clockwise. The compass calibration message will disappear once it is completed. -
Page 20: Staring / Stopping The Motors
(4) Aircraft has not locked sufficient GPS satellites for positioning. please don't force take-off ; (5) The power of the drone should be ≥15% ; Connected Starting the Motors Push both sticks down and outwards as shown in picture to start the S P E E D 0 . -
Page 21: Aircraft Functions
4 Aircraft Functions 4.1 Flight Control Mode Flight Control Mode (The flight controller monitors the GPS signals and switches to the corresponding flight modes) Use GPS and downward vision positioning system to achieve precise hovering, stable flight, intelligent flight mode, etc. The vision system works in a well-lit Mode environment . -
Page 22: Aircraft Indicator
4.2 Aircraft Indicator Video Indicator (red) Camera Error Red LED flashes slowly (1 time/second) FPV Board Error Red LED off Working Red LED solid Upgrading Red LED flashes quickly (5 times/2 seconds) Image Indicator (green) Working ( Date Green LED solid link normal ) Booting Green LED off... -
Page 23: Return-To-Home(Rth)
4.3 Return-to-home(Rth) There are three types of RTH: One-key RTH, Low Battery RTH, and Failsafe RTH. When taking off, and GPS has locked more than 6 satellites, the aircraft will mark take off point as home point. If there is no GPS signal and drone is forced to take-off, Whenever GPS locks more than 6 satellites, it will record that point as home position. -
Page 24: Landing Apron Search
(5) If you do not need to use this feature, please turn it off in app. 4.5 Vision Systems and Infrared Sensing Systems. HUBSAN ACE PRO is equipped with Forward, Backward, and Downward Infrared Sensing Systems, providing omnidirectional obstacle sensing.The main components of the Forward, Backward,and Downward Vision Systems are two cameras located on the nose, rear side, and the underside of the aircraft. - Page 25 Calibrating Vision System Cameras The Vision System cameras installed on the aircraft are factory calibrated. When the X-Hubsan 2 prompts Vision Calibration, the aircraft should be connected to the Hubsan Calibration Assistant For Zino Vision Calibration software and refer to the vision calibration tutorial to complete the calibration.
- Page 26 Be sure to maintain line of sight with the aircraft and pay attention to prompts in HUBSAN ACE PRO APP takes no responsibility for any aircraft that is damaged or lost while using Vision Systems.
-
Page 27: Flight Mode
Do not use any cleaner that contains alcohol. c. Contact HUBSAN Support if there is any damage to the glass of the Infrared Sensing and Vision System. Do not obstruct the Infrared Sensing System. -
Page 28: Orbiting
Comet Mode 1 0 0 % 1.0x Rocket 360° Comet Dronie 4.6.2 Orbiting Tap on "Mode Selection" then "Orbit Mode" to set the current location or the position of the mobile device as the center. During Orbit mode, you can adjust the speed and direction by moving the control stick left and right and adjust the orbit radius by moving the control stick forward and backward. -
Page 29: Line Fly Mode
If the aircraft is not in the starting position, the aircraft will fly to the starting waypoint position before starting this function. Waypoint 1 0 0 % Waypoint 1.0x Waypoint Waypoint Planning Memory Tap one and enter into the operation interface S P E E D 0 . -
Page 30: Follow Mode
4 5 . 8 7 7 5 0 3 , - 1 0 6 . 1 2 3 9 8 4 , 6 5 m Active Tracking 3.0 HUBSAN ACE PRO Active Tracking 3.0 includes Spotlight, Active Tracking, Circle Tracking. -
Page 31: Hyperlapse
4.6.6 Hyperlapse When you choose Hyperlapse mode,you can choose free and Circle. Hyperlapse 1 0 0 % 1.0x free surround time-lapse time-lapse Free The aircraft will take a certain number of photos and compose time-lapse videos automatically according to the parameters set. During the process of shooting, the user can control the flight of the aircraft freely. -
Page 32: Panorama Mode
Circle The aircraft will take a certain number of photos and compose time-lapse video automatically according to the circle point of interest and the parameters set. During shooting, moving any sticks on controller will automatically quit the task. (1) select circle. (2) set the shutter interval, video length and maximum flight speed. -
Page 33: Gimbal Pitch Axis Adjustment
4.7 Gimbal Pitch Adjustment Please make sure there are no stickers or impurities on the gimbal before take off, and place the aircraft on flat and open ground. Please do not bump the gimbal after the power is turned on. The gimbal contains precision parts. -
Page 34: Tf Card
2. Aircraft ID not available. (1) Restart the drone, remote control and X-HUBSAN 2.0 APP (2) Update the aircraft firmware (3) Check whether the LED next to TF card slot of the drone is on in red, if it flashing, means the aircraft function is abnormal 3. - Page 35 6.The battery cannot charge Re-plug the charger and battery 7. short flight times Battery overcharge or high temperature environment can easily lead to reduction of battery life, it is recommended to keep the remaining 60% or so, full charge again before use 8.
-
Page 36: Limitation Of Liability
L i m i t a t i o n o f L i a b i l i t y HUBSAN accepts no liability for damages, injuries or any legal responsibili- ties directly or indirectly from the use of HUBSAN products under the following conditions: 1.Damages, injuries or any legal responsibilities when users are drunk,... - Page 37 12. The acquisition, through use of HUBSAN products (specifically but not limited to aircraft), of any data, audio, video that results in infringement of law and / or rights. 13. Misuse and / or alteration of batteries, product / aircraft circuits, hardware protections (including protection circuits), RC model and battery chargers.
-
Page 38: Fcc Information
F C C I N F O R M A T I O N This equipment has been tested and found to comply with the limits for a Class B digital device, pursuant to Part 15 of the FCC Rules. These limits are designed to provide reasonable protection against harmful interference in a residential installation. - Page 40 ●This product is not a toy ●Not suitable for children under 14 years of age Flight Academy Product name: HUBSAN ACE PRO Product Standard Number:Q / HBS 001-2017 Vendor: Shenzhen Hubsan Technology Co., Ltd Address: Unit 2801, Building F, Xinghe WORLD , Yabao Road, Bantian Street, Longgang District, Shenzhen Email: service@hubsan.com...
Need help?
Do you have a question about the ACE PRO and is the answer not in the manual?
Questions and answers