Advertisement
Quick Links
Advertisement

Related Manuals for XMark Fitness XM-7618


Summary of Contents for XMark Fitness XM-7618
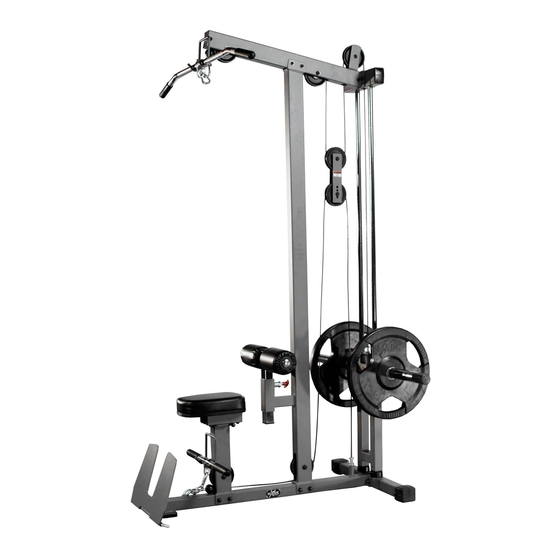
- Page 1 XM-7618 LAT MACHINE Owner’s Manual 8|20...
-
Page 2: Table Of Contents
Table of Contents Important Safety Information Before You Start Assembly 5-12 Parts List Exploded View... -
Page 3: Important Safety Information
Important Safety Information NOTE: Hand tighten bolts and nylon nuts until machine is fully assembled. Prior to assembly, remove components from the box and verify that all the listed parts were supplied. SAFETY INFORMATION WARNING! Before using this unit or starting any exercise program, consult your physician. This is especially important for persons over the age of 35 and/or persons with pre-existing health problems. -
Page 4: Before You Start
Before You Start THANK YOU for making this unit a part of your exercise program. XMark assur es the very best in value, appearance, durability and biomechanics. This manual will guide you through the assembly process. If at any time you are having trouble with the assembly or use of this product, then please contact us at our XMark help line. - Page 5 Assembly...
-
Page 6: Assembly
Assembly NOTE: Hand tighten bolts and Nylon Lock nuts until machine is fully assembled. STEP 1: Connect Main Base (#1) to the Rear Base (#2) using: • 2 x Button Head Cap Sc rews (#34) (#31) • 4 x Flat Washers •... - Page 7 Assembly NOTE: Hand tighten bolts and Nylon Lock nuts until machine is fully assembled. STEP 3: Slide Weight Bumpers (#24) and Weight Support (#12) onto Guide Rods (#9) as shown. STEP Connect Upright (#3) to the Main Base (#1) using: •...
- Page 8 Assembly NOTE: Hand tighten bolts and Nylon Lock nuts until machine is fully assembled. STEP 6: Slide Top Cross Frame (#5) on top of Guide Rods (#9) and secure using: • 2 x Button Head Cap Screws (#36) • 2 x Flat Washers (#31) STEP 7: Attach Top Frame (#4) to the Upright (#3) using: •...
- Page 9 Assembly NOTE: Hand tighten bolts and Nylon Lock nuts until machine is fully assembled. STEP 10: Start by attaching the High Pully Cable (#15) to Slide Weight Support (#12) using: • 1 x 1/2"-12 Jam Nut (#44) STEP 11: Attach a Pulley (#21) to the Top Frame (#4) using: •...
- Page 10 Assembly NOTE: Hand tighten bolts and Nylon Lock nuts until machine is fully assembled. Before STEP 13 route the UPPER CABLE as shown making sure the cable is routed over the 2 Button Head Cap Screws (#38). Not doing so will damage the cable! STEP 13 STEP 14 STEP 15...
- Page 11 Assembly NOTE: Hand tighten bolts and Nylon Lock nuts until machine is fully assembled. STEP 15: Attach two Pulleys (#21) to Upright (#3) & Seat Support (#6) using: • 2 x Button Head Cap Screw (#33) • 2 x Nylon Locknut (#37) •...
- Page 12 Assembly NOTE: Hand tighten bolts and Nylon Lock nuts until machine is fully assembled. STEP 18: Complete leg hold down assembly using: • 1 x Roller Pad Frame (#10) • 2 x Plastic Washers ( #42) • 2 x Foam Paddings ( #30) •...
- Page 13 Assembly NOTE: Wrench Tighten above all bolts and Nylon Locknuts. STEP 21: Slide two Adapters (#50) to the Weight Support (#12) and secure using: • 2 x Screws (#49) (preinstalled) Apply Lubricant to Guide Rods is rubbing occurs Standard weights can be used without the use of the Adapters (#50) and the included clips (#56)
-
Page 14: Parts List
Parts List XM-7618 Parts List Ref # Part # Description P00279 Main Base P00280 Rear Base P00449 Upright P00450 Top Frame P00451 Top Cross Frame P00452 Seat Support P00453 Seat Pad Tube P00676 Lat Bar Hook GYM P00454 Guide Rod... -
Page 15: Exploded View
Exploded View 37 37 57 57 31 31 33 33... - Page 16 7144 West Park Drive Shreveport, LA 71129 Customer Service: 1-800-719-4605...