Advertisement
Quick Links
Advertisement

Related Manuals for XMark Fitness XM-7615.1


Summary of Contents for XMark Fitness XM-7615.1
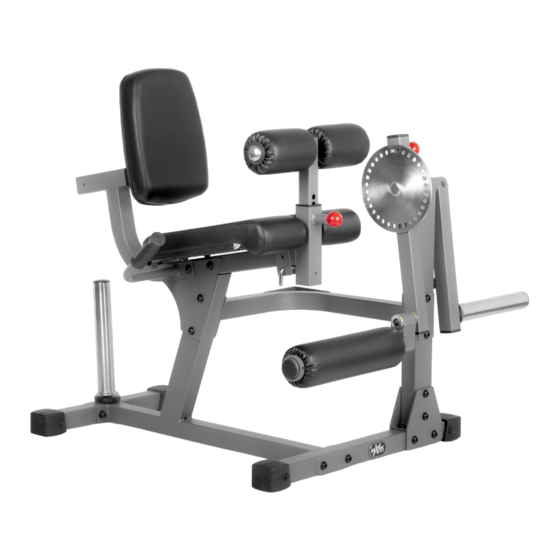
- Page 1 XM-7615.1 ROTARY LEG MACHINE Owner’s Manual...
-
Page 2: Table Of Contents
TABLE OF CONTENTS IMPORTANT SAFETY INFORMATON Page 2 BEFORE YOU BEGIN Page 2 ASSEMBLY Page 3-8 PARTS LIST Page 9 EXPLODED VIEW Page 10... -
Page 3: Important Safety Informaton
IMPORTANT SAFETY INFORMATION Before using this unit or starting any exercise program, consult your physician. This is especially important for persons over the age of 35 and/or persons with preexisting health problems. The unit is not intended for use by persons with reduced physical, sensory, or mental capabilities or lack of experience and knowledge, unless they are given supervision or instruction about use unit by someone responsible for their safety. - Page 4 ASSEMBLY INSTRUCTIONS : Hand tighten bolts and Nylon Lock nuts until machine is fully assembled. STEP 1: Attach the ear ase ss to the ra e using: • Two Button Head Cap Screws (#37) Four Flat Washers (#32) • • Two Nylon lock Nuts (#34) STEP 2: Attach the r t ase ss...
- Page 5 ASSEMBLY INSTRUCTIONS IMPORTANT: Hand tighten bolts and Nylon Lock nuts until machine is fully assembled. STEP 4: Attach the two Fr t ra e t ra e t ra e e ti e ti e ti Plates Plates to the r t ase ss and the r t ra e ss...
- Page 6 ASSEMBLY INSTRUCTIONS IMPORTANT: Hand tighten bolts and Nylon Lock nuts until machine is fully assembled. : Hand tighten bolts and Nylon Lock nuts until machine is fully assembled. STEP 7: Attach the i e le ra e le ra e to the to the t ra e ss...
- Page 7 ASSEMBLY INSTRUCTIONS IMPORTANT: Hand tighten bolts and Nylon Lock nuts until machine is fully assembled. uts until machine is fully assembled. STEP 10: Pulling outward on the P towards the back of the eat ra e ss , slid the sta le ar ss into the back receiver, then release the P...
- Page 8 ASSEMBLY INSTRUCTIONS IMPORTANT: Hand tighten bolts and Nylon Lock nuts until machine is fully assembled. : Hand tighten bolts and Nylon Lock nuts until machine is fully assembled. STEP 13: Attach one a ter ss Front ra e ss with the pre-installed stalled screw.
- Page 9 ASSEMBLY INSTRUCTIONS IMPORTANT: Hand tighten bolts and nylon lock nuts until machine is fully assembled. Hand tighten bolts and nylon lock nuts until machine is fully assembled. STEP 16: Attach the eat Pa to the eat ra et eat ra et using: •...
-
Page 10: Parts List
Parts List... -
Page 11: Exploded View
Exploded View... - Page 12 Visit xmarkfitness.com for warranty information Customer Service: service@xmarkfitness.com 1-800-719-4605 Hours: 7:30 AM to 3:00 PM CST Monday – Friday...
Need help?
Do you have a question about the XM-7615.1 and is the answer not in the manual?
Questions and answers