Table of Contents
Advertisement
Quick Links
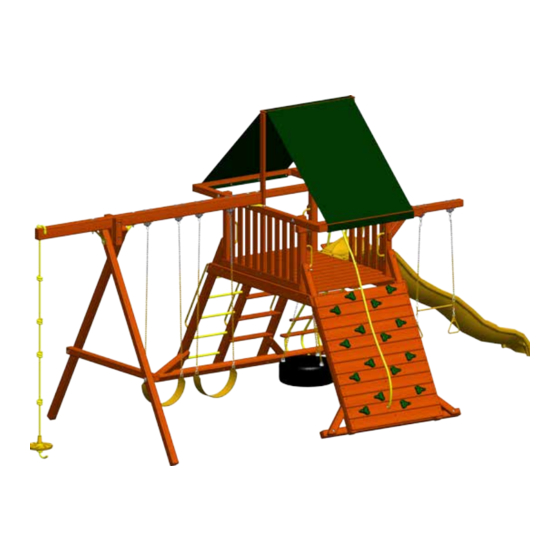
PARROT ISLAND PLAYCENTER
Tape Measure
Phillips Screw Driver
Claw Hammeror Rubber Mallet
9/16" Deep Well Socket
Phillips Head Screw Bits
Please familiarize yourself with the install manual, parts/components and general construction process of your new swing set before
getting started. Approximate assembly time: 6 to 8 hours. 6 foot unobstructed safety perimeter around swing set recommended.
HOUSTON, TX 77041 • WWW.TREEFROGSSWINGSETS.COM • © 2013 KID STRUCTURES INC.
BASE MANUAL
Version 4.15
Tools Needed for Assembly
24" Level
3/8" Cordless Drill or Electric Drill
Pliers or Vise Grips
3/4" Deep Well Socket
An Adult with two Adult Helpers
Angle Square
3/8" Drive Ratchet or Electric Impact Gun
7/16" Deep Well Socket
1/8", 1/4", and 9/16" Drill Bits
Advertisement
Table of Contents

Related Manuals for Tree Frogs PARROT ISLAND PLAYCENTER


Summary of Contents for Tree Frogs PARROT ISLAND PLAYCENTER
- Page 1 PARROT ISLAND PLAYCENTER BASE MANUAL Version 4.15 Tools Needed for Assembly Tape Measure 24” Level Angle Square Phillips Screw Driver 3/8” Cordless Drill or Electric Drill 3/8” Drive Ratchet or Electric Impact Gun Claw Hammeror Rubber Mallet Pliers or Vise Grips 7/16”...
- Page 2 All Slides: 125 Lbs. Tree Frogs recommends that the weight limits for all components must not be exceeded. Failure to adhere to these and other safety guidelines could result in damage to the swing set and/or injury to the users.
- Page 3 Most cracks are not warrantable, however if you believe that the integrity of your play set is compromised by this natural occurrence, please contact the Tree Frogs Swing Set Dealer that you purchased your swing set from. We appreciate your purchase and know that you will enjoy your play system for many years to come.
- Page 4 ● Depending on your experience, assembly of our play sets can take as little as 6 hours up to 24 hours, depending on size, after inventory of parts; therefore, we recommend you set aside a full two days for assembly. ● Identify all of the parts for your play set. Empty each box and lay out boards so you can see each part. Your instruction book will have detailed drawings that will make it easy for you to recognize individual parts. Keep all hardware and metal parts separate from wooden pieces.
- Page 5 CONSUMER INFORMATION SHEET FOR PLAYGROUND SURFACING MATERIALS The U.S. Consumer Product Safety Commission (CPSC) estimates that about 100,000 playground equipment related injuries resulting from falls to the ground surface are treated annually in U.S. hospital emergency rooms. Injuries involving this hazard pattern tend to be among the most serious of all playground injuries, and have the potential to be fatal, particularly when the injury is to the head.
-
Page 6: Table Of Contents
PARROT ISLAND LUMBER BASE Item No. Part No. Part Description QTY. PPB-1 PPB-1 31 15/16” BOTTOM RAIL FACIA PPB-2 PPB-2 32” SPINDLE PPB-3 PPB-3 50” CENTER TARP BOARD PPB-4 PPB-4 56 3/4” END TARP BOARD PPB-5 PPB-5 60 1/2” LONG BOTTOM RAIL FACIA PPB-6 PPB-6 62”... -
Page 7: Item No
PARROT ISLAND BASE ACCESORIES Item No. Part No. Part Description QTY. PIP-1 51-1-00031 43” PLASTISOL COATED CHAIN- YELLOW PIP-2 54-2-00006 1 1/4” DIAMETER 22 1/4” PLAYGRIP TUBE PIP-3 56-1-00012 DUCTILE IRON SWING HANGER PIP-4 56-1-00015 TIRE SWIVEL PIP-5 57-2-00001 1” PLAYGRIP SAFETY HANDLE PIP-6 57-2-00002 1”... - Page 8 PARROT ISLAND BASE HARDWARE Item No. Part No. Part Description QTY. PIH-21 40-1-00083 1/2” USS FLATWASHER PIH-22 40-1-00084 3/4” USS FLATWASHER PIH-23 40-1-00117 3/8” X 6” HEX BOLT PIH-24 40-1-00122 #14 X 1” PAN PHILLIPS T/S PIH-25 40-1-00123 1 1/2” COATED DECK SCREW PIH-26 41-1-00025 3/8”...
- Page 9 SWING BEAM HARDWARE (PPB-104) Item No. Part No. Part Description QTY. SBH-1 40-1-00001 3/8” ACORN NUT PLATED SBH-2 40-1-00002 1/2” ACORN NUT PLATED SBH-3 40-1-00011 1/2” X 3 1/2” CARRIAGE BOLT SBH-4 40-1-00013 1/2” X 7” CARRIAGE BOLT SBH-5 40-1-00014 1/2” X 9” CARRIAGE BOLT SBH-6 40-1-00026 3/8”...
-
Page 10: 31 15/16" Bottom Rail Facia
Parrot Island Playcenter Base Lumber PPB-1 PPB-2 PPB-3 31 15/16” Bottom Rail Facia 32” Spindle 50” Center Tarp Board QTY. 1 QTY. 12 QTY. 1 PPB-4 PPB-5 PPB-6 56 3/4” End Tap Board 60 1/2” Long Bottom Rail Facia 62” Rockwall Center Support QTY. -
Page 11: 50" Rockwall Board
Parrot Island Playcenter Base Lumber PPB-10 PPB-11 PPB-12 50” Rockwall Board 50” Blank Rockwall Board 74 3/4” Center Deck Support QTY. 7 QTY. 4 QTY. 1 PPB-13 PPB-14 PPB-15 24” Rope Rung 75” Center Post 23 9/16” Ladder Step QTY. 6 QTY. -
Page 12: 19" (L) Gusset
Parrot Island Playcenter Base Lumber PPB-19 PPB-20 PPB-21 19” (L) Gusset 39 7/16” (L) Corner Post 39 7/16” (R) Corner Post QTY. 3 QTY. 2 QTY. 2 PPB-22 PPB-23 PPB-24 65” Center Combo Ladder Leg 75” Ground Runner 80” Rockwall Ladder Leg QTY. -
Page 13: 90 1/8" Rope Ladder Arm
Parrot Island Playcenter Base Lumber PPB-28 PPB-29 PPB-30 90 1/8” Rope Ladder Arm 96” Top Joist Swing Beam 96” Top Joist QTY. 1 QTY. 1 QTY. 1 PPB-31 96 1/8” Rope Ladder Runner QTY. 1... -
Page 14: Parrot Island Swing Beam Lumber
Parrot Island Swing Beam Lumber PSB-1 PSB-2 PSB-3 7 5/8” Center A-Frame Block 12 7/8” A-Frame Block 12 7/8” A-Frame Block Sinked QTY. 1 QTY. 1 QTY. 1 PSB-4 PSB-5 PSB-6 68” A- Frame Crossmember 113” A-Frame Leg 119 13/16” 3Position Swingbeam QTY. - Page 15 Parrot Island Playcenter Base hardware Bag (PPB-101) Installer note: (yoU MUst asseMBle thIs ProdUct In accordance wIth these asseMBly InstrUctIons. when coMPlete gIVe ManUal to owner.) PIh-1 PIh-2 PIh-4 PIh-5 PIh-6 40-1-00001 40-1-00002 40-1-00022 40-1-00026 40-1-00028 3/8" acorn nut 1/2" acorn nut 2 1/2"...
- Page 16 Parrot Island Playcenter Base hardware Bag (PPB-101) Installer note: (yoU MUst asseMBle thIs ProdUct In accordance wIth these asseMBly InstrUctIons. when coMPlete gIVe ManUal to owner.) PIh-10 PIh-17 40-1-00055 40-1-00074 1/4" x 3" hex lag screw 1/2" split lockwasher QtY. 19 QtY.
- Page 17 Parrot Island Playcenter Base hardware Bag (PPB-101) Installer note: (yoU MUst asseMBle thIs ProdUct In accordance wIth these asseMBly InstrUctIons. when coMPlete gIVe ManUal to owner.) PIh-19 PIh-20 PIh-21 PIh-22 40-1-00081 40-1-00082 40-1-00083 40-1-00084 1/4" uss flatwasher 3/8" uss flatwasher 1/2"...
- Page 18 rockwall hardware (PPB-102) Installer note: (yoU MUst asseMBle thIs ProdUct In accordance wIth these asseMBly InstrUctIons. when coMPlete gIVe ManUal to owner.) rWh-1 rWh-8 40-1-00022 40-1-00111 2 1/2" Coated deck screw 2" Metal tap screw QtY. 48 QtY. 4 rWh-2 40-1-00059 3/8"...
- Page 19 steP/ coMBo ladder hardware (PPB-103) Installer note: (yoU MUst asseMBle thIs ProdUct In accordance wIth these asseMBly InstrUctIons. when coMPlete gIVe ManUal to owner.) sCh-1 sCh-8 40-1-00055 40-1-00122 1/4" x 3" hex lag screw #14 x 1" Pan Phillips t/s QtY.
- Page 20 slIde hardware (PPB-105) Installer note: (yoU MUst asseMBle thIs ProdUct In accordance wIth these asseMBly InstrUctIons. when coMPlete gIVe ManUal to owner.) Psh-1 Psh-2 Psh-3 40-1-00065 40-1-00077 40-1-00081 #14 x 1" Pan Phillips M/s 1/4" 4 Prong t-nut 1/4" uss flatwasher QtY.
- Page 21 swIngBeaM hardware (PPB-104) Installer note: (yoU MUst asseMBle thIs ProdUct In accordance wIth these asseMBly InstrUctIons. when coMPlete gIVe ManUal to owner.) sbh-5 40-1-00014 1/2" x 9' Carriage bolt QtY. 1 sbh-6 sbh-9 sbh-7 40-1-00026 40-1-00059 40-1-00028 3/8" hex nut 3/8"...
- Page 22 swIngBeaM hardware (PPB-104) Installer note: (yoU MUst asseMBle thIs ProdUct In accordance wIth these asseMBly InstrUctIons. when coMPlete gIVe ManUal to owner.) sbh-10 40-1-00061 3/8" x 5" hex lag screw QtY. 2 sbh-11 sbh-12 sbh-13 sbh-14 sbh-15 40-1-00064 40-1-00073 40-1-00074 40-1-00082 40-1-00083 3/8"...
- Page 23 swIngBeaM hardware (PPB-104) Installer note: (yoU MUst asseMBle thIs ProdUct In accordance wIth these asseMBly InstrUctIons. when coMPlete gIVe ManUal to owner.) sbh-18 sbh-20 40-1-00122 41-1-00025 #14 x 1" Pan Phillips t/s 3/8" bolt Cup QtY. 2 QtY. 14 sbh-19 40-1-00124 1/2"...
- Page 24 Parrot Island Base Accessories PIP-1 PIP-2 PIP-3 PIP-4 51-1-00031 54-2-00006 56-1-00012 56-1-00015 43" Plastisol Coated Chain 1 1/4" x 22 1/4" Playgrip Tube Ductile Iron Swing Hanger Tire Swivel QTY. 3 QTY. 5 QTY. 8 QTY. 1 PIP-5 PIP-6 PIP-7 PIP-8 57-2-00001 57-2-00002...
- Page 25 Parrot Island Base Accessories PIP-13 PIP-14 PIP-15 PIP-16 59-1-00012 37-1-00017 37-1-00021 60-1-00005 Spiral Ground Anchor 12" Ship's Wheel Telescope 16" Trapeze Bar w/ Rings QTY. 4 QTY. 1 QTY. 1 QTY. 1 PIP-17 PIP-18 65-7-00017 65-7-00019 14' Yellow Rope 17' Yellow Rope QTY.
- Page 26 COMBO STEP LADDER ASSEMBLY PARTS NEEDED HARDWARE NEEDED PPB-22- Center Combo Ladder Leg- SCH-1- 1/4” x 3” Hex Lag Screws- (16) PPB-26- (L) Combo Ladder Leg- PIP-2- 1 1/4” x 22 1/4” Playgrip Tube- PPB-25- (R) Combo Ladder Leg- SCH- 5- 1/4” USS Flatwasher- (16) PPB-15- Ladder Step-...
- Page 27 COMBO STEP LADDER ASSEMBLY PARTS NEEDED HARDWARE NEEDED PPB-31- Rope Ladder Runner- SCH-3- 3/8” x 5” Hex Lag Screw- PPB-18- (R) Gusset- SCH-2- 3/8” x 3 1/2” Hex Lag Screw- PPB-19- (L) Gusset- SCH-6- 3/8” USS Flatwasher-...
- Page 28 ROCKWALL ASSEMBLY PARTS NEEDED HARDWARE NEEDED PPB-9- Rockwall Board w/ Rope Hole- RWH-1- 2 1/2” Coated Deck Screw- (48) PPB-10- Rockwall Board- RWH-4- 1/4” x 1 1/4” Pan Phillips M/S- (32) PPB-11- Blank Rockwall Board- RWH-6- 1/4” USS Flatwasher- (32) PPB-24- Rockwall Ladder Leg- RWH-5- 1/4”...
- Page 29 ROCKWALL ASSEMBLY PARTS NEEDED HARDWARE NEEDED PPB-12- Center Deck Support- PIH-25- 1 1/2” Coated Deck Screw- (12) PPB-23- Ground Runner- RWH-3- 3/8” x 5” Hex Lag Screw- RWH-7- 3/8” USS Flatwasher-...
- Page 30 ROCKWALL ASSEMBLY MAIN ASSEMBLY PARTS NEEDED HARDWARE NEEDED PPB-18- (R) Gusset- RWH-2- 3/8” x 3 1/2” Hex Lag Screw- PPB-19- (L) Gusset- RWH-7- 3/8” USS Flatwasher- PIH- 23- 3/8” x 6” Hex Bolt- PIH-20- 3/8” USS FLatwasher- PIH-18- 3/8” 4 Prong T-Nut- PIH-1- 3/8”...
- Page 31 MAIN ASSEMBLY PARTS NEEDED HARDWARE NEEDED PPB-20- Left Corner Post- PIH-1- 3/8” Acorn Nut- PIH-10- 1/4” x 3” Hex Lag Screw- (8) PPB-21- Right Corner Post- PIH-16- 3/8” 4 Prong T-Nut- PIH-19- 1/4” USS Flatwasher- PIH-20- 3/8” USS Flatwasher- PIH-23- 3/8” x 6” Hex Bolt-...
- Page 32 MAIN ASSEMBLY PARTS NEEDED HARDWARE NEEDED PPB-8- Long Deck Board- PIH-4- 2 1/2” Coated Deck Screw- (56) PIH-19- 1/4” USS Flatwasher- PPB-7- Short Deck Board- (10) PIH- 24- #14 x 1” Pan Phillips T/S- PPB-12- Center Deck Support- There is a 1/8” Gap between each Deck Board...
- Page 33 MAIN ASSEMBLY PARTS NEEDED HARDWARE NEEDED PPB-29- Top Joist Swing Beam- PIH-1- 3/8” Acorn Nut- PIH-5- 3/8” Hex Nut- PPB-30- Top Joist- PIH-16- 3/8” Split Lockwasher- PIH-20- 3/8” USS Flatwasher- PIH-26- 3/8” Bolt Cup- PIH-9- 3/8” x 6 1/2” Hex Bolt-...
- Page 34 MAIN ASSEMBLY PARTS NEEDED HARDWARE NEEDED PPB-27- Trapeze Arm- PIH-1- 3/8” Acorn Nut- PIH-5- 3/8” Hex Nut- PPB-28- Rope Ladder Arm- PIH-16- 3/8” Split Lockwasher- PIH-20- 3/8” USS Flatwasher- PIH-26- 3/8” Bolt Cup- PIH-9- 3/8” x 6 1/2” Hex Bolt- PIH-13- 3/8”...
-
Page 35: Parts Needed
MAIN ASSEMBLY PARTS NEEDED HARDWARE NEEDED PPB-18- (R) Gusset- PIH-7- 3/8” x 1 1/2” Hex Bolt- PIH- 10- 1/4” x 3” Hex Lag Screw- (2) PPB-19- (L) Gusset- PIH-12- 3/8” x 3 1/2” Lag Screw- (4) PIH-18- 3/8” 4 Prong T-Nut- PPB-5- Long Bottom Rail Facia- PIH-20- 3/8”... -
Page 36: Pih-19- 1/4" Uss Flatwasher
MAIN ASSEMBLY PARTS NEEDED HARDWARE NEEDED PPB-2- Spindle- PIH-25- 1 1/2” Coated Deck Screw- (32) PPB-1- Bottom Rail Facia- PIH-7- 1 1/2” Hex Bolt- PIH-20- 3/8” USS Flatwasher- PIH-18- 3/8” 4 Prong T-Nut- PIH-19- 1/4” USS Flatwasher- PIH-10- 1/4” x 3” Hex Lag Screw- There is a 2 1/2”... - Page 37 MAIN ASSEMBLY PARTS NEEDED HARDWARE NEEDED PPB-2- Spindle- PIH-25- 1 1/2” Coated Deck Screw- (16) PPB-3- Center Tarp Board- PIH-4- 2 1/2” Coated Deck Screw- PPB-4- End Tarp Board- PIH-11- 1/4” x 4 1/2” Hex Lag Screw- PIH-19- 1/4” USS Flatwasher- There is a 2 1/2”...
- Page 38 MAIN ASSEMBLY PARTS NEEDED HARDWARE NEEDED PIP-6- 1” Playgrip Ladder Handle- (3) PIH-8- 3/8” x 5” Hex Bolt- PIH-26- 3/8” Bolt Cup- PIH-20- 3/8” USS Flatwasher- PIH-16- 3/8” Split Lockwasher- PIH-5- 3/8” Hex Nut- PIH-1- 3/8” Acorn Nut- SCH-5- 1/4” USS Flatwasher- SCH-4- 1/4”...
- Page 39 MAIN ASSEMBLY PARTS NEEDED HARDWARE NEEDED PIP-5- 1” Playgrip Safety Handle- PIH-19- 1/4” USS Flatwasher- PIH-15- #14 x 2” Pan Phillips T/S-...
-
Page 40: Pih-24- #14 X 1" Pan Phillips T/S
MAIN ASSEMBLY HARDWARE NEEDED PIH-24- #14 x 1” Pan Phillips T/S- PIH-19- 1/4” USS Flatwasher- PIP-7- Small 90 Degree Bracket-... - Page 41 ROPE LADDER ASSEMBLY TARP INSTALL Figure A. (Figure A.)- Take one corner of the VINYL TARP and place it flush in the corner. Tap the snap with a blunt object, leaving an indention of the snap in Slide one end of rop through the Upper Rope Arm and tie a good knot. the wood.
- Page 42 PARTS NEEDED HARDWARE NEEDED (Shift+Cntrl+Click) to edit (Shift+Cntrl+Click) to edit Slip the rope through the PPB-17 and tie a knot, then tie a knot about every foot and a half to 2 feet until the rope goes throught the Rockwall and tie a knot securing the rope.
- Page 43 TRAPEZE INSTALL TIRE SWING INSTALL...
- Page 44 TIRE SWING INSTALL Drill Marked Holes from previous step using a 9/16” bit.
- Page 45 SLIDE INSTALL SWING BEAM INSTALL PARTS NEEDED HARDWARE NEEDED Slide- PSH-1- 1/4” x 1” Pan Philliups M/S- SBH-1- 3/8” Acorn Nut Plated- PSB-1- Center A-Frame Block- PSH-2- 1/4” USS Flatwasher- SBH-17- 3/8” x 10” Hex Bolt- PSB-2- A-Frame Block- PSH-3- 1/4” 4 Prong T-Nut- SBH-20- 3/8”...
- Page 46 SWING BEAM INSTALL PARTS NEEDED HARDWARE NEEDED PSB-5- A-Frame Leg- SBH-1- 3/8” Acorn Nut- (12) SBH-11- 3/8” Nylon Insert Nut- (12) PSB-6- 3 Position Swing Beam- SBH-2- 1/2” Acorn Nut- SBH-12- 3/8” Split Lockwasher- (12) PIP-10- Swing Beam 45 Degree Bracket- SBH-14- 3/8”...
- Page 47 SWING BEAM INSTALL HARDWARE NEEDED SBH-1- 3/8” Acorn Nut- SBH-2- 1/2” Acorn Nut- SBH-6- 3/8” Hex Nut- SBH-7- 1/2” Hex Nut- SBH-12- 3/8” Split Lockwasher- SBH-13- 1/2” Split Lockwasher- SBH-14- 3/8” USS Flatwasher- SBH-15- 1/2” USS Flatwasher- SBH-20- 3/8” Bolt Cup- SBH-16- 3/4”...
- Page 48 SWING BEAM INSTALL PARTS NEEDED HARDWARE NEEDED PSB-4- A-Frame Crossmember- SBH-4- 1/2” x 7” Carriage Bolt- SBH-5-1/2” x 9” Carriage Bolt- SBH-16- 3/4” USS Flatwasher- SBH-15- 1/2” USS Flatwasher- SBH-13- 1/2” Split Lockwasher- SBH-7- 1/2” Hex Nut- SBH-2- 1/2” Acorn Nut- Place Crossmember across A-Frame Legs while keeping level and mark the hole placement.
- Page 49 SWING BEAM INSTALL HARDWARE NEEDED SBH-10- 3/8” x 5” Hex Lag Screw- SBH-14- 3/8” USS Flatwasher-...
- Page 50 Parrot Island Playcenter - wood roof Lumber Item No. Part No. Part Description QTY. PPwr-1 PPwr-1 12 5/16” ShorT faN boarD PPwr-2 PPwr-2 46 11/16” boTTom faN boarD PPwr-3 PPwr-3 62” ceNTer wooD roof SuPPorT PPwr-4 PPwr-4 10” ceNTer faN boarD...
- Page 51 Parrot Island Playcenter- Wood Roof Lumber PPWR-1 PPWR-2 PPWR-3 12 5/16” Short Fan Board 43 11/16” Bottom Fan Board 62” Center Wood Roof Support QTY. 4 QTY. 2 QTY. 2 PPWR-4 PPWR-5 PPWR-6 10” Center Fan Board 11 5/8” Peak Facia 63 3/4”...
- Page 52 Parrot Island Playcenter Wood roof hardWare Installer note: (yoU MUst asseMBle thIs ProdUct In accordance WIth these asseMBly InstrUctIons. When coMPlete GIVe ManUal to oWner.) Wrh-1 Wrh-2 Wrh-3 40-1-00019 40-1-00022 40-1-00059 1 1/4" Coated deck screw 2 1/2" Coated deck screw 3/8"...
- Page 53 Parrot Island Wood Roof Assembly Parts Needed Hardware Needed PPWR-1- Short Fan Board- WRH-6- 1 1/2” Coated Deck Screws- (20) PPWR-2- Bottom Fan Board- WRH-3- 3/8” x 3 1/2” Hex Lag Screw- PPWR-4- Center Fan Board- WRH-4- 3/8” USS Flatwasher- PPWR-6- Roof Supports- WRH-2- 2 1/2”...
- Page 54 Parrot Island Wood Roof Assembly Parts Needed Hardware Needed PPWR-5- Peak Facia- WRH-5- 2” Coated Deck Screw- PPWR-8- Wood Roof Board- (10) WRH-6- 1 1/2” Coated Deck Screw- (40) Repeat for both sides of Wood Roof...
- Page 55 Parrot Island Wood Roof Assembly Parts Needed Hardware Needed PPWR-3- Center Wood Roof Support- WRH-1- 1 1/4” Coated Deck Screw- (10) PPWR-8- Wood Roof Board- (18) WRH-6- 1 1/2” Coated Deck Screw- (72)
- Page 56 Parrot Island Wood Roof Assembly Parts Needed Hardware Needed PPWR-7- Roof Board Ripped- WRH-6- 1 1/2” Coated Deck Screw- (24) Wood Roof Fan Assembly- WRH-5- 2” Coated Deck Screw- Back View...
- Page 57 This includes all blow molded slides. Surface rust, fading, weathering, cracks/chips in coatings and corrosion that does not affect structural integrity is not covered by this warranty. And for a period of 1-Year Tree Frogs warranties all ropes to be free of defects in material and workmanship. This includes all structural foam molded slides. Fading is not considered a defect and may occur with seasonal and geographical conditions.
Need help?
Do you have a question about the PARROT ISLAND PLAYCENTER and is the answer not in the manual?
Questions and answers