Advertisement
Quick Links
Tape Measure
Phillips Screw Driver
Claw Hammeror Rubber Mallet
9/16" Deep Well Socket
Phillips Head Screw Bits
Please familiarize yourself with the install manual, parts/components and general construction process of your new swing set before
getting started. Approximate assembly time: 6 to 8 hours. 6 foot unobstructed safety perimeter around swing set recommended.
Houston, tX 77041 • www.treefrogsswingsets.com • © 2013 kiD structures inc.
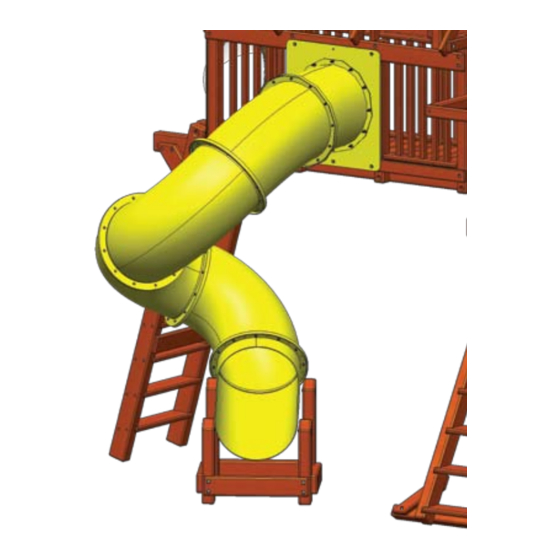
5.4 & 7 Deluxe Spiral Slide
Install Manual
Version 4.14
Tools Needed for Assembly
24" Level
3/8" Cordless Drill or Electric Drill
Pliers or Vise Grips
3/4" Deep Well Socket
An Adult with two Adult Helpers
Angle Square
3/8" Drive Ratchet or Electric Impact Gun
7/16" Deep Well Socket
1/8", 1/4", and 9/16" Drill Bits
Advertisement

Related Manuals for Tree Frogs 5.4 Deluxe Spiral Slide


Summary of Contents for Tree Frogs 5.4 Deluxe Spiral Slide
- Page 1 5.4 & 7 Deluxe Spiral Slide Install Manual Version 4.14 Tools Needed for Assembly Tape Measure 24” Level Angle Square Phillips Screw Driver 3/8” Cordless Drill or Electric Drill 3/8” Drive Ratchet or Electric Impact Gun Claw Hammeror Rubber Mallet Pliers or Vise Grips 7/16”...
- Page 2 ● Be sure that the sealant you select is non-toxic and child safe. Your local tree frogs wooden swing set factory dealer may offer a complete power wash and reseal and maintenance program.
-
Page 3: Important - Please Read
Most cracks are not warrantable, however if you believe that the integrity of your play set is compromised by this natural occurrence, please contact the tree frogs swing set Dealer that you purchased your swing set from. We appreciate your purchase and know that you will enjoy your play system for many years to come. - Page 4 ● Depending on your experience, assembly of our play sets can take as little as 6 hours up to 24 hours, depending on size, after inventory of parts; therefore, we recommend you set aside a full two days for assembly. ●...
- Page 5 consumer informAtion sHeet for PLAYgrounD surfAcing mAteriALs The U.S. Consumer Product Safety Commission (CPSC) estimates that about 100,000 playground equipment related injuries resulting from falls to the ground surface are treated annually in U.S. hospital emergency rooms. Injuries involving this hazard pattern tend to be among the most serious of all playground injuries, and have the potential to be fatal, particularly when the injury is to the head.
- Page 6 Loft Spiral Slide Filler Bundle Item No. Part Number Part Description QTY. sfB-1 10-4-00197 sPirAL sLiDe fiLLer BoArD Dlx Spiral Slide Legs Bundle sLB-1 17-4-00127 20” SPIRAL SLIDE BRACE sLB-2 17-4-00128 30” SPIRAL SLIDE BRACE sLB-3 17-4-00129 Left 24” sPirAL sLiDe Leg sLB-4 17-4-00130 RIGHT 24”...
- Page 7 Loft Spiral Slide Filler Bundle SFB-1 10-4-00197 Spiral Slide Filler Board QTY. 2 DLX Spiral Slide Legs Bundle SLB-1 SLB-2 SLB-3 SLB-4 17-4-00127 17-4-00128 17-4-00129 17-4-00130 20” Spiral Slide Brace 30” Spiral Slide Brace Left 24” Spiral Slide Leg Right 24” Spiral Slide Leg QTY.
- Page 8 DLX. SpiraL SLiDe HDwr. Bag iNSTaLLer NOTe: (YOU MUST aSSeMBLe THiS prODUCT iN aCCOrDaNCe wiTH THeSe aSSeMBLY iNSTrUCTiONS. wHeN COMpLeTe giVe MaNUaL TO OwNer.) #shb-2 #shb-1 #shb-3 #shb-4 #shb-5 40-1-00083 40-1-00082 40-1-00074 40-1-00028 40-1-00002 3/8” uss flatwasher 1/2” uss flatwasher 1/2”...
- Page 9 DLX. SpiraL SLiDe HDwr. KiT iNSTaLLer NOTe: (YOU MUST aSSeMBLe THiS prODUCT iN aCCOrDaNCe wiTH THeSe aSSeMBLY iNSTrUCTiONS. wHeN COMpLeTe giVe MaNUaL TO OwNer.) #shk-1 #shk-2 #shk-3 40-1-00082 40-1-00003 3/8” uss flatwasher 5/16” uss flatwasher 3/8” x 1 1/4” Carriage bolt QtY.
- Page 10 DLX Spiral Slide Components SC-1 SC-2 SC-3 Slide Component-1 Slide Component-2 Slide Component-3 QTY. 1 QTY. 1 QTY. 1 SC-4 SC-5 SC-6 SC-7 Slide Component-4 Slide Component-5 Slide Component-6 Slide Component-7 QTY. 1 QTY. 1 QTY. 1 QTY. 1...
- Page 11 Sub- Assemblies Parts Needed Hardware Needed SHK-3- 3/8” x 1 1/4” Carriage Bolt- (12) SHB-2- 3/8” USS Flatwasher-(16) SC-1- Slide Component-1- SC-7- Slide Panel- SHK-5- 3/8” Nylon Locknut- (12) SHK-1- 3/8” USS FLatwasher-(12) SLB-1- 20” Spiral Slide Brace- SLB-2- 30” Spiral Slide Brace- SHB-7- 3/8”...
-
Page 12: Main Assembly
Main Assembly Parts Needed Hardware Needed 1/4” x 2” Hex Lag Bolts- (4) w/ Loft Hardware Bundle SFB-1- Spiral Slide Filler Board- 1/4” USS Flatwashers- (4) w/ Loft Hardware Bundle Step 1 Assembly- SHK-6- 3/8” x 5” Hex Lag Screw- SHK-2- 3/8”... - Page 13 Main Assembly Parts Needed Hardware Needed SC-2- Slide Component 2- SHK-2- 5/16” USS Flatwasher- (48) SC-3- Slide Component 3- SHK-4- 5/16” x 1” Hex Bolt- (24) SHK-6- 5/16” Nylon Locknut- (24) Inner Seam SC-2 SC-2 SC-1 Inner Seam Inner Seam SC-3 Inner Seam Step:...
- Page 14 Main Assembly Parts Needed Hardware Needed SC-4- Slide Component- 4- SHK-2- 5/16” USS Flatwasher- (48) SC-5- Slide Component-5- SHK-4- 5/16” x 1” Hex Bolt- (24) SHK-6- 5/16” Nylon Locknut- (24) SC-3 SC-4 SC-4 SC-5 Step: Step: Again the first thing we want to do now is find the inner Again the first thing we want to do now is find the inner and outer seam of SC-4.
- Page 15 Main Assembly Parts Needed Hardware Needed SC-6- Slide Component 2- SHK-2- 5/16” USS Flatwasher- (24) SHK-4- 5/16” x 1” Hex Bolt- (12) SHK-6- 5/16” Nylon Locknut- (12) SC-5 Step: Step: For the SC-6 we want it to be level. Making the exit an To finish the Deluxe Spiral we only have 2 steps left.
- Page 16 Main Assembly SHB-3 SHB-4 SHB-1 SHB-2 SHB-5 SHB-8 This step needs to be combined with the previous step to ensure this gets done properly. After drilling a 9/16” Hole through the slide we are going to secure it to the base using a SHB-8 (3/8” x 3 1/2” Car- riage bolt), SHB-1 (1/2”...
Need help?
Do you have a question about the 5.4 Deluxe Spiral Slide and is the answer not in the manual?
Questions and answers