
Related Manuals for B. Braun Infusomat compact plus


Summary of Contents for B. Braun Infusomat compact plus
- Page 1 plus Infusomat ® compact Instructions for use Version 1.0 English Valid for software 003A 0123...
-
Page 3: Table Of Contents
Table of Contents About this document Set-up and start-up ..................Setting up and connecting the device Purpose ................7.1.1 Attach/remove the compact plus pole clamp Signs, symbols and tags ........7.1.2 Operating the device on a stand......Warnings .............. - Page 4 Alarms ............... Device alarms ............Pre-alarms and operating alarms ....9.2.1 Pre-alarms ..............9.2.2 Operating alarms ............. Reminder alarm ............ Note ................Cleaning and care ..........10.1 Cleaning ..............10.2 Battery operation and maintenance ..10.2.1 Notes for optimal battery operation ....10.2.2 Changing the battery ..........
-
Page 5: About This Document
About this document 1 About this document Signs, symbols and tags Purpose Symbol Meaning These instructions for use are part of the Prerequisite device and describe how to use the device Handling step: Follow the safely and correctly. specified instructions. Read these instructions for use before using this device. -
Page 6: Warnings
About this document Warnings Symbol Meaning Danger for people. Non-compliance will lead to death or serious injuries. DANGER Danger for people. Non-compliance could lead to death or serious injuries. WARNING Danger for people. Non-compliance could lead to minor injuries. CAUTION CAUTION Risk of damage or incorrect operation. -
Page 7: Symbols
Symbols 2 Symbols Symbols on the product and packaging Symbol Meaning Symbol Meaning Caution! Serial number Date of manufacture Consult instruction for use (year-month-day) Manufacturer Refer to instruction manual (Follow instruction for use) Humidity limitation Labeling of electric and electronic devices according to directive Temperature limit 2002/96/EC (WEEE) -
Page 8: Symbols On The Device's Display
Symbols Symbols on the device’s display Symbol Meaning Delivery in progress Delivery stopped Mains connection/battery status Pressure symbol (“manometer”): Indication of P1 to P9 pressure level set with current system pressure (pointer) Caution: Pre-alarm Caution: Operating alarm Infusion is above the upper soft limit Infusion is below the lower soft limit Pre-alarm temporarily muted... -
Page 9: Intended Use
Intended use 3 Intended use The Infusomat® compact plus infusion The Infusomat® compact plus infusion pump system is intended for use by quali- pump system is a transportable volumetric infusion pump used in combination with fied medical professionals in rooms used for medical purposes, in outpatients and specific infusion lines and accessories. -
Page 10: Safety Instructions
Safety instructions 4 Safety instructions Set-up and start-up 4.1.4 For mobile use (patient transport Read the safety instructions before within the clinic and outside the using the device and observe them. clinic), ensure secure mounting or Safe handling positioning of the device. Changes of position and strong vibrations can General 4.1.1... -
Page 11: Operation
Safety instructions Operation Irrespective of the soft limit, ensure 4.1.6 that the values set for the patients are Stand in front of the device to operate the medically correct values. it. This ensures that you are able to When using the device near equipment reach all control elements and that the that can cause higher interference display is clearly visible. -
Page 12: Enteral Nutrition
Safety instructions See the corresponding manufacturer Only use disposable items and acces- information for possible incompatibili- sories that are intended for this pur- ties between the device and medicinal pose and are labelled as such for the products. transfusion. Use only Luer lock, ENFit or NRFit Electrical connection feed systems, and use only compatible combinations of devices, accessories,... -
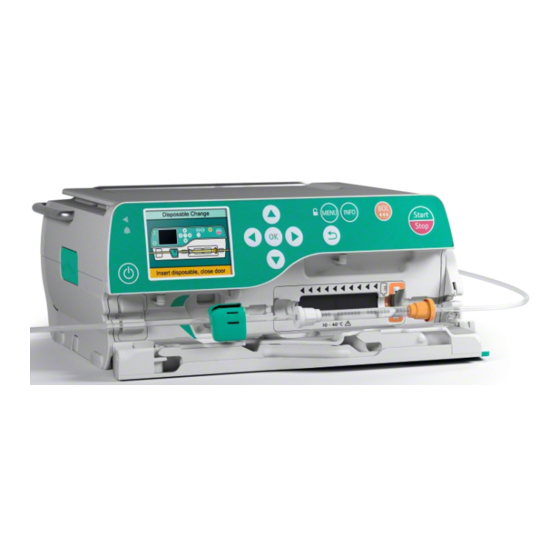
Page 13: Description Of The Device
Description of the device 5 Description of the device Device overview Name Air Sensor Attachment for safety clamp with push button Downstream pressure sensor Upstream pressure sensor Anti-freeflow mechanism... -
Page 14: Interfaces
Description of the device Interfaces Name Pole clamp Accessory port (e.g. staff call, ambulance) Mains connection (socket for power cable. In the event of a power cut, the device switches to battery mode automatically) Infrared interface (communication in station) Guide rails for connecting pumps... -
Page 15: Display And Control Elements
Description of the device Display and control elements Element Meaning On/Off key: Switches the device on and off Status display Green LED: Delivery Red LED: Technical alarm, operating alarm Arrow keys: Scroll through menus Change settings Answer yes/no questions Select scale values and change between digits when inputting values Open a function while the infusion is ongoing or suspended OK key:... - Page 16 Description of the device Element Meaning Back key: Return to the last display or last menu level Lock/unlock symbol: The keypad is locked and unlocked by pressing and holding down the menu key. Menu key: Call up main menu and lock/unlock the device Info key: Call up therapy data from the current infusion Bolus key:...
-
Page 17: Display Overview
Description of the device Display overview Alarm status display Alarms are displayed via a notification on the display, a signal tone and flashing of the red LED (operating alarm): Yellow: Pre-alarm Display / Function Moving arrows: Delivery in progress (stopped delivery is shown by two bars) Mains connection/battery Red: Operating alarm... -
Page 18: Menu Structure/Device Functions
Menu structure/device functions 6 Menu structure/device Main menu > Rate, volume & time 6.1.1 functions The device offers the option of entering the delivery rate, a volume or a time limit. If the volume limit and infusion time are entered, Main menu the rate will be calculated automatically. -
Page 19: Main Menu > Dose Calculation
Menu structure/device functions Main menu > Dose calculation Main menu > Settings... 6.1.3 6.1.4 Menu Meaning Menu Meaning Dose unit Night mode Turn night mode on/off Select unit: Brightness Enter brightness: μg Level 1 (=lowest level) - to - Level 9 (=highest level) Audio Select the volume: mmol... -
Page 20: Settings > Service
Menu structure/device functions Settings > Service 6.1.5 After the service code has been entered, the following service settings can be changed: Menu Meaning Language Select language Date Set date in DD.MM.YYYY format Time Set time Bolus rate Enter default bolus rate Switch KVO on/off Night Set night schedule:... -
Page 21: Set-Up And Start-Up
Set-up and start-up 7 Set-up and start-up Connecting the device to the 7.1.5 mains electricity Setting up and connecting DANGER! Risk of death from electric the device shock. Connect the power cable with mains plus Attach/remove the compact 7.1.1 connection to the device. pole clamp Position the power cable so that it Note:... -
Page 22: Turning Night Mode On/Off
Set-up and start-up Configuring the pressure 7.3.4 alarm limit WARNING! Danger to the patient from an incorrectly set pressure alarm limit. Ensure that the pressure alarm level limit is set so that the alarm can be triggered in good time. It may be necessary to change the pressure Turning night mode on/off alarm limit due to various influencing fac-... -
Page 23: Configuring Service Settings
Set-up and start-up Configuring service settings 7.3.5 Alarm Pressure value Select Service... and press OK to con- level firm. 0.300 bar (225 mmHg) Enter the service code and press OK 0.400 bar (300 mmHg) to confirm. The “Service Menu” screen is displayed. 0.500 bar (375 mmHg) 0.700 bar (525 mmHg) 0.900 bar (675 mmHg) -
Page 24: Locking/Unlocking The Keypad
Set-up and start-up Switching KVO on/off Note: The keypad lock is not activated for all keys. It is always possible to stop the The pump can continue to deliver with a infusion using the Start/Stop and On/Off pre-defined KVO rate (see section 16) after keys. -
Page 25: Operation
Operation 8 Operation Push the infusion line into the air – sensor on the left and into the Device settings configured pump based safety clamp on the right. Switching on the device Device connected to the mains elec- tricity or battery fully charged. Press the On/Off key on the device. -
Page 26: Priming The Infusion Line
Operation Follow the instructions on the screen A message asking if the line is discon- and open the roller clamp. nected from the patient is displayed. Press the up arrow key to start the The pump will perform a calibration of the tube. -
Page 27: Setting The Infusion Values
Operation Setting the infusion values Starting and stopping the infusion Infusion line inserted and selected Note: Depending on the last therapy, the Values for the treatment set pump starts either when the delivery rate is Press the Start/Stop key to start the entered or when a drug is selected. -
Page 28: Activating Standby
Operation Administering a bolus Activating standby In the event of longer interruptions, the user There are three different options for bolus administration: has the option of retaining the set values and continuing the infusion at a later time. Manual bolus Bolus with preselection of the bolus Activating standby mode volume Infusion line inserted and selected... -
Page 29: Administering A Bolus With Preselected Bolus Volume/Bolus Duration
Operation Using the drug database Note: Manual bolus administration is limited to a maximum of 10 s. The bolus DANGER! Danger to the patient from administration is automatically stopped, incorrectly selected drug. but it can be continued by pressing the Ensure that the correct drug has Bolus key again. -
Page 30: Hard And Soft Limits
Operation Start the infusion with the Start/Stop Soft limits key. Soft limits for rate/dose/bolus volume - or - and bolus rate can also be stored in the Confirm the delivery rate by pressing database. These can be exceeded with no restriction but the following message The “Overview”... -
Page 31: Calculating The Dose
Operation Calculating the dose Note: Pressing the OK key brings up the Overview screen. The Dose calculation function is used to Check the plausibility of the displayed calculate the delivery rate in ml/h based on values. the dose parameters entered. Start the infusion with the Start/Stop Infusion line inserted and selected key. -
Page 32: Entering A Combination Of Delivery Rate, Volume And Time
Operation Calculation using: Body surface area If one or more parameters are entered, changing a parameter has the following Select Body surface area and press effects on the other parameters. OK to confirm. Rate (or dose rate) changed: Enter weight and press OK to confirm. If only the volume has been entered, –... -
Page 33: Resetting The Therapy
Operation Resetting the therapy Remove the infusion line. 8.11 Close the pump door while simultane- The “Reset therapy” function is used to ously pulling the door lever. delete all currently set therapy data. A new Switching off the device therapy can be started. 8.14 “Reset therapy”... -
Page 34: Alarms
Alarms 9 Alarms Pre-alarms 9.2.1 In the event of a pre-alarm, an acoustic Device alarms signal sounds and a staff call is activated. The display remains in pre-alarm until the If a device alarm is triggered the infusion is operating alarm goes off. Pre-alarms do not stopped immediately. -
Page 35: Operating Alarms
Alarms Operating alarms 9.2.2 Display Meaning notification In the event of an operating alarm, the infusion is stopped. An acoustic signal “Pressure There is an occlusion in sounds, the red LED flashes and a staff call too high” the system. The set level is activated. -
Page 36: Reminder Alarm
Alarms Note Display Meaning notification Display Meaning “Pump Pump door was opened notification door open” during delivery. “No battery It is not possible to use the in the pump without a battery Reminder alarm Ask a service techni- device” cian to insert a battery Reminder alarms are triggered in the follow- ing cases: “Tempera-... -
Page 37: Cleaning And Care
Cleaning and care 10 Cleaning and care Battery operation 10.2 and maintenance Device is switched off Device is unplugged from the mains The device is equipped with a modern Device accessories are disconnected lithium- ion battery that, at the time of deliv- ery and after being fully charged, guarantees Cleaning 10.1... -
Page 38: Changing The Battery
Cleaning and care Optimal battery life will then only be achieved if the pump is in continu- ous operation at room temperature in charged state. The battery display on the pump is an approximate value based on the current delivery rate. If the battery is old, the “battery display”... -
Page 39: Decommissioning
Decommissioning 13 Disposal 11 Decommissioning No ongoing therapy The device should be returned to B. Braun for further disposal. No patient connected Observe all country-specific regula- Remove accessory parts and dispose tions when disposing of equipment of according to the instructions. locally. -
Page 40: Start-Up And Trumpet Curves
Start-up and trumpet curves 15 Start-up and trumpet curves Significance in 15.1 clinical practice Trumpet curves show the recorded maximum and minimum deviations in flow rate com- pared to the delivery rate per time interval. In clinical practice, the trumpet curve makes it easier for the treating doctor to decide if the pump is sufficiently precise for the administration of the desired drug. -
Page 41: Typical Start-Up And Trumpet Curves
Start-up and trumpet curves Typical start-up and 15.2 trumpet curves Anlaufkurven Trompetenkurven Start-up curves Trumpet curves Anlaufkurven Trompetenkurven Percentage flow error Fluss Q(t) [ml/h] Prozentualer Flussfehler Flow Q(t) [ml/h] Prozentualer Flussfehler Fluss Q(t) [ml/h] Infusomat Plus Line Infusomat Plus Line Infusomat Plus Line Infusomat Plus Line Delivery rate = 1 ml/h... -
Page 42: Alarm Times
Start-up and trumpet curves Alarm times These graphs show the accuracy and 15.3 uniformity of flow over time. Take into The following graphics show alarm times account: depending on pressure level. The delivery behaviour and the delivery accuracy are fundamentally affected Infusomat®... -
Page 43: Technical Data
Technical data 16 Technical data Note: The data given, e.g. delivery accuracy, pressure alarm and alarm reaction times, apply at room temperature and with water as the test material. Different media viscosities and temperatures may lead to deviations. Parameter Value Type of device Volumetric infusion pump Product classification... - Page 44 Technical data Parameter Value Interfaces Cold connector for mains voltage Accessory port for interface cable 12 V CP and staff call IrDA infrared for communication in the station and for service Operating conditions Temperature +10 °C … +40 °C / +50 °F ... +104 °F Relative air humidity 30% …...
- Page 45 Technical data Parameter Value Rate: ≥ 10 ml/h: KVO rate 3 ml/h KVO rate Rate: < 10 ml/h: KVO rate 1 ml/h Rate: < 1 ml/h: KVO rate = rate set using the service program (factory default rate 0.1 ml/h) or current rate if this is lower. Air detector Technical sensitivity: Detection of air bubbles ≥...
-
Page 46: Electromagnetic Compatibility
Electromagnetic compatibility 17 Electromagnetic compatibility Note: In order to meet with the following compliance levels, only original accesso- ries and replacement parts may be used. Otherwise, there may be elevated emissions or reduced device immunity. Note: If the device is used in a system involving other devices (e.g. -
Page 47: Electromagnetic Interference Emissions
Electromagnetic compatibility Electromagnetic interference emissions 17.1 Interference emission Compliance Electromagnetic environment measurements guidelines HF emissions Group 1 The device uses HF energy for its as per CISPR 11 internal functions only. As such, its HF emissions rate is very low and it is unlikely to interfere with nearby electronic equipment. -
Page 48: Electromagnetic Immunity
Electromagnetic compatibility Electromagnetic immunity 17.2 The device is designed to be used in the following electromagnetic environment. The device users and customers should ensure that it is being operated in such an environment. Immunity tests Test level Compliance Electromagnetic EN 60601-1-2 level environment guidelines EN 60601-2-24... - Page 49 Electromagnetic compatibility Immunity tests Test level Compliance Electromagnetic EN 60601-1-2 level environment guidelines EN 60601-2-24 Voltage dips, <5% UT ¹ Complies The supply voltage quality brief supply volt- for ½ periods through should be the same as that age interruptions (>95% dip) the use of of a typical commercial or...
- Page 50 Electromagnetic compatibility Immunity tests Test level Compliance Electromagnetic EN 60601-1-2 level environment guidelines EN 60601-2-24 Radiated HF 10 V/m [E1] 10 V/m The field strength should be interference 80 MHz to 80 MHz to lower than 10 V/m according to 2.5 GHz 6 GHz d = 12/E1 √P ² IEC 61000-4-3 80 MHz to 800 MHz d = 23/E1 √P ²...
-
Page 51: Recommended Safe Distances
Electromagnetic compatibility Recommended Note: The deviating test values derived 17.3 from IEC 60601-2 24 are labelled in the safe distances table. However, these test values allow one The device is designed for use in an electro- outage with an alarm while the test values magnetic environment in which HF disrup- according to DIN EN 60601-1-2 do not tions are controlled. - Page 52 Electromagnetic compatibility Transmitter Safe distance according to transmitter frequency m rated power 150 kHz to 80 MHz ¹ 80 MHz to 800 MHz 800 MHz to 6 GHz ¹ in W 1.2√P 1.2√P 2.3√P 0.01 0.12 0.12 0.23 0.38 0.38 0.73 7.27 ¹...
-
Page 53: Instructions For Use For Accessories
Instructions for use for accessories 18 Instructions for use for Interface lead staff call 18.2 CP (8718030) accessories Connect device to the staff call system Interface lead 12 V CP 18.1 (8718020) The staff call system must comply with the requirements of VDE 0834. - Page 54 Instructions for use for accessories The device has two different staff call operating modes: Switched off Switched on Switched off Operating alarm Alarm Static without Opera- off alarm *) tion Alarm 1 sec. Dyn. without Opera- off alarm *) tion * In “static without off alarm” mode, the staff call can be disabled by pressing the OK key. Short infusion stand 18.3 (8713135)
-
Page 55: Ordering Data & Ordering Codes
Ordering data & ordering codes 19 Ordering data & ordering codes Art. no. Name plus 8717050 Infusomat® compact Accessories 19.1 Recommended accessories for the Infusomat® compact plus Original Infusomat® compact plus lines 19.1.1 Art. no. Name PUR (PVC-free) Length Fill volume SafeSet 8700200 Infusomat... - Page 56 Ordering data & ordering codes Art. no. Name PUR (PVC-free) Length Fill volume Transfusion plus 8700350 Infusomat Line, Transfusion, 240 cm / 17.3 ml PVC, 240 cm (DEHP-free) 150 cm plus 8700360 Infusomat Line, Transfusion, 300 cm / 18.0 ml PVC, 240 cm, needle free Y-Port (DEHP-free) 200 cm UV-light protect...
-
Page 57: Interface Lead
Ordering data & ordering codes Interface lead 19.1.2 Art. no. Name 8718020 Interface lead 12 V CP 8718030 Interface lead staff call CP Short infusion stand 19.1.3 Art. no. Name 8713135 Short infusion stand... -
Page 58: Index
Index Index Enter time 18 Enter volume 18 Abbreviations 6 Accessories 53, 55 Accessories and consumables 11 General 10 Administering bolus 28 Alarms 34 Alarms and staff call 11 Inserting the infusion line 25 Alarm status 17 Intended use 9 Alarm times 42 Interface lead 57 Audio Volume 22... - Page 59 Notes Rate, volume & time 18 Repair 39 Safe handling 10 Safety check 39 Safety instructions 10 Safety standards 12 Service settings 20 Setting the infusion values 27 Set-up 21 Set-up and start-up 10 Short infusion stand 57 Software 10 Stacking 10 Standby 28 Starting and stopping the infusion 27 Start-up 21 Start-up and trumpet curves 40...
- Page 60 Manufacturer: Sales: B. Braun Melsungen AG B. Braun Melsungen AG 34209 Melsungen Hospital Care division Germany 34209 Melsungen Tel +49 (0) 56 61 71-0 Germany www.bbraun.com Tel: +49 (0) 56 61 71-0 Fax: +49 (0) 56 61 71-20 44 www.bbraun.com 38932201 •...
Need help?
Do you have a question about the Infusomat compact plus and is the answer not in the manual?
Questions and answers