Table of Contents
Advertisement
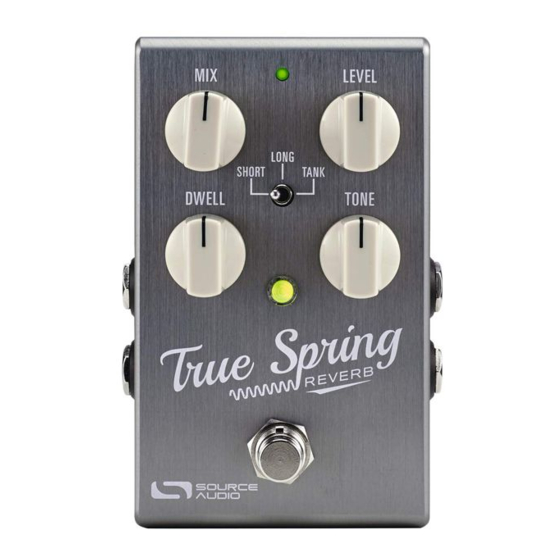
True Spring Reverb
User Guide
Welcome
Thank you for purchasing the True Spring Reverb. This powerful stereo effects pedal revisits and
reimagines the timeless combination of spring reverb and tremolo. The Source Audio engineering
team put years of collective man-hours into capturing every nuance and idiosyncrasy of the spring
reverb and tremolo effects from some of the music gear industry's most iconic guitar amps and
outboard gear. We hope you love where this pedal takes you.
The pedal comes in a compact and durable brushed aluminum housing with stereo inputs and
outputs, a three-position toggle switch, and a simple four-knob control surface. When combined with
the Neuro Hub, the True Spring also features full MIDI functionality.
Dialing in a wide selection of gorgeous reverb and tremolo tones is simple right out of the box, but
the True Spring also offers a far deeper set of editing abilities and unique routing options when
SA247
True Spring Reverb User Guide
1
Advertisement
Table of Contents

Related Manuals for Source Audio True Spring Reverb


Summary of Contents for Source Audio True Spring Reverb
-
Page 1: Welcome
User Guide Welcome Thank you for purchasing the True Spring Reverb. This powerful stereo effects pedal revisits and reimagines the timeless combination of spring reverb and tremolo. The Source Audio engineering team put years of collective man-hours into capturing every nuance and idiosyncrasy of the spring reverb and tremolo effects from some of the music gear industry’s most iconic guitar amps and... -
Page 2: Overview
Continuous Controller (CC) messages. It is also possible to send MIDI CC messages to the True Spring through the pedal’s mini USB port. Class compliant USB-MIDI allows the True Spring to work as a plug-and-play device with recording software running on Mac and Windows. SA247 True Spring Reverb User Guide... -
Page 3: Quick Start
True Spring requires an isolated 9V DC power source with a minimum of 165mA and a center-negative plug. Warning: Using a non-Source Audio supply, especially an unregulated supply, could damage the unit. Please be very cautious when using 3 -party power supplies. - Page 4 Footswitch: Enables or bypasses the effect. Pressing and holding the footswitch from the bypassed state also toggles between Standard and Preset Modes. The pedal mode is indicated by the illuminated green (Standard) or red (Preset) center LED color. SA247 True Spring Reverb User Guide...
-
Page 5: Table Of Contents
Daisy-Chaining Neuro Communication ....................40 Neuro Hub (Formerly the Soundblox Hub) .................... 42 MIDI ............................... 42 USB ................................. 44 True Spring Reverb Specifications ......................44 Troubleshooting ............................. 45 Frequently Asked Questions ........................46 Rubber Feet ............................47 Waste Disposal Notes ..........................47 Warranty .............................. -
Page 6: Connections
(if applicable) will be on the tip contact of the plug, and the Neuro App data will be on the ring contact. Input 2 accepts data from the Neuro Mobile App. Data from the Neuro Hub comes through the CONTROL INPUT port. SA247 True Spring Reverb User Guide... - Page 7 The ring contact on Output 2 acts as a data connection for the Neuro App, passing data from the True Spring to the next Source Audio effect in your signal chain. You can daisy-chain the Neuro App data regardless of whether Output 2 is configured to output audio or not. Connect Output 2 to the next pedal’s Neuro App Data input (Input 2) using a stereo (TRS) ¼”...
- Page 8 User’s Guide. Control Input Port The 3.5 mm CONTROL INPUT Port connects to external control devices such as the Source Audio Tap Tempo Switch, Dual Expression Pedal, Reflex Universal Expression Pedal, Neuro Hub, and Hot Hand Motion Controller. For more information, refer to the...
-
Page 9: Basic Spring Reverb And Tremolo Operation
1960s with the Fender Twin Reverb™ and Deluxe Reverb™ amplifiers and a revolution was born. The True Spring Reverb also has the capability to combine its spring reverbs with any of the pedal’s three classic tremolo effects - Opto, Harmonic, and Bias. There are a number of different designs for creating the amplitude modulation known as Tremolo (see the descriptions below). -
Page 10: Additional Spring Reverb Engines
80s Lexicon™ Hall reverb. It is a massive, lingering reverb with a smooth and subtle modulation. Trash Can Spring This nasty reverb is exactly what you might expect. Imagine the sound of a spring tank reverberating through an old metal trash can – it’s trashy! SA247 True Spring Reverb User Guide... - Page 11 Ventris True Spring This highly realistic spring reverb effect originally appeared in the Ventris Dual Reverb. Its splashy attack and vibrant trails instantly grabbed the attention of spring reverb enthusiasts worldwide. SA247 True Spring Reverb User Guide...
-
Page 12: Controls
100% wet. Roughly 3 o’clock on the MIX knob is where a 50/50 split between wet and dry occurs. Kill Dry Mode is also available as a global option (see Kill Dry Mode in the Neuro Hardware Options section of this manual). 50% Wet 100% Dry 100% Wet 50% Dry SA247 True Spring Reverb User Guide... - Page 13 OPTO (or to the tremolo type assigned to that reverb engine with the Neuro Mobile App or Desktop Editor – see the Tremolo Controls section in the Neuro Desktop Editor for details on changing the default tremolo types). SA247 True Spring Reverb User Guide...
-
Page 14: Standard And Preset Modes
Standard and Preset Modes The True Spring Reverb features two user modes - Standard Mode and Preset Mode. To alternate between the two modes press and hold the footswitch from the disengaged state until the center LED changes color. - Page 15 Creating a Preset (Without the Neuro Desktop Editor) • Bypass the True Spring Reverb by clicking the footswitch once. The engage/bypass LED should be dark at this time. • Press and hold the footswitch for 5 seconds and wait for the engage/bypass LED to turn red.
-
Page 16: Universal Bypass Tm
Universal Bypass Most effect pedals offer either true bypass or buffered bypass. The True Spring Reverb contains two separate circuits for bypass mode, allowing you to choose the method you prefer. The true bypass path uses signal relays, which are electromechanical switches. This provides an ultra-low resistance path from the input jacks to the output jacks, which is effectively the same as a single wire. - Page 17 / mono out rig – the processor simply ignores Input and Output 2. Mono To Stereo Receives a mono signal through Input 1 and processes the dry signal and a stereo effect through Outputs 1 & 2. SA247 True Spring Reverb User Guide...
- Page 18 Takes a mono signal through Input 1 and processes a wet/dry signal through Output 1 and a completely dry signal through Output 2. Sum To Mono Receives a stereo input signal through Inputs 1 & 2 and sums an affected mono signal through Output 1. SA247 True Spring Reverb User Guide...
-
Page 19: External Control
The CONTROL INPUT port opens a variety of external control options, allowing for direct control over many of the True Spring’s parameters. It is an input for the Source Audio Dual Expression Pedal, Reflex Universal Expression Pedal, Source Audio Tap Switch, or a data port for the Neuro Hub. - Page 20 CONTROL INPUT port. Expression Pedal Input Many parameters of the True Spring Reverb can be controlled with the Source Audio Dual Expression Pedal or Reflex Universal Expression Pedal. Connect either of these expression pedals to the Control Input port using a 1/8”...
- Page 21 Source Audio website for more details on HH. The Hot Hand has two axes of expression: X and Y. These signal are carried on the two rings of the TRRS cable that comes from the Hot Hand receiver.
- Page 22 Control Input button until the Control LED blinks. This clears all Expression, Hot Hand, and MIDI mapping. The Source Audio Tap Switch The Source Audio Tap Switch connects directly to the CONTROL INPUT with a 1/8” TRRS cable. The Tap Switch offers two very useful functions: Tap Tempo and Tremolo Engage/Bypass. •...
- Page 23 One Blink: Neuro Hub/Expression Pedal o Two Blinks: Tap Tempo o Three Blinks: Tremolo Bypass/Engage The Source Audio Tap Switch is included in the True Spring Reverb/Tap Switch Bundle, but can also be purchased separately at Source Audio’s Reverb.com Webstore.
-
Page 24: Neuro Mobile App & Neuro Desktop Editor
Connections field indicating that the True Spring is ready for editing. If your True Spring Reverb is in need of a firmware update, the Firmware Update icon (the arrow icon) will be framed in yellow. Upon clicking the arrow icon, you will be instructed on the updating procedure. - Page 25 Firmware Updates: Click the arrow icon to download any recent firmware updates to the connected pedal. If an update is available this icon will be framed in yellow. Upon clicking the icon, the software will provide instructions on how to proceed. SA247 True Spring Reverb User Guide...
- Page 26 Hardware Options Clicking the gear icon in the True Spring Reverb’s Connections window opens the Hardware Options menu (see the graphic below). Use the Hardware Options window to choose your pedal’s global hardware settings.
- Page 27 Standard and Preset Modes from 5 seconds to 800 ms. Sound Editor Upon clicking the wrench icon in the Connections section, the True Spring Reverb’s Sound Editor interface appears in a tab in the center field. This is where all of the sound editing work takes place.
- Page 28 Tremolo Assign: What should come first in the signal chain, tremolo or reverb? It is a very hotly debated topic. The True Spring Reverb lets you choose the order that works best for you. All the classic Fender™ “blackface” amps placed the tremolo after the reverb tank, but a lot of pedalboard designers put reverb at the very end of their signal chain.
- Page 29 Alternate Tone Knob Assign: Use the dropdown menu to select which parameter will be controlled with the TONE knob’s alternate function. To access the knob’s alternate function, press and hold the CONTROL INPUT button on the top of the pedal while turning the knob. SA247 True Spring Reverb User Guide...
- Page 30 (100Hz, 125Hz, 150Hz, 200Hz, 250Hz, 300Hz). This function only affects the wet signal. • ON/OFF State: Choose whether your True Spring Reverb powers up with the pedal engaged or bypassed. External Control...
- Page 31 The Presets section is located on the right side of the Neuro Desktop interface. There you will find a list of all the presets and empty preset positions available in your True Spring Reverb. The Presets section is also where you Save, Import, and Export presets. The buttons located at the top of the Presets field perform the functions listed below: •...
- Page 32 Knos Mode (Green LED). These three presets will engage with all the parameters pre-programmed with the exception of the physical knobs. In Knobs Mode, the physical position of the knobs will affect their corresponding parameter. SA247 True Spring Reverb User Guide...
-
Page 33: The Neuro Mobile App
It is important to mention that communication is one-way from the Neuro Mobile App to the True Spring Reverb. What this means is that unlike the Neuro Desktop Editor, the Neuro Mobile App cannot read settings from the pedal. It might help to think of the Neuro Mobile App as a remote control, so you can change parameters on the pedal with the Neuro App, but the parameter settings that appear in the App’s interface don’t necessarily reflect the settings on the pedal. - Page 34 Main Menu. This will open the About page. Scroll to the bottom of the page and select the Volume Calibration button to reestablish communication. 7. If you’re still have problems connecting the Neuro Mobile App to the True Spring Reverb, email us at contact@sourceaudio.net.
- Page 35 The Main Menu is a carousel featuring images of all the Neuro Mobile App compatible pedals in the One Series line of pedals. To make edits to the True Spring Reverb, scroll through the pedal images until you reach the image of the True Spring. The three icons below the pedal image are links to the...
- Page 36 Sound Editor Click on the True Spring Reverb’s slider icon (or on the pedal image itself) on the Main Menu to open the True Spring’s Sound Editor. This is where all of the sound editing work takes place.
- Page 37 The three buttons at the bottom of the Sound Editor page are used to save and name presets. Presets can be saved either directly to your True Spring Reverb or to your personal preset library. The three buttons include File Menu, Burn, and Send All.
- Page 38 • Browse Sounds: Goes directly to the Browse Sounds page. Burn Uploads the current preset directly to the True Spring Reverb pedal. Choose between any of the three toggle switch positions in either of the two modes. Send All Sends all the current engines and parameter positions of the Sound Editor directly to the pedal. It's a good idea to hit this button before starting the editing process to ensure that you are correctly hearing all the current settings of the Neuro Mobile App.
- Page 39 The Browse Sounds menu is also the place to browse and test presets that other True Spring Reverb owners have created. There are four preset tabs listed across the top of the page: User, Factory, Published, and Web.
-
Page 40: Daisy-Chaining Neuro Communication
Sounds page. Daisy-Chaining Neuro Communication If you have multiple Source Audio One Series pedals running in series, it is possible to maintain Neuro communication with each pedal through a single Neuro cable connection. Source Audio makes couplers that are designed specifically for connecting multiple One Series products in series. These couplers are available at the Source Audio Reverb.com... - Page 41 In the case of a signal path that splits a mono input to stereo outputs, the Neuro data can be input to the first effect directly from the mobile device and then carried on to consecutive effects via TRS cables. The audio signal is carried on the same cable. SA247 True Spring Reverb User Guide...
-
Page 42: Neuro Hub (Formerly The Soundblox Hub)
Neuro Hub to your computer via USB for updates, saving and editing multi-pedal presets, and more. To connect the True Spring Reverb to the Neuro hub, use a 3.5 mm TRRS cable and make a connection between the True Spring’s Control Input jack and any of the Neuro Hub’s multi-function outputs. - Page 43 2. In the top bar menu select Device > Edit Device MIDI Map from the dropdown menu. 3. The True Spring Reverb MIDI Map Editor window will open. Scroll to the MIDI CC value you wish to map and select that CC’s dropdown menu. A list of parameters will unfold.
-
Page 44: Usb
Just power up the pedal and connect it to the computer using a USB cable. The computer should automatically recognize the True Spring, which will be identified as “Source Audio One Series” in the operating system. USB to Neuro Desktop Editor Use the USB port on the top of the pedal to connect the True Spring to the Neuro Desktop Editor on both Mac or Windows based computers. -
Page 45: Troubleshooting
Using the Neuro Mobile App, go to Hardware Settings and choose the Factory Reset option. Factory Reset using the Neuro Desktop Editor Connect the True Spring Reverb to the Neuro Desktop Editor. From the top bar menu select Device > Factory Reset > when the Confirm Factory Reset window pops up, select “Yes.”... -
Page 46: Frequently Asked Questions
Reverb engine. Then, send a CC message with one of the following values to enable a certain effect type: CC Value Effect Type Short Spring Long Spring Tank Spring Tiny Tank Triple Spring Space Spring Drip Machine Hall S Trash Can Spring Ventris True Spring SA247 True Spring Reverb User Guide... -
Page 47: Rubber Feet
Apple support article: https://support.apple.com/en-us/HT202491. Rubber Feet The True Spring Reverb comes standard with a flat aluminum bottom, making it easy to apply Velcro and mount to a pedalboard. Additionally, adhesive rubber feet are included in the True Spring’s box. -
Page 48: Warranty
Source Audio. Warranty Information Source Audio may, at its option, require proof of the original purchase date in the form of a dated copy of the original authorized dealer’s invoice or sales receipt. Service and repairs of Source Audio products are to be performed only at the Source Audio factory or a Source Audio authorized service center. -
Page 49: Version History
Do not open the effects pedal under any circumstance. This will void the warranty. The foregoing limited warranty is the only warranty given by Source Audio and is in lieu of all other warranties. All implied warranties, including warranties of merchantability and fitness for any particular purpose, exceeding the specific provisions of this limited warranty, are hereby disclaimed and excluded from this limited warranty.
Need help?
Do you have a question about the True Spring Reverb and is the answer not in the manual?
Questions and answers