
Related Manuals for SPRT SP-POS76IV


Summary of Contents for SPRT SP-POS76IV
- Page 1 SPRT ® SP-POS76IV Receipt Printer User’s Manual (Ver 1.02) Beijing Spirit Technology Development Co.,Ltd www.sprt-printer.com...
-
Page 2: Table Of Contents
Content Notes For Use......................1 Chapter 1 Feature and Performance............... 1 1.1 Print Performance..................1 1.2 Print Paper......................1 1.3 Ribbon......................2 1.4 Print Font and Command................2 1.4.1 Print Font....................2 1.4.2 Print Command..................2 1.5 Interface......................2 1.6 Printing Control Command................3 1.7 Power Supply....................3 1.8 Working Environment..................3 1.9 Outline Dimension.................. -
Page 3: Notes For Use
Notes For Use ● Don't plug or unplug the interface cable,printer head cabe or power cable under the state of power on,or else it will cause the damage of printer or control board. ● At any time,don’t take the wastepaper or other attached objects by hard things(such as tweezers,blades and so on),in order to avoid the permanent damage to the printer head. -
Page 4: Ribbon
Impact paper thickness(1 original+2 copies) :0.05mm~0.20mm ● Paper Loading: Auto Feeding Paper ● Paper Cutting: Manual Tear/ Auto Cutter (Full/Partial Cutting optional) 1.3 Ribbon ERC-39 purple or black Working Life:3,000,000characters (ASCII 7×9) 1.4 Print Font and Command 1.4.1 Print Font ●... -
Page 5: Printing Control Command
●USB interface: Standard USB interface ●Cash drawer control DC24V,1A,6pin RJ-11 socket 1.6 Printing Control Command Character printing command: support ANK character, custom character and Chinese character width, times of high print, can adjust the line space between characters. 1.7 Power Supply ●Put in (110-220)v±10%,50/60Hz,1.5A, Standard three-wire interface socket. -
Page 6: Model Classification
1.10 Model classification Model Cutter Interface SP-POS764-BS With RS-232C serial interface SP-POS764-DS Without SP-POS764-BP With Parallel interface SP-POS764-DP Without SP-POS764-BE With Ethernet interface SP-POS764-DE Without SP-POS764-BU With USB interface SP-POS764-DU Without... -
Page 7: Chapter 2 Operation Specification
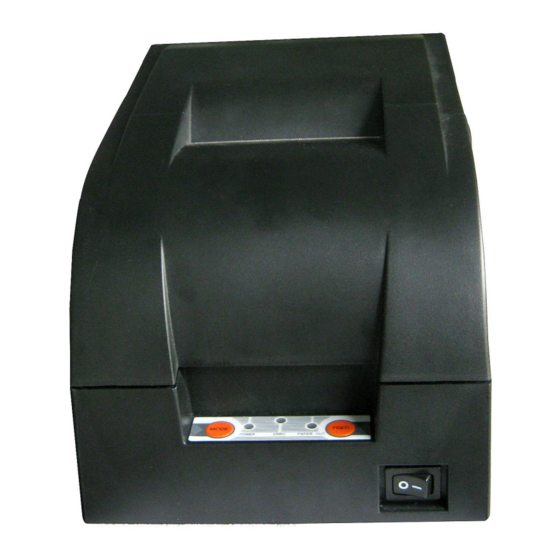
Chapter 2 Operation Specification 2.1 Printer Appearance Paper-out Slot Paper Cover Upper Cover Status Indicator Power Indicator Paper-out Indicator MODE Feed Power Cash Drawer Interface Interface Socket Power Socket Fig.2-1 printer appearance... -
Page 8: Ribbon And Paper Installation
2.2 Ribbon and Paper Installation 2.2.1 Ribbon Installation Steps of ribbon installation are as below (1)Open front cover (2)Put the ribbon into printer head,turn the knob as the direction shown on it for two~three circles.. (3)Close the front cover 2.2.2 Paper Installation The installation steps of paper are as below: (1)Living with your hands on both sides of the paper cover, open the paper cover. -
Page 9: Interface
2.3 Interface 2.3.1 Serial Interface The serial interface of POS764 printer is compatible with RS-232C, use DB-25(female) socket, DTR/DSR handshaking protocols.The pin order of the serial port is as Fig.2-2 shows: Fig.2-2 Pin Order of Serial Port The pin assignment of serial interface is shown in Fig. 2-3: Pin No. -
Page 10: Parallel Interface
(2)Logical signal level is EIA. The baud rate and data structure under serial interface mode is 9600bps, 8-bit data bits, no parity and 1 stop bit. The serial interface of POS764 can be connected to standard RS-232C interface. When it is connected with IBM PC or its compatible machine, connection can accord to Fig.2-3. -
Page 11: Cash Drawer Interface
CGND Logic-H Logic “1” level nFault Low level means the printer is at fault 14,15,17 18,34,36 No connection 16,19~30, Grounding, logical 0 level +5V power Fig.2-4 36Pin assignment of parallel interface Note: (1)“In” denotes input to the printer , “Out” denotes output from the printer. -
Page 12: Indicators、Buzzer And Buttons
Fig.2-6 Cash Drawer Interface The pin assignment is as below: Pin No. Signal Direction Chassis Ground —— Cash drawer driver signal 1 Cash drawer on/off status signal +24VDC —— Cash drawer driver signal 2 Signal ground —— 2.4 Indicators、Buzzer and Buttons There is two buttons 、... - Page 13 type of printer: 1. Unrecoverable error: The Red ERROR light flashes and buzzer rings many times then keep on for a long time. 2. Recoverable error: The Red ERROR light flashes and buzzer rings many times then keep off for a long time. 3.
-
Page 14: Regular Starting Status
Automatic flashes continuely:the recovery error temperature of printernhead is too high or the cover is wrong. 2.5 Regular Starting Status On shutdown state, the 【paper cover 】is closed, then open the power switch, the paper status indicators and the PAPER OUT flash alternately twice, and then put out, after the print head resets, the printer will be into the normal working mode. -
Page 15: Hexadecimal Printing
Fig2-8: content of self-test 2.7 Hexadecimal Printing Turn on the printer according to the steps below,it will enter the mode of Hexadecimal Printing. 1. Press 【MODE】and 【FEED】in the same time,switch on; 2. After the paper status indicators and the PAPER OUT flash alternately,loose the【MODE】and 【FEED】in the same time;... -
Page 16: The Printer Parameter Set
2.8 the printer parameter set The function is to set up some simple parameters of the printer. Enter the parameter setting method: On shutdown condition, press the "MODE" button first, and then press down the "FEED" button, and then open the power switch. After the status indicators and PAPER OUT lights flash alternately, release the "FEED"... - Page 17 2. Click” the BID adjustment test spline", the printer will print out the 25 printing effect whose serial number is “0-24”.Found out the serial number of the best printing effect;Marked with '*' in front of the printing effect for the currently selected;...
-
Page 18: Appendix A: Parameter Settings
Appendix A: parameter Settings This appendix is about how to set the default printer parameter by button. Setup instructions: Press the "MODE" button to choose set items, each click on the "MODE" key, set a change to the next item, and print out the current value.
Need help?
Do you have a question about the SP-POS76IV and is the answer not in the manual?
Questions and answers