
Related Manuals for Thermo Scientific Smart-Vue Pro


Summary of Contents for Thermo Scientific Smart-Vue Pro
- Page 1 Smart-Vue Pro LoRaWAN Enabled Receiver User Guide 331676H02 • Revision A • 05/14/2020...
- Page 2 © 2020 Thermo Scientific. All rights reserved. Thermo Scientific, the Thermo Scientific logo, Smart-Vue Pro Duo and Smart-Vue Pro Quatro are the exclusive property of Thermo Scientific. All other brands mentioned are the property of their respective owners. This is a non-contractual document. Features and specifications...
-
Page 3: Table Of Contents
Configuring “Failover” Order for Network Access ..12 Troubleshooting ............14 Firmware Upgrade from Version 1.4.17 to 5.1.2 ..18 Set Up Procedure ............19 Smart-Vue Pro LoRaWAN Set Up Procedure with Smart-Vue Pro Duo/Quatro and Web app ....19... - Page 4 Appendix - Product Specifications ......28 Smart-Vue Pro LoRaWAN Enabled Receiver Features ........... 28 Related Products ............ 28 Installation Details ............ 29 WEEE Compliance ............30 Contact Information ............ 31...
-
Page 5: Regulatory Information
20 cm from all users and must not be co-located or operated in conjunction with any antenna or transmitter not described under this FCC id, except in accordance with FCC multi-transmitter product procedures. Smart-Vue Pro LoRaWAN Enabled Receiver Regulatory Information |... -
Page 6: Safety Notices
CAUTION: Using accessories, such as antennas, that MultiTech has not authorized or that are not compliant with MultiTech's accessory specifications may invalidate the warranty. Safety Notices Smart-Vue Pro LoRaWAN Enabled Receiver... -
Page 7: Introduction
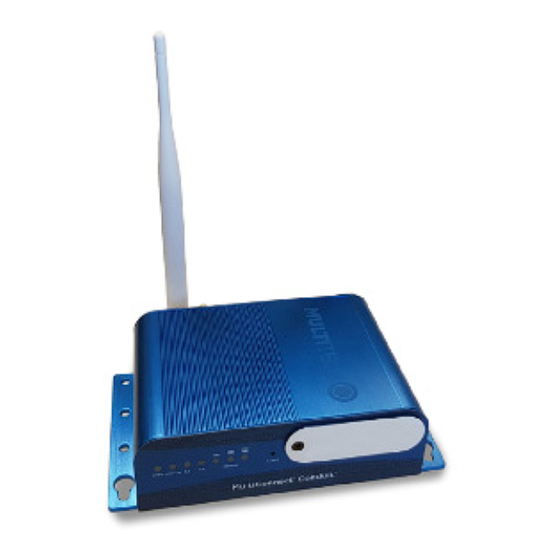
Technical Highlights Product Overview • Up to 10 miles (16 km) line-of-sight wireless range. It is designed for the use with Thermo Scientific wireless • 2-ways wireless communications. modules featuring Smart-Vue Pro LoRaWAN connectivity. •... -
Page 8: Architectures And Technologies
Smart-Vue Pro Internet or Local network LoRaWAN Receiver Cloud or Local Server Internet or Local network Data logger Smart-Vue Pro web application Figure 2. Receiver connecting Smart-Vue Pro Quatro/Duo data logger to the Cloud Introduction Smart-Vue Pro LoRaWAN Enabled Receiver... -
Page 9: Setting Up Your Receiver
Getting Started Plug in the Smart-Vue Pro LoRaWAN Antenna 1. Plug the white Smart-Vue Pro LoRaWAN radio antenna into the “RF” connector (the location may vary according to your unit’s options). 2. Hand-tighten the antenna by rotating the ring clockwise. - Page 10 While performing the initial configuration of the device for the you will be prompted to create a new user-name and network, an administrative user-name and password is set. password. There is no default user-name or password. Setting Up your Receiver Smart-Vue Pro LoRaWAN Enabled Receiver...
- Page 11 First-Time Setup Figure 11. Call home configuration a. This feature is not supported for the Smart-Vue Pro solution so click Next to go to the next screen without Setting Up Your Device Using changing the settings.
- Page 12 Figure 14. Access configuration a. Leave the settings to default and click Next to go to the a. This feature is not supported for the Smart-Vue Pro next screen. The detailed procedure to configure the solution so click Next to go to the next screen without Ethernet is mentioned in “Setting Up an Ethernet...
-
Page 13: Lorawan Configuration
Figure 16. LoRaWAN configuration screen 2. Ensure the following default values are entered. 3. Click in the lower right-hand corner to verify a. For Smart-Vue Pro Quatro/Duo data loggers: the connection. Server Address: smartvueconnect.com CAUTION: Test Lora Server will only work Port (up &... -
Page 14: Setting Up An Ethernet Connection
1. Click Setup Network Interfaces Options (Edit) for “eth0” (1). 10 | Setting Up your Receiver Smart-Vue Pro LoRaWAN Enabled Receiver... - Page 15 Figure 17. Ethernet adapter settings for your network Smart-Vue Pro LoRaWAN Enabled Receiver Setting Up your Receiver |...
-
Page 16: Setting Up A Wi-Fi Connection To Your Network
Figure 18. Attaching antenna for Wi-Fi network connect through any firewalls. 2. Click Wireless Wi-Fi as WAN, as shown below: 12 | Setting Up your Receiver Smart-Vue Pro LoRaWAN Enabled Receiver... - Page 17 Workaround for Wi-Fi Connection with Static IP Address As of this writing, the Smart-Vue Pro LoRaWAN receiver does not support the use of a static IP addresses for Wi-Fi communications. Figure 20. Wi-Fi Network Settings To use your Smart-Vue Pro LoRaWAN receiver in Wi-Fi mode Table 2.
-
Page 18: Configuring "Failover" Order For Network Access
1. Click Setup WAN Configuration. The list below shows the priority order in which 3. Set up the Smart-Vue Pro LoRaWAN receiver to use an connectivity options are used. In the case below, Ethernet Ethernet connection (see Setting Up an Ethernet is used in priority. - Page 19 “Failover” network configuration. This helps to ensure that variables in network performance (wired or wireless) are not impacting the data flows, thus supporting the availability of the device. Smart-Vue Pro LoRaWAN Enabled Receiver Setting Up your Receiver |...
-
Page 20: Troubleshooting
Troubleshooting How do I access the Smart-Vue Pro LoRaWAN configuration page? For the first time when you plug in your Smart-Vue Pro LoRaWAN, use your web browser to connect to the receiver’s default IP address: http://192.168.2.1. Once Wi-Fi or ethernet is successfully configured and saved then use the IP address assigned to the Smart-Vue Pro LoRaWAN to connect. - Page 21 You may test the wireless connection between your receiver Figure 25. Smart-Vue Pro LoRaWAN signal and a Smart-Vue Pro LoRaWAN data logger as described in the data logger user guide. For more information, or to Why is the telemetry data from the sensors (connected...
- Page 22 Smart-Vue Pro LoRaWAN has good internet speed. • Stop data logging takes certain time to stop based on the data which need to be synced from Smart-Vue Pro LoRaWAN Quatro to cloud. Audit trails in web app shall show the time of the event happened.
- Page 23 Configure IPv4. 5. This will bring up all the advanced settings for the network connection. Click the TCP/IP tab and you’ll see a drop down next to Configure IPv4. Smart-Vue Pro LoRaWAN Enabled Receiver Troubleshooting |...
-
Page 24: Firmware Upgrade From Version 1.4.17 To 5.1.2
CAUTION: Use official firmware files provided by thermo scientific. 4. Select Start upgrade and continue the process as directed on the screen. Figure 26. Normal Configuration Link 20 | Firmware Upgrade from Version 1.4.17 to 5.1.2 Smart-Vue Pro LoRaWAN Enabled Receiver... -
Page 25: Set Up Procedure
Example: Smart sensor value displayed in show sensor screen. Figure 28. In Smart-Vue Pro Quatro device 3. Press “Test” in Smart-Vue Pro Quatro device to ensure the Smart-Vue Pro LoRaWAN coverage is good. Figure 27. Smart Sensor value display 2. Ensure LoRaWAN is ON in Smart-Vue Pro Quatro. - Page 26 To save the settings, save and restart to be selected. • add the network Wireless Wi-Fi as WAN and select the enabled option and submit the settings to save. Figure 31. Wi-Fi as WAN 22 | Set Up Procedure Smart-Vue Pro LoRaWAN Enabled Receiver...
- Page 27 Press “Test Lora Server” in Smart-Vue Pro LoRaWAN page after infrastructure is added in webapp (This only works once you configure your network properly (as described in the Setting Up an Ethernet Con- nection and Setting Up a Wi-Fi Connection to your Network).
- Page 28 Figure 34. After adding the device b. In sensor page, verify the associated sensor serial number shown. c. In infrastructure, add the Smart-Vue Pro LoRaWAN details. Figure 35. Add Smart-Vue Pro LoRaWAN details in Infrastructure 24 | Set Up Procedure Smart-Vue Pro LoRaWAN Enabled Receiver...
- Page 29 Smart-Vue Pro LoRaWAN label. Figure 36. Add the node ID in Smart-Vue Pro LoRaWAN label e. Create an equipment and then add the sensor to equipment which is recently added to device.
- Page 30 After successfully adding the equipment, device and Figure 39. Associate sensor testing the Smart-Vue Pro LoRaWAN coverage on Smart-Vue Pro Quatro, start the data logging from either Equipment page or Device page by clicking on the play icon. 26 |...
- Page 31 Figure 41. Data loggers page h. We can see the equipment thumbnail in home screen when data logging is in progress. Note: For more detail refer the user guides of the data logger. Smart-Vue Pro LoRaWAN Enabled Receiver Set Up Procedure |...
- Page 32 Figure 42. Watch Mode Figure 43. Tiles on watch mode 28 | Set Up Procedure Smart-Vue Pro LoRaWAN Enabled Receiver...
-
Page 33: Appendix - Product Specifications
(161.3 mm x 107.4 mm x 42.8 mm) Enabled Receiver Features • Weight: About 16.2 oz. (459 g) • Chassis Type: Metal • Internet of Things connectivity featuring Smart-Vue Pro • Operating Temperature: -30°C to +70°C LoRaWAN wireless connectivity • Storage Temperature: -40°C to +85°C •... -
Page 34: Installation Details
Therefore, we recommend that you keep it plugged it into an interruptible power supply or safety plug. Smart-Vue Pro LoRaWAN enabled receiver may be placed on a flat surface or mounted using the mounting holes located at bottom of the casing. -
Page 35: Weee Compliance
Ulteriori informazioni sulla conformità di Thermo Fisher Scientific con queste Direttive, l’elenco delle ditte di riciclaggio nel Vostro paese e informazioni sui prodotti Thermo Scientific che possono essere utili alla rilevazione di sostanze soggette alla Direttiva RoHS sono disponibili sul sito www.thermofisher.com in Servizi e Supporto. - Page 36 IF YOU NEED ASSISTANCE: Thermo Fisher Scientific products are backed by a global technical support team ready to support your applications. We offer cold storage accessories, including remote alarms, temperature recorders, and validation services. Visit thermofisher.com or call: Countries Sales Services North America +1 866 984 3766...
Need help?
Do you have a question about the Smart-Vue Pro and is the answer not in the manual?
Questions and answers