Table of Contents
Advertisement
Available languages
Available languages
Quick Links
INSTALLATION INSTRUCTIONS FOR PART 99-7519B
Mazda MX-5 Miata 2009-2010
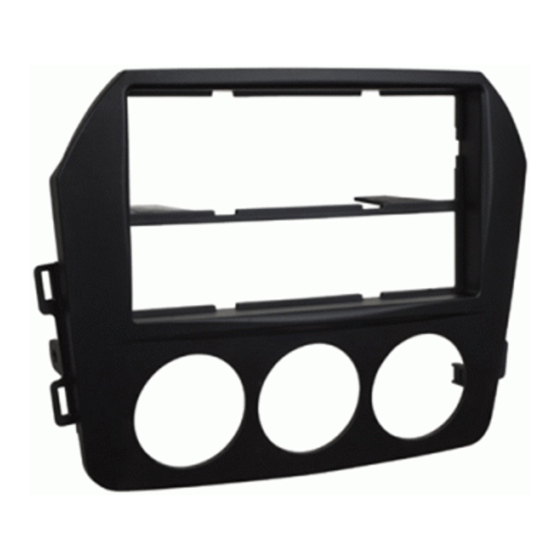
KIT FEATURES
• DIN Head Unit Provision with pocket
• ISO DIN Head Unit Provision with pocket
• Double DIN Head Unit Provision
• Stacked ISO DIN Head Unit Provision
• Painted Matte Black to Match Factory
KIT COMPONENTS
• A) Radio Housing • B) Snap-In Pocket • C) ISO Brackets • D) ISO Trim Plate
• E) Double DIN Brackets • F) Double DIN Trim Plate • G) (4) Panel Clips
A
F
APPLICATIONS
99-7519B
B
WIRING & ANTENNA CONNECTIONS (Sold Separately)
Harness:
• 70-7903 - Mazda harness 2001-up
Antenna Adapter:
• Not required
TOOLS REQUIRED
Cutting Tool
Phillips Screwdriver
•
METRA. THE WORLD'S BEST KITS.™
1-800-221-0932
© COPYRIGHT 2004-2011 METRA ELECTRONICS CORPORATION
C
D
Socket Wrench
•
metraonline.com
E
Advertisement
Table of Contents

Related Manuals for Metra Electronics 99-7519B


Summary of Contents for Metra Electronics 99-7519B
- Page 1 INSTALLATION INSTRUCTIONS FOR PART 99-7519B APPLICATIONS Mazda MX-5 Miata 2009-2010 99-7519B KIT FEATURES • DIN Head Unit Provision with pocket • ISO DIN Head Unit Provision with pocket • Double DIN Head Unit Provision • Stacked ISO DIN Head Unit Provision •...
-
Page 2: Table Of Contents
99-7519B Table of Contents Dash Disassembly – Mazda MX-5 Miata 2009-2010 Kit Preparation – Radio Housing Preparation Kit Assembly – DIN Head Unit Provision – ISO DIN Head Unit Provision – Double DIN Head Unit Provision – Stacked ISO DIN Head Unit Provision... -
Page 3: Dash Disassembly
99-7519B Dash Disassembly 1. Unclip panel below steering column and remove. (Figure A) 2. Remove (4) Phillips screws from metal brace below steering column and remove. (Figure A) 3. Looking at the side of the radio/climate control panel from underneath the... - Page 4 99-7519B Dash Disassembly 4. Remove (2) Phillips screws from bottom and remove center fascia panel. (Figure D) 6. Unclip, unplug and remove the entire center console. (Figure E) 7. Remove the (2) Phillips screws securing the side panels from each side of the radio/climate control panel.
- Page 5 99-7519B Dash Disassembly 9. Remove (2) Phillips screws, (1) on each side, from the side of the radio/climate control panel. (Figure H) 10. Pull radio/climate control panel out, disconnect plugs and remove. (Figure I) 11. Turn the radio/climate control panel...
-
Page 6: Kit Preparation
Kit Preparation 99-7519B Radio Housing Preparation 1. Attach the (4) Panel Clips to the posts on the back of the radio housing. (Figure A) Continue to kit assembly (Figure A) -
Page 7: Kit Assembly
Kit Assembly 99-7519B DIN Head Unit Provision 1. Turn over the 99-7519B housing, take the climate control and screws removed from the factory panel and attach the climate control to the kit housing using the factory screws. (Figure A) 2 Slide the pocket into the bottom section of the kit housing. -
Page 8: Iso Din Head Unit Provision
Kit Assembly 99-7519B ISO DIN Head Unit Provision 1. Turn over the 99-7519B housing, take the climate control and screws removed from the factory panel and attach the climate control to the kit housing using the factory screws. (Figure A) 2 Slide the pocket into the bottom section of the kit housing. -
Page 9: Double Din Head Unit Provision
Kit Assembly 99-7519B Double DIN Head Unit Provision 1. Turn over the 99-7519B housing, take the climate control and screws removed from the factory panel and attach the climate control to the kit housing using the factory screws. (Figure A) -
Page 10: Stacked Iso Din Head Unit Provision
Kit Assembly 99-7519B Stacked ISO DIN Head Unit Provision 1. Turn over the 99-7519B housing, take the climate control and screws removed from the factory panel and attach the climate control to the kit housing using the factory screws. (Figure A) - Page 11 Notes...
- Page 12 INSTALLATION INSTRUCTIONS FOR PART 99-7519B METRA. THE WORLD’S BEST KITS.™ metraonline.com 1-800-221-0932 © COPYRIGHT 2004-2011 METRA ELECTRONICS CORPORATION...
-
Page 13: 99-7519B
INSTRUCCIONES DE INSTALACIÓN PARA LA PIEZA 99-7519B APLICACIONES Mazda MX-5 Miata 2009-2010 99-7519B CARACTERÍSTICAS DEL KIT • Accesorio para unidades centrales DIN con bolsillo. • Accesorio para unidades centrales DIN ISO con bolsillo. • Accesorio para unidades centrales DIN dobles. -
Page 14: Enhance Your Installation And Fabrication Skills By
99-7519B Indice Desmontaje del tablero – Mazda MX-5 Miata 2009-2010 Preparación del kit – Preparación de radio de la vivienda Montaje del kit: – Accesorio para unidades centrales DIN – Accesorio para unidades centrales DIN ISO – Accesorio para unidades centrales DIN dobles –... - Page 15 99-7519B Desmontaje Del Tablero 1. Desenganche el panel que se encuentra debajo de la columna de la dirección y retírelo. (Figura A) 2. Retire (4) tornillos Phillips del refuerzo de metal que se encuentra debajo de la columna de la dirección y retírela.
- Page 16 99-7519B Desmontaje Del Tablero 5. Retire la estera de hule que se encuentra dentro del portavasos y, luego, retire el tornillo Phillips visible. (Figura D) 6. Desenganche, desenchufe y retire toda la consola central. (Figura E) 7. Retire los (2) tornillos Phillips que...
- Page 17 99-7519B Desmontaje Del Tablero 9. Retire (2) tornillos Phillips, (1) en cada lado, del lado del panel del radio/de control de clima. (Figura H) 10. Jale el panel del radio/de control de clima hacia afuera, desconecte los enchufes y retire. (Figura I) 11.
- Page 18 Preparación Del Kit 99-7519B Radio Preparación de Vivienda 1. Coloque los (4) ganchos del panel en los postes que se encuentran en la parte posterior del alojamiento del radio. (Figura A) Continuará montaje del kit (Figura A)
- Page 19 Montaje Del Kit 99-7519B Accesorio Para Unidades Centrales DIN 1. Gire hacia arriba el alojamiento del 99-7519B, tome el control de clima y los tornillos que se retiraron del panel de fábrica y coloque el control de clima en el alojamiento del kit usando los tornillos de fábrica.
- Page 20 Accesorio Para Unidades Centralies DIN ISO 1. Gire hacia arriba el alojamiento del 99-7519B, tome el control de clima y los tornillos que se retiraron del panel de fábrica y coloque el control de clima en el alojamiento del kit usando los tornillos de fábrica.
- Page 21 Accesorio Para Unidades Centrales DIN Dobles 1. Gire hacia arriba el alojamiento del 99-7519B, tome el control de clima y los tornillos que se retiraron del panel de fábrica y coloque el control de clima en el alojamiento del kit usando los tornillos de fábrica.
- Page 22 Accesorio Para Unidades Centrales DIN ISO Apiladas 1. Gire hacia arriba el alojamiento del 99-7519B, tome el control de clima y los tornillos que se retiraron del panel de fábrica y coloque el control de clima en el alojamiento del kit usando los tornillos de fábrica.
- Page 23 Notas...
- Page 24 INSTRUCCIONES DE INSTALACIÓN PARA LA PIEZA 99-7519B METRA. THE WORLD’S BEST KITS.™ metraonline.com 1-800-221-0932 © COPYRIGHT 2004-2011 METRA ELECTRONICS CORPORATION...
Need help?
Do you have a question about the 99-7519B and is the answer not in the manual?
Questions and answers