Table of Contents
Advertisement
Quick Links
Installation instructions for 99-3010S-LC
Chevrolet Camaro 2010-2015
KIT FEATURES
• DIN radio provision with pocket
• ISO DIN radio provision with pocket
• ISO DDIN radio provision
• Painted silver to match factory finish
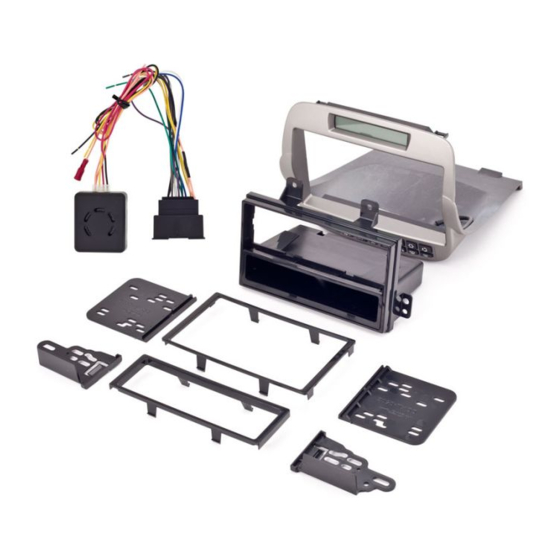
KIT COMPONENTS
• A) Radio trim panel • B) Radio housing • C) ISO brackets • D) ISO trim plate • E) ISO DDIN brackets
• F) ISO DDIN trim plate • G) Pocket • H) Axxess interface and harness (not shown)
A
B
F
METRA. The World's best kits.
®
99-3010S-LC
C
D
G
®
WIRING & ANTENNA CONNECTIONS (sold separately)
Wiring Harness:
• Axxess interface included
Antenna Adapter:
• 40-EU55
TOOLS REQUIRED
• Panel removal tool • Phillips screwdriver
• 7mm socket wrench • T-20 Torx Wrench • Cutting tool
E
CAUTION!
All accessories, switches, climate controls panels, and
especially air bag indicator lights must be connected before cycling
the ignition. Also, do not remove the factory radio with the key in the
on position, or while the vehicle is running.
Advertisement
Table of Contents

Related Manuals for Metra Electronics 99-3010S-LC


Summary of Contents for Metra Electronics 99-3010S-LC
- Page 1 ® Installation instructions for 99-3010S-LC Chevrolet Camaro 2010-2015 WIRING & ANTENNA CONNECTIONS (sold separately) Wiring Harness: 99-3010S-LC • Axxess interface included Antenna Adapter: KIT FEATURES • 40-EU55 • DIN radio provision with pocket • ISO DIN radio provision with pocket •...
-
Page 2: Table Of Contents
® 99-3010S-LC Table of Contents Dash Disassembly Dash Disassembly ........... 2-3 For vehicles without UMQ gauge panel, unsnap and remove shifter trim panel and skip to step 8. Kit Preparation .............3 1. Unclip and remove the (2) side trim panels running the length of the center console. -
Page 3: Dash Disassembly
® 99-3010S-LC Kit Preparation Dash Disassembly 6. For automatic models, remove one 1. Cut and remove the sub dash T-20 Torx screw from the front of the radio support to make room for the shifter, and then remove the knob interface and harnesses. -
Page 4: Din Radio Provision With Pocket
(Figure C) order of disassembly using the 6. Continue to Axxess Interface 99-3010S-LC radio trim panel Installation, and once completed, instead of the factory panel. reassemble the dash in reverse order of disassembly using the 99-3010S-LC radio trim panel instead of the factory panel. -
Page 5: Iso Ddin Radio Provision
Installation, and once completed, • 3010S-LC interface • 3010S-LC harness reassemble the dash in reverse order of disassembly using the 99-3010S-LC radio trim panel instead of the factory panel. TOOLS REQUIRED • Wire cutter • Crimping tool • Tape • Solder gun •... -
Page 6: Connection To Be Made
® Axxess interface installation 99-3010S-LC Connections to be made Installing the Axxess interface With the key in the off position: From the 3010S-LC harness to the aftermarket radio: • Connect the 3010S-LC harness into the interface, and then to the wiring harness •... -
Page 7: Changing Display Backlight Color
® Axxess interface installation 99-3010S-LC Vehicle customization with the Changing display backlight color optional AX-LCD (sold separately) 1. Press the front defrost button for 5 seconds, • Press and hold the “Def/Foot” button to The AX-LCD allows the retention of the vehicles personalization this will engage the “Configure Backlight...
Need help?
Do you have a question about the 99-3010S-LC and is the answer not in the manual?
Questions and answers