Hach TitraLab KF1000 Series User Manual
Hide thumbs
Also See for TitraLab KF1000 Series:
- Basic user manual (176 pages) ,
- User manual (42 pages) ,
- Basic user manual (510 pages)

Subscribe to Our Youtube Channel
Related Manuals for Hach TitraLab KF1000 Series


Summary of Contents for Hach TitraLab KF1000 Series
- Page 1 DOC022.52.93082 ® TitraLab KF1000 series workstations User Manual 03/2019, Edition 9...
-
Page 3: Table Of Contents
Table of Contents Section 1 Specifications ........................3 Section 2 General information ......................5 2.1 Safety information........................5 2.1.1 Use of hazard information....................5 2.1.2 Precautionary labels......................5 2.1.3 Certification......................... 6 2.1.4 Restriction of hazardous substances (RoHS)..............6 2.2 Product overview.......................... 7 2.3 Instrument connections........................ - Page 4 Table of Contents 8.5 Regenerate the molecular sieve....................40 8.6 Replace the syringe electro-valve block..................40 8.7 Maintenance menu........................41 8.7.1 Syringe activation......................41 8.7.2 Pump activation......................... 41 8.7.3 Syringe management......................42 8.7.4 Pump cassette replacement....................42 8.7.5 Syringe verification......................43 8.7.6 Other maintenance options....................
-
Page 5: Section 1 Specifications
Section 1 Specifications Specifications are subject to change without notice. Specification Details Dimensions (W x D x H) 22 x 40 x 36 cm (8.7 x 15.7 x 14.2 in.) Weight 4 kg (8.8 lb) Power requirements 100–240 VAC, 50/60 Hz Altitude 2,000 m (6,562 ft) maximum Operating temperature... - Page 6 Specifications...
-
Page 7: Section 2 General Information
Section 2 General information In no event will the manufacturer be liable for direct, indirect, special, incidental or consequential damages resulting from any defect or omission in this manual. The manufacturer reserves the right to make changes in this manual and the products it describes at any time, without notice or obligation. -
Page 8: Certification
General information This symbol indicates the presence of devices sensitive to Electro-static Discharge (ESD) and indicates that care must be taken to prevent damage with the equipment. Electrical equipment marked with this symbol may not be disposed of in European domestic or public disposal systems. -
Page 9: Product Overview
General information Name: TitraLab KF1000 Table 1 有毒有害物质或元素 (Hazardous Substance) 部件名称 (Parts) 铅 (Pb) 汞 (Hg) 镉 (Cd) 六价铬 (Cr6+) 多溴联苯 (PBB) 多溴二苯醚 (PBDE) 电 阻 (Resistor) 二极管 ( Diode) 表示该部件中有毒有害物质在所有均质材料中的含量均为 SJ/T11363-2006 标准规定的限量要求以下 Indicates that the concentration of the hazardous substance in all homogeneous materials in the parts is below the relevant threshold of the SJ/T11363-2006 standard. -
Page 10: Instrument Connections
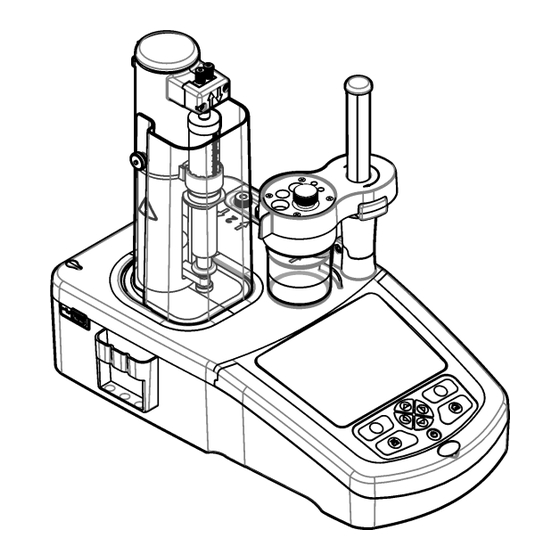
General information 1 Keypad 6 Syringe protection cover 11 Pump 2 input/output (waste) 2 Display 7 Syringe input/output 12 Pump 1 input/output (solvent) 3 USB port 8 Tube clips 13 Pump access cover 4 Sample stopper 9 Syringe 5 Beaker 10 Sensor holder Table 2 Instrument configuration Model... -
Page 11: Product Components
General information 2.4 Product components Make sure that all components have been received. Refer to the packing list in the box. If any items are missing or damaged, contact the manufacturer or a sales representative immediately. Figure 1 Contents of the instrument box Note: For identification, the outlet tube from the syringe is fitted with a blue marker. - Page 12 General information...
-
Page 13: Section 3 Installation
Section 3 Installation C A U T I O N Multiple hazards. Only qualified personnel must conduct the tasks described in this section of the document. N O T I C E This is a class A product. There may be potential difficulties in ensuring electromagnetic compatibility in other environments, due to conducted as well as radiated disturbances. -
Page 14: Install The Syringe
Installation 3.3 Install the syringe Before syringe installation, set the instrument power to on. Push the power button on the front of the instrument. Make sure that the startup sequence shows on the display. The syringe holder lowers to its operating position. Note: Ignore any warning messages related to missing applications that show on the display. -
Page 15: Install The Sensor Holder Accessories
Installation 3.4 Install the sensor holder accessories Add the stir bar to the beaker, and then attach the beaker to the sensor holder. Install the desiccant cartridge and the sample stopper. Refer to the illustrated steps that follow. 3.5 Prepare the tubes Remove any bends in the end of the tubes. -
Page 16: Connect The Tubes
Installation 3.6 Connect the tubes Arrow symbols identify the inlet and outlet ports for the syringe and the pump connections. The “up” arrow is the outlet port. The “down” arrow is the inlet port. Turn the tube connectors on the inlet and outlet ports of the syringe and pump until they click. The suction tube that drains into the waste bottle must be installed on the bottom of the beaker for good drainage. -
Page 17: Check The Titrant Tube And Sensor Installation
Installation 3.7.2 Check the titrant tube and sensor installation The titrant must be added where there is most turbulence and as far away from the sensor to allow the reagent time to react. Check that the titrant tube and the sensor are positioned correctly. -
Page 18: Install The Titrant And The Reagent
Installation Figure 3 Titrant tube and sensor positions 1 Titrant tube 2 Sensor 3 Magnetic stir bar 3.8 Install the titrant and the reagent C A U T I O N Chemical exposure hazard. Obey laboratory safety procedures and wear all of the personal protective equipment appropriate to the chemicals that are handled. -
Page 19: Tidy The Work Area
Installation Figure 4 Bottles identification 1 Titrant 3 Solvent 2 Waste 3.9 Tidy the work area Attach the tubes to the instrument with the clips on the electrovalve and the sensor holder. Refer to the illustrated steps that follow. - Page 20 Installation...
-
Page 21: Section 4 Install Accessories
Section 4 Install accessories 4.1 Install a balance This accessory is used to automatically send accurate weights to the instrument. The balance is a laboratory type balance and uses the RS232 communication protocol with no flow control. When a balance is connected, the window shown at the end of a titration that lets users enter a weight, shows the value from the balance. - Page 22 Install accessories 1. Put an empty beaker on the balance. Refer to the illustrated steps that follow. 2. For the fully automated mode, connect the balance to the instrument. 3. Install the support stand near the balance. Put the pipette tip adapter above the beaker on the balance.
-
Page 23: Section 5 User Interface And Navigation
Section 5 User interface and navigation 5.1 Keypad 1 Power 3 Selection keys 5 Home key 2 Printer 4 Navigation keys Description Power Sets the instrument power to on or off. Push the key for 2 seconds to set the power to off. Printer The printer key only operates if a printer is connected to the instrument. -
Page 24: Menu Structure
User interface and navigation Table 3 Information icons Icon Description A printer is connected to the instrument A USB key is connected to the instrument A sensor is connected to sensor port 1 A sensor is connected to sensor port 2 The data log file is full. - Page 25 User interface and navigation Table 5 Settings menu (continued) Option Description Set the date and time Date & Time Adjust the display brightness Brightness Set the sound on or off for specific operations Sounds Set the operating language Language Give a name to identify the instrument Network Show instrument and attached hardware information Info...
- Page 26 User interface and navigation Table 6 Maintenance menu (continued) Option Description Use this option when replacing reagents Reagent replacement Manage the maintenance tasks Maintenance schedule See the number of days remaining on specified devices before maintenance is required Maintenance summary When enabled, starts the syringe verification procedure.
-
Page 27: Section 6 Startup
Section 6 Startup C A U T I O N Chemical exposure hazard. Obey laboratory safety procedures and wear all of the personal protective equipment appropriate to the chemicals that are handled. Refer to the current safety data sheets (MSDS/SDS) for safety protocols. C A U T I O N Personal injury hazard. -
Page 28: Cell Standby
Startup Option Description Options Sets the following options: • Set the application parameters view to expert or basic mode • When the instrument is set to off, sets the syringe to empty into the titrant bottle • Changes the temperature display unit •... -
Page 29: Prepare The Instrument For Measurement
Startup 1. Push Home to go to the main menu. 2. Connect the USB key to the USB port on the side of the instrument. The applications on the USB key show on the display. 3. Push the arrow keys to highlight and select an application to install. Push the left or right arrow key to select it. - Page 30 Startup...
-
Page 31: Section 7 Standard Operations
Section 7 Standard operations C A U T I O N Multiple hazards. Only qualified personnel must conduct the tasks described in this section of the document. C A U T I O N Chemical exposure hazard. Obey laboratory safety procedures and wear all of the personal protective equipment appropriate to the chemicals that are handled. - Page 32 Standard operations signal and ranges in color from red (unstable), through yellow, to green (stable). The cell drift value is shown in the middle of the display. These messages can be displayed under the cell drift value: Message Description Excess of water The measurement cell contains too much water.
-
Page 33: Get A Sample Measurement
Standard operations 21. When the calibration is complete, push the left and right arrow keys to see the different calibration views. 22. Push Reject or Continue. Option Description Reject Rejects the calibration. Select Cancel to go back to the result display or Confirm to reject the calibration. - Page 34 Standard operations 8. Application information shows on the display. If necessary, select an icon for more information or to change some data. Option Description Information Shows more information about the application. Operator Changes the operator ID. Select from a list of applicable operators. Sample Sample Name: Change the specified name of the sample.
-
Page 35: Get A Sample Measurement (Cell Standby Option Selected)
Standard operations 17. Put the sample stopper back into the sensor holder. Make sure that the sample stopper fits tightly into the sensor holder. 18. Weigh the empty sample container and subtract this value from the weight of the sample in its container (refer to step 15). The result is the exact weight of the sample analyzed. - Page 36 Standard operations 5. From the home screen, select the measurement application, then push Select. 6. The cell standby operation starts. The stirring speed is that specified for the application and cannot be changed. The stability bar and the cell drift value are shown at the bottom of the display.
-
Page 37: Change The Application Settings
Standard operations 14. Put the sample stopper back into the sensor holder. Make sure that the sample stopper fits tightly into the sensor holder. 15. Weigh the empty sample container and subtract this value from the weight of the sample in its container (refer to step 12). The result is the exact weight of the sample analyzed. -
Page 38: Sample Name
Standard operations 1. From the home screen, select Settings. 2. Select Applications followed by Edit. 3. If more than one application is installed, choose an application to change from the installed list and then push Edit. 4. Push the left and right arrow keys to jump to the previous or next parameter group. Push the up and down arrow keys to scroll through the application parameters in the parameter group. -
Page 39: Purge
Standard operations Option Description Export data log Exports measurement data from the system to an external device. Preview data selection before it is exported. Make sure that an external device is connected to the instrument (e.g., a USB key, external hard drive, etc.). Delete data log Removes measurement data from the system. - Page 40 Standard operations...
-
Page 41: Section 8 Maintenance
Section 8 Maintenance C A U T I O N Multiple hazards. Only qualified personnel must conduct the tasks described in this section of the document. N O T I C E Do not disassemble the instrument for maintenance. If the internal components must be cleaned or repaired, contact the manufacturer. -
Page 42: Clean The Sensor
Maintenance 8.3 Clean the sensor Obey the cleaning instructions given in the documentation supplied with the sensor, and any other instructions given in the application note. 8.4 Replace the tubes After installing a new tube, make sure that it is correctly installed by turning the tube connectors on the inlet and outlet ports of the syringe or pump until they click. -
Page 43: Maintenance Menu
Maintenance 8.7 Maintenance menu Select Maintenance from the home screen. Refer also to Table 6 on page 23. 8.7.1 Syringe activation Do a check of the syringe. Make sure the syringe fills and empties correctly. 1. From the maintenance menu, push Syringe activation. Push the arrow keys to select an option. -
Page 44: Syringe Management
Maintenance Push Toggle to change to the second pump or to operate all pumps. 8.7.3 Syringe management Use this option to replace the syringe, or change the syringe volume. 1. From the maintenance menu, push Syringe management. Option Description Syringe If two syringes are installed, select the syringe to replace. -
Page 45: Syringe Verification
Maintenance To replace the pump cassette, refer to the illustrated steps that follow and obey the instructions on the display. 8.7.5 Syringe verification Use the syringe verification option to examine the syringe accuracy based on the ISO 8655 standard. For the best results, follow the procedure in the application note supplied with the syringe verification kit. -
Page 46: Other Maintenance Options
Maintenance 4. From the home screen, select Maintenance, then push Select. 5. From the maintenance screen, select Syringe verification, then push Select. Note: When the option is selected for the first time, enter the license key. 6. Push the up and down button to select and change the syringe test options. Option Description Syringe... -
Page 47: Prepare The Instrument For Long-Term Storage
Maintenance 1. Carefully clean the measurement cell using an applicable organic solvent to dissolve any residue and oil. 2. Fill the measurement cell with a new working medium. 3. Add titrant to the working medium until it becomes brown in color. 4. - Page 48 Maintenance 3. Ship the instrument at a temperature –5 to 40 °C (23 to 104 °F) and relative humidity up to 80%. 4. Make sure that the storage location for the instrument does not have dust, condensation or chemical evaporation.
-
Page 49: Section 9 Troubleshooting
Section 9 Troubleshooting Refer to the following tables for problem messages and possible causes and solutions. Table 8 Measurement Error/Warning Description Possible solution The measurement from the sensor is not Make sure that there are no bubbles around Measurement unstable stable the sensor element or junction Adjust the sample preparation to be inside the... - Page 50 Troubleshooting Table 8 Measurement (continued) Error/Warning Description Possible solution Refer to the application note for best practices and do the titration again The titration is stopped because the supplied Max. vol. reached volume of reagent is more than the maximum Adjust the maximum volume stop point for the quantity application (refer to...
- Page 51 Troubleshooting Table 10 USB storage device Error/Warning Description Possible solution Make sure that the USB storage device is correctly installed and the USB icon can be seen in the Exporting {application name} - header bar (refer to Table 3 on page 22) access forbidden to the Error when exporting data to the Remove the USB storage device and make sure...
- Page 52 Troubleshooting Table 10 USB storage device (continued) Error/Warning Description Possible solution This selection is not allowed Application {application name} Contact technical support to get an authenticated because the application has not (untrusted) application file been authenticated The selection is allowed. When the The automatic update will set the new application Application {application name} application is exported, it will...
- Page 53 Troubleshooting Table 14 Syringe verification Error/Warning Description Possible solution Configure the balance to be compatible with the The data received from the balance is not format of messages accepted by the instrument Format of message compatible with the format of messages (refer to Install a balance on page 19)
- Page 54 Troubleshooting...
-
Page 55: Section 10 Replacement Parts And Accessories
Section 10 Replacement parts and accessories W A R N I N G Personal injury hazard. Use of non-approved parts may cause personal injury, damage to the instrument or equipment malfunction. The replacement parts in this section are approved by the manufacturer. Note: Product and Article numbers may vary for some selling regions. - Page 56 Replacement parts and accessories Table 15 Replacement parts and accessories (continued) Description Item no. Bottle stopper GL45 LZE117 Glass bottle, 1L LZE119 Desiccant tube filled with molecular LZE121 sieve Conical adapter LZE183 Stopper 20 mm, KF cell LZE123 Tube fitting (2x) LZE124...
- Page 57 Replacement parts and accessories Table 15 Replacement parts and accessories (continued) Description Item no. Spare pump cassette LZE126 Magnetic stir bar, PTFE, 20 x 6 mm (5x) LZE136 Set of accessories, 5 mL syringe LZE140 Power supply (without power cable) LZE144 Power cable (EU) YAA080...
- Page 58 Replacement parts and accessories Table 15 Replacement parts and accessories (continued) Description Item no. Power cable (UK) XLH057 RS-232 adapter cable LZE145 Syringe protection cover LZE156 Electro-valve block and connector LZE165 RS-232 cable for balance connection to LZE196 TitraLab Thermo-Drucker USB printer LQV161.99.10000 AT1000/KF1000 syringe volume LZE228...
- Page 59 Replacement parts and accessories Table 16 Electrodes and electrode accessories Description Item no. MTC301, platinum combined electrode, 1 m cable MTC30101 MTC306, silver combined electrode, 1 m cable MTC30601 MTC695, Pt-Pt electrode, 1 m cable MTC69501 PHC705, pH probe, red rod, glass, general purpose, standard PHC70501 PHC725, pH probe, glass PHC72501...
- Page 60 Replacement parts and accessories...
-
Page 61: Appendix A Change Application Parameters
Appendix A Change application parameters N O T I C E The applications installed on the instrument have been pre-defined to optimize the measurement process. Changing these default application parameters will have an effect on the measurement process and measurement results. Only qualified personnel should change these parameters or use the instrument in Expert mode. - Page 62 Change application parameters Table 21 Electrode Parameter Description Basic mode Expert mode Type Type of measurement electrode Part of name Part of the name used to identify matching electrodes if the preferred electrode is not connected Recommended electrode Recommended electrode to be used for this analysis Working mode Specify if the probe is used in imposed voltage/current (AC or DC) Current (sample analysis) Set the value of the imposed current during sample analysis...
- Page 63 Change application parameters Table 22 Titrant (continued) Parameter Description Basic mode Expert mode Max. amount Maximum amount of the standard Concentration Concentration value of the standard Resolution Number of decimals for the concentration value of the standard Table 23 Methods Parameter Description Basic mode...
- Page 64 Change application parameters...
-
Page 65: Appendix B Frequently Asked Questions
Appendix B Frequently asked questions Table 24 Application files Question Cause Procedure Wrong file placement on the Make sure that the file path on the USB storage USB storage device device is correct Why can't I load any applications Push the Home key to make sure that you are in The user is not in the home the home screen before connecting the USB screen... - Page 66 Frequently asked questions...
- Page 68 Tel. +49 (0) 2 11 52 88-320 SWITZERLAND Fax (970) 669-2932 Fax +49 (0) 2 11 52 88-210 Tel. +41 22 594 6400 orders@hach.com info-de@hach.com Fax +41 22 594 6499 www.hach.com www.de.hach.com © Hach Company/Hach Lange GmbH, 2014–2016, 2019. All rights reserved. *DOC022.52.93082*...
Need help?
Do you have a question about the TitraLab KF1000 Series and is the answer not in the manual?
Questions and answers