Table of Contents
Advertisement
Advertisement
Table of Contents

Related Manuals for Aiphone IXG System


Summary of Contents for Aiphone IXG System
- Page 1 IXG System Guard Station IXG-MK Operation Manual Software version 1.00 or later IXG-MK Important • Please read this document (Operation Manual) before use, and be sure to use it correctly. • The illustrations used in this manual may differ from the actual ones.
-
Page 2: Precautions
Precautions Literature information Literature information The important information concerning correct operation and what you should observe is marked with the following symbols. Informs users of precautions (includes warnings and precautions). Informs users of prohibited acts. Alerts the user to important instructions, prohibited matters, and matters to be aware of before operation. -
Page 3: Precautions
Precautions Precautions Precautions This symbol means that operating the device incorrectly ignoring these Warning precautions may cause severe injury or death. Do not disassemble or modify the station. If there is smoke, abnormal odor, abnormal This may result in fire or electrical shock. sound, or if the station is damaged, immediately disconnect the LAN cable from Keep the station away from liquid. -
Page 4: Precautions On Operation
Precautions Precautions Precautions on operation Requests • Keep the unit more than 1m (3.3') away from radio or TV set. • Keep the station at least 20 cm (7-7/8") away from wireless devices such as wireless routers, or cordless telephones. These devices may cause the image or sound distortion. - Page 5 • This station is designed for indoor use only. Do not use at outdoor locations. • This station is not meant to protect lives or property. Aiphone is not to be held responsible for any and all resulting serious accidents, disaster accidents, or physical damage.
-
Page 6: Table Of Contents
Table of contents Table of contents Precautions Literature information ....................2 Literature information ......................2 Precautions ........................ 3 Precautions .......................... 3 Precautions on operation ..................... 4 Before Using Part Names ........................ 9 Part Names .......................... 9 Status Indicators ...................... 11 Status Indicators ........................ - Page 7 Table of contents Receiving a page ....................... 44 Monitoring ........................ 46 Monitoring a door station ....................46 Scan Monitoring ......................... 48 Using Speed Dial Buttons ..................50 Using Speed Dial Buttons ....................50 Checking recordings ....................51 Viewing Recordings ......................51 Understanding the Playback Screen.
- Page 8 Table of contents Other Appendix ........................ 121 Specifications ........................121 Maintenance ........................121 Notice regarding the software ................122 Notice regarding the software ..................122 FOR PROPER USE OF THE STATION ..............126 REGULATIONS ....................... 126 WARRANTY ........................127...
-
Page 9: Before Using Part Names
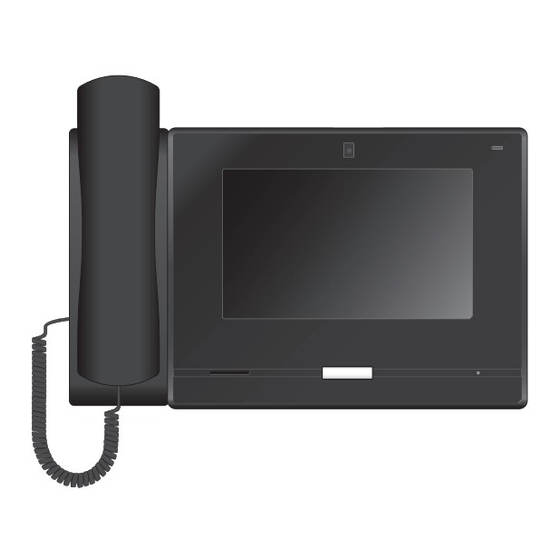
Before Using Part Names Part Names Guard Station IXG-MK Right Side... - Page 10 Before Using Part Names Name & description Handset Touchscreen LCD Camera Displays video to the other party during a call. Status LED (Orange/Blue) Shows the status of this station. (→page 11) Microphone Home button Press this to display the Home screen. Pressing this while the Home screen is displayed will switch the station into standby mode.
-
Page 11: Status Indicators
Before Using Status Indicators Status Indicators Status LED : On, : Off Name Status (pattern) Description Status LED Orange Setting transfer light Orange Normal flashing Booting flashing 0.75 sec 0.75 sec Fast flashing Device error Startup error 0.25 sec 0.25 sec Flashing with long OFF time Communication failure 0.5 sec... - Page 12 Before Using Status Indicators Name Status (pattern) Description Status LED Blue light Standby (Depends on setting) Blue Slow flashing (if lighting during standby) Calling destination flashing busy 1 sec 1 sec Repeat 3 times, then turn on Slow flashing Incoming page 2 sec 2 sec Fast flashing Outgoing call...
-
Page 13: Camera View Range And Mounting Position
Before Using Camera View Range and Mounting Position Camera View Range and Mounting Position Camera view adjustment The camera angle can be adjusted downward (0 to -20 degrees) using the camera angle adjustment lever. Set the angle to the optimal position. Rear Camera angle adjustment lever -20°... -
Page 14: User Interface
Before Using User Interface User Interface When the LCD display is OFF, the device is in standby mode. If the station is inactive for approximately one minute or if the [HOME] button is pressed while the display is active, the station will enter standby mode. Note Screen display varies depends on the settings. - Page 15 Before Using User Interface Name Description CALL Tap this to place a call using the address book. (→page 30) Missed Incoming Call History Shows recent incoming call history and recorded videos. If no videos have been recorded, the recorded video image will not be displayed.
- Page 16 Before Using User Interface Incoming Call Screen When receiving a call from a video station When receiving a call from an audio station Name Description Priority Indicates the priority level of the incoming call and page. : Urgent, : Priority, : Normal Settings The following items can be adjusted.
- Page 17 Before Using User Interface Name Description Screen control icon Tap these to change the visible display area of the screen. This cannot be done if the icon is not displayed. (→page 65) : Move the screen up. : Move the screen down. : Move the screen left.
- Page 18 Before Using User Interface Communication Screen When receiving a call from a video station When receiving a call from an audio station Name Description Priority Indicates the priority level of the current call. : Urgent, : Priority, : Normal Settings The following items can be adjusted.
- Page 19 Before Using User Interface Name Description Screen control icon Tap these to change the visible display area of the screen. This cannot be done if the icon is not displayed. (→page 65) : Move the screen up. : Move the screen down. : Move the screen left.
-
Page 20: Entering Text
Before Using Entering Text Entering Text Use this to search in the Address Book. Example: Address book search screen Alphabet input mode Name Description Text field This shows entered text. Input mode The input mode switches in "Alphabet" → "Number & Symbol" order each time it is tapped. -
Page 21: Answering A Call
Before Using Answering a call Answering a call Answering a call with the handset Receiving a call with hands-free Lift the handset when receiving a When receiving a call, tap call. Speak with the other party. Speak with the other party. When the communication ends, hang up handset. - Page 22 Before Using Answering a call Communicate using touch-to-talk To hear the voice of the other This station prioritizes the louder side of a conversation party, tap to switch to so that the quieter side can be heard. Touch-to-talk manually switches between the sides. It is useful when the ambient noise is loud enough to interrupt audio.
- Page 23 Before Using Answering a call Using the headset A 3rd party headset can be connected to the 3.5 mm 4- pole stereo mini jack on this station. When using the headset, the microphone and the speaker on the station cannot be used. The system administrator will need to configure the device to use a headset.
-
Page 24: Setting The Date And Time
Before Using Setting the date and time Setting the date and time The date and time are used for video/audio recording and the incoming/outgoing call history. Be sure to set them correctly. When the station is synchronized with a NTP server, date and time will be automatically configured. Default value: 2020/01/01 09:00 Tap [Settings] on the Home Tap [Date and Time]. - Page 25 Before Using Setting the date and time Note • A maximum of 1 minute time gain/loss can occur in the displayed time over a month. It is recommended to correct the time periodically. • If the power is turned off for at least 30 minutes in an event such as a power outage, the date and time return to default.
-
Page 26: About Microsd Card
• A maximum of 999 video/audio files can be saved. However, this may vary depending on the size of the video/audio files and the capacity of the microSD card. • Aiphone is not to be held responsible in any way for microSD cards. -
Page 27: Inserting/Removing Microsd Cards
Before Using About microSD card Inserting/Removing microSD Cards Inserting the microSD card Removing the microSD card Press the Home button or tap the standby screen to display the Home Screen. Open the microSD card slot cover. Tap [Yes]. Insert the microSD card straight into the slot and close the cover. - Page 28 Before Using About microSD card Important • Insert or remove the microSD card only when the station is not receiving a call. Calls and other similar operations cannot be performed while the microSD card is mounted. • Removing the microSD card before disappears could cause data corruption.
-
Page 29: How To Use Specifying A Station
How to use Specifying a station Selecting / Choosing / Calling by Number When calling, specify the unit or station using unit numbers or station numbers. The following are to be specified with unit numbers. • Residential Unit • Commercial Unit •... -
Page 30: Specify A Station Or Unit Using The Address Book
How to use Specifying a station Specify a station or unit using the address book. When calling, specify a unit or station registered in the Address Book from the list. The following are displayed in the Address Book. • Residential Unit •... -
Page 31: Searching For Stations
How to use Specifying a station Searching for stations Enter characters to search and specify units, stations, or messages. <Example: Making an outgoing call> Tap the unit or station to call. Enter the name or number of the Note unit or station to search. •... -
Page 32: Call / Recording History
How to use Call / Recording History Reviewing Call History Incoming/outgoing/missed call history and the history of recordings can be viewed. Monitoring is not logged in the call history. Up to 500 incoming/outgoing call records can be saved. New records will be saved over the oldest records if the number of records exceeds 500. -
Page 33: History Screen
How to use Call / Recording History History Screen Outgoing call history screen Recording history screen Name Description Missed : Displays for unanswered calls in the history. It is not displayed if the other station answered. Priority/Type : Displays on call history. Colors indicate priority (red: urgent, orange: priority, Station Number green: normal). -
Page 34: Placing / Answering A Call
How to use Placing / Answering a Call Calling the other party Place a call to one of the following units or stations. • Residential Unit • Commercial Unit • Other Guard Units • Other Inside Areas • Mobile App that is registered in the same Guard Unit. •... - Page 35 How to use Placing / Answering a Call To end the communication, hang up the handset or tap Note • It may not be possible to place a call. It depends on the configuration of the station. • The ringback tone may not be played, depending on the settings.
-
Page 36: Use An External Device To Place A Call
How to use Placing / Answering a Call Use an external device to place a call Use an external device (sensor, call button, etc.) to place a call to a pre-determined location. Input Outgoing Station Call button, etc. Activate the external device To end the communication, hang up the handset or tap •... -
Page 37: Answering A Call
How to use Placing / Answering a Call Answering a call When there is an incoming call, the status indicator flashes and the ringtone plays. Video of the destination station is displayed, and it is able to communicate by answering the call. When receiving a call, lift the Note handset or tap... -
Page 38: Page / Receive Paging
How to use Page / Receive paging Sending a page Send a page to stations that were registered in advance. [PAGE] may not be displayed on the Home Screen, depending on the configuration. If this is the case, this function cannot be used. - Page 39 How to use Page / Receive paging Note • When the station being paged answers, the page will end and a call will be established with the station that answered. • The ringback tone will sound until paging begins. • Depending on the configuration, the Paging Pretone may be heard from an externally installed speaker or other device.
-
Page 40: Sending A Message Page
How to use Page / Receive paging Sending a message page Send a page using a pre-recorded message (audio data) to stations registered in advance. [PAGE] may not be displayed on the Home Screen, depending on the configuration. If this is the case, this function cannot be used. - Page 41 How to use Page / Receive paging Canceling sent messages that are After the message is sent, the playing on stations screen will return to the Home Screen. Tap [History] on the Home Screen. No. of stations that have received the Total No.
- Page 42 How to use Page / Receive paging Tap [PAGE CANCEL]. • Ends the Message Page. Note • The ringback tone plays until paging begins. • Depending on the configuration, the Paging Pretone may be heard from an externally installed speaker or other device.
-
Page 43: Contact Input Page
How to use Page / Receive paging Contact Input Page An external device such as sensors and buttons can be used to send a page or message page to a registered page destinations, or page using an external audio source. Input Paging Button, etc. -
Page 44: Receiving A Page
How to use Page / Receive paging Receiving a page When a page is received, the Paging Pretone will sound and the paging begins. Depending on the configuration, may be displayed when a page is received. Answering the page in this case will begin the call. - Page 45 How to use Page / Receive paging Note • The Paging Pretone may not sound, depending on the configuration. • Depending on the configuration, the paging pretone and incoming page tone may be heard from a separately installed speaker or other device. •...
-
Page 46: Monitoring
How to use Monitoring Monitoring a door station Video and audio of the following stations can be monitored. • Entrance Station • Door Stations that are registered in Outside Areas • Door Stations that are registered in the same Unit •... - Page 47 How to use Monitoring Note • Tap or lift the handset during monitoring to initiate a call. • If the configured Monitor Timeout elapses, monitoring will automatically end. A notification tone will be played approximately 10 seconds prior to monitoring ending. The notification tone may not play, depending on the configuration.
-
Page 48: Scan Monitoring
How to use Monitoring Scan Monitoring Video and audio of the following stations can be monitored automatically in order. • Entrance Station • Door Stations of that are registered in Outside Areas • Door Stations that are registered in the same Unit •... - Page 49 How to use Monitoring View the video and audio. Pause • Tap to stop automatically switching video and audio. Video and audio from the currently displayed station will continue to be monitored. • : Press this to switch monitoring to the previous station.
-
Page 50: Using Speed Dial Buttons
How to use Using Speed Dial Buttons Using Speed Dial Buttons The Speed Dial buttons can be used to quickly perform functions that have been pre-assigned. This function can be configured in “How to configure Speed Dial Settings (→page 112)”. Home Screen 1 Home Screen 2 Tap [Favorites] on the Home Screen to display the Speed Dial... -
Page 51: Checking Recordings
How to use Checking recordings Viewing Recordings Video/audio recordings can be selected from the history to be viewed. Depending on the configuration, a single video/audio recording may be split into multiple files. Tap [History] on the Home Tap [Play]. screen. •... - Page 52 How to use Checking recordings Note • The station may not be able to play video or audio normally. The recordings may not be saved properly because of the communication. • Network camera video may not be recorded due to the size of the image.
-
Page 53: Understanding The Playback Screen
How to use Checking recordings Understanding the Playback Screen. 12 13 Name Description Station information Shows the Station Number, Station Name, and Building Name of the station that recorded the video/audio. Date and time This shows the date and time of the recording. Function Adjust the brightness of the screen and audio volume with this button. -
Page 54: Play Video/Audio Recordings Using A Pc
How to use Checking recordings Play Video/Audio Recordings using a PC Insert the microSD card the microSD card slot on the PC or a microSD card reader connected to the PC to play video/ audio files recorded to the microSD card on the PC. •... -
Page 55: Transfer
How to use Transfer Transfer calls (during communication) A call can be transferred to another station. Transfer a call Tap [TRANSFER CALL]. during communication to place the call on hold. • To take a call off hold, tap [HOLD CANCEL]. •... - Page 56 How to use Transfer Receive a transferred call Note When receiving a call from the • It may not be possible to transfer calls, depending on the transfer source, lift the handset or configuration of the transfer destination station. • If the transfer destination ends the call first, the communication with the station that placed the call will resume.
- Page 57 How to use Transfer When the transferring station hangs up, the call is transferred and communication can begin. • For how to view the screen during a call, refer (→page 18). • Refer to (page 60 through page 69) for operations during a call.
-
Page 58: Absent Transfer
How to use Transfer Absent Transfer Activate absent transfer to have incoming calls sent to another station while away. This may not be used depending on administrator settings. Absent transfer When a call is received while away, the call is automatically transferred to another station. Absent transfer set... -
Page 59: Other Transfer Options
How to use Transfer Other Transfer Options Incoming calls can be automatically transferred to another station while away. Call transfer must be configured in advance. It may be transferred to multiple stations. If a call is transferred to multiple stations, only the first station that answers the call can communicate. -
Page 60: Operations While Placing A Call, In Communication, Paging And Monitoring
Operations while placing a call, in communication, How to use paging and monitoring Unlocking a door In the following case, the electric lock can be released. • Incoming call (only while the video is displayed) • Communicating • Monitoring Releasing with the door release button Releasing with the keypad Depending on the configuration, the button may... - Page 61 Operations while placing a call, in communication, How to use paging and monitoring Tap [ENTER]. • The door unlocks. • When the door is released, switches to for 3 seconds. • The status indicator of the master station will flash blue when the door is released. Note •...
-
Page 62: Placing A Call On Hold
Operations while placing a call, in communication, How to use paging and monitoring Placing a call on hold When on a call, the call can be put on hold temporarily. The on-hold tone will play on the other station while it is on hold. during a call. -
Page 63: Selecting A Station To Answer
Operations while placing a call, in communication, How to use paging and monitoring Selecting a station to answer When receiving multiple incoming calls or receiving an incoming call from another station when placing a call, sending a page, or in communication, you can select which station to answer. on the screen. -
Page 64: Recording Video / Audio
Operations while placing a call, in communication, How to use paging and monitoring Recording Video / Audio Video / Audio can be recorded when receiving a call, during communication, and during monitoring. If there is no camera on the station, only audio will be recorded. Depending on the configuration, may not be displayed on the screen. -
Page 65: Fixing The Capture Area
Operations while placing a call, in communication, How to use paging and monitoring Fixing the Capture Area The capture area of the network camera can be modified. The capture area may not be able to be adjusted/locked, depending on the network camera configuration. When video is being displayed, tap Tap [CAMERA PRESET] to fix the capture area. -
Page 66: Adjusting Video To Enhance Visibility
Operations while placing a call, in communication, How to use paging and monitoring Adjusting video to enhance visibility Adjust the video from an Entrance Station or Video Door Station to enhance visibility. Tap [OFF]. • The image will be adjusted. A sample is shown below. -
Page 67: Adjusting Screen Brightness
Operations while placing a call, in communication, How to use paging and monitoring Adjusting Screen Brightness The brightness of the screen can be adjusted when placing a call, receiving an incoming page, during communication, or during (scan) monitoring. to adjust the screen brightness. -
Page 68: Adjusting Speaker Volume
Operations while placing a call, in communication, How to use paging and monitoring Adjusting speaker volume The receive volume can be adjusted during communication or (scan) monitoring. to adjust the receive volume. • Press this to decrease one step. • Press this to increase one step. -
Page 69: Adjusting Microphone Volume
Operations while placing a call, in communication, How to use paging and monitoring Adjusting microphone volume The microphone volume can be adjusted during communication or when sending a page. to adjust the microphone volume. • Press this to decrease one step. •... -
Page 70: Adjusting Ringtone Volume
Operations while placing a call, in communication, How to use paging and monitoring Adjusting Ringtone Volume The ringtone volume can be adjusted during an incoming call or when receiving a page. to adjust the ringtone volume. • Press this to decrease one step. •... -
Page 71: Checking The System
How to use Checking the System Confirming Station Information The firmware version and network configuration information of this station can be checked. Tap [Information] on the Home Enter the administrator password, screen. and then tap [ENTER]. Contact the system administrator for passwords. Check the network information for this station. -
Page 72: Other Functions
How to use Other functions Configuring the station sound a tone on a schedule Configure the station to play a chime tone on the configured schedule. Refer to “How to configure Chime Settings (Daily Schedule) (→page 102)” and < > for configuring chimes. <Example schedule>... -
Page 73: Sending An Email
How to use Other functions Sending an email Send email to an email address registered in advance when particular conditions occur such as while a microSD access error is detected. When microSD access errors are detected, etc. Send the email automatically Email Mail Server Example of sending email:... -
Page 74: Settings And Adjustments
Settings and Adjustments Configuring on the station Configuring settings Configure each setting. Example: If changing the language Tap [Settings] on the Home screen. • The privileges selection screen will be shown. Select the privileges to configure. • To configure using user privileges, tap [User] and proceed to Step 4. •... - Page 75 Settings and Adjustments Configuring on the station Tap the item to set. Configure the settings. • The settings will be saved when returning to the Setting screen. Depending on the settings, the setting will be saved when [SELECT], , or is tapped.
- Page 76 Settings and Adjustments Configuring on the station The following settings can be performed on the Settings screen. Entry Description Settings Default values Station LANGUAGE Configure the display English • 日本語 language. • English Changing the display • Français language may cause the •...
- Page 77 Settings and Adjustments Configuring on the station Entry Description Settings Default values Outgoing Call Setting 2 - Ringback Tone Call Button PLAY Set the play count of • 1-20 times ∞ (infinite) COUNT ringback tone for outgoing • ∞ (infinite): The call.
- Page 78 Settings and Adjustments Configuring on the station Entry Description Settings Default values Ringback Select the sound to be • None Call Pattern 4 Tone played by the station when • Call Pattern 1 placing a call. • Call Pattern 2 •...
- Page 79 Settings and Adjustments Configuring on the station Entry Description Settings Default values Incoming Call Setting 2 - Ringtone Call Button Ringtone Select the ringtone for • None Call Pattern 1 incoming call. Ringtone can • Call Pattern 1 be set per each source •...
- Page 80 Settings and Adjustments Configuring on the station Entry Description Settings Default values Incoming Call Setting 3 AUTO ANSWER Select ON / OFF to • ON (Auto Answer) automatically answer the • OFF (No Auto Answer) individual call. AUTO ANSWER: When receiving an individual call, answer automatically.
- Page 81 Settings and Adjustments Configuring on the station Entry Description Settings Default values DELAY TIMER Set the delay time between 1-300 sec (by 1 sec) 30 sec receiving and transferring a call. Schedule Transfer An incoming call can be automatically transferred to the transfer destination, if an incoming call is received during the time configured...
- Page 82 Settings and Adjustments Configuring on the station Entry Description Settings Default values URGENT PAGE RESPONSE (administrator Configure whether to refuse • ON (refuse) privileges only) communication or ending • OFF (do not refuse) operations on the destination station, when an urgent page is sent. Urgent message pages and urgent external input pages cannot be refused.
- Page 83 Settings and Adjustments Configuring on the station Entry Description Settings Default values TRIGGER EVENT Configure the trigger in use Select from the following. Not selected to start recording video/ (Multiple selections audio automatically. allowed) • Call: Record start when station receives Incoming Call.
- Page 84 Settings and Adjustments Configuring on the station Entry Description Settings Default values CHIME Set the sound for chime. • None None • Call Pattern 1 • Call Pattern 2 • Call Pattern 3 • Call Pattern 4 • Call Pattern 5 •...
- Page 85 Settings and Adjustments Configuring on the station Entry Description Settings Default values CHIME Set the sound for chime. • None None • Call Pattern 1 • Call Pattern 2 • Call Pattern 3 • Call Pattern 4 • Call Pattern 5 •...
- Page 86 Settings and Adjustments Configuring on the station Entry Description Settings Default values RANGE Select the Output Time • 200 to 2000 msec: 400 msec (TIMER) Range for relay output if Select this to set a “FUNCTION (→page 85)” time between 200 and is set to "Door Release".
- Page 87 Settings and Adjustments Configuring on the station Entry Description Settings Default values RANGE Select the Output Time • 200 to 2000 msec: 400 msec (TIMER) Range for relay output if Select this to set a “FUNCTION (→page 85)” time between 200 and is set to "Door Release".
- Page 88 Settings and Adjustments Configuring on the station Entry Description Settings Default values Relay Output 2 Schedule Daily Schedule Configure the schedule to perform relay output. Refer “How to configure Relay Output Schedule (Daily Schedule) (→page 108)” for information on how to configure this.
- Page 89 Settings and Adjustments Configuring on the station Entry Description Settings Default values RINGTONE Select the volume for 0: Mute, 1 - 10 Ringtone and Paging Pretone. The ringtone will sound at that volume, each time the setting value is changed. BUTTON FEEDBACK Select Enable / Disable for •...
- Page 90 Settings and Adjustments Configuring on the station Entry Description Settings Default values Monitor Assign the monitoring or scan monitoring function to the Speed Dial button. Scan monitoring cannot be assigned unless scan monitoring is configured in “Monitor (→page 82)”. Refer to “How to configure Speed Dial Settings (→page 112)”...
- Page 91 Settings and Adjustments Configuring on the station Entry Description Settings Default values Factory Reset Default User Settings The data that can be configured on the screen will be initialized. Settings restricted under administrator privileges will not be initialized. The Incoming/Outgoing/Missed calls history will also be cleared.
-
Page 92: How To Configure The Ringtone
Settings and Adjustments Configuring on the station How to configure the Ringtone Refer to “Configuring settings (→page 74)” for information on how to display the setting screens. Tap [Call Button] or [Option Input] on the Call Settings (4/5) screen. • The Ringtone Settings screen will be shown. Tap the source station to change the ringtone. -
Page 93: How To Configure Absent Transfer Settings
Settings and Adjustments Configuring on the station How to configure Absent Transfer settings Important When a transfer destination includes the Mobile App of another Unit, the original call to any Mobile Apps will be canceled when the transfer occurs. Refer to “Configuring settings (→page 74)”... -
Page 94: How To Configure Delay Transfer Settings
Settings and Adjustments Configuring on the station How to configure Delay Transfer settings Important When a transfer destination includes the Mobile App of another Unit, the original call to any Mobile Apps will be canceled when the transfer occurs. Refer to “Configuring settings (→page 74)”... - Page 95 Settings and Adjustments Configuring on the station Configure [DELAY TIMER]. Tap [SELECT]. • The settings will be saved.
-
Page 96: How To Configure Schedule Transfer (Daily Schedule)
Settings and Adjustments Configuring on the station How to configure Schedule Transfer (Daily Schedule) Important When a transfer destination includes the Mobile App of another Unit, the original call to any Mobile Apps will be canceled when the transfer occurs. Set the transfer destination and time for schedule transfer for each day. - Page 97 Settings and Adjustments Configuring on the station Tap [NEW] to configure the transfer destination unit. To configure a retransfer destination, tap the "Re" row and tap [EDIT]. * Up to 1 unit can be configured for the transfer destination. 1 station can be configured for the re-transfer (i.e. transfer a transferred call) destination.
-
Page 98: How To Configure Schedule Transfer (Weekly Schedule)
Settings and Adjustments Configuring on the station How to configure Schedule Transfer (Weekly Schedule) Important When a transfer destination includes the Mobile App of another Unit, the original call to any Mobile Apps will be canceled when the transfer occurs. Set the transfer destination and time for each day of the week from Sunday through Saturday. - Page 99 Settings and Adjustments Configuring on the station Tap [NEW]. * To change a registered schedule, tap the row to change, and tap [EDIT]. * To delete a registered schedule, tap the row to delete, and then tap [DELETE]. * To delete all weekly schedules for the displayed day, tap [DELETE ALL]. •...
- Page 100 Settings and Adjustments Configuring on the station Tap [ENTER]. • The Set Weekly Schedule screen will be shown. * Stations of the room set as the transfer destination are displayed in rows No. 1 to 10 (left-side column of the transfer destination station list), and the station set as the retransfer destination is displayed in the "Re"...
-
Page 101: How To Configure Scan Monitoring
Settings and Adjustments Configuring on the station How to configure Scan Monitoring Refer to “Configuring settings (→page 74)” for information on how to display the setting screens. Tap [Scan Monitor Settings] on the Monitor Settings screen. • The Scan Monitor Settings screen will be shown. Tap [NEW] and configure the stations and network cameras to perform scan monitoring. -
Page 102: How To Configure Chime Settings (Daily Schedule)
Settings and Adjustments Configuring on the station How to configure Chime Settings (Daily Schedule) Configure the chime tone start time and the chime tone for each day. A schedule one year from the set day can be configured. 50 schedules can be set for each day. Refer to “Configuring settings (→page 74)”... - Page 103 Settings and Adjustments Configuring on the station Tap the chime tone to play. • Refer to “Searching for stations (→page 31)” to search chime tones. Tap [ENTER]. • The Set Schedule screen will be shown. Configure the start time. Tap [SELECT]. •...
-
Page 104: How To Configure Chime Settings (Weekly Schedule)
Settings and Adjustments Configuring on the station How to configure Chime Settings (Weekly Schedule) Configure the start time and chime tone to play for each day of the week, from Sunday to Saturday. 50 schedules can be set for each day of the week. Refer to “Configuring settings (→page 74)”... - Page 105 Settings and Adjustments Configuring on the station Tap [EDIT]. • The Select Chime screen will be shown. Tap the chime tone to play. *Refer to “Searching for stations (→page 31)” to search chime tones. Tap [ENTER]. • The Set Schedule screen will be shown. Configure the start time.
-
Page 106: How To Configure The Status Output
Settings and Adjustments Configuring on the station How to configure the Status Output Refer to “Configuring settings (→page 74)” for information on how to display the setting screens. On the Relay Output Settings screen, tap [Relay Output 1] or [Relay Output 2]. Tap [Status Output] on the Relay Output Settings (Advanced) screen. -
Page 107: How To Configure Door Release Settings
Settings and Adjustments Configuring on the station How to configure Door Release settings Refer to “Configuring settings (→page 74)” for information on how to display the setting screens. On the Relay Output Settings screen, tap [Relay Output 1] or [Relay Output 2]. Tap [Door Release] on the Relay Output Settings (Advanced) screen. -
Page 108: How To Configure Relay Output Schedule (Daily Schedule)
Settings and Adjustments Configuring on the station How to configure Relay Output Schedule (Daily Schedule) Configure the time to perform the relay output for each day. A schedule one year from the set day can be configured. 12 schedules can be set for each day. Refer to “Configuring settings (→page 74)”... - Page 109 Settings and Adjustments Configuring on the station Configure the start time and end time. Tap [SELECT]. • The settings will be saved.
-
Page 110: How To Configure Relay Output Schedule (Weekly Schedule)
Settings and Adjustments Configuring on the station How to configure Relay Output Schedule (Weekly Schedule) Configure the time to perform the relay output for each day of the week from Sunday through Saturday. 12 schedules can be set for each day of the week. Refer to “Configuring settings (→page 74)”... - Page 111 Settings and Adjustments Configuring on the station • The Set Schedule screen will be shown. Configure the start time and end time. Tap [SELECT]. • The settings will be saved.
-
Page 112: How To Configure Speed Dial Settings
Settings and Adjustments Configuring on the station How to configure Speed Dial Settings Configure settings related to the Speed Dial buttons. *This is an administrator privileges setting. If configuring the Speed Dial buttons is restricted, this cannot be configured under user privileges. Refer to “Configuring settings (→page 74)”... - Page 113 Settings and Adjustments Configuring on the station Configure the function to assign. Entry Description Call Assign the calling function to the Speed Dial button. Refer to “How to assign calling functions to Speed Dial buttons (→page 115)” for information on how to configure this.
- Page 114 Settings and Adjustments Configuring on the station Enter the Speed Dial Button Name. • Refer to “Entering Text (→page 20)” for how to enter characters. Tap [ENTER]. • The Speed Dial Settings (Advanced) screen will be shown. Confirm the details of the configured Speed Dial button, and then tap [SELECT]. •...
- Page 115 Settings and Adjustments Configuring on the station How to assign calling functions to Speed Dial buttons (1) On the Speed Dial Settings (Advanced) screen, tap [Call]. – The Address Book will be shown. (2) Tap the destination unit to set to the Speed Dial button. –...
- Page 116 Settings and Adjustments Configuring on the station How to assign paging functions to Speed Dial buttons (1) On the Speed Dial Settings (Advanced) screen , tap [Page]. (2) Tap the building to page using the Speed Dial button. – Refer to “Searching for stations (→page 31)”...
- Page 117 Settings and Adjustments Configuring on the station (4) Tap [SELECT]. – The settings will be saved.
- Page 118 Settings and Adjustments Configuring on the station How to assign monitoring functions to Speed Dial buttons (1) On the Speed Dial Settings (Advanced) screen, tap [Monitor]. (2) To assign the monitoring function, tap the station to monitor. – Refer to “Searching for stations (→page 31)”...
- Page 119 Settings and Adjustments Configuring on the station How to assign Relay Control functions to Speed Dial buttons (1) On the Speed Dial Settings screen, tap [Relay Control]. – The Set Destination Relay screen will be shown. (2) Configure detailed settings. (3) Tap [Set Destination].
- Page 120 Settings and Adjustments Configuring on the station (5) Tap the station to control the Relay. * If specifying stations in other buildings, tap [SELECT BUILDING] first, and select a building. *Refer to “Searching for stations (→page 31)” to search for stations. (6) Tap [ENTER].
-
Page 121: Appendix
Other Appendix Specifications Power PoE (IEEE802.3af Class 0 standard) Power consumption Standby: 3.2 W; Maximum: 7.4 W Communication Concurrent communication method (depending on other party)/alternate call (touch-to-talk) Display 7" TFT LCD display WVGA 800×480 (approx. 1.15 million pixels) Camera 1/4-type CMOS VGA 640×480 (approx. 300,000 pixels) Ethernet (10BASE-T, 100BASE-TX), Auto MDI/MDI-X-compatible Audio codec G.711 (u-law, A-law) -
Page 122: Notice Regarding The Software
Other Notice regarding the software Notice regarding the software Use of the software installed on this product has received direct or indirect authorization from third parties. (1) Apache License 2.0 This software includes Google Protocol Buffers. You may obtain a copy of the License at "http://www.apache.org/licenses/LICENSE-2.0". Please be noted that a portion of this software is made by changing or modifying original source files. - Page 123 OF OR IN CONNECTION WITH THE USE OR PERFORMANCE OF THIS SOFTWARE. (6) MIT License Copyright (c) 2018 Aiphone co.,Ltd. Released under the MIT license. Permission is hereby granted, free of charge, to any person obtaining a copy of this software and associated documentation files (the "Software"), to deal in the Software without restriction, including without limitation the...
- Page 124 Other Notice regarding the software (a) Redistributions of source code must retain the above copyright notice, this list of conditions and the following disclaimer. (b) Redistributions in binary form must reproduce the above copyright notice, this list of conditions and the following disclaimer in the documentation and/or other materials provided with the distribution.
- Page 125 (14) This software is based in part on the work of the FreeType team. See the following website for source code including changes for software that has been authorized under the above licenses. http://www.aiphone.co.jp/data/software/source/gpl/download/ixg/ * Be sure to read the following before downloading. <<Please confirm>>...
-
Page 126: For Proper Use Of The Station
Trade Name : AIPHONE Model : IXG-2C7, IXG-2C7-L, IXG-DM7, IXG-DM7-HID, IXG-MK, IXGW-LC, IXGW-GW Responsible Party – U.S. Contact Information Company Name : AIPHONE CORPORATION Location of Office : 6670 185th Ave NE, Redmond, WA, 98052, USA Telephone Number : (800) 692-0200 Email Address : tech@aiphone.com... -
Page 127: Warranty
This warranty shall not apply to any Aiphone product which has been subject to misuse, neglect, accident, power surge, or to use in violation of instructions furnished, nor extended to units which have been repaired or altered outside of the factory. - Page 128 MEMO...
- Page 129 AIPHONE CO., LTD., NAGOYA, JAPAN Ⓐ Issue Date: Aug.2020 P0820 RQ 63031...
Need help?
Do you have a question about the IXG System and is the answer not in the manual?
Questions and answers