Table of Contents
Advertisement
Quick Links
IXGS-TE Telephone Entry Kit Guide
Introduction
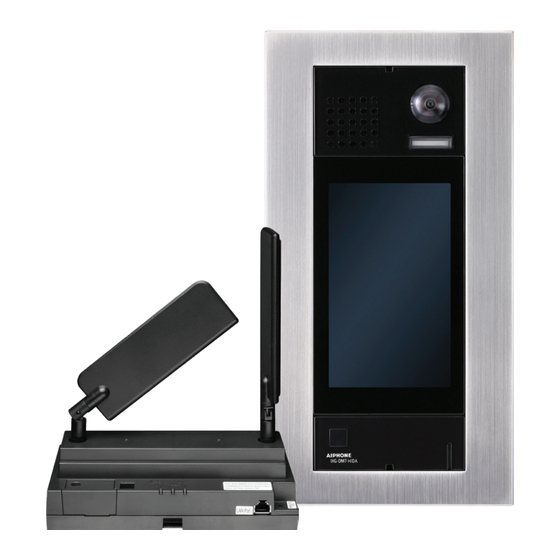
The IXGS-TE Telephone Entry Kit includes everything needed for a telephone entry and mobile app multi-tenant
intercom system. It includes an IXG-DM7-HIDA entrance station, an IXGW-TGW cloud gateway with SIM card, and an
IXG‑DM7‑BOX flush‑mount box for the entrance station.
There are two options for configuring the equipment. The preferred method is AiphoneCloud, which grants access to
Remote Management. Remote Management allows for off‑site programming through a web interface. There is also the
option to use IXG Support Tool, a PC program that can configure the stations at the site. Both methods will be shown in
this guide.
In order to use the telephone and 4G LTE features on the IXGW-TGW, a SIM billing account must be activated. After
finishing the programming steps in this guide, be sure to follow the SIM Billing Guide, which is available at this link:
https://www.aiphone.com/sim‑activation
Systems programmed in IXG
Support Tool cannot be migrated to
Remote Management at this time.
10/24
Table of Contents
Page 1
Introduction
Page 2
Remote Management Programming
Page 21
IXG Support Tool Programming
Page 35
Registering Phone Numbers by Call-In
1
Advertisement
Table of Contents

Related Manuals for Aiphone IXGS-TE


Summary of Contents for Aiphone IXGS-TE
- Page 1 Registering Phone Numbers by Call-In Introduction The IXGS-TE Telephone Entry Kit includes everything needed for a telephone entry and mobile app multi-tenant intercom system. It includes an IXG-DM7-HIDA entrance station, an IXGW-TGW cloud gateway with SIM card, and an IXG‑DM7‑BOX flush‑mount box for the entrance station.
-
Page 2: Remote Management
Remote Management Table of Contents Page 2 AiphoneCloud Instructions and Navigation Page 3 AiphoneCloud Registration Page 4 Accessing Remote Management Page 5-11 Creating a New Site Page 12‑14 Configuring Units Page 15 Configuring Tenants Page 16-17 Entrance Station Settings Page 18-19 Registering Mobile Apps Page 20 Updating Stations... - Page 3 AiphoneCloud Registration Navigate to https://aiphone.cloud. If there is already an existing account, enter the credentials and click Log In . create a new account, click Register Here . To register an account, fill in the required information and click Register . A six‑digit code will be sent to the registered email.
-
Page 4: Accessing Remote Management
AiphoneCloud account must belong to a branch. Contact your local Sales Rep (https://www.aiphone.com/sales/regional‑ sales) or cloudadmin@aiphone.com to create your Branch in AiphoneCloud. A page will be displayed showing existing sites under the Branch, if any exist. To create the new site, the AiphoneCloud account will need to be linked to the IXG Portal. -
Page 5: Creating A New Site
Creating a New Site Make sure that the equipment is attached to the same network switch as the IXGW‑TGW gateway. Click Create Site at the top of the page A new window will appear. Fill out the information and click Next . - Page 6 Creating a New Site (continued) A general description of multi‑tenant sites will appear. Scroll to the bottom of the window and click Create Site . Follow these steps to use the New Site Wizard: • Connect the IXGW‑TGW to the same network as the intercom stations. •...
- Page 7 Creating a New Site (continued) In order to be registered, the IXGW‑TGW will need to be connected to a network with a DHCP server, since it uses DHCP by default. If the station’s final location does not have one, temporarily connect it to a network with a DHCP server and internet access.
- Page 8 Creating a New Site (continued) The Devices page will load. The IXG-DM7-HIDA will appear under the Entrance Stations tab, and the IXGW-TGW will appear under Gateway Adaptors. If everything looks correct, click Continue . The Add Buildings page will load. Systems using the IXGS‑TE kit will almost always be single building. Leave the number at 1 and click Continue .
- Page 9 Creating a New Site (continued) A list of units in the system will appear. Units are used by the system to organize stations, tenants, and mobile apps. The IXG-DM7-HIDA should already be added to an Entrance Unit. Residential units will need to be created for each apartment. Units can be added or adjusted later instead, as shown on pages 12-14, but be sure the entrance station is assigned to a unit.
- Page 10 Creating a New Site (continued) If multiple residential units need to be created, use the batch add option to save time. Toggle Switch to batch add, which allows a range of numbers to be generated between the Starting Unit Number and Ending Unit Number. This will add stations for every number in the range.
- Page 11 Creating a New Site (continued) Click on the next page to exit the wizard. Go to Site Info This will open the main Site Info page. The links on this page allows for station settings to be configured and pushed to the stations through the gateway.
-
Page 12: Configuring Units
Configuring Units To configure the units, navigate to Tenant Management, Units. This will display a list of the site’s units. To create a new unit, click in the top right corner. This menu will look like the setup wizard instructions on Add a Unit page 9 of this guide. - Page 13 Configuring Units (continued) Adding Additional Tenants and Changing the Primary Tenant Under the Tenants section, new tenants can be created by clicking . Fill out the information and Add Tenant to Unit click Add Tenant The first tenant added to a unit will be automatically set as the Primary Tenant. While all tenants can have a phone number registered, only the Primary Tenant’s phone number will be called by the entrance station.
-
Page 14: Setting Access Options
Configuring Units (continued) Adding Tenants by Call-In IXGW-TGW gateways typically support the option to register phone numbers by calling the IXGW-TGW directly. However, this option is not compatible with Remote Management. Always use Remote Management to add or edit phone numbers for systems not programmed with IXG Support Tool. - Page 15 Configuring Tenants A list of all tenants in all units can be added to or modified by navigating to Tenant Management, Tenants. This will open a list of tenants on the site. Click in the top right corner. Add a tenant A new window will appear.
- Page 16 Entrance Station Settings To configure the entrance station, navigate to Intercoms, Entrance Stations. Click Edit Advanced Settings Click on the left‑hand menu. This screen allows for different features to be displayed and set as Entrance Settings the default. A setting can be disabled by clicking the Disabled/Enabled slider beneath the setting, and set to be the default view by clicking anywhere in the setting box that is not a button.
- Page 17 Entrance Station Settings (continued) Door Release Keypad: Enter a key code to unlock the door. Call by Unit Number: Dial the unit number to place a call. Call by Directory: The units are displayed in order, with a call button for each on the touchscreen. Search by Name: Search by the first and last names assigned to the unit.
- Page 18 In addition to telephone entry, the IXGS‑TE kit can also place video calls to the Aiphone IXG app. The units need to be set to support mobile apps, and then tenants can register their phones using a QR code.
- Page 19 . Once scanned, follow the prompts on the Export QR Codes Email QR Codes mobile app to complete registration. More information on using and registering the Aiphone IXG app is available here: https://www.aiphone.com/IXG-App-Operation-Guide https://www.aiphone.com/IXG-Portal-Management-Guide 10/24...
- Page 20 Updating Stations Once everything is configured, the stations will need to have their settings, and possibly their firmware, updated. Navigate to Site Info on the left side menu. This will display the status for the gateway and the entrance station. If a station shows that it needs a firmware update, click before clicking Needs Update...
- Page 21 IXG Support Tool Instructions IXG Support Tool can be downloaded here: https://www.aiphone.com/IXG‑SupportTool This section is focused on programming the included stations for telephone and mobile app setup. If more stations need to be added, or if other features need to be configured, refer to these full programming guides.
-
Page 22: Initial Setup
Initial Setup Open IXG Support Tool. Select the Administrator radio button, enter the ID and password, then click . If this Login is the first time that IXG Support Tool has been opened, the default credentials will be admin/admin, and there will be a prompt to choose a new password. - Page 23 Creating Units In IXG Support Tool, units are used to organize stations. There will be a unit for the IXG-DM7-HIDA entrance station, and there will be a unit for each apartment or office that will be assigned a phone number or mobile apps. Navigate to Site Settings, Units/Stations.
-
Page 24: Advanced View
Creating Units (continued) For each residential unit, use the drop-down menu to change Phone Registration from Disable to Enable. For the entrance unit, click to set the Door/Entrance Station 1 station to IXG-DM7(-*). Select If the site will use mobile apps, scroll to the far right. Under Number of Available Mobile Apps, use the drop-down menu to change the number from 0 to 8 for each unit. -
Page 25: Network Settings
Registering the IXGW-TGW Navigate to Gateway Settings, Gateway Registration. Place a check mark under the Enable column. This will open up other settings for the gateway. The automatically set name can be changed under Station Name, but this is optional. The Key Input Wait Time setting controls how long a user calling the IXGW‑TGW to register their phone has between key presses when entering their password. - Page 26 Associating the Stations To apply these network settings to the stations, navigate to Connection(S), Association Settings. A station search will begin automatically, and a pop‑up window will appear. Click to end the search after a few seconds. Cancel If nothing comes up in the station search, check that the proper network connecion was selected under File(F), IXG Support Tool...
- Page 27 Entrance Station Settings There are a variety of ways that the IXG‑DM7‑HIDA can be configured. This document focuses on the most common settings for telephone entry applications. Other settings can be viewed in the Quick Start Programming Guide that was linked on page 1 of this guide.
- Page 28 Entrance Station Settings (continued) Direct Call List (continued) Put a check mark next to the desired unit (only one can be selected). Click to confirm. Repeat these steps for each button that is configured, and click to finalize the settings. Save Access Code (optional) If tenants will be assigned access codes to release the door, navigate to Entrance Station Settings, Access Code.
-
Page 29: Gateway Settings
SIM card is supported, and should never be removed. Navigate to Gateway Settings, Gateway SIM Settings. Configure the settings as follows: APN: iot0723.com.attz User Name: aiphone Password: aiphone Authentiation Type: PAP (default setting, do not change) APN protocol: IPv4v6 (default setting, do not change) Network Type: Automatic (default setting, do not change) There is an option to set a PIN code under PIN Code Settings. - Page 30 Gateway Settings (continued) Telephone Entry Settings There are two ways to register phone numbers with the system. End users can call the IXGW‑TGW’s phone number and register directly. Instructions for this process are included on page 15 of this guide, since phone numbers can’t be registered that way until all other settings have been completed.
- Page 31 Uploading Settings to Stations Navigate to Connection(S), Upload Settings. Click with the station type set to all, then click . This Select Settings will push the settings to both stations. IXG Account Registration Once the hardware is configured, an administrator account needs to be created and registered. If an appropriate administrator account already exists, skip to Upload Settings to IXG Cloud Server on the next page.
- Page 32 Click Login . Select the country and click Upload . Click Agree to accept the licensing agreement. These credentials will also allow the administrator to manage the site at https://portal.ixg.aiphone‑app.net. A single app can be used for testing right away, but the site and billing information will need to configured before more apps can be registered. See this guide for more information: https://www.aiphone.com/IXG‑Portal‑Management‑Guide...
- Page 33 To register the device, open the Aiphone IXG app. Follow the prompts and accept the privacy policy listed there, then use the camera to scan the QR code. Follow the on screen instructions to complete the process. Repeat for each tenant.
-
Page 34: Export System Configuration
Export System Configuration It is strongly recommended to back up the settings once all settings have been configured. This will prevent having to completely reprogram or recover the system later. Navigate to File, Export System Configuration. Click and select a location to save the configuration folder. Click Export to exit ths screen. - Page 35 How to Register Your Phone Number with the IXG Series System These instructions are for tenants and other end users to help them register their phone number to receive calls from IXG Series entrance stations. Before you begin, make sure that the system administrator or manager has provided you with the phone number to call, your unit number, and a password to enter.
Need help?
Do you have a question about the IXGS-TE and is the answer not in the manual?
Questions and answers