Advertisement
Quick Links
Assembly & Installation Instructions:
Hanging Pedestal
ACC-HPED-X
Included:
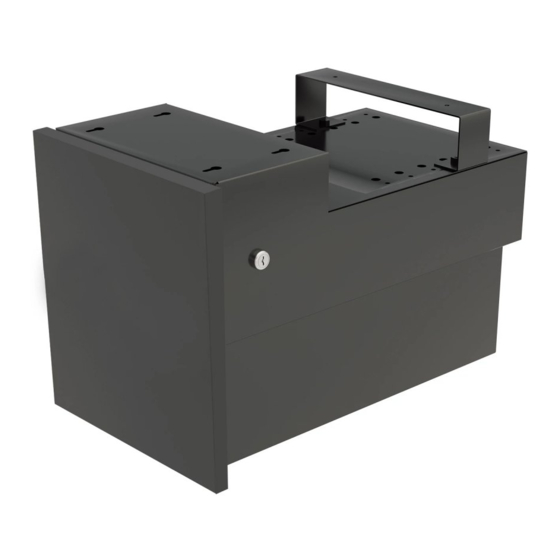
A
Tools Required:
0.4126 "
0.134"
3/4"
#12 Screw Size
#3 Drive
4 mm Hex Key
⅛" Drill Bit
WARNING:
Installation on table with payload below 200 lb not recommended
Weight capacity of Hanging Pedestal is 30 lb
NOTE: Different worksurface materials may require alternative mounting screws
REMOVE DRAWER
1
Completely remove drawer
from main body of pedestal.
Drawer
Workrite Ergonomics | 800.959.9675 www.workriteergo.com
0.216"
Cordless Drill
Required, Sold Separately:
Desk or Table
B
Clamp (2x)
#3 Phillips Screwdriver
or Drill/Driver
ID
Part Name
A
Hanging Pedestal
B
#12 × ¾" Phillips Pan Head Screws
Mounting Bracket
Main Body
Plastic Tab
Flip the plastic tab on
each side of drawer to
release drawer from
main body (right tab
down, left tab up).
Qty
1
6
1 of 3
Advertisement

Subscribe to Our Youtube Channel
Related Manuals for Workrite Ergonomics ACC-HPED-X


Summary of Contents for Workrite Ergonomics ACC-HPED-X
- Page 1 Mounting Bracket Main Body Plastic Tab Flip the plastic tab on each side of drawer to release drawer from main body (right tab Drawer down, left tab up). Workrite Ergonomics | 800.959.9675 www.workriteergo.com 1 of 3...
- Page 2 ⅞" offset side of worksurface. If using provided Clamps Worksurface Front Edge hardware, use ⅛" drill bit. DO NOT DRILL DEEPER THAN ¾" INTO WORKSURFACE Previously Marked Pilot Screw Holes Mounting Bracket 2 of 3 Workrite Ergonomics | 800.959.9675 www.workriteergo.com...
- Page 3 #3 Phillips Screwdriver #12 × ¾" Phillips Pan Head Screw REMOVE CLAMPS AND INSERT DRAWER Drawer 1500407 Rev B 3 of 3 Workrite Ergonomics | 800.959.9675 www.workriteergo.com...
Need help?
Do you have a question about the ACC-HPED-X and is the answer not in the manual?
Questions and answers