
Related Manuals for Kramer RC-76R


Summary of Contents for Kramer RC-76R
- Page 1 K R A ME R E LE CT R O N IC S L T D . USER MANUAL MODEL: RC-76R/RC-78R Room Controllers P/N: 2900-300253 Rev 5...
-
Page 3: Table Of Contents
Installing the Front Panel Button Caps and Labels Technical Specifications Figures Figure 1: RC-76R/RC-78R Room Controllers – US-D Size Figure 2: RC-76R/RC-78R Room Controllers – EU / UK Size Figure 2: Connecting the RC-76R/RC-78R Room Controllers Figure 3: K-NET PINOUT Connection Figure 4: Grounding Connection Components... -
Page 4: Introduction
Introduction Welcome to Kramer Electronics! Since 1981, Kramer Electronics has been providing a world of unique, creative, and affordable solutions to the vast range of problems that confront video, audio, presentation, and broadcasting professionals on a daily basis. In recent years, we have redesigned and upgraded most of our... -
Page 5: Getting Started
Avoid interference from neighboring electrical appliances that may adversely influence signal quality • Position your Kramer RC-76R/RC-78R away from moisture, excessive sunlight and dust This equipment is to be used only inside a building. It may only be connected to other equipment that is installed inside a building. -
Page 6: Safety Instructions
To comply with the WEEE Directive, Kramer Electronics has made arrangements with the European Advanced Recycling Network (EARN) and will cover any costs of treatment, recycling and recovery of waste Kramer Electronics branded equipment on arrival at the EARN facility. RC-76R/RC-78R - Getting Started... -
Page 7: Overview
KNET™ system, or part of a multi-unit Ethernet system managed by the Kramer Site- CTRL™ site management platform. The RC-76R/RC-78R have identical functionality. -
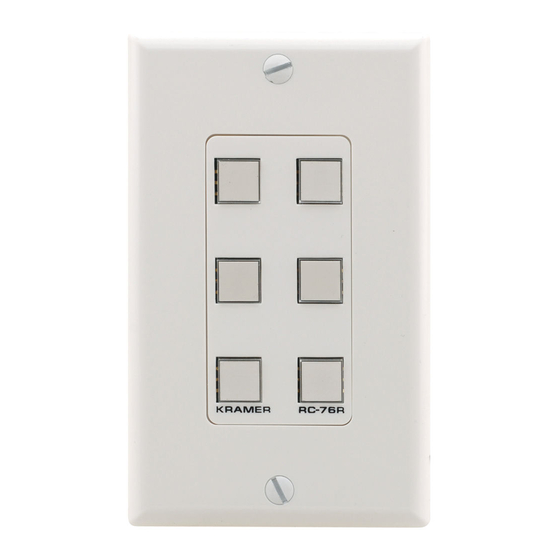
Page 8: Defining The Rc-76R/Rc-78R Room Controllers
Defining the RC-76R/RC-78R Room Controllers This section defines the RC-76R/RC-78R. Figure 1: RC-76R/RC-78R Room Controllers – US-D Size RC-76R/RC-78R - Overview... -
Page 9: Figure 2: Rc-76R/Rc-78R Room Controllers - Eu / Uk Size
Figure 2: RC-76R/RC-78R Room Controllers – EU / UK Size Feature Function 6/8 Configurable Buttons Function is programmed by the K-Config Configuration software USB Connector Connect to a computer for firmware upgrade or for uploading the configuration file ETHERNET RJ-45 Connector... - Page 10 Slide the DIP-switch up to terminate the K-Net line with a 120Ω load; down is for no termination Mounting Plate Screws 2 screws that hold the mounting plate to the body of the device. Remove to access the buttons (see Figure RC-76R/RC-78R - Overview...
-
Page 11: Connecting The Rc-76R/Rc-78R
Always switch off the power to each device before connecting it to your RC-76R/RC-78R. After connecting your RC-76R/RC-78R, connect its power and then switch on the power to each device. To connect the RC-76R/RC-78R as illustrated in the example in Figure 1. Connect the IR outputs as follows: Connect an IR emitter to IR OUTPUT 1 and attach the emitter to the ... -
Page 12: Connecting Rs-232 Devices
Using a straight cable, connect pin 2 to TX, pin 3 to RX and pin 5 to GND on the RS-232 terminal block connector of the RC-76R/RC-78R Connecting RS-485 Devices You can control up to one AV device by connecting it to the RC-76R/RC-78R via its RS-485 connection. To connect a device to the RC-76R/RC-78R via RS-485:... -
Page 13: Connecting The Ethernet Port
Site-CTRL control program to control AV devices. To connect the RC-76R/RC-78R to a network: 1. Connect the Ethernet port of the RC-76R/RC-78R to the Ethernet port on a network hub or network router, via a straight cable with RJ-45 connectors. -
Page 14: Connecting The K-Net Port
The grounding screw is used to earth the chassis of the unit to the building ground preventing static electricity from impacting the performance of the unit. Figure 5 defines the grounding screw components. Component Description M3X6 screw 1/8" Toothed Lock Washer M3 Ring Tongue Terminal Figure 5: Grounding Connection Components RC-76R/RC-78R - Connecting the RC-76R/RC-78R... - Page 15 2. Insert the M3x6 screw through the toothed lock washers and the tongue terminal in the order shown above. 3. Insert the M3x6 screw (with the two toothed lock washers and ring tongue terminal) into the grounding screw hole and tighten the screw. RC-76R/RC-78R - Connecting the RC-76R/RC-78R...
-
Page 16: Operating The Rc-76R/Rc-78R
Operating the RC-76R/RC-78R You can operate your RC-76R/RC-78R using: Front panel buttons. These are configured using the K-Config software. For • instructions on using the software, see the K-Config Software Guide • A PC running Site-CTRL control software: To operate your device using Site-CTRL, see the Site-CTRL User Guide available at the Kramer Web site •... -
Page 17: Front Panel Button Caps And Labels
Front Panel Button Caps and Labels The RC-76R/RC-78R are supplied with a button label sheet and 6/8 clear, button caps to house the labels. The label size: 8.8mm x 8.8mm. Figure 6 illustrates a sample button label sheet. RC-76R/RC-78R - Front Panel Button Caps and Labels... - Page 18 RC-76R/RC-78R - Front Panel Button Caps and Labels...
-
Page 19: Figure 5: Sample Button Label Sheet
Figure 6: Sample Button Label Sheet RC-76R/RC-78R - Front Panel Button Caps and Labels... -
Page 20: Installing The Front Panel Button Caps And Labels
4. Lift each cap away from its button. 5. Holding the button cap with the “wings” on the top and bottom as shown in Figure 8, insert the label inside the cap. RC-76R/RC-78R - Front Panel Button Caps and Labels... -
Page 21: Figure 7: Button Cap Orientation With Label
7. Repeat for all caps. 8. Replace the mounting plate and screw it into place with its mounting screws. 9. Replace the design frame over the unit and screw it into place with its mounting screws. RC-76R/RC-78R - Front Panel Button Caps and Labels... -
Page 22: Technical Specifications
Power supply, design frame (black and white DECORA design frames included in US-D models), mounting plate (black and white mounting plates included in US-D models), label set (label size: 8.8mm x 8.8mm) DECORA® is a registered trademark of Leviton Manufacturing Co., Inc. RC-76R/RC-78R - Technical Specifications... - Page 23 RC-76R/RC-78R - Technical Specifications...
- Page 24 For the latest information on our products and a list of Kramer distributors, visit our Web site where updates to this user manual may be found. SAFETY WARNING Disconnect the unit from the power supply before opening and servicing P/N:...
Need help?
Do you have a question about the RC-76R and is the answer not in the manual?
Questions and answers