Table of Contents
Advertisement
Quick Links
Download this manual
See also:
User Manual
Advertisement
Table of Contents

Related Manuals for Kramer RC-62


Summary of Contents for Kramer RC-62
-
Page 1: User Manual
Kramer Electronics, Ltd. USER MANUAL Room Controller Models: RC-62 Series (RC-62, RC-62P, RC-62L) RC-63A Series (RC-63A, RC-63AL, RC-63AP) RC-63D Series (RC-63D, RC-63DL, RC-63DP) -
Page 2: Table Of Contents
Button Labels Panel Labels Technical Specifications Figures Figure 1: RC-62 Room Controller Front Panel Figure 2: RC-62 Room Controller Rear Panel Figure 3: RC-63D Room Controller Front Panel Figure 4: RC-63D Room Controller Rear Panel Figure 5: RC-63D Standalone Power Supply Pinout Figure 6: Example of a Typical RC-63DL Configuration Figure 7: RC-63D connected to the SV-551 SummitView™... -
Page 3: Introduction
Introduction Introduction Welcome to Kramer Electronics! Since 1981, Kramer Electronics has been providing a world of unique, creative, and affordable solutions to the vast range of problems that confront the video, audio, presentation, and broadcasting professional on a daily basis. In recent years, we have redesigned and upgraded... -
Page 4: Getting Started
The package includes the following items: Any version of the RC-62 series, the RC-63A series or the RC-63D series 3' (0.91m) USB cable Screwdriver This user manual... -
Page 5: Overview
Overview Overview This user manual describes the RC-62 / RC-63A / RC-63D series. Each of these highly versatile controller interfaces acts as an all-in-one extended remote control panel for control of A/V equipment—especially projectors and associated equipment—in any room (such as classrooms, boardrooms, or auditoriums). They streamline operations and simplify control by integrating audio, video, and computer-video sources into a centralized system. -
Page 6: Installing The Room Controller
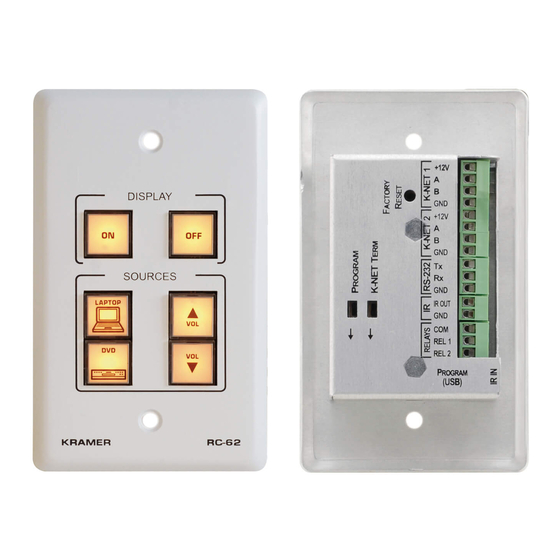
Version for Europe Figure 1: RC-62 Room Controller Front Panel 1 For example: model number AD2512C, part number 2535-000251 2 The USA version shown has plastic cap labels (RC-62P), and the European version shown has printed labels (RC-62) KRAMER: SIMPLE CREATIVE TECHNOLOGY... -
Page 7: Figure 2: Rc-62 Room Controller Rear Panel
Installing the Room Controller Table 2: RC-62 Front Panel Features Feature Function RC-62 - "DISPLAY" and “SOURCE” are printed on the panel “DISPLAY” and “SOURCE” Labels RC-62P - backlit plastic cap to affix your own labels (see Figure 10) RC-62L - an LCD version on a blue background that displays up to 8... -
Page 8: Defining The Rc-63A, Rc-63Al And Rc-63Ap
Installing the Room Controller 4.2 Defining the RC-63A, RC-63AL and RC-63AP The Kramer RC-63A is available as a 2 Gang wall plate. It features 6 front panel buttons designed in two groups; one group of 2 buttons, and another group of 4 buttons. -
Page 9: Table 4: Defining The Rc-63, Rc-63Al And Rc-63Ap
Installing the Room Controller Table 4: Defining the RC-63, RC-63AL and RC-63AP Feature Function Feature Function SOURCE These 4 configurable GND Connection Ground connection for the Buttons backlit buttons can set up potentiometer any supported command LEVEL Wiper of potentiometer Connection “DISPLAY”... -
Page 10: Defining The Rc-63D, Rc-63Dp And Rc-63Dl
Installing the Room Controller 4.3 Defining the RC-63D, RC-63DP and RC-63DL The Kramer RC-63D is available as a 2 Gang wall plate for the USA or a 2 Gang wall plate for Europe. It features 6 front panel buttons designed in two groups;... -
Page 11: Figure 4: Rc-63D Room Controller Rear Panel
Installing the Room Controller Table 5: RC-63D Front Panel Features Feature Function SOURCE Buttons These 4 configurable backlit buttons can set up any supported command RC-63D - "DISPLAY" and “SOURCE” are printed on the panel “DISPLAY” and “SOURCE” Labels RC-63DP - backlit plastic cap to affix your own labels (see Figure 10) RC-63DL - an LCD version on a blue background that displays up to 8 characters at once (programmed via the USB port) and includes rolling text DISPLAY Buttons... -
Page 12: Using Your Room Controller
The room controller is easy to use, as the example in Figure 6 and Table 7 defines 1 By authorized Kramer technical personnel or by an external system integrator 2 It is recommended to place labels on the buttons prior to installing the unit, as this involves removing the face plate 3 Refer to the separate online “RC-SV Configuration Guide”... -
Page 13: Figure 6: Example Of A Typical Rc-63Dl Configuration
Using Your Room Controller Figure 6: Example of a Typical RC-63DL Configuration Table 7: Connection Scheme (for the example in Figure 6) This connector: Connects to: REL 1 The screen REL 2 IR OUT and GND PINs A DVD player RS-232 (TX, RX) Terminal Block Connector A projector +12V and GND... -
Page 14: Figure 7: Rc-63D Connected To The Sv-551 Summitview™ Processor / Switcher
White = B Green = A = +12V To 5A Power Supply SV-551 Figure 7: RC-63D connected to the SV-551 SummitView™ Processor / Switcher 1 Power supplies are sold separately. Consult your Kramer dealer for details KRAMER: SIMPLE CREATIVE TECHNOLOGY... -
Page 15: Operating The Room Controller
Using Your Room Controller 5.1 Operating the Room Controller In the following example that is illustrated in Figure 8, the room controller is labeled with specific functions and each button is programmed to perform several tasks as defined in Table 8. Table 8: The Commands Configuration The Label The Macro Sequence... -
Page 16: Customizing The Controllers' Buttons And Labels
Figure 9 illustrates the button labels for the macro buttons Figure 9: Sample “Button Labels” Sheet 1 You can program the color of the button with flexible RGB values 2 Installed by the system integrator only KRAMER: SIMPLE CREATIVE TECHNOLOGY... -
Page 17: Panel Labels
Customizing the Controllers' Buttons and Labels 6.2 Panel Labels supplied with the RC-62P, Figure 10 illustrates the sample "Labels" sheet RC-62AP and the RC-63DP, for inserting under the plastic caps: Figure 10: Sample “Panel Labels" Sheet 1 Installed by the system integrator only... -
Page 18: Technical Specifications
SummitView™ kits: 12V, 5A; independent: 12V/500mA DIMENSIONS: RC-62 (for the USA): 6.9cm x 2.6cm x 11.4cm (2.72" x 1.02" x 4.49", W, D, H) RC-63A and RC-63D: (for the USA): 11.4cm x 2.6cm x 11.4cm (4.49" x 1.02" x 4.49", W, D, H) RC-62 and RC-63D (for Europe): 15.2cm x 1.9cm x 8.6cm (5.98"... - Page 19 EXCLUSION OF DAMAGES The liability of Kramer for any effective products is limited to the repair or replacement of the product at our option. Kramer shall not be liable for: 1. Damage to other property caused by defects in this product, damages based upon inconvenience, loss of use of the product, loss of time, commercial loss;...
- Page 20 For the latest information on our products and a list of Kramer distributors, visit our Web site: www.kramerelectronics.com, where updates to this user manual may be found. We welcome your questions, comments and feedback. Safety Warning: Disconnect the unit from the power supply before opening/servicing.
Need help?
Do you have a question about the RC-62 and is the answer not in the manual?
Questions and answers