Advertisement
Quick Links
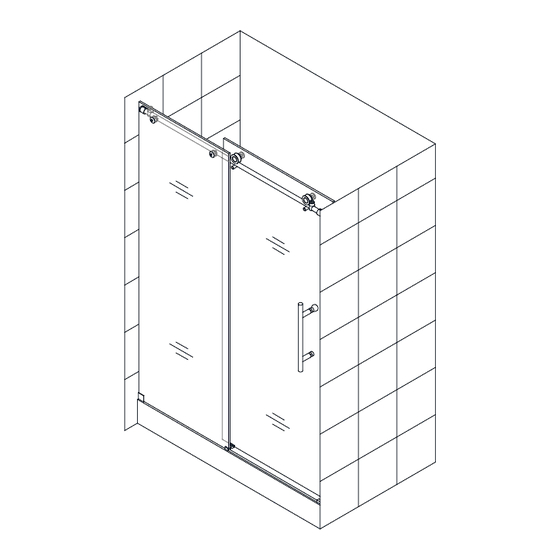
ENIGMA-X / SPARKLE
S
HOWER
IMPORTANT
DreamLine
reserves the right to alter, modify or redesign products at any time without prior notice.
®
For the latest up-to-date technical drawings, manuals, warranty information or additional details please refer
to your model's web page on DreamLine.com
SHDR-61606210-##
*The SPARKLE model name designates a model with the MirrorMax
patterned glass. The installation is identical to the Enigma-X.
Right Hand door installation shown
Please read these instructions carefully before installing. If you have any questions regarding installation, please
contact our technical support specialists Monday through Friday 8:00 AM – 7:00 PM EST at Phone:
1-866-731-2244, Fax: 1-866-857-3638 or e-mail our technical support group at Support@DreamLine.com
For more information about DreamLine
ENIGMA-X / SPARKLE manual Ver 6 Rev 4 07/2016
D
I
OOR
NSTALLATION
SHDR-61487610-##
SHDR-61607610-##
Shower Doors & Tub Doors please visit DreamLine.com
®
*
I
NSTRUCTIONS
SHDR-61727610-##
##=finish
07- Brushed Stainless Steel
08- Polished Stainless Steel
Advertisement

Related Manuals for Dreamline SPARKLE


Summary of Contents for Dreamline SPARKLE
- Page 1 DreamLine.com SHDR-61606210-## SHDR-61487610-## SHDR-61727610-## SHDR-61607610-## *The SPARKLE model name designates a model with the MirrorMax ##=finish patterned glass. The installation is identical to the Enigma-X. 07- Brushed Stainless Steel Right Hand door installation shown 08- Polished Stainless Steel Please read these instructions carefully before installing.
- Page 2 MANUAL FOR DETAILS REGARDING PROPER INSTALLATION. Roller Wheel Safety Set Screws must THE LATEST VERSION OF THE INSTALLATION be re-tightened after installation MANUAL IS AVAILABLE TO VIEW OR PRINT ON DREAMLINE.COM ENIGMA-X / SPARKLE manual Ver 6 Rev 4 07/2016...
- Page 3 ® 2. Please note that you should consult your local building codes with questions on installation compliance standards. Building and plumbing codes may vary by location, and DreamLine is not ® responsible for code compliance standards for your project and will not accept any returns.
- Page 4 If any parts are damaged or missing, please contact DreamLine for replacement. The shipping boxes may contain extra parts not used in ® your model configuration. NOTE: Retain these installation instructions for future reference. ENIGMA-X / SPARKLE manual Ver 6 Rev 4 07/2016...
- Page 5 Large Truss Head Screw ST6 x 55 These instructions will show the installation of the shower door. ** not used with the 72” configuration Please follow the same steps for the installation of the tub door. ENIGMA-X / SPARKLE manual Ver 6 Rev 4 07/2016...
- Page 6 Allen Wrench 3, 4, 5mm 1 each Small Stationary Glass Anti-Water Strip Upper guide rail for 72” ST4.2x55 Truss Head Screw ST4.2 x 40mm countersunk screw Wall Bracket 21 Small Stationary glass bracket ENIGMA-X / SPARKLE manual Ver 6 Rev 4 07/2016...
-
Page 7: Installation Steps
Small Stationary Glass (#23) Small Stationary Glass (#23) *Note that this is only an example and the actual door end cut-off length will vary based on the actual finished opening dimension. Fig 2 ENIGMA-X / SPARKLE manual Ver 6 Rev 4 07/2016... - Page 8 See the detail of the disks below as viewed from inside prior to installing on the glass. Door end of guide rail High spot of disk bushing Fig 4 ENIGMA-X / SPARKLE manual Ver 6 Rev 4 07/2016...
- Page 9 Bracket (#19) onto the larger notch at the bottom corner of the Small Stationary glass (#23). Use the provided gaskets to protect the glass. See Fig 6 for details outside outside Fig 6 ENIGMA-X / SPARKLE manual Ver 6 Rev 4 07/2016...
- Page 10 If a horizontal adjustment is required, adjust it by loosening, rotating and re-tightening the disks on the Glass brackets (#07). See Fig 7 for details rotate disk(s) to level rail Fig 7 ENIGMA-X / SPARKLE manual Ver 6 Rev 4 07/2016...
- Page 11 Small Stationary Glass (#23), re-attach the outer disk and secure the Small Stationary glass bracket (#21) to the Upper guide rail for 72”(#24). Fig 8a See Fig 8a & 8b for details Fig 8b ENIGMA-X / SPARKLE manual Ver 6 Rev 4 07/2016...
- Page 12 (#22) with the edge of the Small stationary Glass (#23) (Fig 10b) and mark its position and the hole for drilling. See Fig 10a & 10b for details Fig 10a Fig 10b ENIGMA-X / SPARKLE manual Ver 6 Rev 4 07/2016...
- Page 13 Ø3/8” (10mm) drill bit and insert the Wall anchors (#9a). (FIG 12.3...12.6)**. If mounting into a stud (recommended), drill a Ø1/4” hole and do not use the wall anchors (see note above). See Fig 12 for details Fig 12 ENIGMA-X / SPARKLE manual Ver 6 Rev 4 07/2016...
- Page 14 & guide block Fig 14a face plate M5 X 10 Guide Block must be installed square to the plane of the glass Part#12 - Guide Block (with caps) ENIGMA-X / SPARKLE manual Ver 6 Rev 4 07/2016...
- Page 15 Do Not attempt to lift the door glass with the handle as this may result in damage to the glass and/or serious personal injury. Use a professional grade glass suction cup and an assistant. protective padding ENIGMA-X / SPARKLE manual Ver 6 Rev 4 07/2016...
- Page 16 Guide Rail (#03) bottom set screw to for level. lower the rail. Loosen the bottom set screw and tighten the top set screw to raise the rail. ENIGMA-X / SPARKLE manual Ver 6 Rev 4 07/2016...
- Page 17 Attach the face plate to the Wall Bracket (#19). See Fig 17 for details Anti-water strip (#14) at the top Note: Use a razor knife to trim the Fig 17 to avoid interfering with the Roller guards (#20). outside ENIGMA-X / SPARKLE manual Ver 6 Rev 4 07/2016...
- Page 18 Cut the Anti-splash threshold (#15) to the size See Fig 19a for details of: L” + 3/4”. See Fig 19b for details for 48”or 60“ for 72” model model X + 3/8” Fig 19a Fig 19b ENIGMA-X / SPARKLE manual Ver 6 Rev 4 07/2016...
- Page 19 Fig 20 it in position tight to the threshold until the silicone fully cures. for 72” model See Fig 21 for details Fig 21 ENIGMA-X / SPARKLE manual Ver 6 Rev 4 07/2016...
- Page 20 1/16” gap between the roller guards and the guide rail (Fig 23). front view See Fig 22 & 23 for details Upper Guide Rail Roller Guard Roller Guard 1/16” Fig 23 ENIGMA-X / SPARKLE manual Ver 6 Rev 4 07/2016...
- Page 21 (Right hand door installation shown as example) Fig 25 Anti-water strip (#14) at the top Note: Use a razor knife to trim the to avoid interfering with the Roller guards (#20). ENIGMA-X / SPARKLE manual Ver 6 Rev 4 07/2016...
- Page 22 (ENIGMA-X Right hand door 72” model with Right hand Fig 26b installation shown as example) door installation ENIGMA-X / SPARKLE manual Ver 6 Rev 4 07/2016...
- Page 23 Anti-Splash Threshold (#15). Please allow 24 hours for the silicone to fully cure before using the shower. See Fig 27 for details Hours Fig 27 ENIGMA-X / SPARKLE manual Ver 6 Rev 4 07/2016...
- Page 24 ENIGMA-X / SPARKLE manual Ver 6 Rev 4 07/2016...
-
Page 25: Product Maintenance
Product Maintenance BASES and BACKWALLS: To ensure long lasting life for your acrylic back walls: wipe them off after each use with a soft cloth. To clean the acrylic back walls use non-abrasive sprays or cream based cleaners. Avoid the use of aerosol spray cleaners. Never use abrasive cleansers, metal brushes or scrapers that could scratch or dull the surface. - Page 26 TEL: 866-731-2244 FAX: 866-857-3638 DREAMLINE.COM For more information on DreamLine Shower Doors and Enclosure please visit DreamLine.com ®...
Need help?
Do you have a question about the SPARKLE and is the answer not in the manual?
Questions and answers