Table of Contents
Advertisement
Quick Links
Advertisement
Table of Contents

Related Manuals for ADLINK Technology cPCI-6910 Series


Summary of Contents for ADLINK Technology cPCI-6910 Series
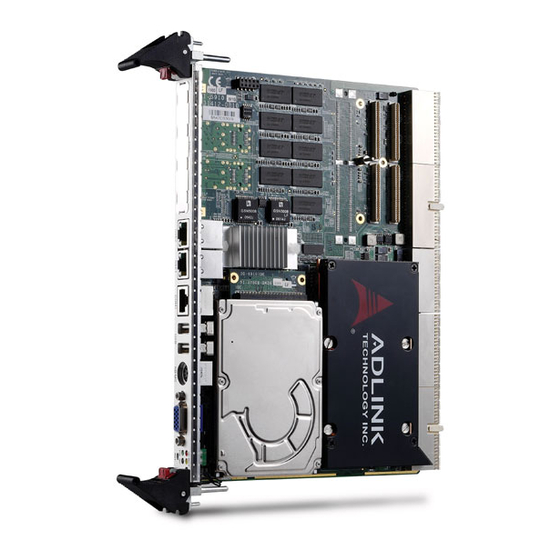
- Page 1 Artisan Technology Group is your source for q new and certified-used/pre-owned equipme • FAST SHIPPING AND SERVICE CENTER REPAIRS WE BUY USED EQUIPM DELIVERY Experienced engineers and technicians on staff Sell your excess, un at our full-service, in-house repair center We also offer credit •...
- Page 2 Series ® 6U CompactPCI Single Board Computer with ® ® Dual-Core Intel Xeon Processor LV/ULV User’s Manual Manual Revison: 2.05 Revision Date: June 6, 2008 Part No: 50-15056-1030 Advance Technologies; Automate the World.
- Page 3 Revision History Version Release Date Revision(s) 2.00 2006/12/29 First release. 2.01 2007/04/04 Added power consumption data. Updated J1 to J5 pin assignment. Added RJ-45 COM pin-out. Updated SW1 function description. Modified various installations in Chapter 5: Get- ting Started. Added CF adapter information (supports CF by adapter design on front board).
- Page 4 Version Release Date Revision(s) 2.04 2008/02/25 ® Revised CompactPCI J3 Pin Assignments Revised Oem Command Summary Table Revised BMR-AVR-cPCI Supported Command List Revised Onboard Device BIOS descriptions Revised USB 2.0 Controller descriptions Updated Block Diagram Revised CompactPCI J2 Pin Assignments Revised RJ-45 Connector Pin Assignments Revised OemShowRevision Table 2.05...
- Page 5 This page intentionally left blank.
-
Page 6: Preface
Series Preface Copyright 2008 ADLINK TECHNOLOGY INC. This document contains proprietary information protected by copy- right. All rights are reserved. No part of this manual may be repro- duced by any mechanical, electronic, or other means in any form without prior written permission of the manufacturer. -
Page 7: Using This Manual
Series Using this Manual Audience and Scope The cPCI-6910 Series User’s Manual is intended for hardware technicians and systems operators with knowledge of installing, configuring and operating industrial grade single board computers. Manual Organization This manual is organized as follows:... - Page 8 Series Chapter 8, BIOS Setup: Describes the setup utility program for specifying cPCI-6910 Series system configurations and settings. Chapter 9, IPMI Interface: Describes OEM extension IPMI commands' usages which are not listed in the associated IPMI specification documentation. Appendix, Serial Console: Provides a detailed explanation of how to setup and use a serial console for remote access to POST messages and system commands.
-
Page 9: Conventions
Series Conventions Take note of the following conventions used throughout this manual to make sure that users perform certain tasks and instructions properly.. Additional information, aids, and tips that help users per- form tasks. NOTE: NOTE: Information to prevent minor physical injury, component damage, data loss, and/or program corruption when try- ing to complete a task. -
Page 10: Getting Service
Sales & Service: info@adlinktech.com Toll-Free: +1-866-423-5465 Fax No.: +1-949-727-2099 Mailing Address: 8900 Research Drive, Irvine, CA 92618, USA ADLINK TECHNOLOGY CO. LTD. (BEIJING) Sales & Service: market@adlinkchina.com.cn Telephone No.: +86-10-5885-8666 Fax No.: +86-10-5885-8625 Mailing Address: Rm. 801, Power Creative E, No. - Page 11 Sales & Service japan@adlinktech.com Telephone No. +81-3-4455-3722 Fax No. +81-3-5333-6040 Mailing Address Asahiseimei Hatagaya Bld. 1-1-2 Hatagaya Shibuya-ku, Tokyo, Japan ADLINK TECHNOLOGY INC. (SOUTH KOREA) Sales & Service: korea@adlinkchina.com.cn Telephone No.: +82-2-2057-0565 Fax No.: +82-2-2057-0563 Mailing Address: 4F, Kostech Building, 262-2,...
-
Page 12: Related Documentation
Series Related Documentation The following list of documents may be used as reference materi- als to support the installation, configuraiton and/or operation of the ADLINK cPCI-6910 Series. Publication Number Document Title Source and Date ® Intelligent Platform Document Revision 1.1 Intel Corp. - Page 13 Series This page intentionally left blank. Preface...
-
Page 14: Table Of Contents
Series Table of Contents Preface ..................v Using this Manual ............vi Conventions ..............viii Getting Service ...............ix Related Documentation ..........xi Table of Contents..............xiii List of Figures ..............xix List of Tables................ xxi 1 Introduction ................ 1 Features................3 Block Diagrams.............. - Page 15 Series Idle mode under Linux® ..........17 Full-load CPU mode under Windows® XP ....17 Idle mode under Windows® XP ........17 3 Functional Description ............. 19 Processor................19 Chipset................19 Memory ................19 PCI Express® (High-speed Serial I/O) ......21 Hub Interface 1.5 ...............
- Page 16 Series Rear Transition Modules............ 31 cPCI-R6910 Board and Daughterboard Layouts ..31 DB-R6910SAS .............. 32 DB-R6910SAT .............. 32 cPCI-R6911 Board Layout ..........33 Connector Pin Assignments ..........34 USB Connectors ............34 Ethernet (RJ-45) Connector .......... 34 VGA Connector ............. 35 PS2 Connector .............
- Page 17 Series On the cPCI-6910 ............55 On the cPCI-R6910 rear transition module ....58 Installing the CompactFlash® Card Slot ......61 Installing the cPCI-6910 to the Chassis ......63 Installing the cPCI-R6910 to the Chassis ......63 6 Driver Installation.............. 65 Installing the VGA driver ............
- Page 18 Series BMR-AVR-cPCI Command Summary ....... 97 OEM Commands Summary Table........99 OemShowRevision ............99 OemRescanGaInput ........... 100 OemTestFunction ............100 OemReportGeoAddress ..........100 OemEnableSmbus ............100 OemDisableSmbus ............. 101 OemDispDebugVariable ..........101 OemResetHost ............101 OemPowerOff ............. 102 OemPowerOn ............. 102 CompactPCI®...
- Page 19 Series This page intentionally left blank. xviii Table of Contents...
-
Page 20: List Of Figures
Series List of Figures Figure 1-1: cPCI-6910 with cPCI-R6910 Block Diagram ....4 Figure 1-2: cPCI-R6911 Block Diagram..........5 Figure 7-1: WDT Block Diagram ............69 Figure 8-1: Control keys & Information Bar in Main Menu ....76 Figure 8-2: Control keys in Sub-menu ..........76 Figure 10-1: Null Modem Connection .......... - Page 21 Series This page intentionally left blank. List of Figures...
-
Page 22: List Of Tables
Series List of Tables Table 9-1: Commands Supported by BMR-AVR-cPCI ....97 Table 9-2: OEM Commands Summary Table......... 99 Table 9-3: CompactPCI Address Map .......... 103 List of Tables... - Page 23 Series This page intentionally left blank. xxii List of Tables...
-
Page 24: Introduction
These processors are developed with an intelligent power management that significantly reduces power consumption for maximum energy efficiency. The cPCI-6910 Series supports up to 2 GB of system memory using DDR2 400 MHz registered SDRAM with ECC. Promoting ®... - Page 25 Series non-transparent PCI interface. cPCI-6910 can be used as a sys- tem slot or peripheral slot and may also be a server blade for stand-alone operation on any non-system slot with no PCI bus. The cPCI-6910, when deployed on peripheral or non-PCI bus slot, supports hot-swap functionality for superior performance and shorter MTTR.
-
Page 26: Features
Series 1.1 Features ® ® Supports one Dual-Core Intel Xeon Processor LV/ULV with up to 2.0 GHz core speeds, 2 MB L2 cache Up to 667 MHz Front Side Bus ® ® Server-grade Intel E7520 and Intel 6300ESB chipset... -
Page 27: Block Diagrams
Series 1.2 Block Diagrams cPCI-6910 with cPCI-R6910 Block Diagram Figure 1-1: cPCI-6910 with cPCI-R6910 Block Diagram Introduction... -
Page 28: Cpci-R6911 Block Diagram
Series cPCI-R6911 Block Diagram GigaLAN x2 (PICMG 2.16) SATA Secondary IDE IDE 40-pin Rear Master CF Socket Panel x4 PCI-E PCI-X 133 MHz SCSI ® PEX8114 53C1020 (68-pin) USB 2.0 x2 COM2 Figure 1-2: cPCI-R6911 Block Diagram Introduction... -
Page 29: Product List
Series 1.3 Product List The cPCI-6910 Series SBS and supported rear transition modules come in the following configurations. cPCI-6910 Configurations cPCI-6910/DCX20/M1G ® ® Dual-Core Intel Xeon Processor LV 2.0 GHz with 1 GB sol- dered memory. Ports: COM1, PS/2, VGA, 2 x USB, 2 x GbE, PMC. -
Page 30: Rear Transition Modules
Series Rear Transition Modules cPCI-R6910 2 x GbE, 2 x USB, COM2, CF card slot, and SAS/SATA connector cPCI-R6911 2 x GbE, 2 x USB, COM2, SATA, IDE, CF card slot, and SCSI connector Introduction... -
Page 31: Package Contents
Series 1.4 Package Contents Before unpacking, check the shipping carton for any damage. If the shipping carton and/or contents are damaged, inform your dealer immediately. Retain the shipping carton and packing mate- rials for inspection. Obtain authorization from your dealer before returning any product to ADLINK. - Page 32 Series NOTES: CPU, memory, and HDD specifications may vary de- pending on the selected SBC configuration. The HDD accessory pack is not available when the 2.5" HDD is pre-installed. The heatsink kit is not included when the CPU is pre-installed.
- Page 33 Series This page intentionally left blank. Introduction...
-
Page 34: Specifications
Series Specifications This section tells you the specifications of the SBC and supported rear transition modules. 2.1 cPCI-6910 SBC Specifications ® ® • PICMG 2.0 CompactPCI Rev. 3.0 ® CompactPCI ® ® • PICMG 2.1 CompactPCI hot-swap Standards specification Rev. 2.0 ®... - Page 35 Series • Dual-channel IDE • 44-pin primary IDE connector for onboard HDD and secondary connector on rear via J4 connector • Bus Master IDE controller supports two UltraATA 100/66/33 devices • Award-Phoenix with 4 MB Flash ROM BIOS • BIOS write protection feature •...
- Page 36 Series Environment • Operating temperature ® ® Intel Xeon LV CPU: -10 °C to 50 °C ® ® Intel Xeon ULV CPU: -10 °C to 70 °C • Storage temperature: -40 °C to 85 °C • Humidity: 5% to 95% non-condensing •...
-
Page 37: Cpci-R6910/Cpci-R6911 Rtm Specifications
Series 2.2 cPCI-R6910/cPCI-R6911 RTM Specifications Form Factor ® • Standard 6U CompactPCI rear I/O • Board size: 233.35 mm x 80 mm • One slot width (4HP, 20.32 mm) ® • CompactPCI connectors: with rJ3, rJ4 and rJ5 connectors Faceplate I/O •... -
Page 38: I/O Connectivity Table
Series 2.3 I/O Connectivity Table cPCI-6910 cPCI-R6910 RTM cPCI-R6911 RTM Faceplate Onboard Faceplate Onboard Faceplate Onboard Serial Port Y(J5) Y(J5) Y(J5) x2 Y(J5) x2 Gigabit Ethernet Y(J3) x2 Y(J3) x2 SCSI Y(J3) Y(J3) PS2 Keyboard/Mouse Y(J4, 40- Y (44-pin)* pin) ®... -
Page 39: Power Consumption
Series 2.4 Power Consumption This section provides information on the power consumption ® ® of cPCI-6910 when using Dual-Core Intel Xeon ULV Proces- ® ® sor at 1.66 GHz and a Dual-Core Intel Xeon LV Processor at 2.0 GHz. The cPCI-6910 was tested under the following environment: ®... -
Page 40: Idle Mode Under Linux
Series ® Idle mode under Linux Voltage ULV 1.66 GHz LV 2.0 GHz LV 1.66 GHz Current Power Current Power Current Power (watts) (watts) (watts) 19.5 22.0 Total 24.8 27.6 26.3 ® Full-load CPU mode under Windows Voltage ULV 1.66 GHz LV 2.0 GHz... - Page 41 Series This page intentionally left blank. Specifications...
-
Page 42: Functional Description
Series Functional Description The following sections describe the cPCI-6910 features and func- tions. 3.1 Processor ® ® The cPCI-6910 supports a Dual-Core Intel Xeon processor LV/ ULV (2.0 GHz/1.66 GHz) with 2 MB L2 cache in a micro-FCPGA ®... - Page 43 Series Direct connection of two memory channel interfaces with DDR2 400 DIMMs Full operational support in single-channel mode on either channel interface. Lock-step support only for dual-channel operation (logically shared address, independent data) Stacked or unstacked DIMM support for registered DDR2-...
-
Page 44: Pci Express (High-Speed Serial I/O)
Series ® 3.4 PCI Express (High-speed Serial I/O) Three x8 port configuration interfaces, with each interface supporting connection to PCI, Ethernet, iSCSI devices (6700PXH, 82571EB Gigabit Ethernet Controller, or I/O pro- ® cessor), or other PCI Express peripherals Each x8 interface is capable of logically dividing into sepa-... -
Page 45: Intel 6300Esb I/O Controller Hub (Ich)
Series ® 3.6 Intel 6300ESB I/O Controller Hub (ICH) The cPCI-6910 features a highly-integrated, multi-functional I/O Controller Hub (ICH) that supports the interface to the PCI bus, and various I/O functions for current and legacy devices. The chipset communicates via a dedicated hub interface (HI-1.5). The ®... -
Page 46: Ultra Ata100/66/33 Ide
Series 3.7 Ultra ATA100/66/33 IDE The cPCI-6910 supports dual-channel Ultra ATA100 IDE. The pri- mary IDE channel comes onboard the cPCI-6910, while the sec- ondary IDE is routed to the rear transition module (cPCI-R6910) via the J4 connectors. 2.5” hard disk drive slots may be used for ®... -
Page 47: Uart
Series 3.11 UART The serial port has a UART that supports all functions of a stan- dard 16550 UART including hardware flow control interface. The UART performs serial-to-parallel conversion of data characters received from a peripheral device or a modem and parallel-to- serial conversion of data characters received from the processor. -
Page 48: Ati Es1000 Vga Chip
Series 3.15 ATI ES1000 VGA chip Maximum 2D performance with the fastest available 2D graphics for multimedia applications in true 24-bit color ® Comprehensive support for Windows Server OS, including GDI extension acceleration like Alpha BLTs and Gradient Fills, as well as exclusive alpha cursor support 3.16 Hardware Monitor... -
Page 49: Pci-X To Pci-X Bridge
Series 3.18 PCI-X to PCI-X Bridge ™ The PLX FastLane PCI-6540 is a dual-mode universal PCI-X-to- PCI-X bridge and implements the system/peripheral slot on the cPCI-6910. The dual-mode device is capable of operating in trans- parent, non-transparent, or universal mode. When in non-trans-... -
Page 50: Jumpers And Connectors
Series Jumpers and Connectors This chapter illustrates the board layout, connector pin assign- ments, and jumper settings to familiarize the users on the cPCI- 6910. Jumpers and Connectors... -
Page 51: Cpci-6910 Board Layout
Series 4.1 cPCI-6910 Board Layout CPU Socket Buzzer ® Intel E7520 Soldered memory chips PLX PCI-6540 PMC socket ® Intel 6300ESB cPCI-J1 ATI ES1000 cPCI-J2 ® Intel 82571EB cPCI-J3 SIO (IT8217F) cPCI-J4 BIOS cPCI-J5 RTC Battery Board-to-board connector Jumpers and Connectors... -
Page 52: Cpci-6910 Front Panel
Series 4.2 cPCI-6910 Front Panel PMC slot Gigabit Ethernet Port 1/2 COM1 port USB 2.0 ports KB/MS port VGA port System LEDs and reset button System LED indication Color Condition Indication No HDD HDD is installed Blinking Data read/write in process... -
Page 53: Cpci-6910 Daughterboard Layout
Series 4.3 cPCI-6910 Daughterboard Layout DB-6910IDE 44-pin IDE connector Board to board connector Front view Rear View DB-6910SAT SATA connector Board to board connector Front view Rear View DB-6910CF CompactFlash socket Board to board connector Front view Rear View... -
Page 54: Rear Transition Modules
Series 4.4 Rear Transition Modules cPCI-R6910 Board and Daughterboard Layouts COM port USB ports GbE4 port GbE3 port Board to board connector cPCI rJ3 connector SAS nVRAM cPCI rJ4 connector LSI1064E controller cPCI rJ5 connector ® SAS Flash ROM... -
Page 55: Db-R6910Sas
Series DB-R6910SAS Board to board connector SAS connector Rear view DB-R6910SAT SATA connector Board to board connector Front view Rear View Jumpers and Connectors... -
Page 56: Cpci-R6911 Board Layout
Series cPCI-R6911 Board Layout SCSI port COM port GbE4 port GbE3 port USB ports CF card slot LSI1020 controller cPCI rJ3 connector 68-pin SCSI connector cPCI rJ4 connector ® cPCI rJ5 connector CompactFlash socket 40-pin IDE connector Jumpers and Connectors... -
Page 57: Connector Pin Assignments
Series 4.5 Connector Pin Assignments USB Connectors Pin # Signal Name USB- USB+ Ethernet (RJ-45) Connector Pin # Signal Name Function GBE0_MDI0+ Media Dependent Interface 0+ GBE0_MDI0- Media Dependent Interface 0- GBE0_MDI1+ Media Dependent Interface 1+ GBE0_MDI2+ Media Dependent Interface 2+... -
Page 58: Vga Connector
Series VGA Connector Signal Name Pin # Pin # Signal Name Green Blue N.C. +5V. N.C. CRTDATA HSYNC VSYNC CRTCLK PS2 Connector Pin # Signal Function KBDATA Keyboard Data MSDATA Mouse Data Ground Power KBCLK Keyboard Clock MSCLK Mouse Clock... -
Page 59: Serial Port (Com1)
Series Serial Port (COM1) Pin # Signal Name Function DCD# Data Carrier Detect RTS# Request to Send DSR# Data Set Ready Transmit Data Receive Data Ground CTS# Clear to Send DTR# Data Terminal Ready COM Port Signal Definitions CTS: Indicates that the data set is ready to exchange data. -
Page 60: Compactflash® Connector
Series ® CompactFlash Connector Signal Name Pin # Pin # Signal Name DD11 DD12 DD13 DD14 DD15 CS1# CS3# DIOR# DIOW# IRQ15 PCSEL PCIRST4# DIORDY DREQ DACK# DACT# 66DECT DD10 Jumpers and Connectors... -
Page 61: Hard Disk Drive Board To Board Connector
Series 4.6 Hard Disk Drive Board to Board Connector On CPU Blade - SATA/IDE Connector Signal Name Pin # Pin # Signal Name PIDE_DIOR-L PIDE_66DECT PCIRST4# PIDE_IORDY PIDE_D8 PIDE_D7 PIDE_DACK-L PIDE_D9 PIDE_D6 IDE_IRQ14 PIDE_D10 PIDE_D5 PIDE_DA1 PIDE_D11 PIDE_D4 PIDE_DA0... -
Page 62: On Rear I/O - Sata/Sas Connector
Series On Rear I/O - SATA/SAS Connector Signal Name Pin # Pin # Signal Name SAS0_RX-N SAS0_TX-N SAS0_RX-P SAS0_TX-P +12V +12V SAS1_RX-N SAS1_TX-N +12V SAS1_RX-P SAS1_TX-P +12V SAS2_RX-N SAS2_TX-N SATA_LED# SAS2_RX-P SAS2_TX-P SATA1_RX-N SAS3_RX-N SATA1_TX-N SAS3_TX-N SATA1_RX-P SAS3_RX-P SATA1_TX-P... -
Page 63: Compactpci® J1 Pin Assignment
Series ® CompactPCI J1 Pin Assignment -12V TRST# +12V INTA# INTB# INTC# INTD# +5V_IPMB HEALTHY# RST# GNT0# REQ# PRESENT 3.3V BP_CLK0 AD[31] AD[30] AD[29] AD[28] AD[27] AD[26] AD25 AD[24] CBE[3]# IDSEL AD[23] AD[22] AD[21] +3.3V AD[20] AD[19] AD[18] AD[17]... -
Page 64: Compactpci® J2 Pin Assignment
Series ® CompactPCI J2 Pin Assignment CLK1 REQ1# GNT1# REQ2# CLK2 CLK3 SYSTEM# GNT2# REQ3# CLK4 GNT3# REQ4# GNT4# C/BE[7]# C/BE[6]# C/BE[5]# 64EN# C/BE[4]# PAR64 AD[63] AD[62] AD[61] AD[60] AD[59] AD[58] AD[57] AD[56] AD[55] AD[54] AD[53] AD[52] AD[51] AD[50]... -
Page 65: Compactpci® J3 Pin Assignment
Series ® CompactPCI J3 Pin Assignment +3.3V +3.3V +3.3V +3.3V +3.3V +3.3V +3.3V +3.3V +3.3V +3.3V +12V +12V +12V +12V +12V -12V -12V SATA_LED# SATA1_TX-N SATA_RX-N SATA1_TX-P SATA1_RX-P IPM_CLK IPM_DAT LANBB_LINK# LANBB_100# LANBB_ACT# LANBA_1G# LANBA_100# LANBA_ACT# LANBA_LINK# LANBB_1G# P1V8_LANB... -
Page 66: Compactpci® J4 Pin Assignment
Series ® CompactPCI J4 Pin Assignment PMC_IO9 PMC_IO7 PMC_IO5 PMC_IO3 PMC_IO1 PMC_IO10 PMC_IO8 PMC_IO6 PMC_IO4 PMC_IO2 PMC_IO19 PMC_IO17 PMC_IO15 PMC_IO13 PMC_IO11 PMC_IO20 PMC_IO18 PMC_IO16 PMC_IO14 PMC_IO12 PMC_IO29 PMC_IO27 PMC_IO25 PMC_IO23 PMC_IO21 PMC_IO30 PMC_IO28 PMC_IO26 PMC_IO24 PMC_IO22 PMC_IO39 PMC_IO37 PMC_IO35... -
Page 67: Compactpci® J5 Pin Assignment
Series ® CompactPCI J5 Pin Assignment COM2_DCD# COM2_RI# COM2_CTS# COM2_DTR# COM2_RTS# COM2_DSR# COM2_TXD COM2_RXD RTM_IN# PCIRST4# USB2-N USB2-P USB3-N USB3-P USB_OC3# USB_OC2# CLK100_SAS-P CLK100_SAS-N PCIEC_TP0 PCIEC_RP0 PCIEC_TN0 PCIEC_RN0 PCIEC_TP1 PCIEC_RP1 PCIEC_TN1 PCIEC_RN1 PCIEC_TP2 PCIEC_RP2 PCIEC_TN2 PCIEC_RN2 PCIEC_TP3 PCIEC_RP3 PCIEC_TN3... -
Page 68: Switches
Series 4.7 Switches Clear CMOS Switch (SWZ1) To reset the CMOS values to default, the cPCI-6910 comes with a clear CMOS switch. Press the switch to clear the CMOS SWZ1 COM and IPMI Switch (SWZ2) This switch allows you to set the serial port to COM or IPMI mode. -
Page 69: Pcb Switch (Sw1)
Series PCB Switch (SW1) The SW1 switch is OFF by default. Refer to the tables below for switch settings: SW1 settings for PCB version B2 and previous versions. Switch Status Description Reserved for debugging purposes Reserved for debugging purposes Precharge disabled. -
Page 70: Miniature Switch On The Lower Ejector (Front Panel)
Series SW1 settings for PCB version B3 and future versions. Switch Status Description Disables CMM control Reserved for debugging purposes Precharge disabled. The board boots up in peripheral slot even without a system board. SYSTEM# ENABLE. The board behaves as the system board in a peripheral slot. -
Page 71: Cpci-R6911 Rtm Switches (Swy1, 2, 3 & 4)
Series cPCI-R6911 RTM Switches (SWY1, 2, 3 & 4) SWY 5 Settings Switch Status Description Reserved Reserved CF Slave (default) CF Master Jumpers and Connectors... - Page 72 Series SWY2, SWY1, SWY4, and SWY3 Settings All SWY switches are set to ON by default The cPCI-R6911 supports GbE3 and GbE4 on both the 2.16 back- ® plane and rear I/O. The PICMG 2.16 backplane and rear I/O can- not be accessed simultaneously.
- Page 73 Series cPCI-R6910 RTM Switches (SWZ1, 2, 3 & 4) SWZ1, SWZ2, SWZ4, and SWZ3 Settings All SWZ switches are set to ON by default The cPCI-R6910 supports GbE3 and GbE4 on both the 2.16 back- ® plane and rear I/O. The PICMG 2.16 backplane and rear I/O can-...
-
Page 74: Getting Started
Series Getting Started This chapter describes the installation of the following components to the cPCI-6910 and cPCI-R6910 rear transition module: Heat sink 2.5" hard disk drive (IDE/Serial ATA/SAS) CompactFlash card 5.1 Tools Keep the following tools on hand when installing components to... -
Page 75: Installing The Cpu
Series 5.2 Installing the CPU ® ® The cPCI-6910 supports one Dual-Core Intel Xeon processor LV/ULV. A proprietary heatsink is included in the package for ther- mal management. Follow these procedures to install the CPU and heatsink. NOTE Skip this section if the CPU and heatsink comes pre-in- stalled on the cPCI-6910. - Page 76 Series 4. Gently press the CPU until it is properly seated on the socket, then turn the CPU lock screw clockwise to lock the socket. Getting Started...
-
Page 77: Installing The Heatsink
Series 5.3 Installing the Heatsink 1. Peel the plastic film that covers the thermal strip for the CPU and Northbridge chip. 2. Position the heatsink on top of the CPU and the North- bridge chip until the heatsink screw holes align with the board standoffs. -
Page 78: Installing The Hard Disk Drive
Series 5.4 Installing the Hard Disk Drive On the cPCI-6910 The cPCI-6910 supports a 2.5" IDE or Serial ATA HDD. All acces- sories are packed in the HDD accessory pack (DB-6910IDE/DB- 6910SAT HDD kit). NOTE If the cPCI-6910 comes with a pre-installed HDD, pro- ceed to the next section. - Page 79 Series 3. Position the HDD assembly on top of the cPCI-6910. Make sure you align the HDD standoffs with the board screw holes and the adapter board with the board-to- board connector. NOTE When removing the HDD, always lift it with the adapter board in a vertical motion (up/down) to avoid damaging the board and other components.
- Page 80 Series 5. Secure the HDD with four screws from the board’s sol- der side. Getting Started...
-
Page 81: On The Cpci-R6910 Rear Transition Module
Series On the cPCI-R6910 rear transition module The cPCI-6910 supports a 2.5" Serial ATA or Serial Attached SCSI (SAS) HDD. All accessories are packed in the HDD acces- sory pack (DB-R6910SAT/DB-R6910SAS HDD kit). To install a SATA/SAS hard disk drive to the RTM: 1. - Page 82 Series 3. Attach the DB-R6910SAT/DB-R6910SAS adapter board to the HDD connectors. SATA 4. Position the HDD assembly on top of the RTM. Make sure that the bottom HDD and the board screw holes align and the adapter board matches with the board-to- board connector.
- Page 83 Series 5. Press the DB-R6910SAT/DB-R6910SAS adapter to the board-to-board connector until it is properly seated. Secure the adapter with two screws. 6. Secure the HDD with four screws on the solder side of the board. Getting Started...
-
Page 84: Installing The Compactflash® Card Slot
Series ® 5.5 Installing the CompactFlash Card Slot Depending on your selected configuration, the cPCI-6910 comes with an optional DB-6910CF accessory kit that allows installation of an internal CF card slot instead of a hard disk drive. Compact- ®... - Page 85 Series 3. Press the DB-6910CF adapter to the board-to-board connector until it is properly seated. Secure the adapter with two screws. 4. Install the CF card guard, then secure the DB-6910CF adapter to the board-to-board connector using two screws.
-
Page 86: Installing The Cpci-6910 To The Chassis
Series 5.6 Installing the cPCI-6910 to the Chassis The cPCI-6910 may be installed in a system or peripheral slot of a 6U cPCI chassis. These instructions are for reference only. Refer to the documentation that came with the chassis for more informa- tion. - Page 87 Series This page intentionally left blank. Getting Started...
-
Page 88: Driver Installation
Series Driver Installation The cPCI-6910 drivers are available from the ADLINK All-In-One CD or from the ADLINK website (http://www.adlinktech.com). The following describes the driver installation procedures for Win- ® ® dows 2000, Windows ® 1. Install the Windows operating system before installing any driver. -
Page 89: Installing The Vga Driver
Series 6.1 Installing the VGA driver ® Windows 2000 1. Click Start, right-click on My Computer, then select Properties from the drop-down menu. 2. Click on the Hardware tab, then click Device Manager. 3. Right-click on the Video Controller (VGA Compatible) item, then click Properties from the drop-down menu. -
Page 90: Windows® Xp Professional
Series ® Windows XP Professional 1. Follow steps 1 to 4 of the previous section. 2. When the Hardware Update Wizard window appears, select the Yes, this time only option, then click Next. 3. Select the Install from a list or specific location (Advanced) option, then click Next. - Page 91 Series This page intentionally left blank. Driver Installation...
-
Page 92: Watchdog Timer
Series Watchdog Timer This section explains the operation of the cPCI-6910’s watchdog timer (WDT). It provides an overview of watchdog operation and features, as well as a sample code to help you learn how the watchdog timer works. 7.1 WDT Overview The primary function of the watchdog timer is to monitor the cPCI- 6910’s operation and to generate IRQ or reset the system if the... -
Page 93: Configuration Registers
Series The cPCI-6910’s custom watchdog timer circuit is integrated in the ® Intel 6300ESB Southbridge. ® The Intel 6300ESB ICH includes a two-stage Watchdog Timer (WDT) that provides a resolution ranging from one microsecond to ten minutes. The timer uses a 35-bit Down-Counter that is loaded with the value from the first Preload register. - Page 94 Series Follow these to write a value to preload value 1 and 2 register: 1. Write 80H to offset BAR + 0CH. 2. Write 86H to offset BAR + 0CH. 3. Write desired value to preload register. (BAR + 00H or...
-
Page 95: Gpio Control Registers
Series Offset 68H: WDT Lock Register Bit 2 chooses the functionality of the timer. (0 = Watchdog Timer mode, 1 = Free running mode) The free running mode ignores the first stage and uses only Preload Value 2. It is not necessary to reload the timer in free running mode as it is done automatically every time the down counter reaches zero. -
Page 96: Wdt Programming Procedure
Series WDT LED light Sets bit 25 of GPIOBASE + 04H to 0. Bit 25 of GPIOBASE + 0CH determines the state of WDT LED (0 = on, 1 = off). WDT LED blink Sets bit 25 of GPIOBASE + 04H to 0. Bit 25 of GPIOBASE + 18H enables the WDT LED to blink (0 = function normally, 1 = enable blinking). -
Page 97: Utilities
® 7.2 Intel Preboot Execution Environment (PXE) ® The cPCI-6910 series supports the Intel Preboot Execution Envi- ronment (PXE) that is capable of booting up or executing an OS installation through the Ethernet ports. To use PXE, there must be a DHCP server in the network with one or more servers running ®... -
Page 98: Bios Setup
Series BIOS Setup The Phoenix-Award BIOS provides a setup utility program for specifying the system configurations and settings. The BIOS ROM of the system stores the setup utility. When you turn on the com- puter, the BIOS is immediately activated. Pressing the <Del> or <Tab>... -
Page 99: Navigating Through The Bios Menus
Series 8.1 Navigating Through the BIOS Menus You can navigate the BIOS menus using the arrow keys to high- light the items, then by pressing <Enter> to select. Use the <PgUp> and <PgDn> keys to select from the options, <F1> for help, and <Esc>... -
Page 100: Standard Cmos Features
Series 8.2 Standard CMOS Features This menu sets the system date/time, shows basic hardware con- figurations present in your system, and error handling mode. Use this menu when you need to change the system hardware configu- rations, when the onboard battery fails, or when the configuration stored in the CMOS memory fails or gets corrupted. - Page 101 Series Video Selects the type of video display card installed in your system. You may choose from the following video display cards: EGA/VGA For EGA, VGA, SEGA, SVGA or PGA monitor adapters CGA 40 Power up in 40 columns mode...
- Page 102 Series 8.2.1 IDE Devices The IDE devices sub-menu allows you to auto-detect installed storage drives or to set the HDD parameters manually. IDE HDD Auto-Detection Highlight this item, then press <Enter> to allow the BIOS to auto- detect installed HDDs. When auto-detection is successful, the BIOS fills-in the other parameters such as cylinder, head, pre- comp, landing zone, and sector.
- Page 103 Series If your hard disk drive type is undetected, you can use normal access mode to manually define the drive type. The Capacity item is adjusted automatically according to the configuration. If you select normal access mode, related information are requested for the following parameters.
-
Page 104: Advanced Bios Features
Series 8.3 Advanced BIOS Features This menu enables you to configure advanced system configura- tions and enable/disable various system features. Hard Disk Boot Priority Allows you to select the HDD where you want to boot the system. Select this item, then press <Enter> to enter a sub-menu. The sub-menu allows you to select the HDD where you want the sys- tem to boot. - Page 105 Series First/Second/Third Boot Device Boot Other Device Sets the device where the system boots. The BIOS loads the operating system from the devices sequentially listed in these parameters. The First Boot Device default is Hard Disk, followed by CDROM and USB-CDROM. Options include:...
- Page 106 Series Security Option Limits the access to the system and/or the BIOS setup. Setup The system prompts you to enter the supervisor password every time you try to access the BIOS setup System The system prompts you to enter the user password...
- Page 107 Series NOTE The Baud rate setting of the cPCI-6910 and the monitor- ing computer must be the same. When there is difference in Baud rate, an “Award Preboot Agent Installation Failed” message appears when BIOS builds the connec- tion between the two computers.
-
Page 108: Advanced Chipset Features
Series 8.4 Advanced Chipset Features This setup menu controls the configuration of the chipset. System BIOS Cacheable When enabled, the BIOS ROM addresses at F0000H-FFFFFH is duplicated in the SRAM and works with the enabled cache control- ler. Options include:... - Page 109 Series cessor's die temperature within factory specifications under typical real-world operating conditions. Once automatic mode is activated, the TCC activates only when the internal die temperature is very near the temperature thresh- olds of the processor. When TCC is enabled, and the CPU is in high temperature, the clocks are modulated by maintaining a duty cycle within a range of 30% to 50%.
-
Page 110: Integrated Peripherals
Series 8.5 Integrated Peripherals This menu allows you to configure integrated system devices. Select an item, then press <Enter> to display the sub-menu. Onboard Lan Boot ROM Allows you to enable or disable PXE support. The PXE function allows system boot from a network environment. This option is enabled by default. - Page 111 Series 8.5.1 OnChip IDE Device This sub-menu lets you configure advanced IDE controller config- urations. IDE HDD Block Mode Allows the hard disk drive controller to use the fast block mode when transferring data. Options include: Enabled IDE controller uses block mode...
- Page 112 Series The system supports five modes, numbered 0 to 4, that differ in timing. Setting this item to Auto allows the BIOS to select the best available mode. Auto Auto select which mode that BIOS communi- cates with the controller and CPU...
- Page 113 Series 8.5.2 Onboard Devices This menu allows configuration of the USB controller. USB2.0 Controller Select Enabled if your system contains a Universal Serial Bus(USB) controller and you have USB peripherals. The default is Enabled. USB Keyboard Support Select Enabled to support USB Keyboard functionality under leg- acy OS such as MS-DOS.
- Page 114 Series 8.5.3 Super IO Function Setup The SuperIO menu lets you set the IRQ addresses of the serial ports. Onboard Serial Port 1 Onboard Serial Port 2 Sets the addressed of the onboard serial ports. The default values for these ports are:...
-
Page 115: Pnp/Pci Configuration
Series 8.6 PnP/PCI Configuration This menu allows to configure the PCI bus system. Reset Configuration Data Disabled by default. Enable this item to reset the Extended Sys- tem Configuration Data (ESCD). You need to reset the ESCD when you installed a new add-on card and the system reconfigura- tion has caused a serious conflict that the operating system does not boot. -
Page 116: Frequency/Voltage Control
Series IRQ Resources Sets the IRQ resource when the Resources Controlled by is set to Manual. Assign each system interrupt a type depending on the type of device using the interrupt. PCI/VGA Palette Snoop Some non-standard VGA display cards may not show colors prop- erly. -
Page 117: Load Fail-Safe Defaults
Series 8.8 Load Fail-Safe Defaults This option allows you to load the default values permanently stored in the BIOS ROM. These values are not optimized and dis- ables all high-performance features. To load the fail-safe default values, select Load Fail-Safe Defaults, press <Enter>, press <Y>, then press <Enter>. -
Page 118: Setting The Supervisor And User Passwords
Series 8.9 Setting the Supervisor and User Passwords You may set the supervisor and user passwords using these options. The Supervisor Password protects the system from unauthorized access. When set, the system prompts every user to enter the correct password every time the system boots up. The User Password prevents unauthorized access to the BIOS setup. -
Page 119: Saving And Exiting The Bios Setup
Series 8.10 Saving and Exiting the BIOS Setup Save & Exit Setup Select this option when you want to save the changes to the CMOS before exiting. When prompted, type <Y> to accept the changes and exit the setup. Type <N> to ignore the changes and return to the main menu. -
Page 120: Ipmi Interface
Series IPMI Interface 9.1 Audience This section is intended for users with a basic understanding of the the newest BMC implementation in the IPMI specification rev. 1.0 and describes some OEM extension IPMI commands' usages which are not listed in the IPMI specification. This section also has a short revision history of the firmware. - Page 121 Series IPMI IPM Controller Req Command NetFn (PICMG 3.0/PICMG 2.9) Spec Get Device SDR Info Mandatory/Optional 29.2 Get Device SDR Mandatory/Optional 29.3 Reserve Device SDR Repository Mandatory/Optional 29.4 Optional/Optional Set Sensor Hysteresis 29.6 Get Sensor Hysteresis Optional/Optional 29.7 Optional/Optional Set Sensor Threshold 29.8...
-
Page 122: Oem Commands Summary Table
Series 9.3 OEM Commands Summary Table Command NetFn Code Cmd Code OemShowRevision OEM (30h) OemRescanGaInput OEM (30h) OemTestFunction OEM (30h) OemReportGeoAddress OEM (30h) OemEnableSmbus OEM (30h) OemDisableSmbus OEM (30h) OemDispDebugVariable OEM (30h) OemResetHost OEM (30h) OemPowerOff OEM (30h) OemPowerOn... -
Page 123: Oemrescangainput
Series OemRescanGaInput Re-scans the geo-address input pins and reset the IPMB address according the input value. Action Byte Value Description NetFn/LUN for OEM Request OEM defined command Complete Code 00h means OK Response New IPMB address New IPMB address value OemTestFunction Internal test purposes only. -
Page 124: Oemdisablesmbus
Series Action Byte Value Description Response Complete Code 00h means OK OemDisableSmbus This command is used to shut down the I2C bus accessing. Action Byte Value Description NetFn/LUN for OEM Request OEM defined command Response Complete Code 00h means OK... -
Page 125: Oempoweroff
Series OemPowerOff This command is implement to control the system’s status if power off is required. Operators can control the system from remote. Action Byte Value Description NetFn/LUN for OEM Request OEM defined command Response Complete Code 00h means OK OemPowerOn This command is implement to control the system’s status if power... -
Page 126: Compactpci® Address Map
Series ® 9.4 CompactPCI Address Map Since you may insert more than one system in a single chassis, we allocate their IPMB addresses based on GA input as peripheral ® cards. The CompactPCI Peripheral Address Mapping Table is provided below. -
Page 127: Ipmi Sensors List
Series 9.5 IPMI Sensors List cPCI-6910 B2 and earlier versions Sensor Sensor Normal Number name Reading Watchdog 3.3 V 3.3 V CPU Temp. 40 °C System Temp. 25 °C cPCI-6910 B3 and future versions Sensor Sensor Normal Number name Reading 3.3 V... - Page 128 Series Revision Description Revision 1.3.7 Disabled sensor function at OS shutdown and Fixed BMC watchdog hardware reset command Added support for CMM power on/off/reset command for Intel CMM ZT7102 ® Fixed the IPMB address error for Intel Chassis MPCHC5091AC...
-
Page 129: Known Issues
Series 9.7 Known Issues Timestamp resets after the system is powered up No real time clock (RTC) is built in the BMC of the IPMI solution. This is the reason why the internal clock resets after the system is powered on. -
Page 130: Appendix: Using Serial Console
Series Appendix: Using Serial Console 10.1 Introduction Most industrial implementations use wired network or direct cable as an interface between the user and the computer. This product comes with a serial console redirection function that allows a remote computer to display the Power-On Self Test (POST) mes- sages from the system and to execute commands via the serial port. -
Page 131: Setting Up The Server Computer
Series Figure 10-1: Null Modem Connection Setting up the Server Computer The server computer used in the following guide is a CPU board with an Award Preboot Agent integrated in the BIOS. To support serial console, the BIOS parameters must be adjusted accord- ingly. - Page 132 Series To use HyperTerminal: NOTE The following illustrations use HyperTerminal under Win- ® dows 98 SE operating system. 1. Click Start > Accessories > Communications > HyperTerminal. 2. Double-click on the HyperTerminal icon. 3. When prompted to install a modem before running HyperTerminal, click No.
- Page 133 Series 4. When the Connection Description window appears, key-in a name for the serial connection, click on then click OK. 5. After building the connection node, select the serial port that will connect to the server computer from the Con- nect using: field, then click OK.
- Page 134 Series 6. When the serial port’s properties window appears, set the Bits per second (Baud rate) the same as with the server computer’s Baud rate, click on Apply, then click 7. The HyperTerminal main window appears. Click File >...
- Page 135 Series 8. From the connection Properties window, click the Set- tings tab, then check if the Telnet terminal mode is set to ANSI. When finished, click the ASCII Setup button. 9. To echo the data that the client computer sends, check all options in the ASCII Setup window, then click OK.
-
Page 136: Performing Operations In The Hyperterminal Console
Series puter. The POST messages of the server computer is displayed in the HyperTerminal console. 11. After the server computer enters the OS, execute com- mands through the HyperTerminal console. 10.3 Performing Operations in the HyperTerminal Console The <DEL>, <ESC>, <Page Up>, <Page Down>, <Up Arrow>, <Down Arrow>, <Left Arrow>, and <Right Arrow>... - Page 137 Series Function Key/Operation Key Sequence ESC [ 2 ~ ESC [ 3 ~ ESC [ 4 ~ ESC ESC PG UP ESC [ 5 ~ PG DOWN ESC [ 6 ~ UP ARROW ESC [ A DOWN ARROW ESC [ B...
-
Page 138: Important Safety Instructions
Series Important Safety Instructions For user safety, please read and follow all instructions, WARNINGS, CAUTIONS, and NOTES marked in this manual and on the associated equipment before handling/operating the equipment. Read these safety instructions carefully. Keep this user’s manual for future reference. - Page 139 Series Equipment must be serviced by authorized technicians when: The power cord or plug is damaged; Liquid has penetrated the equipment; It has been exposed to high humidity/moisture; It is not functioning or does not function according to the user’s manual;...
-
Page 140: Warranty Policy
Series Warranty Policy Thank you for choosing ADLINK. To understand your rights and enjoy all the after-sales services we offer, please read the following carefully. 1. Before using ADLINK’s products please read the user manual and follow the instructions exactly. When sending in... - Page 141 Series 3. Repair service is not covered by ADLINK's two-year guarantee in the following situations: Damage caused by not following instructions in the User's Manual. Damage caused by carelessness on the user's part during product transportation. Damage caused by fire, earthquakes, floods, lightening, pollution, other acts of God, and/or incorrect usage of voltage transformers.
- Page 142 Artisan Technology Group is your source for q new and certified-used/pre-owned equipme • FAST SHIPPING AND SERVICE CENTER REPAIRS WE BUY USED EQUIPM DELIVERY Experienced engineers and technicians on staff Sell your excess, un at our full-service, in-house repair center We also offer credit •...
Need help?
Do you have a question about the cPCI-6910 Series and is the answer not in the manual?
Questions and answers