Advertisement
Quick Links
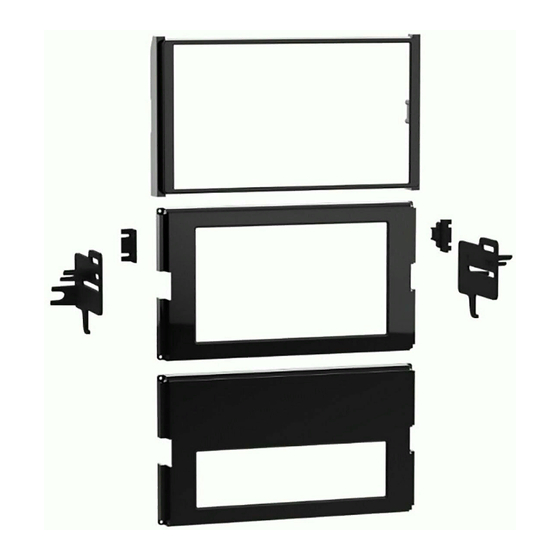
KIT COMPONENTS
• A) ISO DIN radio trim panel • B) ISO DDIN radio trim panel • C) Trim panel housing • D) Trim panel housing clip brackets • E) Radio brackets
• F) Pioneer adapter brackets • G) Panel clips (qty. 2) • H) Phillips screws (qty. 8)
A
B
Metra. The World's Best Kits.
®
Toyota Corolla 2020-Up, Corolla Hatchback
Visit
MetraOnline.com
specific applications
KIT FEATURES
• ISO DIN radio provision
• ISO DDIN radio provision †
• Pioneer modular DDIN radio
provision †
• Painted high gloss black to
match the factory finish
C
D
G
MetraOnline.com
for more detailed information about the product and up-to-date vehicle
† This kit can only be used with an ISO DDIN radio
with an "L" shaped chassis design, with the radio
chassis at the bottom of the screen. As of this
writing, only the Alpine INE-W967HD (discontinued,
replaced by INE-W977HD), iLX-107, and iLX-207 have
this design. Also, The Pioneer modular radios,
DMH-C2550NEX and DMH-C2500NEX, can be used
with the adapter brackets provided.
E
F
H
© COPYRIGHT 2019 METRA ELECTRONICS CORPORATION
99-8270HG
I N S TA L L AT I O N I N S T R U C T I O N S
2019-Up
TABLE OF CONTENTS
Dash Disassembly ..................................................2
Kit Assembly
–ISO DIN radio provision .......................................3
–ISO DDIN radio provision .....................................4
–Pioneer modular DDIN radio provision .............5
WIRING & ANTENNA CONNECTIONS (sold separately)
Wiring Harness: 70-1765
Antenna Adapter: 40-LX11
Steering wheel control interface: ASWC-1
12v-to-6v camera step-down: AX-CAM6V
TOOLS REQUIRED
• Panel removal tool • Phillips screwdriver
• 10mm socket wrench
Attention!
Let the vehicle sit with the key
out of the ignition for a few minutes before
removing the factory radio. When testing the
aftermarket equipment, ensure that all factory
equipment is connected before cycling the
key to ignition.
REV. 12/11/19 INST99-8270HG
Advertisement

Related Manuals for Metra Electronics 99-8270HG


Summary of Contents for Metra Electronics 99-8270HG
- Page 1 When testing the aftermarket equipment, ensure that all factory equipment is connected before cycling the key to ignition. Metra. The World’s Best Kits. MetraOnline.com ® © COPYRIGHT 2019 METRA ELECTRONICS CORPORATION REV. 12/11/19 INST99-8270HG...
- Page 2 DASH DISASSEMBLY 1. Unclip and remove the radio trim panel. 4. Remove (4) 10mm screws securing the (Figure A) bottom of the radio. Two screws will be clearly visible, but two will be hidden, 2. Unclip, unplug, and remove the climate facing upward.
- Page 3 KIT ASSEMBLY ISO DIN radio provision 5. Attach the ISO DIN radio trim panel to the trim panel housing, then secure 1. Remove the metal DIN sleeve and trim using (4) Phillips screws provided ring from the aftermarket radio. (Figure C) 2.
- Page 4 KIT ASSEMBLY ISO DDIN radio provision 4. Attach the ISO DDIN radio trim panel to the trim panel housing, then secure 1. Secure the radio brackets to the radio using (4) Phillips screws provided using screws supplied with the radio. (Figure C) Note the location of the bracket on the radio and the screw slots to be used.
- Page 5 KIT ASSEMBLY Pioneer Modular DDIN radio provision Note: For steps 1 and 2, reference the installation manual provided with the radio for which hardware to use. The display screen and radio chassis use two different types of screws. 1. Secure the Pioneer adapter brackets to the radio chassis using (4) screws supplied with the radio.
- Page 6 4. Secure the radio brackets to the radio 7. Attach the ISO DDIN radio trim panel chassis using screws supplied with the to the trim panel housing, then secure radio. Note the location of the bracket using (4) Phillips screws provided on the radio and the screw slots to be (Figure E) used.
- Page 7 REV. 12/11/2019 INST99-8270HG...
- Page 8 Log onto www.installerinstitute.com or call 800-354-6782 for more information and take steps toward a better tomorrow. Metra recommends MECP certified technicians Metra. The World’s Best Kits. MetraOnline.com ® © COPYRIGHT 2019 METRA ELECTRONICS CORPORATION REV. 12/11/19 INST99-8270HG...
Need help?
Do you have a question about the 99-8270HG and is the answer not in the manual?
Questions and answers