NovaStar MCTRL R5 User Manual
Led display controller
Hide thumbs
Also See for MCTRL R5:
- User manual (15 pages) ,
- User manual (20 pages) ,
- User manual (23 pages)

Related Manuals for NovaStar MCTRL R5


Summary of Contents for NovaStar MCTRL R5
- Page 1 MCTRL R5 LED Display Controller User Manual Document Version: V1.0.2 Document Number: NS110100814...
- Page 2 Xi’an NovaStar Tech Co., Ltd. Statement You are welcome to use the product of Xi'an NovaStar Tech Co., Ltd. (hereinafter referred to as NovaStar). This document is intended to help you understand and use the product. For accuracy and reliability, NovaStar may make improvements and/or changes to this document at any time and without notice.
-
Page 3: Change History
MCRL R5 LED Display Controller User Manual Change History Change History Document Firmware Release Date Description Version Version V1.0.2 V1.0.2.0 2019-09-06 Optimized the document content. V1.0.2.0 V1.0.1 2018-06-04 Updated the document style. V1.0.0.0 V1.0.0 2016-06-06 First release www.novastar.tech... -
Page 4: Table Of Contents
7.5.2 Input Resolution Settings ........................16 7.6 Display Control ............................16 7.7 Advanced Settings ............................. 17 7.7.1 Mapping Function ........................... 17 7.7.2 Load RCFG Files ............................ 17 7.7.3 Alarm Threshold ............................18 7.7.4 Save to RV Card ............................. 18 7.7.5 Redundancy ............................19 www.novastar.tech... - Page 5 7.9 Language ..............................20 8 Operations on PC ......................21 8.1 Software Operations on PC ........................21 8.1.1 NovaLCT ..............................21 8.1.2 SmartLCT ............................... 21 8.2 Firmware Update ............................22 8.2.1 NovaLCT ..............................22 8.2.2 SmartLCT ............................... 22 9 Specifications ....................... 23 www.novastar.tech...
-
Page 6: Overview
SmartLCT and allows for display rotation at any angle to present a variety of images and bring an amazing visual experience to users. The MCTRL R5 can be mainly used in rental and fixed applications, such as concerts, live events, monitoring centers, Olympic Games and various sports centers. -
Page 7: Features
Innovative architecture to enable smart configuration and shorter stage preparation time NovaStar G4 engine to enable a stable and smooth display with good sense of depth and no flickering or scanning lines Supports the new generation of NovaStar pixel level calibration technology, which is fast and efficient. -
Page 8: Applications
MCRL R5 LED Display Controller User Manual 3 Applications Applications www.novastar.tech... -
Page 9: Cascading Devices
Cascading Devices If the control computer needs to control multiple MCTRL R5 units, you can cascade the units via USB IN and USB OUT of the MCTRL R5 according to the figure below. Up to 8 units can be cascaded. -
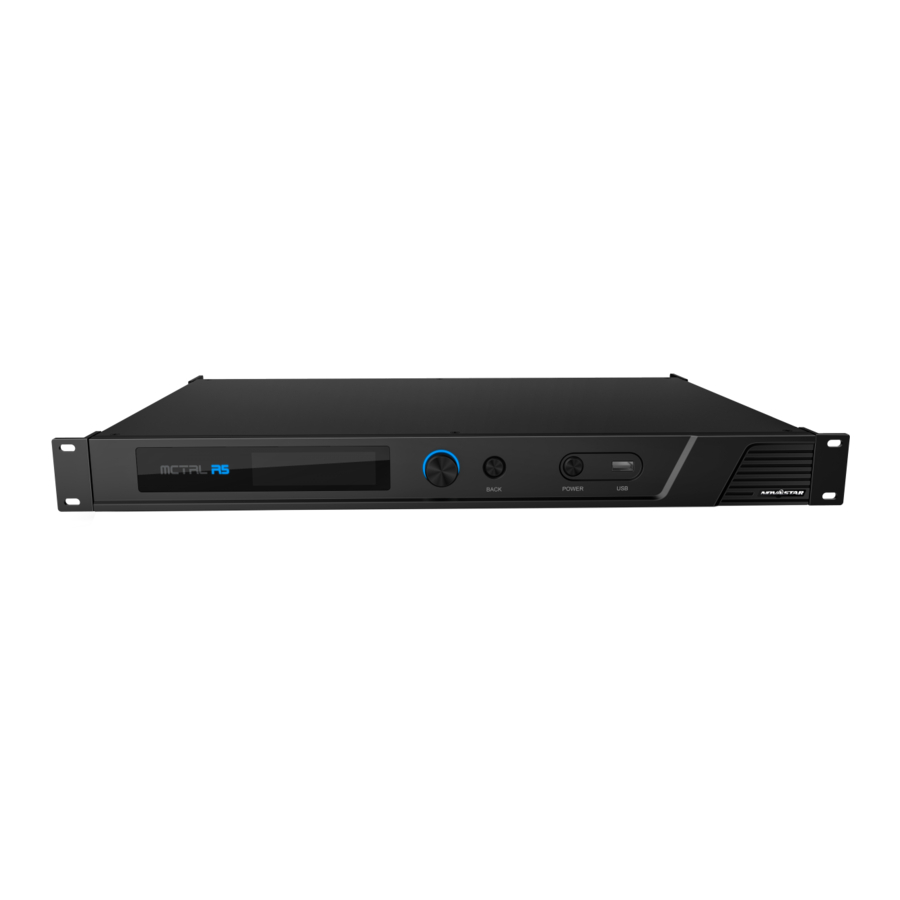
Page 10: Hardware Structure
Knob Hold down the knob and BACK button simultaneously for 5s to lock or unlock all the buttons. BACK Press to go back to the previous menu. POWER Standby button Insert USB drive to update firmware. Rear Panel www.novastar.tech... - Page 11 Dual link DVI input, with a maximum resolution of 3840×1080@60Hz and minimum resolution of 800×600@24Hz Pixel capacity: 4,140,000 pixels Custom resolution supported Resolution limit with maximum width: 3840×1080@60Hz Resolution limit with maximum height: 800×3840@60Hz Supported standard resolutions: D-DVI 1024×768@(24/25/30/48/50/60/72/75/85/100/120)Hz 1280×720@(24/25/30/48/50/60/72/75/85/100/120)Hz 1280×1024@(24/25/30/48/50/60/72/75/85/100/120)Hz 1366×768@(24/25/30/48/50/60/72/75/85/100/120)Hz 1440×900@(24/25/30/48/50/60/72/75/85/100/120)Hz 1536×1536@(24/25/30/48/50/60/72/75/85)Hz www.novastar.tech...
- Page 12 ETHERNET Fast Ethernet port to connect to PC. Support TCP/IP. USB IN Input port for cascading devices, or connecting to PC Output port for cascading devices. Up to 8 MCTRL R5 units can be USB OUT cascaded. GENLOCK GENLOCK input connector ...
-
Page 13: Dimensions
AC 100 V–240 V, 50/60Hz Power switch ON/OFF Note: Type-A USB port is prohibited from being connected to the control computer directly. This product can only be worked horizontally. Wall mounting is not permitted. 5.2 Dimensions Unit: mm www.novastar.tech... -
Page 14: Homepage
MCRL R5 LED Display Controller User Manual 6 Homepage Homepage After the MCTRL R5 is powered on, the home screen is shown in the figure below. Description ① Name of the device ② Resolution and frame rate of the current input source. - Page 15 Optical port connection status: Black: The optical port connection works and the port serves as master. White: The optical port is not connected or the connection does not work. Connection status of control ports: USB connected/Ethernet connected/GENLOCK connected Rotation enabled/disabled www.novastar.tech...
-
Page 16: Menu Operations
MCRL R5 LED Display Controller User Manual 7 Menu Operations Menu Operations The MCTRL R5 is powerful and easy to use. You can quickly configure the LED screen to light it up and display the entire input source following steps in 7.1 Quick Screen Configuration. -
Page 17: Step 2 Setting Input Resolution
Step 1 On the home screen, press the knob to enter the menu. Step 2 Choose Input Settings > Preset Resolution to enter its submenu. Step 3 Select a resolution and refresh rate, and press the knob to apply them. The MCTRL R5 supports the following preset resolutions. 1024×768@(24/25/30/48/50/60/72/75/85/100/120)Hz ... -
Page 18: Step 3 Quickly Configuring Screen
Ensure that the cabinets loaded by each Ethernet port are connected one by one in the same direction. e). Ensure that the Ethernet port 1 is at the beginning position of the whole physical www.novastar.tech... -
Page 19: Brightness Adjustment
7.1.3 Step 3 Quickly Configuring Screen. 7.3.2 Advanced Configuration Set parameters for each Ethernet port, including number of cabinet rows and columns (Cabinet Row Qty and Cabinet Column Qty), horizontal offset (Start X), vertical offset (Start Y), and data flow. www.novastar.tech... -
Page 20: Image Offset
Screen rotation: Rotation of the whole LED display according to the rotation angle Figure 7-8 Rotation settings: Step 1 On the home screen, press the knob to enter the menu. Step 2 Choose Rotation Settings > Rotation Enable, and choose Enable. www.novastar.tech... -
Page 21: Input Settings
Step 3 Choose Port Rotate or Screen Rotate and set the rotation step and angle. Note: The screen must be configured on the MCTRL R5 before rotation setting in LCD menu. The screen must be configured in SmartLCT before rotation setting in SmartLCT. -
Page 22: Advanced Settings
Example: P: 05 indicates the Ethernet port No. #001 indicates the cabinet No. 7.7.2 Load RCFG Files Before you begin: Save the cabinet configuration file (*.rcfgx or *.rcfg) to the local PC. Note: Configuration files of irregular cabinets are not supported. www.novastar.tech... -
Page 23: Alarm Threshold
When there are no temperature or voltage alarms, the home screen will display the backup status. 7.7.4 Save to RV Card By using this function, you can: Send and save the configuration information to the receiving cards, including brightness, color temperature, Gamma and display settings. www.novastar.tech... -
Page 24: Redundancy
After a backup video source takes effect, the video source selection is irreversible. Table 7-1 Video source backup Primary Video Source Backup Video Source NULL/DVI/HDMI NULL/SDI/HDMI HDMI NULL/DVI/SDI 7.7.8 Factory Reset Reset the controller to factory settings. www.novastar.tech... -
Page 25: Go Homepage (S)
Manual settings parameters include controller IP address and subnet mask. − − Automatic settings can read the network parameters automatically. Reset: Reset the network parameters to default values. 7.9 Language Change the UI language of the MCTRL R5 unit. www.novastar.tech... -
Page 26: Operations On Pc
8.1 Software Operations on PC 8.1.1 NovaLCT Connect the MCTRL R5 to the control computer installed with NovaLCT (V5.1.0 or later) via USB port to perform screen configuration, brightness adjustment, calibration, display control, monitoring, etc. For details on their operations, see NovaLCT LED Configuration Tool for Synchronous System User Guide. -
Page 27: Firmware Update
8 Operations on PC 8.2 Firmware Update 8.2.1 NovaLCT In NovaLCT, perform the following steps to update the MCTRL R5 firmware. Step 1 Start NovaLCT and choose User > Advanced Synchronous System User Login and log in as an advanced user. -
Page 28: Specifications
1 × HDMI cable 1 × DVI cable The product and accessory box (containing related Packing rules cables) packed in the carrying case and the carrying case packed in the packing box Certifications FCC, RoHS, UL&CUL, EMC, LVD, CB, IC www.novastar.tech...
Need help?
Do you have a question about the MCTRL R5 and is the answer not in the manual?
Questions and answers