
Related Manuals for Kargo Master 4081S


Summary of Contents for Kargo Master 4081S
- Page 1 Installation Guide 4081S Kargo Master Rancho Cordova, CA 95742 800‐343‐7486 CustomerService@KargoMaster.com DATE: ______________...
-
Page 2: Table Of Contents
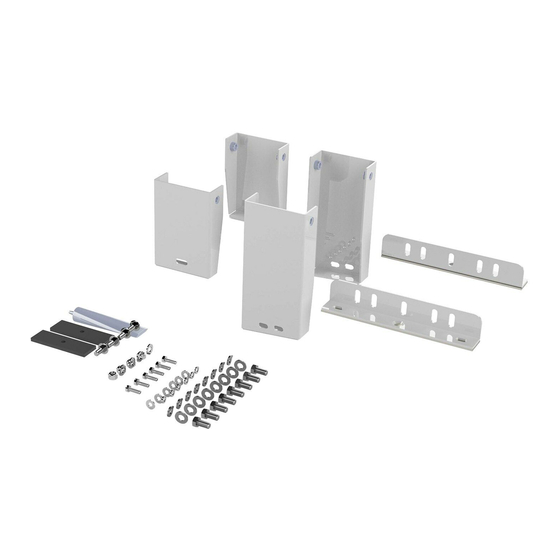
Installation Instructions – 4081S *PLEASE READ ALL INSTRUCTIONS AND WARNINGS PRIOR TO ASSEMBLING, INSTALLING, AND USING THIS PRODUCT* Warning Always check for wires, fuel tanks and lines, brake lines and other important vehicle functionality items prior to drilling and installing all products. Tools Needed 1/2” Socket and Wrench Tape Measure Table of Contents Sprinter Parts List ........................ 2 18‐40818‐FT‐R1 Hardware ...................... 3 18‐40818‐S‐R1 Hardware ...................... 3 Step 2 – Prepare Extrusion ...................... 4 Step 2 – Locate Mount Holes ..................... 5 Step 3 – Insert Mount Rails ..................... 6 ‐7 Step 4 – Attach Mount Block ..................... 8 Step 5 – Attach Mount Foot ...................... 9 Step 6 –Mount Feet to Rack ..................... 10 Before You Begin Read all instructions. When mounting to the roof, place generous amounts of E6000 to seal the interior of van from the exterior elements. E6000 will be in the rack assembly. Follow assembly instructions to assemble and install rack. ... - Page 3 Installation Instructions – 4081S Sprinter Mount Parts For Technical Support Call: 800‐343‐7486 Monday‐Friday 7AM ‐ 4 PM (PST) Page 2 ...
- Page 4 Installation Instructions – 4081S 18‐40818‐S‐R1 18‐40818‐FT‐R1 For Technical Support Call: 800‐343‐7486 Monday‐Friday 7AM ‐ 4 PM (PST) Page 3 ...
-
Page 5: Step 2 - Prepare Extrusion
Installation Instructions – 4081S Step 1 – Prepare Extrusion Slide two 5/16” x 1‐1/4” carriage bolts into each rail piece. For Technical Support Call: 800‐343‐7486 Monday‐Friday 7AM ‐ 4 PM (PST) Page 4 ... -
Page 6: Step 2 - Locate Mount Holes
Installation Instructions – 4081S Step 2 – Locate Mount Holes Locate the 2 rear most factory bosses and drill out using a 5/16” drill bit. Approximately 16‐15/16” apart from each other. Skip the next 2 bosses, then drill the forward 2 (@ 62” and 78.5” from the rear most hole). Some roof heights and wheelbases will vary, your mounting rail should allow for the rack to be mounted approximately between 14” to 18” from the rear of the van and have about 40” between the mounting rails. For Technical Support Call: 800‐343‐7486 Monday‐Friday 7AM ‐ 4 PM (PST) Page 5 ... - Page 7 Installation Instructions – 4081S Step 3 – Attach Mount Rails Put rubber pad (B) onto carriage bolts and align them with the holes drilled in previous step. Place E6000 in between rubber pad and the roof. The shorter rail goes to the rear of the van with approximately 6” of the rail behind the carriage bolt. E6000 Bolt through the roof using previously installed carriage bolt, 5/16” fender washer and 5/16” nyloc nut. Be sure to put E6000 around the hole in the rood to ensure no water leaks ...
- Page 8 Installation Instructions – 4081S **PICTURE SHOWN ABOVE DOES NOT SHOW SPACING BETWEEN RAILS** Snug Tighten, But allow movement. Have approximately 40” in between the front and rear rails. Repeat on driver side. For Technical Support Call: 800‐343‐7486 Monday‐Friday 7AM ‐ 4 PM (PST) Page 7 ...
-
Page 9: Step 4 - Attach Mount Block
Installation Instructions – 4081S Step 4 – Attach Mount Block Slide two 5/16” x 3/4" carriage bolts into the top slot on each rail piece. Place mount block on top of each carriage bolt. Bolt using the carriage bolt, two 5/16” flat washers and two 5/16” nyloc nuts. Space mount blocks 71.5” apart for a standard installation. Space mount blocks 96” apart for an extended installation. Snug Tighten, but allow brackets to move. For Technical Support Call: 800‐343‐7486 Monday‐Friday 7AM ‐ 4 PM (PST) Page 8 ... -
Page 10: Step 5 - Attach Mount Foot
Installation Instructions – 4081S Step 5 – Attach Mount Feet Mount short feet to previously installed mount blocks using two 5/16” x 3/4" carriage bolts, two 5/16” flat washers and two 5/16” nyloc nuts. The carriage bolt can face upward or downward based on preference. Repeat on all four mount blocks. Approximately 71.5” apart. Approximately 96” apart. For Technical Support Call: 800‐343‐7486 Monday‐Friday 7AM ‐ 4 PM (PST) Page 9 ... -
Page 11: Step 6 -Mount Feet To Rack
Installation Instructions – 4081S Step 6 – Mount Feet to Rack Determine if the rack is being assembled on the vehicle or if the rack will be assembled off the vehicle and set on top of installed feet. In either case, bolt bows to feet using 3/8‐16 x 3/4” hex head, a 3/8” lock washer and a 3/8” flat washer in order shown. TIGHTEN GO BACK AND ENSURE ALL HARDWARE IS TIGHT Your installation is now complete. For Technical Support Call: 800‐343‐7486 Monday‐Friday 7AM ‐ 4 PM (PST) Page 10 ...
Need help?
Do you have a question about the 4081S and is the answer not in the manual?
Questions and answers