
Related Manuals for Kargo Master 40649TL


Summary of Contents for Kargo Master 40649TL
- Page 1 Instruction Guide 40649TL Kargo Master Rancho Cordova, CA 95742 800-343-7486 CustomerService@KargoMaster.com 20200608R1 DATE: ________________...
-
Page 2: Table Of Contents
Step 12 – Installing Wing to “B” Pillar ......................12 Before You Begin Read all instructions prior to installing any Kargo Master product. Be sure to have 40640 partition assembled and ready to be installed before continuing. For Technical Support Call: 800-343-7486 Monday-Friday 7AM - 4 PM (PST) -
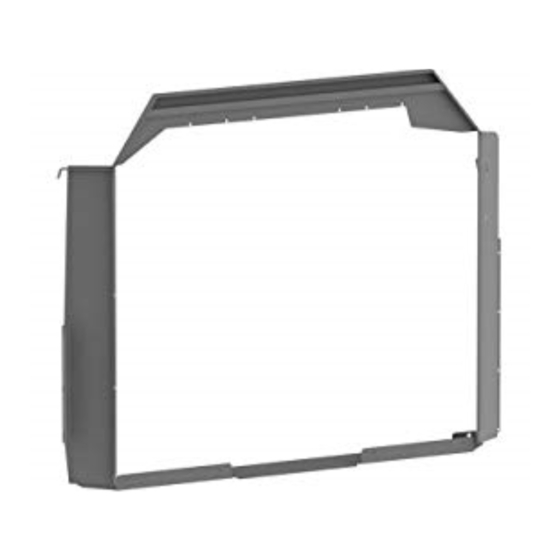
Page 3: Parts List
Installation Instructions – 40649TL Parts List For Technical Support Call: 800-343-7486 Monday-Friday 7AM - 4 PM (PST) Page 2... -
Page 4: Hardware
Installation Instructions – 40649TL Hardware For Technical Support Call: 800-343-7486 Monday-Friday 7AM - 4 PM (PST) Page 3... -
Page 5: Step 1 - Attaching Side Wings
Installation Instructions – 40649TL Step 1 – Attaching Side Wings Using four 1/4” x 5/8” flanged bolts and four 1/4” flanged lock nuts, bolt passenger side (PS) side wing to partition. Snugly tighten. Using four 1/4” x 5/8” flanged bolts and four 1/4”... -
Page 6: Step 2 - Attaching Top Panel
Installation Instructions – 40649TL Step 2 – Attaching Top Panel Using six 1/4” x 5/8” flanged bolts and a 1/4” flanged lock nuts, bolt top wing to partition. Snug tighten. Step 3 – Attaching Bottom Plate Using four 1/4” x 1/2” hex head bolts, four 1/4” lock washer, and four 1/4” washers, bolt through the partition panels into the bottom panel. -
Page 7: Step 4 - Attaching Roof Support
Installation Instructions – 40649TL Step 4 – Attaching Roof Support Using a 1/4” x 5/8” flanged bolt and a 1/4” flanged lock nut and the previously installed 1/4” x 5/8” flanged bolt and 1/4” flanged lock nut, LOOSELY bolt the roof support to partition. -
Page 8: Step 6 - Installation Preparation
Installation Instructions – 40649TL Using a M6 x 25mm hex head, 1/4” lock washer and a 1/4” split lock washer, install handle mount where handle was previously removed. Snug tighten. Step 6 – Installation Preparation Remove the D-rings from both the driver’s side and... -
Page 9: Step 7 - Installing Partition To Floor
Installation Instructions – 40649TL Step 7 – Installing Partition to Floor Place assembled partition with wings into van with the flanged side of partition facing to the rear and wings bent towards the front. Push the partition firm against the passenger side “B”... -
Page 10: Step 8 - Installing Partition To Floor
Installation Instructions – 40649TL Using the 9/16” box wrench, hold the plus nut tool stationary and then tighten hex head bolt until plus nut is tightly gripping and does not spin when hex bolt is loosened. DO NOT overtighten plus nut. -
Page 11: Step 9 - Installing Driver Side Wing To Van Siding
Installation Instructions – 40649TL Step 9 – Installing Driver Side Wing to Van Siding On the driver’s side of van, the driver’s wing should line up with three (3) factory holes in the van siding. There are two options for installing the wing to the driver’s side van siding. -
Page 12: Step 10 - Installing Roof Support To Van Siding
Installation Instructions – 40649TL Step 10 – Installing Roof Support to Van Siding On the driver’s side of van, the roof support should line up with a factory hole high in van siding. Install a plus nut into the existing hole in the van siding. -
Page 13: Step 12 - Installing Wing To "B" Pillar
Installation Instructions – 40649TL Step 12 – Installing Wing to “B” Pillar Always check that each location is clear of wires, fuel tanks and lines, air bags, and other important vehicle functionality items prior to installing screws into “B” pillar.
Need help?
Do you have a question about the 40649TL and is the answer not in the manual?
Questions and answers