
Related Manuals for Kargo Master 408TC


Summary of Contents for Kargo Master 408TC
- Page 1 Installation Guide 408TC Kargo Master Rancho Cordova, CA 95742 800-343-7486 CustomerService@KargoMaster.com DATE: ______________...
-
Page 2: Table Of Contents
Installation Instructions – 408TC *PLEASE READ ALL INSTRUCTIONS AND WARNINGS PRIOR TO ASSEMBLING, INSTALLING, AND USING THIS PRODUCT* Warning Always check for wires, fuel tanks and lines, brake lines and other important vehicle functionality items prior to drilling and installing all products. -
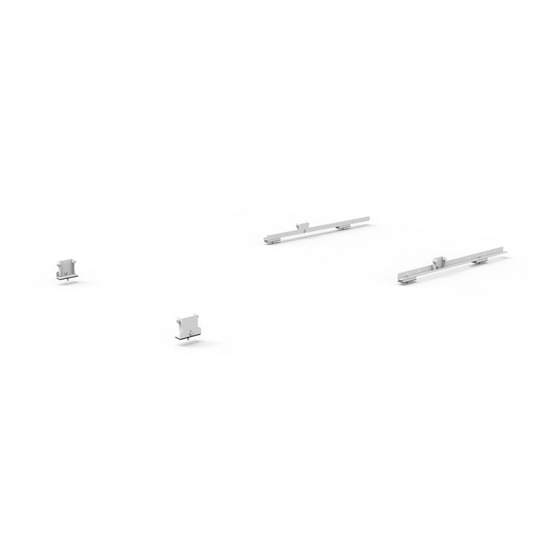
Page 3: Parts List
Installation Instructions – 408TC Parts For Technical Support Call: 800-343-7486 Monday-Friday 7AM - 4 PM (PST) Page 2... -
Page 4: Hardware List
Installation Instructions – 408TC Hardware For Technical Support Call: 800-343-7486 Monday-Friday 7AM - 4 PM (PST) Page 3... -
Page 5: Step 1 Rear Foot Mounting (Exclude Ext)
Installation Instructions – 408TC Ford Transit (EXCLUDING High Roof EXT) Step 1 - Rear Foot Mounting • Locate threaded emboss at rear of van. Plugs will need to be removed. 130” Wheel Base 148” Wheel Base • Mount the rear mount bracket with M8 x 30mm Flat Head bolts. Place rubber pad between the bracket and the roof of the van. -
Page 6: Step 2A 130" Wb Front Mount
Installation Instructions – 408TC Step 2A – Front Mount on 130” WB (Low/Mid Roof) • Locate the other threaded emboss at the front of van. Plugs will need to be removed. • Place the long mount rail with the tall flange to the center of the van. - Page 7 Installation Instructions – 408TC • Passenger side shown, repeat on driver side. • Snug Tighten For Technical Support Call: 800-343-7486 Monday-Friday 7AM - 4 PM (PST) Page 6...
-
Page 8: Step 2B 148" Wb Front Mount
Installation Instructions – 408TC Step 2B – Front Mount on 148” WB (Low/Mid/High Roof exclude EXT) • Locate the other threaded emboss at front of van. Plugs will need to be removed • Place the long mount rail with the tall flange to the center of the van. - Page 9 Installation Instructions – 408TC • Passenger side shown, repeat on driver side. • Snug Tighten For Technical Support Call: 800-343-7486 Monday-Friday 7AM - 4 PM (PST) Page 8...
-
Page 10: Step 3A Ext Rear Foot Mounting
Installation Instructions – 408TC Transit 148”Wheelbase, High Roof, EXT Step 3A- EXT Rear Foot Mounting • Mount the rear mount bracket with M8 x 30mm Flat Head bolts. Place rubber pad between the bracket and the roof of the van. Place the bracket parallel with the length of the van. -
Page 11: Step 3B Ext Front Mount
Installation Instructions – 408TC Step 3B- EXT Front Mount • Locate other two threaded emboss at front of van. A plug will need to be removed. • Place the long mount rail with the tall flange to the center of the van. -
Page 12: Installation On Van Installing Feet To Rack
Installation Instructions – 408TC Installing Feet • Have rack assembled. • Measure width between the mounts on the van. • On the cross bows, use the slots that correspond to the measured distance between rails. • Bolt feet to bows as shown, DO NOT TIGHTEN at this point. -
Page 13: Installing Rack To Van
Installation Instructions – 408TC Installing Rack on Van • First, line the rear foot up with the rear mount of van. • Bolt rear foot to rear mount using 5/16” x 3/4” carriage bolts, 5/16” flat washers and a 5/16”... - Page 14 Installation Instructions – 408TC FRONT Notice the short feet are installed at the front. Go back and ensure all hardware is tight. This includes into the roof, within the rack assembly and the mounting of the rack to roof brackets.
Need help?
Do you have a question about the 408TC and is the answer not in the manual?
Questions and answers