
Related Manuals for Reinecker mezzo EDU


Summary of Contents for Reinecker mezzo EDU
- Page 1 User manual mezzo EDU Please read this user manual carefully prior to installation, use and maintenance for your own safety and in order to avoid damages at your system.
- Page 3 The CE mark on the system points out this accordance. The CE mark on the system points out this accordance. M. Reinecker Geschäftsführer M. Reinecker Geschäftsführer Alsbach-Hähnlein, Alsbach-Hähnlein, M. Reinecker General Manager M. Reinecker General Manager 20.03.2018 20.03.2018 06.05.2019 ..........
-
Page 4: Table Of Contents
Special advice for transport and storage ..............8 Disposal of the unit according to EU directive 2002/96/EEC ........8 Power supply .......................8 Safety instructions to avoid damage ................9 II. Instructions for the reading system mezzo EDU ..........10 Delivery content ......................10 Available Options ......................10 Cameras ........................10 Focus camera: FullHD camera with digital zoom and comfort auto-focus ..10... - Page 5 Right ..........................17 Saving the position of the distance camera ............18 Recall saved positions ..................18 Function „Last position“ ..................18 Menu settings mezzo EDU ..................19 Opening the menu ....................19 Select menu options ...................19 Change menu options and confirm ..............19 Menu options ......................20 Menu settings distance camera ................22...
-
Page 6: General Information
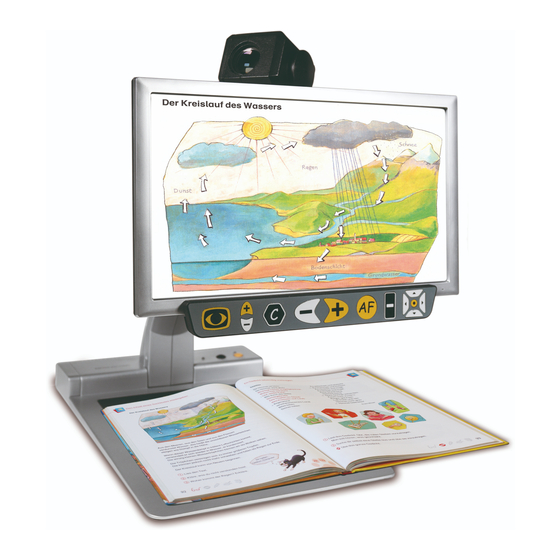
Product description mezzo EDU is an opto-electronic reading system for magnifying text and pictures for professional and permanent private use. Text and pictures are captured using the integrated cameras and displayed on the monitor. -
Page 7: Medical Device
Note: The mentioned life span does not reflect the complete life span of the mezzo EDU. It is rather an indication on when the product might be obsolete and substitution might be recommended due to new product developments. -
Page 8: Precautions By Alteration Of The Performance Of The System
Stop using the reading device if technical features or performances should change. Switch the device OFF and disconnect the power supply from the mains wall socket. Refer directly to your authorized dealer or to Reinecker Vision GmbH Service Center. Do not use the system again in this condition. -
Page 9: Safety Instructions To Avoid Damage
2. Do not touch the AC adapter with wet hands. 3. Only use the original power supply and cables which are included in the delivery by Reinecker Vision GmbH. The use of any other equipment might lead to a product damage. -
Page 10: Ii. Instructions For The Reading System Mezzo Edu
ZBMEZZXT ● XY-table mobile Cameras mezzo EDU is equipped with the following camera types: Focus camera: FullHD camera with digital zoom and comfort auto-focus Magnification from approx. 2,1 to 24x* ( at monitor 16‟ class ) ● *factory settings, extended magnification range adjustable in the menu ●... -
Page 11: Power Off
Installation of the system Unpack your mezzo EDU carefully and place it on a solid horizontal surface. If you have not purchased an optionally available stand that fits to the product you must provide a solid surface for the system with sufficient surface area. - Page 12 AC input Operation buttons on the base plate ● Bring the camera/monitor arm in the upright position until the interlock release snaps in. Distance camera Camera ( internal ) ● Bring the distance camera up until the sub-contruction of the distance camera is held by the magnet.
-
Page 13: Alignment Of Monitor
LED light ● Move the monitor upwards. Alignment of monitor Due to the monitor’s technology contrast and brightness change depending on the angle of view. The highly flexible monitor arm enables you to adjust the monitors height and angle according to your best ergonomic position. Control bar... -
Page 14: Connection Of The Unit
Connection of the unit Connect the power supply to a mains wall socket and plug the adapter end of the cable into the AC input socket (12V DC) located on the base plate of the mezzo EDU. Note: The supplied plug-in power supply is exclusively for the operation of this device. -
Page 15: Description Of The Control Bar
Description of the control bar 1 ) Switching button distance mode / document mode, Menu settings ON / OFF 2 ) Brightness 3 ) Color selection 4 ) Zoom OUT 5 ) Zoom IN 6 ) Auto focus ON / OFF 7 ) Line marker / Shadowing / Auto-Exposure ON/OFF ( autom. -
Page 16: Color Settings
Color settings By briefly pressing the color selection button, the following colors can be selected by default: Position 1: full color display Position 2: black font, white background Position 3: white font, black background Position 4: green font, black background Position 5: yellow font, black background Position 6: yellow font, blue background The chosen color mode appears temporarily on the lower side of the... -
Page 17: Auto-Exposure On/Off (Autom. Aperture Control)
Auto-Exposure ON/OFF (autom. aperture control) When the control button is pressed permanently, the automatic aperture control (auto-exposure) in the distance camera is switched ON or OFF. Auto-Exposure ON: The brightness of the camera image is automatically adopted according to the lighting conditions. Auto-Exposure OFF: The brightness of the camera image is no longer automatically adopted to the lighting conditions. -
Page 18: Saving The Position Of The Distance Camera
Saving the position of the distance camera The distance camera is made to save up to 4 different positions. Alternative 1: Briefly press the yellow control button to activate the Pos. 1 saving process. Then press and hold the desired position button (Pos. -
Page 19: Menu Settings Mezzo Edu
Menu settings mezzo EDU Opening the menu Press the control button for approx. 5 seconds until the menu window appears on the screen. Main Menu Color saturation Language English AF Modus auto Min. Magnification Standard Max. Magnification Standard Mains Frequency... -
Page 20: Menu Options
Menu options Main Menu Color saturation Adjustment range from -50 to +50 English | German | French | Swedish | Language Italian | Norwegian | Japanese auto | manual ( via pressing the button ) AF mode Low | Standard Min. - Page 21 Main Menu Advanced Settings Color Combination Setup User colours User colour 1 - Red Adjustment range from 0 to 31 User colour 1 - Green Adjustment range from 0 to 31 User colour 1 - Blue Adjustment range from 0 to 31 User colour 2 - Red Adjustment range from 0 to 31 User colour 2 - Green...
-
Page 22: Menu Settings Distance Camera
Menu settings distance camera Opening menu Press the control button for approx. 5 sec. until the menu window appears on the screen. Extended Menu Image Settings... Color Settings... Preset Settings... OSD-Messages Language English User Menu... Exit Select options Use the up/down arrow buttons to move the cursor to the option you like to change. - Page 23 Extended Menu Color settings... Autom. | via button White Balance Mode Gain Red Autom. Gain Blud Autom. Confirm selection to perform semi automatic white Perform Semi-autom. WB balance Color saturation Adjustment range from -64 to +64 Background Color n / a Foreground Color n / a Mode...
- Page 24 Overview: Main Menu Brightness Contrast Color Saturation - 30 Ruler/Mask... Ruler/Mask Settings... AF Mode Continous Reset to factory settings Recall User Settings Advanced Settings..Exit Main Menu Brightness Adjustment range from -50 to +50 Contrast Adjustment range from -50 to +50 Color Saturation Adjustment range from -50 to +50 OFF | Line marker and shadowing disabled...
- Page 25 Main Menu Ruler/Mask Settings Mask Mode Left/Right | Shadowing left/right; Shadowing covers max. 50% Top/Bottom | Shadowing top/bottom; Shadowing covers max. 50% Left/Right FS | Shadowing left/right; Shadowing covers max. 90% Top/Bottom FS | Shadowing top/bottom; Shadowing covers max. 90% Full-Screen | Shadowing covers all of the monitor 50% | 25% | 0% Mask Transparency...
- Page 26 Overview: Advanced Settings Color Combination Setup Anti Reflection Mode Monitor Brightness Language English Perform White Balance White Balance Mode Autom. Sharpness Settings... OSD Messages Special Settings... Return Advanced Settings Color Combination Setup Color Combinations 1-6 Mode Adjustment range from -50 to +50 Black | Red | Green | Blue | Yellow | Magenta | Foreground Cyan | White | User 1 | User 2...
- Page 27 Advanced Settings OFF | ON | Auto ( 0-9 ) | autom. setting is adjustable Anti Reflection Mode Monitor Brightness Adjustment range from 37 to 100 English | German | French | Swedish | Norwegian Language Perform White Balance Confirm selection to perform white balance White Balance Mode Automatic | via button Advanced Settings...
- Page 28 Special Settings ON | OFF Zoom Extension OFF | Adjustment range from 1,5x to 15,0x Max. Digital Zoom Special Settings Customize Buttons... Disabled | Zoom Tele | Zoom Wide | Down Brightness + | Brightness - | False colours | Overview mode | Auto-focus | Focus Near | Left Fokus Far | Auto Exposure...
- Page 29 Overview: Room camera settings Crosshair Speed Left Speed Right Speed Up/Down Zoom Dependance Speed Blackb. Scan Line Height Blackb. Scan Reinitialize head... Return Room camera settings OFF | ON Crosshair Speed Left Adjustment range from 1 to 100 Speed Right Adjustment range from 1 to 100 Speed Up/Down Adjustment range from 1 to 100...
-
Page 30: Troubleshooting
Check that the power supply is correctly connect- battery charging indicator ed to the mains socket and that the adapter cable does not light. is correctly connected to the mezzo EDU. Technical details mezzo EDU LED flat screen monitor Weight: approx. 6,5 kg 16"-class... -
Page 31: Warranty Information
Warranty Information 1. Reinecker Vision GmbH grants a warranty of 24 months (warranty period only valid within the European Union) against defects in manufacture counted from date of invoice ex Reinecker Vision GmbH. 2. All parts that have been replaced when repairing the unit will automatically become property of Reinecker Vision GmbH. -
Page 32: Notes
Notes... - Page 35 EDU ( MEZEDU01 ) Type: Serial number: Manufacturer: Reinecker Vision GmbH Final examination: Power supply: 100 VAC – 240 VAC 50-60 Hz With plug-in power supply: 12V DC / 5000mA Power consumption: max. 80 watt...
- Page 36 Reinecker Vision GmbH In case service is necessary, please International Contact contact your authorized distributor. sales department, customer relations: Sandwiesenstraße 19 D-64665 Alsbach-Hähnlein customer service: Erlenweg 3 DE-64665 Alsbach-Hähnlein Tel.: +49 6257 93 11-0 Fax: +49 6257 93 11-8008 Email: international@reineckervision.de www.reineckervision.de...
Need help?
Do you have a question about the mezzo EDU and is the answer not in the manual?
Questions and answers