Advertisement
Quick Links
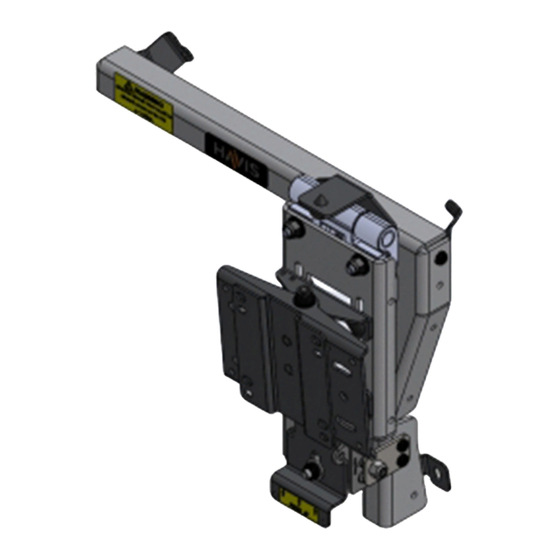
C‐DMM‐3008 Flip Up Dash Monitor Mount
TOOLS REQUIRED:
Ratchet Wrench
7 mm Socket
HARDWARE and PARTS:
QTY DESCRIPTION
1
Upper driver side support bracket
1
Upper passenger side support bracket
1
Lower passenger side support bracket
3
10‐32 x 1/2" Machine screw
3
#10 Star washer
1
VESA rotator plate
1
PVC washer
2
1/4" Plastic washer
2
1/4" Steel washer
2
1/4" Nylock nut
The C‐DMM‐3000 swivel plate accepts C‐MM‐301 offset bracket used with C‐MM‐2XX adaptors.
C‐MM‐2XX series adaptor brackets are not needed for most VESA 75 and other Havis Docking Station
CM009068 VESA rotator plate gives additional positioning options, but is not required depending on
INSTALLATION INSTRUCTIONS
2019 ‐ 2020 Ford Fusion Responder
Dash panel removal tool
Phillips screwdriver
mounting applications.
mounting preference.
Read all instructions before installing any Havis, Inc. products.
Use hardware provided with install kit
Open End Wrench ‐ 7/16"
Wire cutters
PART#
CM009533
CM009534
CM009554
GSM33118
GSM31034
CM009068
CM008582
CM86600
GSM31005
GSM30016
Notes:
Always
!
C‐DMM‐3008_INST_12‐18
Advertisement

Subscribe to Our Youtube Channel
Related Manuals for Havis C-DMM-3008


Summary of Contents for Havis C-DMM-3008
- Page 1 CM008582 2 1/4" Plastic washer CM86600 2 1/4" Steel washer GSM31005 2 1/4" Nylock nut GSM30016 Notes: The C‐DMM‐3000 swivel plate accepts C‐MM‐301 offset bracket used with C‐MM‐2XX adaptors. C‐MM‐2XX series adaptor brackets are not needed for most VESA 75 and other Havis Docking Station mounting applications. CM009068 VESA rotator plate gives additional positioning options, but is not required depending on mounting preference. Always ! Read all instructions before installing any Havis, Inc. products. Use hardware provided with install kit C‐DMM‐3008_INST_12‐18 ...
- Page 2 C‐DMM‐3008 Assembly CM009534 Passenger side upper CM86600 ‐ 1/4" Plastic washer support bracket CM009533 GSM31005 ‐ 1/4" Steel washer Driver side upper GSM30016 ‐ 1/4" Nylock nut support bracket GSM33118 ‐ 10‐32 x 1/2" screw GSM31034 ‐ #10 Star washer CM008582 CM009068 PVC washer VESA rotator plate CM009554 Passenger side lower support bracket C‐DMM‐3008_INST_12‐18 ...
- Page 3 View of dash center instrument panel Carefully remove upper center trim bezel using plastic panel tool. Attach passenger side upper support bracket Attach driver side upper support bracket using using OEM upper radio mount screw. OEM upper radio mount screw. (7mm socket) (7mm socket) Attach passenger side lower support bracket to Carefully partially remove lower center and side dash using OEM lower radio mount screw. trim panels. It is not necessary to completely (7mm socket) remove and unplug panels. C‐DMM‐3008_INST_12‐18 ...
- Page 4 Reattach lower center and side trim panels. Reattach upper center trim bezel. Place DMM main frame onto the support Attach frame to upper passenger side support bracket with 10‐32 x 1/2” screw and star washer. (Phillips screwdriver) brackets. Attach frame to lower passenger side support bracket Attach frame to upper driver side support bracket with 10‐32 x 1/2” screw and star washer. with 10‐32 x 1/2” screw and star washer. C‐DMM‐3008_INST_12‐18 ...
- Page 5 Determine desired position for your specific computer Attach VESA plate to the back of the dock. The and attach to DMM swivel plate using nylon washers, gray nylon washer will go between this bracket steel washers, and nylock nuts. Tighten so that the and the DMM swivel plate. dock rotates smoothly. (Firm, but not too tight) Push up latch to release and lift Route wiring along the side of the DMM flip up frame using Check and adjust positioning as desired. wire ties and existing holes. Test up / down and side to side Test for proper latching in closed position. motion to confirm wires have adequate slack and strain relief. Dock the computer and test. Installation is now complete. C‐DMM‐3008_INST_12‐18 ...
Need help?
Do you have a question about the C-DMM-3008 and is the answer not in the manual?
Questions and answers