Advertisement
Quick Links
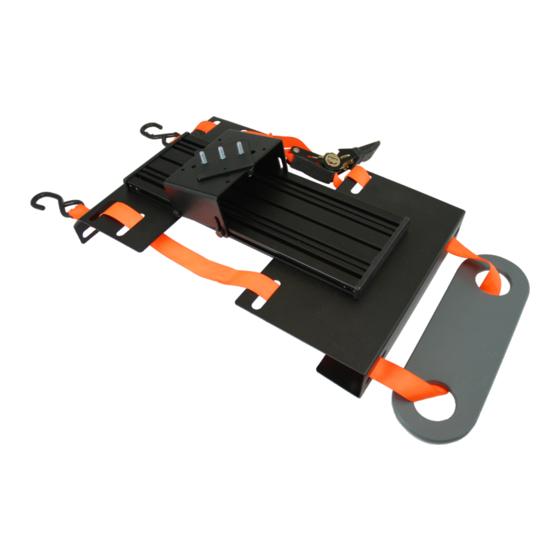
Universal Seat Mount Platform for Laptop Computers
TOOLS REQUIRED:
Ratchet Wrench and Socket Set
7/16" Open End Wrench
PARTS and MOUNTING HARDWARE:
QTY
DESCRIPTION
1
Seat Mount Backing Plate
1
Ratchet Strap with Hooks
All other hardware comes already attached to seat mount assembly or with other optional parts.
C-TM-SEATMT
ASSEMBLY DRAWING
Read all instructions before installing any Havis Inc, products.
Use only hardware provided with install kit.
For product support, visit the Install Instructions Section of our website at
http://havis.com/Installation/Installation.html, email technicalsupport@havis.com or call 1‐800‐
524‐9900 and ask for technical support.
INSTALLATION INSTRUCTIONS
C-TM-SEATMT
Phillips Screw driver
PART #
CM002510
GSM20085
CM002510 Seat Mount Backing Plate
GSM20085 Ratchet Strap with Hooks
Always
!
C‐TM‐SEATMT_INST_7‐10
Advertisement

Subscribe to Our Youtube Channel
Related Manuals for Havis C-TM-SEATMT


Summary of Contents for Havis C-TM-SEATMT
-
Page 1: Installation Instructions
INSTALLATION INSTRUCTIONS C-TM-SEATMT Universal Seat Mount Platform for Laptop Computers TOOLS REQUIRED: Ratchet Wrench and Socket Set Phillips Screw driver 7/16” Open End Wrench PARTS and MOUNTING HARDWARE: DESCRIPTION PART # Seat Mount Backing Plate... - Page 2 Before attaching additional parts, place the main Assemble Strap with Hooks and Backing assembly on the seat top. Adjust the rear plate so plate as shown in photo and / or drawing. it is against the seat back. Ratchet on passenger side works best. Adjust the forward plate so it wraps closely over the front of seat pad. Bolt LPS‐XXX power supply to the bottom Note: An optional offset adaptor can be of Docking Station and attach Dock to seat used to position computer closer to center mount assembly with C‐MD‐202 Tilt of vehicle. C‐HDM‐303 shown. Swivel. Parts sold separately. Docking Station with optional C‐HDM‐303 Place Seat Mount assembly on seat and slip and C‐MD‐202 shown. the backing plate through the gap between the seat back and seat pad. C‐TM‐SEATMT_INST_7‐10 ...
- Page 3 Attach both hooks underneath the seat to a Position backing plate so it will not pull sturdy location. back through the front of seat. Do NOT attach to moving parts or wires. Pull strap slack through ratchet Adjust brackets to position the computer mechanism and tighten the ratchet so the in the desired location. platform is firmly attached to seat. Plug power cable into the 12 volt power source. This platform can accommodate an optional printer mount. NOTE: A towel between the seat and seat mount platform will protect the seat. C‐TM‐SEATMT_INST_7‐10 ...
Need help?
Do you have a question about the C-TM-SEATMT and is the answer not in the manual?
Questions and answers