SMART Board MX V2 Series User Manual
Hide thumbs
Also See for Board MX V2 Series:
- User manual (45 pages) ,
- Installation and maintenance manual (82 pages) ,
- User manual (45 pages)

Subscribe to Our Youtube Channel
Related Manuals for SMART Board MX V2 Series


Summary of Contents for SMART Board MX V2 Series
- Page 1 SMART Board MX (V2) series interactive displays USER GUIDE SBID-MX265-V2 SBID-MX275-V2 SBID-MX286-V2 Was this document helpful? smarttech.com/docfeedback/171554...
- Page 2 © 2019 SMART Technologies ULC. All rights reserved. No part of this publication may be reproduced, transmitted, transcribed, stored in a retrieval system or translated into any language in any form by any means without the prior written consent of SMART Technologies ULC. Information in this manual is subject to change without notice and does not represent a commitment on the part of SMART.
-
Page 3: Important Information
Important information NOTE Refer to the SMART Board MX (V2) series interactive displays installation and maintenance guide (smarttech.com/kb/171555) for important information about installing and maintaining the display. WARNING Do not open or disassemble the display. You risk electrical shock from the high voltage inside the casing. -
Page 4: Federal Communication Commission Interference Statement
Suppliers Declaration of Conformity 47 CFR § 2.1077 Compliance Information Unique Identifier: SBID-7075, ID7075-1, ID7075-2, ID7086-1, ID7086-2 Responsible Party – U.S. Contact Information SMART Technologies Inc. 2401 4th Ave., 3rd Floor Seattle, WA 98121 compliance@smarttech.com This device complies with Part 15 of the FCC Rules. Operation is subject to the following two conditions: 1. -
Page 5: Innovation, Science And Economic Development Canada Statement
IMPORTANT INFORMATION NOTE This equipment has been tested and found to comply with the limits for a Class A digital device, pursuant to part 15 of the FCC Rules. These limits are designed to provide reasonable protection against harmful interference when the equipment is operated in a commercial environment. -
Page 6: Innovation, Science Et Développement Économique Déclaration Du Canada
IMPORTANT INFORMATION Innovation, Science et Développement économique Déclaration du Canada Cet appareil est conforme à la norme ISED CNR-247 pour les appareils radio agréés. Son fonctionnement est soumis aux deux conditions suivantes: 1. le dispositif ne doit pas produire de brouillage préjudiciable, et 2. -
Page 7: Table Of Contents
Installing third-party apps Cleaning up the display Chapter 4: Connecting computers and other devices Installing and using SMART software Connecting room computers and guest laptops Connecting a SMART PCM8 series OPS PC Connecting USB drives, peripherals, and other devices smarttech.com/kb/171554... - Page 8 Touch isn’t working as expected The pens and erasers aren’t working as expected iQ apps aren’t working as expected SMART software on connected computers isn’t working as expected The SMART PCM8 OPS PC isn’t working as expected Contacting your reseller for additional support...
-
Page 9: Chapter 1: Welcome
This chapter introduces the SMART Board® MX (V2) series interactive displays. About this guide This guide explains how to use a SMART Board MX (V2) series interactive display. This guide is intended for individuals who use displays in their organizations. Other documentation and resources are available for those who install and maintain displays (see More information on page 7). -
Page 10: About The Display
CHAPTER 1 WELCOME About the display The SMART Board MX (V2) interactive display with iQ is the hub of your classroom. The display includes an extensive set of features and components: Touch You can do everything on the display that you can do at your computer—open and close applications, meet with others, create new documents or edit existing ones, visit websites, play and manipulate videos, and so on—by touching the display’s surface. - Page 11 CHAPTER 1 WELCOME iQ experience The display’s iQ experience provides one-touch access to collaborative tools, including a whiteboard, wireless screen sharing, and a web browser. With minimal network integration, there’s no need for wires, cables, or manual software and firmware updates. Tap the Home button on the display’s front control panel or the remote control to open the Home screen.
- Page 12 You can install an OPS-compatible device, such as a SMART PCM8 series OPS PC, in the accessory slot. The SMART PCM8 series OPS PC provides a complete Windows 10 Pro solution. For more information on the SMART PCM8 series OPS PC, see SMART PCM8 series OPS PC on page 6.
-
Page 13: Identifying Your Specific Model
For more information about the remote control, see Using the remote control on page 11. Identifying your specific model SMART offers several models of the SMART Board MX (V2) series interactive display. For help identifying your model, see the label on the left side of the display. -
Page 14: Accessories
Intel® Core™ processors and are designed specifically to work with a SMART display. Available in two standard configurations, SMART PCM8 series OPS PCs are WHQL certified and fully licensed with Windows 10 Pro out of the box. Install the OPS PC in a display’s OPS slot to provide a complete 4K UHD Windows 10 solution at your fingertips, without the need for an external PC or additional cables. -
Page 15: More Information
Stands If you want to move the display from place to place, you can install it on a SMART mobile stand. Alternatively, if you are installing the display on a wall that cannot support the display’s full weight, you can install the display on a SMART floor stand. -
Page 17: Chapter 2: Using Basic Features
Touch is not available right after waking up the display or turning it on. Wait a few seconds and then the display will respond to touch. For information about turning the display off, see SMART Board MX-V2 series interactive displays installation and maintenance guide (smarttech.com/kb/171555). -
Page 18: Opening And Using The Home Screen
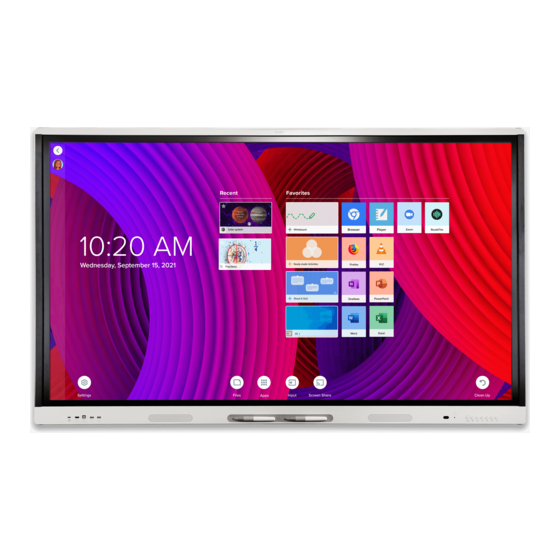
CHAPTER 2 USING BASIC FEATURES Opening and using the Home screen The Home screen appears when you wake the display. You can use it to open and use iQ apps, view the input of connected computers, and more. You can also change the background and personalize other features of the Home screen. -
Page 19: Using The Remote Control
CHAPTER 2 USING BASIC FEATURES Name Procedure Volume decrease Press to turn down the volume (see Adjusting the volume on page 16). Volume increase Press to turn up the volume (see Adjusting the volume on page 16). Power Press to wake the display (see Waking up the display and putting it back to sleep on page 9). - Page 20 CHAPTER 2 USING BASIC FEATURES The image and table below list the functions available for the remote control. Name Procedure Power Press to enter or exit Standby mode (see Waking up the display and putting it back to sleep on page 9). NOTE Touch is not available right after waking up the display or turning it on.
-
Page 21: Using Touch
CHAPTER 2 USING BASIC FEATURES Name Procedure Back Go back one step back in your navigation history. Input Switch input sources (see Viewing a connected computer’s input on page 26). Settings Open display settings. Hide screen contents behind a screen shade (see Showing Screen shade and hiding the screen shade on page 17). - Page 22 CHAPTER 2 USING BASIC FEATURES Pan (one finger) Pan (two fingers) / scroll Pinch to zoom in / scale (enlarge) Pinch to zoom out / scale (reduce) Rotate Flick Erase with palm Erase with fist smarttech.com/kb/171554...
-
Page 23: Writing, Drawing, And Erasing
Using presentation tools, such as Spotlight, Magnifier, and Screen Shade Changing a pen’s default color, thickness, and other properties You can change a pen’s color, thickness, and other properties temporarily using the SMART Ink dynamic (floating) toolbar when you’re viewing a connected computer’s input. -
Page 24: Adjusting The Volume
CHAPTER 2 USING BASIC FEATURES To erase digital ink Move your fist or palm over the digital ink you want to erase. Adjusting the volume Use the buttons on the front control panel or the remote control to mute the display’s volume or turn it up or down. -
Page 25: Showing And Hiding The Screen Shade
CHAPTER 2 USING BASIC FEATURES NOTE Freezing the screen does not pause applications that are running on the connected computer. It simply freezes the display of those applications. To unfreeze the screen, press the Freeze button again. Showing and hiding the screen shade You can temporarily hide the contents of the screen behind a virtual screen shade by pressing the Screen Shade button on the front control panel or the remote control. -
Page 27: Chapter 3: Using The Iq Apps
IT administrator to make sure the network and display have been properly configured. Using the Apps Library The Apps Library contains the Browser, SMART Notebook Player, and kapp Whiteboard apps. You can also add apps from the web and SMART’s app store or install third-party apps. smarttech.com/kb/171554... -
Page 28: Using The Files Library
Using SMART Notebook Player Use SMART Notebook Player to open, view, and interact with SMART Notebook software files. Notebook Player makes it easy to present SMART Notebook files and play SMART lab™ activities on the display. SMART Notebook Player is also the default whiteboard for education models. -
Page 29: Using Browser
To learn more about screenshots, see Writing and drawing over apps. Installing third-party apps You can install third-party apps from the Google Play Store using SMART Remote Management. To learn more about installing third-party apps, see Deploying third-party apps on your display. -
Page 30: Cleaning Up The Display
CHAPTER 3 USING THE IQ APPS Cleaning up the display After you’ve finished using the display, tap Clean Up on the Home screen to clean up the display for the next user. To learn more, see Preparing the display for the next user. -
Page 31: Chapter 4: Connecting Computers And Other Devices
The display comes with the following software, which you can install on connected computers: Software Description Licensing details SMART Learning Suite A suite of desktop and online software 1-year subscription that combines lesson delivery, activities, assessments, and collaborative workspaces and includes SMART Notebook software and... -
Page 32: Downloading And Installing Smart Software
Installing and maintaining SMART Notebook. Using SMART software For information about using SMART software, see the following pages in the Support section of the SMART website: SMART Notebook SMART Learning Suite Online SMART Learning Suite SMART Product Drivers... -
Page 33: Connecting Room Computers And Guest Laptops
Side and bottom connector panel Front connector panel NOTES Install SMART software on any computers you connect to the display (see Installing and using SMART software on page 23). Your organization’s installers might have connected cables to the display and run the cables behind a wall or under the floor to a desk or table where you can place your computer. -
Page 34: Viewing A Connected Computer's Input
CHAPTER 4 CONNECTING COMPUTERS AND OTHER DEVICES Viewing a connected computer’s input To view a connected computer’s input 1. Connect the computer to the display. 2. Press the Input button on the front control panel or the remote control. The display shows thumbnails of the devices that are connected to the display’s inputs: NOTE A thumbnail with Touch enabled indicates a USB cable is connected between the... -
Page 35: Connecting Usb Drives, Peripherals, And Other Devices
CHAPTER 4 CONNECTING COMPUTERS AND OTHER DEVICES Resolution Input source aspect ratio Mode Refresh rate 1280 × 720 16:9 HD / 720p 59.94 Hz / 60 Hz 50 Hz 29.97 Hz / 30 Hz 25 Hz 23.98 Hz / 24 Hz 720 ×... -
Page 36: Connecting A Smart Pcm8 Series Ops Pc
Do not install the OPS PC or remove it from the accessory slot while the display is turned on. You can install the SMART software that is included with the display on the OPS PC. For more information on installing software, see Installing and using SMART software on page 23. -
Page 37: Connecting Usb Drives, Peripherals, And Other Devices
(such as keyboards), and other devices to these connectors and use the devices with the iQ experience, connected computers, and devices installed in the accessory slot (such as the SMART PCM8 series OPS PC). The following table shows which USB 3.0 Type-A receptacles you can use with each input source... - Page 38 CHAPTER 4 CONNECTING COMPUTERS AND OTHER DEVICES NOTE If a SMART PCM8 series OPS PC is installed in the accessory slot, you can connect USB drives, peripherals, and other devices to the USB 2.0 Type-A, USB 3.0 Type-B, and USB Type-C receptacles on the OPS PC to access those devices from the OPC PC input.
-
Page 39: Chapter 5: Troubleshooting
This section explains how to resolve a variety of common issues with the display and SMART PCM8 OPS PC (if installed). If your specific symptoms aren’t covered below or the solutions to the symptoms don’t work, refer to the SMART knowledge base for additional troubleshooting information community.smarttech.com/s/topic/0TO0P000000Xt5yWAC/mx-series... -
Page 40: The Screen Is Blank Or There's A Problem With The Image On The Screen
The image is dim. There are bright spots on the Take a photograph of the screen and send it to SMART support. If SMART screen. support determines that the issue is with the screen and the display is under warranty, you may be eligible for a replacement. -
Page 41: There's No Sound Or There's A Problem With The Sound
Connecting an audio cable to the display’s stereo 3.5 mm out connector disables the internal speakers. If you’re using the display’s S/PDIF out connector to connect a sound bar or receiver for external speakers, see the SMART Board MX (V2) series interactive displays installation and maintenance guide (smarttech.com/kb/171555). -
Page 42: Touch Isn't Working As Expected
On Mac computers, open System Information and make sure there are no error messages in the display’s row. For Mac computers with macOS Mojave, see How to resolve issues with installing and using SMART Learning Suite software on macOS Mojave. The display responds to touch Restart the display. -
Page 43: The Pens And Erasers Aren't Working As Expected
Reinstall or update SMART Product Drivers and SMART Ink on any connected computers. Make sure SMART Product Drivers is 12.14 or later. The display responds to touch but Reinstall or update SMART Product Drivers and SMART Ink on any connected not to writing with a pen. -
Page 44: The Smart Pcm8 Ops Pc Isn't Working As Expected
Press and hold the power button on the OPS PC. b. Wait two minutes. c. Press the power button to turn on the OPS PC. If restarting the OPS PC doesn’t resolve the issue, contact SMART support. There is an issue with Bluetooth. Fix Bluetooth problems in Windows 10: FAQ. - Page 45 Scan the QR code on the label to view the SMART Board MX (V2) series interactive display support pages on the SMART website. You can also find the serial number in the iQ settings. Refer to the SMART Board MX (V2) series interactive displays installation and maintenance guide (smarttech.com/kb/171555) for more information.
- Page 48 SMART TECHNOLOGIES smarttech.com/support smarttech.com/contactsupport smarttech.com/kb/171554...
Need help?
Do you have a question about the Board MX V2 Series and is the answer not in the manual?
Questions and answers