SMART Board MX Series User Manual
Hide thumbs
Also See for SMART Board MX Series:
- Installation and maintenance manual (115 pages) ,
- Instruction for installation and maintenance (90 pages) ,
- User manual (62 pages)
Table of Contents
Advertisement
Quick Links
SMART Board MX and MX Pro series
interactive displays
USER GUIDE
SBID-MX255-V3
|
SBID-MX265-V3
SBID-MX255-V3-PW
|
SBID-MX265-V3-PW
SBID-MX055-V3
|
SBID-MX065-V3
SBID-MX055-V3-PW
|
SBID-MX065-V3-PW
SBID-MX255-V2-C
|
SBID-MX265-V2-C
SBID-MX255-V2-CPW
|
SBID-MX265-V2-CPW
SBID-MX255-V2
|
SBID-MX265-V2
SBID-MX255-V2-PW
|
SBID MX265-V2-PW
SBID MX365
|
SBID-MX375
|
SBID-MX386
IDX55-3
|
IDX65-3
|
IDX75-3
|
IDX86-3
Was this document helpful?
smarttech.com/docfeedback/171554
|
SBID-MX275-V3
|
SBID-MX286-V3
|
SBID-MX275-V3-PW
|
SBID-MX075-V3
|
SBID-MX086-V3
|
SBID-MX075-V3-PW
|
SBID-MX275-V2-C
|
SBID-MX286-V2-C
|
SBID-MX275-V2-CPW
|
SBID-MX275-V2
|
SBID-MX286-V2
|
SBID-MX275-V2-PW
|
SBID MX265
|
SBID-MX275
|
IDX55-2
|
IDX65-2
|
IDX75-2
|
SBID-MX286-V3-PW
|
SBID-MX086-V3-PW
|
SBID-MX286-V2-CPW
|
SBID-MX286-V2-PW
|
SBID-MX286
|
IDX86-2
Advertisement
Chapters
Table of Contents

Related Manuals for SMART SMART Board MX Series


Summary of Contents for SMART SMART Board MX Series
- Page 1 SMART Board MX and MX Pro series interactive displays USER GUIDE SBID-MX255-V3 SBID-MX265-V3 SBID-MX275-V3 SBID-MX286-V3 SBID-MX255-V3-PW SBID-MX265-V3-PW SBID-MX275-V3-PW SBID-MX286-V3-PW SBID-MX055-V3 SBID-MX065-V3 SBID-MX075-V3 SBID-MX086-V3 SBID-MX055-V3-PW SBID-MX065-V3-PW SBID-MX075-V3-PW SBID-MX086-V3-PW SBID-MX255-V2-C SBID-MX265-V2-C SBID-MX275-V2-C SBID-MX286-V2-C SBID-MX255-V2-CPW SBID-MX265-V2-CPW SBID-MX275-V2-CPW SBID-MX286-V2-CPW SBID-MX255-V2 SBID-MX265-V2 SBID-MX275-V2 SBID-MX286-V2 SBID-MX255-V2-PW SBID MX265-V2-PW...
- Page 2 © 2021 SMART Technologies ULC. All rights reserved. No part of this publication may be reproduced, transmitted, transcribed, stored in a retrieval system or translated into any language in any form by any means without the prior written consent of SMART Technologies ULC. Information in this manual is subject to change without notice and does not represent a commitment on the part of SMART.
-
Page 3: Important Information
Important information ENERGY STAR® NOTE Refer to the SMART Board MX and MX Pro series interactive ENERGY STAR is the government-backed symbol displays installation and maintenance guide for energy efficiency, providing simple, credible, (smarttech.com/kb/171555) for important information about and unbiased information that consumers and installing and maintaining the display. - Page 4 Important information Innovation, Science and Economic NOTE Development Canada statement This equipment has been tested and found to comply with the limits for a Class A digital device, pursuant to part 15 of the This device complies with RSS-247 of the Innovation, Science FCC Rules.
- Page 5 Cet émetteur ne doit pas être co- implantés ou exploités conjointement avec une autre antenne ou émetteur. EU declaration of conformity Hereby SMART Technologies ULC declares that the radio equipment type Interactive displays model IDX55-2, IDX55-3, IDX65-1, IDX65-2, IDX-65-3, IDX75-1, IDX75-2, IDX75-3, IDX86-1, IDX86-2, IDX86-3, and the OPS AM40, AM50 are in compliance with Directive 2014/53/EU.
-
Page 6: Table Of Contents
Installing third-party apps Cleaning up the display Using kapp Whiteboard Chapter 4: Connecting computers and other devices Installing and using SMART software Connecting room computers and guest laptops Connecting a SMART OPS PC module Connecting USB drives, peripherals, and other devices smarttech.com/kb/171554... - Page 7 The pens and erasers aren’t working as expected iQ apps aren’t working as expected SMART software on connected computers isn’t working as expected The SMART OPS PC module isn’t working as expected The Intel Compute Card isn’t working as expected Contacting your reseller for additional support smarttech.com/kb/171554...
-
Page 8: Chapter 1: Welcome
This guide is intended for individuals who use displays in their organizations. Other documentation and resources are available for those who install and maintain displays (see More information on page 15). About the display The SMART Board MX or MX Pro interactive display with iQ is the hub of your classroom. smarttech.com/kb/171554... -
Page 9: Touch
Chapter 1 Welcome The display includes an extensive set of features and components: Touch You can do everything on the display that you can do at your computer—open and close applications, meet with others, create new documents or edit existing ones, visit websites, play and manipulate videos, and so on—by touching the display’s surface. -
Page 10: Iq Experience
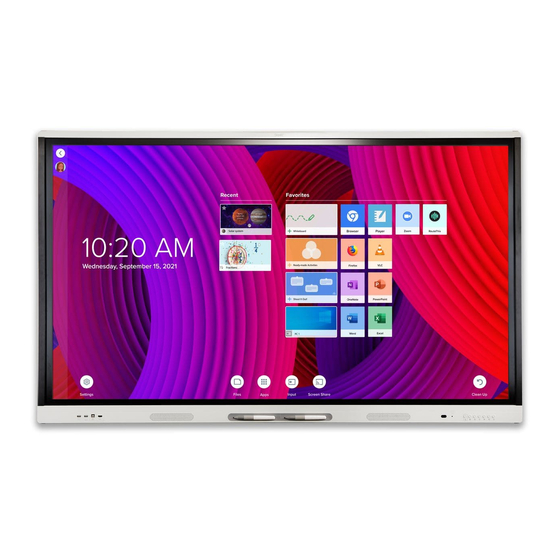
Chapter 1 Welcome iQ experience The display’s iQ experience provides one-touch access to collaborative tools, including a whiteboard, wireless screen sharing, and a web browser. With minimal network integration, there’s no need for wires, cables, or manual software and firmware updates. From the iQ experience Home screen, you can open the iQ apps, switch inputs, and adjust settings. -
Page 11: Room Computers And Guest Laptops
Windows 10 solution at your fingertips, without the need for an external PC or cables. For other models, you can install an OPS-compatible device, such as a SMART OPS PC module, in the accessory slot. SMART OPS PC modules provide a complete Windows® 10 Pro installation. -
Page 12: Front Connector Panel
Chapter 1 Welcome For more information about the front control panel, see Using the front control panel on page 17. Front connector panel The front connector panel includes connectors for USB peripherals and a computer or other input source. For more information about the convenience panel, see Connecting room computers and guest laptops on page 33. -
Page 13: Identifying Your Specific Model
Chapter 1 Welcome Identifying your specific model There are several series of SMART Board MX and MX Pro series interactive displays: SMART Board MX (V3) SMART Board MX (V2- SMART Board MX (V2) SMART MX series series C) series series SBID-MX255-V3 SBID-MX255-V2-C SBID-MX255-V2... -
Page 14: Smart Ops Pc Module
Stands If you want to move the display from place to place, you can install it on a SMART mobile stand. If you are installing the display on a wall that cannot support the display’s full weight, you can install the display on a SMART floor stand. -
Page 15: More Information
More information In addition to this guide, SMART provides other documents for the display in the Support section of the SMART website (smarttech.com/support). Scan the QR code on the cover of this guide to view links to SMART Board MX and MX Pro series interactive display documents and other support resources. -
Page 16: Chapter 2: Using Basic Features
Touch is not available right after waking up the display or turning it on. Wait a few seconds and then the display will respond to touch. For information about turning the display off, see SMART Board MX and MX Pro series interactive displays installation and maintenance guide (smarttech.com/kb/171555). -
Page 17: Using The Home Button
You can return to the Home screen or the Input screen at any time by following the instructions below. To show the Home screen or the Input screen on SMART Board MX (V3, V2 and V2-C) series displays Tap the Home button on the front control panel. -
Page 18: Using The Remote Control
Chapter 2 Using basic features Name Procedure Screen shade Press to hide screen contents behind a screen shade (see Freezing or hiding the screen on page 25). Press to freeze and unfreeze the screen (see Freeze Freezing the screen on page 25). Volume decrease Press to turn down the volume (see Adjusting the volume on page 24). -
Page 19: Smart Board Mx (V3, V2 And V2-C) Series
Chapter 2 Using basic features SMART Board MX (V3, V2 and V2-C) series The image and table below list the remote control’s functions. Name Procedure Press to enter or exit Standby mode (see Waking up the display and Power putting it back to sleep on page 16). -
Page 20: Smart Board Mx Series
Open the Screen Share app (see Sharing your device’s screen to the Share screen display). NOTE This button is not available on all remote control models. SMART Board MX series The image and table below list the remote control’s functions. smarttech.com/kb/171554... -
Page 21: Using Touch
Chapter 2 Using basic features Name Function MUTE Mute or unmute the volume SOURCE Open the input source menu INFO Press to show the display’s detected resolution and refresh rate for the current input source Open the display’s settings AUDIO Change the display’s audio mode VOL + / VOL - Increase or decrease volume... - Page 22 Chapter 2 Using basic features NOTE Not all gestures work in all applications. Refer to an application’s documentation to learn which gestures it supports. Pan (one finger) Pan (two fingers) / scroll Pinch to zoom in / scale (enlarge) Pinch to zoom out / scale (reduce) Rotate Flick smarttech.com/kb/171554...
-
Page 23: Writing, Drawing, And Erasing
Using the SMART Ink® dynamic (floating) toolbar When you start drawing on the screen while viewing a connected computer’s input, the SMART Ink® dynamic (floating) toolbar for SMART Ink appears on the screen. You can use this toolbar to temporarily change the pen’s color, thickness, or other properties, and you can also access SMART Ink’s tools, such... -
Page 24: Adjusting The Volume
Using basic features Changing a pen’s default color, thickness, and other properties You can change a pen’s color, thickness, and other properties temporarily using the SMART Ink dynamic (floating) toolbar when you’re viewing a connected computer’s input. To change the pen’s default color, thickness, and other properties, see Changing pen, eraser, and button settings. -
Page 25: Freezing Or Hiding The Screen
Showing and hiding the screen shade For SMART Board MX (V3), MX (V3) Pro, MX (V2-C), MX (V2-C) Pro, MX (V2), MX (V2) Pro, and MX Pro series displays. You can temporarily hide the contents of the screen behind a virtual screen shade by pressing the Screen Shade button on the front control panel or remote control. -
Page 26: Chapter 3: Using The Iq Apps
Using the Apps Library The Apps Library contains the Browser, SMART Whiteboard, and kapp Whiteboard apps. You can also add apps from the web and SMART’s app store or install third-party apps. To open the Apps Library... -
Page 27: Using The Files Library
Browsing the internet on your display. Using Screen Share For SMART Board MX (V2-C), MX (V2-C) Pro, MX (V2), MX (V2) Pro, and MX series displays. You can share the screens from computers and mobile devices on the display wirelessly using Screen Share. -
Page 28: Using Smart Mirror
Mac computers and iOS devices, using AirPlay Android™ devices, using Cast Screen You can also download the SMART Screen Share app for Chromebooks, Windows computers, Mac computers, iOS devices, and Android devices. To learn how to use the other features of Screen Share, see Sharing your device’s screen to the... -
Page 29: Cleaning Up The Display
Use the kapp Whiteboard to write and erase notes on the display just as you do on a traditional dry erase board. You can also save your notes for later and share them using the SMART kapp® app. The kapp Whiteboard app is the default whiteboard for enterprise models. -
Page 30: Chapter 4: Connecting Computers And Other Devices
Setting a connected computer’s resolution and refresh rate Connecting USB drives, peripherals, and other devices Troubleshooting connected computers Connecting a SMART OPS PC module Connecting USB drives, peripherals, and other devices WARNING Ensure that any cables that cross the floor to the display are properly bundled and marked to avoid a trip hazard. - Page 31 Installing and maintaining SMART Notebook, Installing SMART TeamWorks, or Installing and maintaining SMART Meeting Pro. Using SMART software For information about using SMART software, see the following pages in the Support section of the SMART website: SMART Notebook Lumio by SMART SMART Learning Suite SMART TeamWorks SMART Meeting Pro Pro models only.
- Page 32 SMART Product Drivers and SMART Ink SMART Remote Management SMART Product Drivers and Ink are installed and used on the computer input of the display to enable touch and digital inking features. This supporting software is included with SMART’s software products, such as SMART Notebook,...
-
Page 33: Connecting Room Computers And Guest Laptops
Connecting computers and other devices Connecting room computers and guest laptops You can connect room computers and guest laptops to the display and view and interact with their inputs. SMART Board MX (V3) series Side and bottom connector panels Front connector panel... - Page 34 Chapter 4 Connecting computers and other devices SMART Board MX (V2-C) series Side and bottom connector panels Front connector panel smarttech.com/kb/171554...
- Page 35 Chapter 4 Connecting computers and other devices SMART Board MX (V2) series Side and bottom connector panels Front connector panel HDMI 3 smarttech.com/kb/171554...
- Page 36 Chapter 4 Connecting computers and other devices SMART Board MX series Side and bottom connector panels Front connector panel HDMI 1 HDMI 3 HDMI 2 smarttech.com/kb/171554...
- Page 37 You can charge devices connected to the USB Type-C receptacle on the side connector panel of SMART Board MX (V3) series interactive displays up to 65 W (if a module is not installed in the accessory slot) or up to 30 W (if a module is installed in the accessory slot).
- Page 38 Chapter 4 Connecting computers and other devices To view the input of a computer connected to a SMART Board MX series display 1. Connect the computer to the display. 2. Press the Input on the front control panel. The Input selection menu appears.
- Page 39 Chapter 4 Connecting computers and other devices The following table presents the recommend resolutions and refresh rates for the display’s VGA input source: Resolution Input source Mode Refresh rate aspect ratio 1920 × 1080 16:9 [N/A] 60.000 Hz 1600 × 1200 [N/A] 60.000 Hz 1360 ×...
-
Page 40: Connecting A Smart Ops Pc Module
The display includes the following USB Type A receptacles. You can connect USB drives, peripherals (such as keyboards), and other devices to these connectors and use the devices with the iQ experience, connected computers, and devices installed in the accessory slot (such as the SMART OPS PC module). SMART Board MX (V3) series SMART Board MX (V2-C) series smarttech.com/kb/171554... - Page 41 OPS PC (SuperSpeed) (Hi-Speed) Located on the side connector panels of SMART Board MX (V2 and V2-C) series displays Located on the front connector panels of all displays and on the side connector panel of SMART Board MX series displays smarttech.com/kb/171554...
-
Page 42: Chapter 5: Troubleshooting
Contacting your reseller for additional support This section explains how to resolve a variety of common issues with the display. If your specific symptoms aren’t covered below or the solutions to the symptoms don’t work, refer to the SMART knowledge base for additional troubleshooting information community.smarttech.com/s/topic/0TO0P000000Xt5yWAC/mx-series... -
Page 43: The Screen Is Blank Or There's A Problem With The Image On The Screen
The screen is blank. Make sure the screen is working: On SMART Board MX (V3, V2 or V2-C) series displays, press the Home button on the front control panel or the remote control to open the Home screen. On SMART Board MX series displays, press Input... - Page 44 If the Home screen appears correctly, the issue is with the video input. Take a photograph of the screen and send it to SMART support. If SMART support determines that the issue is with the screen and the display is under warranty, you may be eligible for a replacement.
-
Page 45: There's No Sound Or There's A Problem With The Sound
Connecting an audio cable to the display’s stereo 3.5 mm out connector disables the internal speakers. If you’re using the display’s S/PDIF out connector to connect a sound bar or receiver for external speakers, see the SMART Board MX (V2) and MX (V2) Pro series interactive displays installation and maintenance guide (smarttech.com/kb/171555). -
Page 46: Touch Isn't Working As Expected
On Mac computers, open System Information and make sure there are no error messages in the display’s row. Reinstall or update SMART Product Drivers and SMART Ink on any connected computers. Make sure SMART Product Drivers is version 12.14 or later. smarttech.com/kb/171554... -
Page 47: Iq Apps Aren't Working As Expected
When you write on the screen, the ink Make sure you are using a SMART Board MX or MX Pro series interactive display pen. appears in the wrong place. Restart the display. Confirm with the installers that the computer is connected to the display with only a Writing is intermittent. -
Page 48: The Smart Ops Pc Module Isn't Working As Expected
For SMART Board MX (V3, V2 and V2-C) series displays, the serial number is on a label located on the left side of the display (pictured). Scan the QR code on the label to view the SMART Board MX or MX Pro series interactive display support pages on the SMART website. - Page 49 Chapter 5 Troubleshooting For SMART Board MX series displays, the serial number is on labels located on the bottom frame and the back of the display. NOTE To find the serial number for the iQ appliance and Intel Compute Card, see...
- Page 50 SMART TECHNOLOGIES smarttech.com/support smarttech.com/contactsupport smarttech.com/kb/171554...
Need help?
Do you have a question about the SMART Board MX Series and is the answer not in the manual?
Questions and answers