
Related Manuals for Yeastar Technology K2


Summary of Contents for Yeastar Technology K2
- Page 1 Hardware Installation Guide Yeastar K2 IPPBX Hardware Installation Guide Yeastar K2 IP-PBX December 4, 2019...
-
Page 2: Table Of Contents
Contents Hardware Installation Guide............................ 3 Installation Precautions & Warning........................3 Package List.................................3 Hardware Overview..............................4 Install Yeastar K2 IPPBX#Rack Mount#......................6... -
Page 3: Hardware Installation Guide
Hardware Installation Guide Hardware Installation Guide for Yeastar K2 IPPBX. About this guide This guide describes the hardware indicators and ports on the Yeastar K2 IPPBX, and provides instructions of rack installation, and cable connections of the PBX. Audience This guide is for the person who wants to install the Yeastar K2 IPPBX device. -
Page 4: Hardware Overview
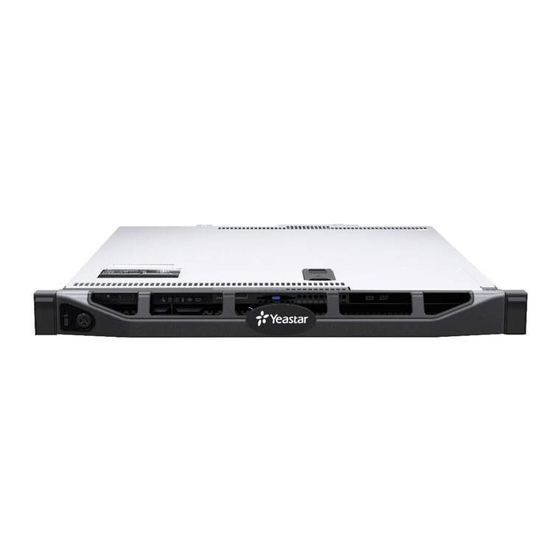
Yeastar K2 IPPBX Hardware Installation Guide | 1 - Hardware Installation Guide | 4 Hardware Overview Descriptions of LED indicators and ports on Yeastar K2 IPPBX. A. Front Panel Front panel of Yeastar K2 IPPBX and Yeastar K2 Lite IPPBX. - Page 5 Yeastar K2 IPPBX Hardware Installation Guide | 1 - Hardware Installation Guide | 5 Diagnostic Indicators The diagnostic indicators on the front panel display the system status during startup. Note: The system equipped with an LCD panel does not provide diagnostic indicator.
-
Page 6: Install Yeastar K2 Ippbx#Rack Mount
Enables you to connect a VGA display to the system. Install Yeastar K2 IPPBX#Rack Mount# Install the Yeastar K2 IPPBX in a rack and connect the cables to the PBX. Yeastar K2 IPPBX support four static rail solutions: • Tool-less, round- or square-hole (four-post) in step 2 •... - Page 7 Yeastar K2 IPPBX Hardware Installation Guide | 1 - Hardware Installation Guide | 7 Step 1. Identify the Static Rail Kit Contents Locate the components for installing the rail kit assembly: • Two static rails. • Two chassis rails. • Two Velcro straps.
- Page 8 Yeastar K2 IPPBX Hardware Installation Guide | 1 - Hardware Installation Guide | 8 Step 4. Install Flush-Mount or Center-Mount Static Rails (Two-Post) Note: To configure your rails for a tooled flush-m installation, refer to step 3. 1. Attach right and left mounting rails to the front mounti with two pairs of screws.
- Page 9 Yeastar K2 IPPBX Hardware Installation Guide | 1 - Hardware Installation Guide | 9 Step 6. Install Four-Post Threaded Static Rails Note: To configure your rails for a tooled installation, refer to step 3 and step 5. 1.Attach the right and left mounting rails to the front mounting flanges with two pairs of screws.
- Page 10 Yeastar K2 IPPBX Hardware Installation Guide | 1 - Hardware Installation Guide | 10 Step 9. Connect Cables Caution: Please use the dedicated power cable. Failure or damage caused by using other power cables is not covered by the warranty.
Need help?
Do you have a question about the K2 and is the answer not in the manual?
Questions and answers