Table of Contents
Advertisement
Quick Links
Advertisement
Table of Contents

Subscribe to Our Youtube Channel
Related Manuals for LifeGear Foldable Oxy Cycle Sync 16080


Summary of Contents for LifeGear Foldable Oxy Cycle Sync 16080
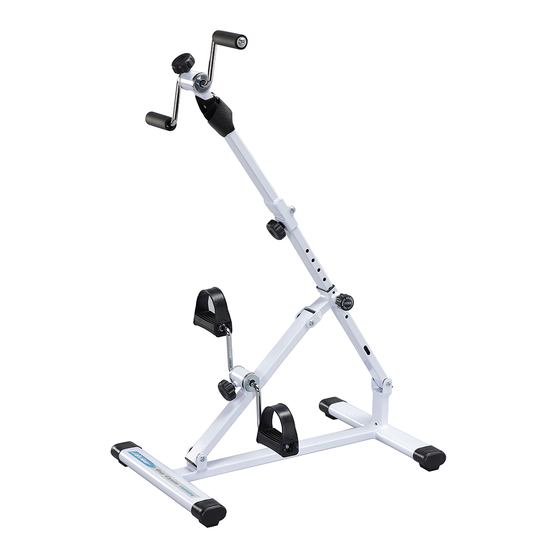
- Page 1 Foldable Oxy Cycle Sync Item No: 16080 OWNER’S MANUAL IMPORTANT: Read all instructions carefully before using this product. Retain this owner’s manual for future reference. The specifications of this product may vary from this photo and are subject to change without prior notice.
-
Page 2: Table Of Contents
TABLE OF CONTENTS WARRANTY ------------------------------------------------------------------------------- 2 IMPORTANT SAFETY INSTRUCTIONS ------------------------------------------- 3 EXPLODED VIEW ----------------------------------------------------------------------- 4 PARTS LIST ------------------------------------------------------------------------------- 5 ASSEMBLY PART ----------------------------------------------------------------------- 5 ASSEMBLY INSTRUCTIONS -------------------------------------------------------- 6 FOLDING STORAGE ------------------------------------------------------------------- 10 ADJUSTMENTS -------------------------------------------------------------------------- 11 MAINTENANCE -------------------------------------------------------------------------- 12 WORKOUT PRINCIPAL ---------------------------------------------------------------- 12 EXERCISES ------------------------------------------------------------------------------- 13 WARM UP AND COOL DOWN ROUTINE ---------------------------------------- 15... -
Page 3: Warranty
ONE YEAR LIMITED WARRANTY LifeGear Inc. warrants to the original purchaser that this product is free from defects in material and workmanship when used for the purpose intended, under the conditions that it has been installed and operated in accordance with LifeGear's Owner's Manual. -
Page 4: Important Safety Instructions
IMPORTANT SAFETY INSTRUCTIONS Read all instructions carefully before operating this product. Retain this owner’s manual and keep all original purchase receipt for future reference. Consult your physician before beginning this or any other exercise program. Do not operate the unit in a wet or moist environment. Close supervision is necessary when the unit is used by, on, or near children, invalids or disabled persons. -
Page 5: Exploded View
EXPLODED VIEW 13 14... -
Page 6: Parts List
PARTS LIST Description Qty No. Description 001 Base Frame End Cap 4 016 Small Tension Block 002 Base Frame 1 017 Knob M8x30 003 Nylon Nut M8 4 018 Tension Control Knob M8x15 004 Washer Ø8.5xØ18x1.5T 8 019 Screw M4x15 005 Plastic Washer Ø8.5xØ20x2T 6 020 Velcro Strap Rectangular Plastic End Cap... -
Page 7: Assembly Instructions
ASSEMBLY INSTRUCTIONS Velcro Strap STEP 1 Undo the Velcro Strap and then remove the Knob (17) from the Height Adjustment Tube (25). STEP 2 Unfold the Arm Exercise Support Tube (21) toward the rear of the unit. - Page 8 STEP 3 Turn the Spring Knob (24) in a counterclockwise direction until it can be pulled out. Pull out the Spring Knob (24) and then slide the Height Slide Tube (23) up to the suitable position. Lock the Height Slide Tube (23) in place by releasing the Spring Knob (24) and sliding the Height Slide Tube (23) up or down slightly until the Spring Knob (24) "pops"...
- Page 9 STEP 4 Secure the Arm Exercise Support Tube (21) to the Height Adjustment Tube (25) using the Knob (17) that was removed from the Height Adjustment Tube (25). Secure the Arm Exercise Support Tube (21) in place by turning the Knob (17) clockwise.
- Page 10 Assembly Part: (18) Tension Control Knob 2 PCS STEP 5 Insert both Tension Control Knob (18) into the holes on the Arm Exercise Support Tube (21) and Leg Exercise Support Tube (29). Turn the Tension Control Knob (18) clockwise to tighten. To increase the resistance, turn the Tension Control Knob (18) in a clockwise direction.
-
Page 11: Folding Storage
FOLDING STORAGE Turn the spring knob in a counterclockwise Pull out the spring knob and then slide direction until it can be pulled out. the height slide tube down to the last adjustment hole on the height adjustment tube. Lock the height slide tube in place by releasing the spring knob and sliding the height slide tube up or down slightly until the... -
Page 12: Adjustments
ADJUSTMENTS Tension Control Knob Adjusting the Tension Control Knob To increase the resistance, turn the tension control knob in a clockwise direction. To decrease the tension, turn the Tension Control Knob tension control knob in a counterclockwise direction. Height Slide Tube Adjusting the Arm Pedals Height Turn the spring knob in a counterclockwise direction until it can... -
Page 13: Maintenance
MAINTENANCE CLEANING After each exercise, ensure that the unit is wiped down and any sweat is removed from the unit. The unit can be cleaned with a soft cloth, mild soap and water. Wipe the equipment down with a damp cloth and dry completely. Do not use abrasives or solvents. INSPECTION Inspect the frames for rust or other damage. -
Page 14: Exercises
EXERCISES How to use your Oxy Cycle Sync When using the unit, the proper way to exercise is to set the desired tension by turning the Tension Control Knob, and then pedaling to get the best results. Pedaling at excessive speeds or applying excessive force will damage the product or may cause injury to persons. - Page 15 Arm Exercise Adjusting the arm pedals height and sit comfortably in a chair, so that user can easily reach the arm pedals without hyper extending (over straightening) the elbow joint. Arm exercise allows the user to exercise the muscles of the arm (biceps, triceps, deltoids and the smaller muscles of the forearms).
-
Page 16: Warm Up And Cool Down Routine
WARM UP AND COOL DOWN ROUTINE The WARM-UP is an important part of any workout. The purpose of warming up is to prepare your body for exercise and to minimize injuries. Warm up for two to five minutes before aerobic exercising. It should begin every session to prepare your body for more strenuous exercise by heating up and stretching your muscles, increasing your circulation and pulse rate, and delivering more oxygen to your muscles. - Page 17 QUADRICEPS STRETCH With one hand against a wall for balance, reach behind you and pull your right foot up. Bring your heel as close to your buttocks as possible. Hold for 15 counts and repeat with left foot. INNER THIGH STRETCH Sit with the soles of your feet together and your knees pointing outward.
Need help?
Do you have a question about the Foldable Oxy Cycle Sync 16080 and is the answer not in the manual?
Questions and answers