Table of Contents
Advertisement
Quick Links
Advertisement
Table of Contents

Subscribe to Our Youtube Channel
Related Manuals for SHOWTEC LED Powerbrick Set


Summary of Contents for SHOWTEC LED Powerbrick Set
- Page 1 LED Powerbrick Set ORDERCODE 41322...
-
Page 2: Table Of Contents
Showtec Showtec LED Powerbrick Set Product Guide ™ Warning..…...................………………………………………….. Safety-instructions………………………………………………………………………………………….…. Operating Determinations……………………………………………………………………………….…. Description..…................……….……………………………….… Features and Overview ………………………………...….……………….………….……….……….… Backside…………………………………………………...…...….……………….…………………...….…. Installation................…...……………………………………..….. Set Up and Operation..............……..…………………………….…… 1) Connected separate……...........……..………………………………………… 2) Connected on top of eachother by using the supplied brackets......……….. 3) Connected Side by Side...........……..………………………………………….. -
Page 3: Warning
WARNING CAUTION! Keep this device away from rain and moisture! FOR YOUR OWN SAFETY, PLEASE READ THIS USER MANUAL CAREFULLY BEFORE YOUR INITIAL START-UP! SAFETY INSTRUCTIONS Every person involved with the installation, operation and maintenance of this device has to: be qualified follow the instructions of this manual CAUTION! Be careful with your operations. -
Page 4: Operating Determinations
The arising condensation water might damage your device. Leave the device switched off until it has reached room temperature. If your Showtec device fails to work properly, discontinue use immediately. Pack the unit securely • (preferably in the original packing material), and return it to your Showtec dealer for service. -
Page 5: Description
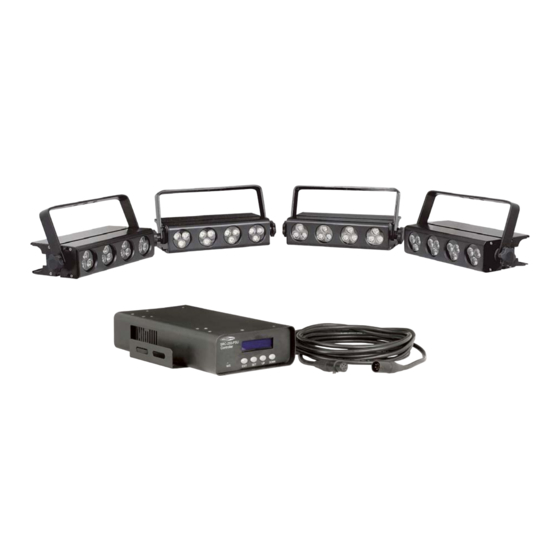
Description of the device Features LED Powerbrick Set is a LED system from Showtec. • Powerbrick set contains 4 Powerbricks, one controller, power leads, DMX leads. • Ultra bright LED • First grade aluminum body construction • Unlimited colors • Low power consumption •... -
Page 6: Installation
Do not attempt to operate a 120V specification product on 230V power, or vice versa. Note : Link all cables before connecting electric power. You have 3 possibilities to set up your LED Powerbrick Set: 1) Separate 2) Connected on top of eachother by using the supplied brackets... - Page 7 Be sure to put the small cube E and the aluminum section together in the small slot. Backside connection of 4 LED Powerbricks Connecting the entire LED Powerbrick system to a Truss system.
-
Page 8: Functions
FUNCTIONS: There are 3 options to operate the LED Powerbrick: Stand-alone Master / Slave DMX Mode After completing your settings, be sure to unplug the Powerbricks and the controller, otherwise errors could occur. This way you reset the entire system, but your settings keep stored in the memory of the controller. Stand-alone 1. - Page 9 1. Static RED Function Set : Gray Level 0-100 (1X Set Up) Flash Freq 0-100 (2X Set Up) Exit : Return to the Mode Menu 2. Static GREEN Function Set : Gray Level 0-100 (1X Set Up) Flash Freq 0-100 (2X Set Up) Exit : Return to the Mode Menu 3.
- Page 10 Flow 3 (FF/REW) Function Set : Run Speed 0-100 (1X Set Up) Flash Freq 0-100 (2X Set Up) Color Sort 0-20 (3X Set Up) Run Times 0-20 (4X Set Up) Exit : Return to the Mode Menu 2 Color Chase Function Set : Run Speed 0-100 (1X Set Up) Flash Freq 0-100 (2X Set Up) Color Sort 0-20 (3X Set Up)
-
Page 11: Connection Stand-Alone
Connection Stand-alone... -
Page 12: Dmx Controlled
DMX Controlled 1. The device will start test-mode. 2. Press MODE button to enter mode setting. 3. Switch to System Mode, then press the Set Up-button. 4. Enter the amount of tubes you are using. 5. For DMX Controlled you have to use DMX Channel: 1-65535, then press the Set Up-button again. 6. -
Page 13: Connection Dmx
Connection DMX You can control the LED Powerbrick with 3, 4 or 5 channels: • 3 channel: rRed, Green, Blue. • 4 channel: Master dimmer, Red, Green, Blue. • 5 channel: Master dimmer, strobe, Red, Green, Blue. -
Page 14: Illuminance Distribution
Illuminance Distribution 1.0m. 0.0m. 1.0m. Illuminance... -
Page 16: Maintenance
3. If all of the above appears to be O.K., plug the unit in again. 4. If you are unable to determine the cause of the problem, do not open the LED Powerbrick Set, as this may damage the unit and the warranty will become void. -
Page 17: Product Specifications
Product Specification Model: Showtec LED Powerbrick Set 4 x Powerbrick Working Voltage: 48V DC Max. Power: 18W Colors: 16.7million Light Source: 1W RGB LED 12 LEDs (4 Red, 4 Green, 4 Blue) Beam Angle: 25° Housing: Aluminum body in black...
Need help?
Do you have a question about the LED Powerbrick Set and is the answer not in the manual?
Questions and answers