
Related Manuals for SHOWTEC Compact Par 7 Tri


Summary of Contents for SHOWTEC Compact Par 7 Tri
- Page 1 USER MANUAL ENGLISH Compact Par 7 Tri Product code: 42580 Highlite International B.V. – Vestastraat 2 – 6468 EX – Kerkrade – the Netherlands...
- Page 2 Compact Par 7 Tri Preface Thank you for purchasing this Showtec product. The purpose of this user manual is to provide instructions for the correct and safe use of this product. Keep the user manual for future reference as it is an integral part of the product. The user manual shall be stored at an easily accessible location.
-
Page 3: Table Of Contents
Compact Par 7 Tri Table of contents Introduction ................................4 Before Using the Product ..........................4 Intended Use ............................... 4 Product Lifespan ..............................4 LEDs Lifespan ............................... 4 Text Conventions ..............................4 Symbols and Signal Words ..........................5 Symbols on the Information Label ........................5 Safety .................................. - Page 4 Compact Par 7 Tri Basic Cleaning Instructions ........................28 Corrective Maintenance ..........................29 Replacing the Fuse .............................29 Deinstallation, Transportation and Storage ....................30 Instructions for Deinstallation ..........................30 Instructions for Transportation ........................30 Storage ................................30 10. Disposal ................................30 11. Approval ................................30 Product code: 42580...
-
Page 5: Introduction
After unpacking, check the contents of the box. If any parts are missing or damaged, contact your Highlite International dealer. Your shipment includes: ● Showtec Compact Par 7 Tri ● Schuko to IEC (C13) power cable (1,5 m) ● User manual Fig. -
Page 6: Symbols And Signal Words
Compact Par 7 Tri Symbols and Signal Words Safety notes and warnings are indicated throughout the user manual by safety signs. Always follow the instructions provided in this user manual. Indicates an imminently hazardous situation which, if not avoided, will result in DANGER death or serious injury. -
Page 7: Safety
Compact Par 7 Tri Safety Important Read and follow the instructions in this user manual before installing, operating or servicing this product. The manufacturer will not accept liability for any resulting damages caused by the non-observance of this manual. Warnings and Safety Instructions... - Page 8 Compact Par 7 Tri WARNING Risk of epileptic shock Strobe lighting can trigger seizures in photosensitive epilepsy. Sensitive persons should avoid looking at strobe lights. Attention Power supply ● Before connecting the device to the power supply, make sure that the current, voltage and frequency match the input voltage, current and frequency specified on the information label on the device.
-
Page 9: Requirements For The User
Compact Par 7 Tri Attention Before each use, examine the device visually for any defects. Make sure that: ● All screws used for installing the device or parts of the device are tightly fastened and are not corroded. ● The safety devices are not damaged. -
Page 10: Description Of The Device
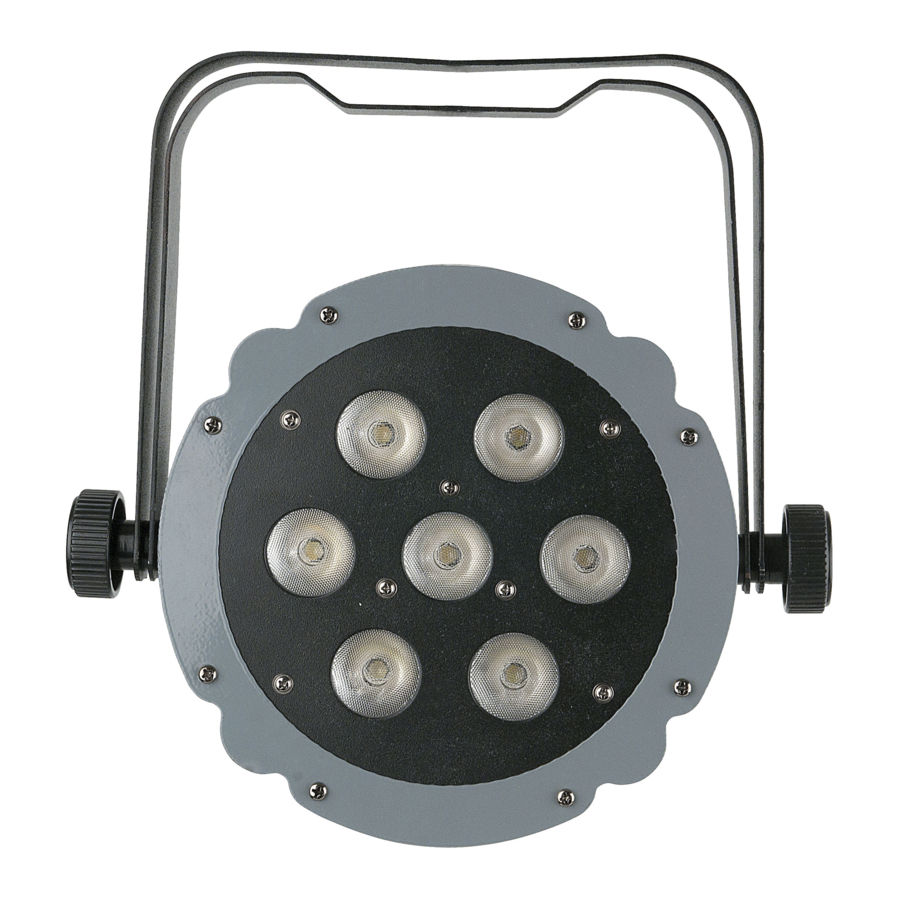
Description of the Device The Showtec Compact Par 7 Tri is a compact par, equipped with 7 x 3 W RGB LEDs. It is suitable for indoor venues and has a double bracket for easy floor positioning. It has a fixed 40° beam angle and is perfect for short-throw color mixing. -
Page 11: Product Specifications
Compact Par 7 Tri Product Specifications Model: Compact Par 7 Tri Electrical: Input voltage: 100–240 V AC, 50/60 Hz Power consumption: 28 W Fuse: T 1 A, 250 V Physical: Dimensions: 275 x 258 x 92 mm (L x W x H) -
Page 12: Dimensions
Compact Par 7 Tri Dimensions Fig. 05 Fig. 06 Installation Safety Instructions for Installation WARNING Incorrect installation can cause serious injuries and damage of property. If trussing systems are used, installation must be carried out only by instructed or skilled persons. -
Page 13: Installation Site Requirements
Compact Par 7 Tri Installation Site Requirements ● The device can be used only indoors. ● The device can be mounted to a truss or other rigging structure. ● The minimum distance to other objects must be bigger than 0,5 m. -
Page 14: Angle Adjustment
Compact Par 7 Tri Angle Adjustment You can adjust the angle of the device with the 2 adjustment screws (02). 01) Turn the adjustment screws (02) counterclockwise to release them. 02) Tilt the device at the desired angle (see Fig. 08). -
Page 15: Setup
Disconnect power supply before connecting or disconnecting data cables. Stand-alone Setup When the Compact Par 7 Tri is not connected to a controller or to other devices, it functions as a stand- alone device. It can be operated manually, in auto mode or in sound-controlled mode. -
Page 16: Dmx Cables
Fig. 09. Fig. 09 Master/Slave Setup The Compact Par 7 Tri supports master/slave control mode. To connect multiple devices in a master/slave setup, follow the steps below: Connect the first device’s DMX OUT connector to the second device’s DMX IN connector. -
Page 17: Dmx Linking
04) Continue assigning the starting addresses of the remaining devices by adding each time 8 to the previous number. Make sure that you do not have any overlapping channels in order to control each Compact Par 7 Tri correctly. If two or more devices are addressed similarly, they will work similarly. -
Page 18: Operation
Control Modes The Compact Par 7 Tri can be operated with a DMX controller, and as a stand-alone device or in a master/slave setup without a DMX controller. -
Page 19: Control Panel
Compact Par 7 Tri To operate the device with a DMX controller: 01) Set the DMX starting address of the device in the DMX Configuration menu. See 6.6.3. DMX Configuration on page 24 for more information. 02) Select the DMX channel mode in the DMX Configuration menu. See 6.6.3. DMX Configuration on page 24 for more information. -
Page 20: Menu Overview
Compact Par 7 Tri Menu Overview Product code: 42580... -
Page 21: Main Menu Options
Compact Par 7 Tri Main Menu Options The main menu has the following options: 1. Built-in programs 2. Auto mode 3. DMX configuration 4. Master/slave mode 5. Sound mode Press the MODE button to navigate through the main menu. 02) Press the SETUP button to open the submenus. -
Page 22: Built-In Programs Mode
Compact Par 7 Tri Built-in Programs Mode In this menu you can select one of the 7 color presets and OFF or run one of the 9 built-in chases. Product code: 42580... -
Page 23: Manual Color Mode
Compact Par 7 Tri Press the UP/DOWN buttons to select one of the following options. The selection range is Program 01– Program 10. You can select one of the manual color Pr.01 programs. See 6.6.1.1. Manual Color Mode on page 22 for more information Programs 02–10 output the built-in chases. -
Page 24: Built-In Programs
Compact Par 7 Tri 01) Press the SETUP button to enable the built-in program selection. 02) Press the UP/DOWN buttons to select one of the 7 color presets or OFF. The device will output the selected color. 03) Press the SETUP button to enable the manual color adjustment. -
Page 25: Dmx Configuration
Compact Par 7 Tri DMX Configuration In this menu you can configure the DMX settings of the device or set an ID for your device. 01) Press the UP/DOWN buttons to select the DMX starting address of the device. The selection range is 001–512. -
Page 26: Dmx Channels
Compact Par 7 Tri DMX Channels 3 CH 4 CH 8 CH Function Value Setting Master Dimmer 000–255 From low to high intensity (0–100 %) 000–255 From low to high intensity (0–100 %) (If CH6=0) No function 001–008 Color 1 R 255;... - Page 27 Compact Par 7 Tri 3 CH 4 CH 8 CH Function Value Setting 200–224 Program 9 (green color flow) 225–249 Program 10 (blue color flow) 250–255 Sound-controlled mode 000–009 ID1–ID66 010–019 020–029 030–039 040–049 050–059 060–069 070–079 080–089 090–099 100–109 ID10 110–119...
-
Page 28: Troubleshooting
Compact Par 7 Tri Troubleshooting This troubleshooting guide contains solutions to problems which can be carried out by an ordinary person. The device does not contain user-serviceable parts. Unauthorized modifications to the device will render the warranty void. Such modifications may result in injuries and material damage. -
Page 29: Maintenance
Compact Par 7 Tri Maintenance Safety Instructions for Maintenance DANGER Electric shock caused by dangerous voltage inside Disconnect power supply before servicing or cleaning. Preventive Maintenance Attention Before each use, examine the device visually for any defects. Make sure that: ●... -
Page 30: Corrective Maintenance
Compact Par 7 Tri Corrective Maintenance The device does not contain user-serviceable parts. Do not open the device and do not modify the device. Refer repairs and servicing to instructed or skilled persons. Contact your Highlite International dealer for more information. -
Page 31: Deinstallation, Transportation And Storage
Compact Par 7 Tri Deinstallation, Transportation and Storage Instructions for Deinstallation WARNING Incorrect deinstallation can cause serious injuries and damage of property. ● Let the device cool down before dismounting. ● Disconnect power supply before deinstallation. ● Always observe the national and site-specific regulations during deinstallation and derigging of the device. - Page 32 ©2021 Showtec...
Need help?
Do you have a question about the Compact Par 7 Tri and is the answer not in the manual?
Questions and answers