
Related Manuals for SHOWTEC Candela Pix 100


Summary of Contents for SHOWTEC Candela Pix 100
- Page 1 MANUAL ENGLISH Candela Pix 100 Ordercode: 41281 Highlite International B.V. – Vestastraat 2 – 6468 EX – Kerkrade – the Netherlands...
-
Page 2: Table Of Contents
Candela Pix 100 Table of contents Warning ....................................2 Safety Instructions ................................. 2 Operating Determinations ............................4 Rigging .................................... 4 Connection with the mains ............................5 Return Procedure ................................5 Claims ....................................5 Description of the device ..............................6 Overview ..................................7 Backside .................................. -
Page 3: Warning
Save the carton and all packing materials. In the event that the fixture must be returned to the factory, it is important that the fixture be returned in the original factory box and packing. Your shipment includes: ● Showtec Candela Pix 100 ● 2 brackets and screws ● Quick lock ●... - Page 4 ● If your Showtec device fails to work properly, discontinue the use immediately. Pack the unit securely (preferably in the original packing material), and return it to your Showtec dealer for service.
-
Page 5: Operating Determinations
The Candela Pix 100 can be placed on a flat stage floor or mounted to any kind of truss by a clamp. Improper installation can cause serious injuries and/or damage of property! -
Page 6: Connection With The Mains
Candela Pix 100 Connection with the mains Connect the device to the mains with the power plug. Always check if the right color cable is connected to the right place. International EU Cable UK Cable US Cable BROWN YELLOW/COPPER PHASE... -
Page 7: Description Of The Device
Candela Pix 100 Description of the device Features The Showtec Candela Pix 100 is an outdoor LED bar with 14 x 4-in-1 RGBW LEDs. It is is a LED bar with high output and great effects. ● Power and data daisy chain ●... -
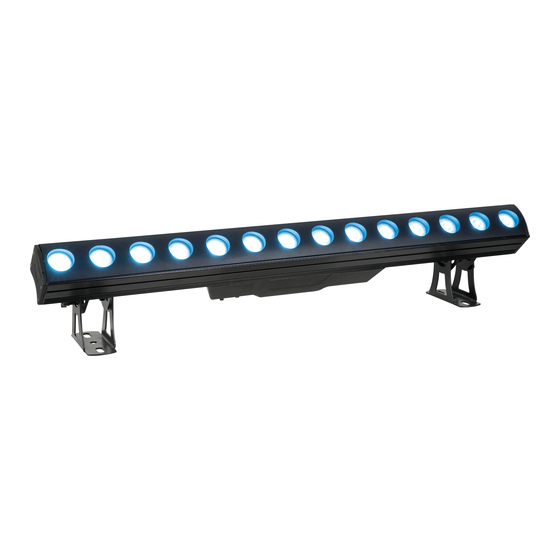
Page 8: Overview
Candela Pix 100 Overview Fig. 01 01) 14 x 15W 4-in-1 RGBW LEDs 02) Mounting bracket with inclination screw Backside Fig. 02 03) Dedicated PowerCON True 1 connector 100-240V IN (IP65) 04) Dedicated PowerCON True 1 connector 100-240V OUT (IP65) -
Page 9: Installation
03) Plug the end of the electric mains power cord into a proper electric power supply socket. 04) When the Candela Pix 100 is not connected with a DMX cable, it functions as a stand-alone device. Please see page 14 for more information about the Auto program mode, Built-in programs or Manual color mode. -
Page 10: Multiple Candela Pixs (Dmx512 Mode)
Candela Pix 100 Multiple Candela Pixs (DMX512 Mode) 01) Fasten the effect light onto firm trussing. Leave at least 0,5 meter on all sides for air circulation. 02) Always use a safety cable (ordercode 70140 / 70141). 03) Use a 3-p XLR cable to connect the Candela Pixs and other devices. -
Page 11: Fixture Linking
DAP Audio DMX adapter: 3-pin > 5-pin. Ordercode FLA30. ● DAP Audio DMX Terminator 3-pin. Ordercode FLA42. ● DAP Audio DMX Terminator 5-pin. Ordercode FLA43. The Candela Pix 100 can be operated with a controller in control mode or without the controller in stand-alone mode. Ordercode: 41281... -
Page 12: Control Panel
Therefore, the DMX address of the first Candela Pix should be 1(001); the DMX address of the second Candela Pix should be 1+56=57 (057); the DMX address of the third Candela Pix 100 should be 57+56=113 (113), etc. Please, be sure that you do not have any overlapping channels in order to control each Candela Pix correctly. -
Page 13: Menu Overview
Candela Pix 100 Menu overview The Candela Pix 100 will show the current software version and current temperature at start-up ! Ordercode: 41281... -
Page 14: Main Menu Options
Candela Pix 100 Main Menu Options 01) Press the MODE or SET button to open the main menu. 02) Press the UP/DOWN buttons to scroll through the menu. The display will show: 03) Press the SET button to open the desired menu. -
Page 15: Manual
Candela Pix 100 2. Manual In this menu you can individually set the static colors. 01) While in main menu, press the UP/DOWN buttons until the display shows Manual. 02) Press the SET button to open the menu, the display will show: Press the UP/DOWN buttons to scroll between the static colors Red, Green, Blue and White. -
Page 16: Master/Slave
Candela Pix 100 08) Press the UP/DOWN buttons to set the desired strobe frequency. The adjustment range is between , from OFF to high strobe frequency. 09) If you choose , press the UP/DOWN buttons to set the program speed and strobe frequency. -
Page 17: Curves Select
Candela Pix 100 6.1. Curves Select In this menu you can adjust the dimming of the device by choosing a dimming curve. 01) Press the UP/DOWN buttons until the display shows Curves Select. 02) Press the SET button to open the menu, the display will show: 03) Press the UP/DOWN buttons to choose the desired dimming curve out of the 4 available options: 04) Press the SET button to confirm your choice. -
Page 18: Pwm Frequency
Candela Pix 100 6.3. PWM Frequency In this menu you can choose several PWM frequencies. 01) Press the UP/DOWN buttons until the display shows PWM Frequency. 02) Press the SET button to open the menu, the display will show: 03) Press the UP/DOWN buttons to select one of the 4 options. -
Page 19: Lock
Candela Pix 100 6.6. Lock In this menu you can select whether the safety lock is active or not. 01) Press the UP/DOWN buttons until the display shows Lock. 02) Press the SET button to open the menu, the display will show: 03) Press the UP/DOWN buttons to select On or Off. -
Page 20: Dmx Channels
Candela Pix 100 DMX Channels 4 Channels Channel 1 – Red Dimmer intensity 0-255 Gradual adjustment Red from 0-100% Channel 2 – Green Dimmer intensity 0-255 Gradual adjustment Green from 0-100% Channel 3 – Blue Dimmer intensity 0-255 Gradual adjustment Blue from 0-100% Channel 4 –... -
Page 21: Dmx Channels
Candela Pix 100 9 DMX Channels Channel 1 – Master Dimmer intensity 0-255 Gradual adjustment, from dark to brightest 0-100% Channel 2 – Red Dimmer intensity (CH1 must be set between 1-255 0-255 Gradual adjustment Red from 0-100% Channel 3 – Green Dimmer intensity (CH1 must be set between 1-255... - Page 22 Candela Pix 100 Channel 8 – Color presets (CH1 must be set between 1-255 0-10 No function 11-16 Color 1 (R255, G000, B000, W000) 17-22 Color 2 (R255, G080, B000, W000) 23-28 Color 3 (R255, G108, B000, W000) 29-34 Color 4 (R255, G152, B000, W000)
-
Page 23: Dmx Channels
Candela Pix 100 56 DMX Channels Channel 1 – Red Pixel LED 1 0-255 Gradual adjustment Red from 0 – 100% Channel 2 – Green Pixel LED 1 0-255 Gradual adjustment Green from 0 – 100% Channel 3 – Blue Pixel LED 1 0-255 Gradual adjustment Blue from 0 –... -
Page 24: Maintenance
04) The electric power supply cables must not show any damages or material fatigue. The Candela Pix 100 requires almost no maintenance. However, you should keep the unit clean. Otherwise, the fixture’s light output will be significantly reduced. Disconnect the mains power supply and then wipe the cover with a damp cloth. - Page 25 Candela Pix 100 Problem Probable cause(s) Solution ● Check if power is switched on and cables are plugged in No power to the fixture One or more fixtures do not function at all ● Return the device to your local...
-
Page 26: Product Specifications
Candela Pix 100 Product Specifications Model: Showtec Candela Pix 100 Input voltage: 100-240V AC, 50/60Hz Power consumption: 200W @FO Drive current: 1000mA DMX linking: 30pcs Dimensions: 1024 x 150 x 235 mm (LxWxH) (incl. brackets) Weight: 11 kg Operating and Programming:... -
Page 27: Dimensions
Candela Pix 100 Dimensions Ordercode: 41281... - Page 28 ©2019 Showtec...
Need help?
Do you have a question about the Candela Pix 100 and is the answer not in the manual?
Questions and answers