
Related Manuals for norbar EvoTorque EBT Series


Summary of Contents for norbar EvoTorque EBT Series
- Page 1 OPERATOR’S MANUAL ® EVOTORQUE BATTERY TOOL (EBT) Part Number 34464 | Issue 2 | Original Instructions (English)
- Page 2 Polski / Tłumaczenie oryginalnej Instrukcja obsługi Polish instrukcji Português / Tradução das Instruções Manual do utilizador Portuguese Originais Español / Traducción de las www.norbar.com/en- Manual del operario Spanish instrucciones originales gb/Downloads/Manuals Svenska / Översättning av Bruksanvisning Swedish bruksanvisning i original...
-
Page 3: Table Of Contents
CONTENTS Part Numbers Covered by This Manual Serial Number Safety Messages Safety – General Power Tool Safety Warnings Work Area Safety Electrical Safety Personal Safety Power Tool Use and Care Battery Tool Use and Care Service Safety – EBT Specific Safety Warning Markings on Tool EBT Tools without Reaction Bar Introduction... -
Page 4: Part Numbers Covered By This Manual
PART NUMBERS COVERED BY THIS MANUAL This manual covers the set up and use of Norbar EvoTorque Battery Tools (EBT). ® Model Torque Range Speed Orientation Case Part Number 180445 BARE 180446 200 – 1350 N·m 180449 BARE 180450 EBT-72-1350 BLE... -
Page 5: Safety Messages
® Use only with Norbar EvoTorque Battery Pack (EBP series) batteries. ®... -
Page 6: Personal Safety
• When operating a power tool outdoors, use an extension cord suitable for outdoor use. Use of a cord suitable for outdoor use reduces the risk of electric shock. • If operating a power tool in a damp location is unavoidable, use a residual current device (RCD) protected supply. -
Page 7: Battery Tool Use And Care
• Keep handles and grasping surfaces dry, clean and free from oil and grease. Slippery handles and grasping surfaces do not allow for safe handling and control of the tool in unexpected situations. Battery Tool Use and Care • Recharge only with the charger specified by the manufacturer. A charger that is suitable for one type of battery pack may create a risk of fire when used with another battery pack. -
Page 8: Safety - Ebt Specific Safety Warning
SAFETY – EBT SPECIFIC SAFETY WARNING This tool is intended for use with threaded fasteners. • It is recommended for the operator to wear hearing protection. • Always use impact or high-quality sockets. • Use only sockets and adaptors which are in good condition. •... -
Page 9: Introduction
INTRODUCTION The EvoTorque Battery Tool (EBT) is an electronic torque tool designed for applying torque to threaded ® fasteners. There are models to cover torque capacities of 1,350 N∙m to 4,000 N∙m. Parts Included Kit or Bare Case type: Contents: Tool handle 2 x Battery (Part EBP 60334.EBT) Plastic carry case... -
Page 10: Accessories
Accessories Model Description EBT-80 EBT-92 EBT-72 ¾" Drive Square 18779 (Fixing Screw) (25325.45) 19431 1" Drive Square 18492 18934 (Fixing Screw) (25352.45) (25352.40) (25352.60) 1 ½" Drive Square 18935 (Fixing Screw) (25352.60) Reaction Bar (NOTE) 18298 Reaction Bar Adaptor 18290 (NOTE) Single-Sided Reaction Plate... -
Page 11: Features And Functions
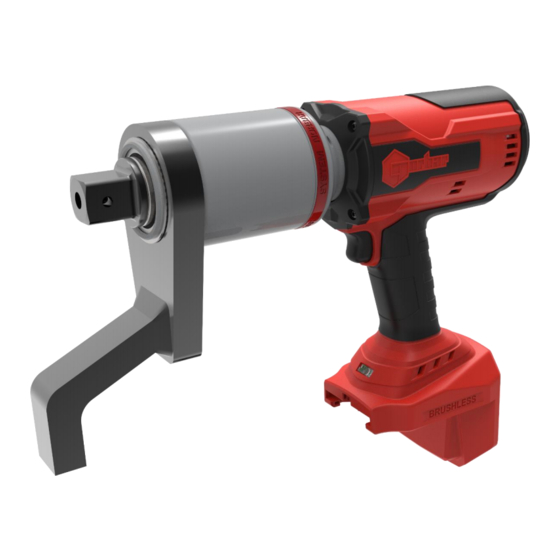
FEATURES AND FUNCTIONS Drive Square Reaction Bar ‘Safe to start‘ Button Trigger Handle LED light Battery Pack Release Button Battery Pack User Interface FIGURE 1 – Tool Features Brushless motor for low maintenance Trigger and ‘safe to start’ button to ensure hands are safely positioned High powered LED light to illuminate application 18V, 5.0Ah battery and efficient motor give outstanding fastening performance per charge OLED display ensures visibility in all conditions... - Page 12 Two modes of operation: ‘Torque only’ is the default mode for the first-time user; only torque targets can be set and data storage / transfer is limited ‘Advanced’ allows angle targets and full data storage / transfer Sleep feature to turn off display to save battery power; default time 20 seconds Clear indication of successful joint application ®...
-
Page 13: Set Up Instructions
SET UP INSTRUCTIONS NOTE: If the equipment is used in a manner not specified by the manufacturer, the protection provided by the equipment may be impaired. WARNING: ALLOW THE TOOL TO EQUALISE TO THE AMBIENT TEMPERATURE / HUMIDITY BEFORE SWITCHING ON. WIPE OFF ANY MOISTURE BEFORE USE. -
Page 14: Torque Reaction
Torque Reaction The reaction bar ensures all reaction forces are contained, so torque reaction is not passed back to the operator. Several reaction bar styles are available. Fit reaction bar as detailed below. Reaction Bar Type Fitting Instructions Cranked Reaction Bar (Standard) Fit reaction bar / plate over the drive square to engage Single Sided Reaction Plate (Optional) reaction splines. - Page 15 If an extra long socket is used it may move the reaction bar outside the safe reaction window, as seen in Figure 8. The standard reaction bar may need to be extended to ensure it remains within the shaded area. For alternative reaction bars see ACCESSORIES list.
- Page 16 When the EBT is in operation the reaction bar rotates in the opposite direction to the output drive square and must be allowed to rest squarely against a solid object or surface adjacent to the fastener to be tightened. (See Figures 12 – 15). Torque Reaction EBT Type Clockwise...
-
Page 17: Display Features
Display Features Button Action Exit / Setting menu Select menu & increase / decrease value TIP: Keep button pressed for fast value change & Accept / Direction Save / no save If locked padlock appears, enter PIN code. Any default value is shown as the first option. Setting Menu Settings Menu Detail... - Page 18 (ii) MODE Advanced: Setting Icon MODE Advanced Select Target # (T01 – T20). Set target torque. Set target angle (0 = no angle). Targets Set final torque (0 = not enabled). Audit mode ‘✘’ or ‘✓’? Set angle limit (for Audit mode) = 5° (2° to 720°). Work Tracks the work done.
-
Page 19: Operating Instructions
OPERATING INSTRUCTIONS WARNING: KEEP HANDS CLEAR OF THE REACTION BAR. WARNING: WHEN USING THIS TOOL IT MUST BE SUPPORTED AT ALL TIMES IN ORDER TO PREVENT UNEXPECTED RELEASE IN THE EVENT OF FASTENER OR COMPONENT FAILURE. Tightening Fit the tool with required impact or high-quality socket. Slide the socket over the tool square drive ensuring the pin hole in both socket and square drive line up. - Page 20 Rotate the handle into a convenient position relative to the reaction bar. Fit the tool onto the fastener to be tightened with the reaction bar adjacent to the reaction point. See figure Adopt a posture to counteract normal or unexpected movement of the tool due to reaction forces.
-
Page 21: Saving Results
Saving Results Auto Reset = Button Operation (after a successful tightening) Press either the buttons to Save the displayed (joint complete) reading and reset the tool, ready for the next tightening operation. Press the button to reset the tool ready for the next tightening operation without saving the (joint complete) reading. -
Page 22: Maintenance
MAINTENANCE For optimum performance and safety, regular tool maintenance is required. The user maintenance is limited to that stipulated in this section. Any other maintenance or repairs should be carried out by Norbar or a Norbar distributor. WARNING: THE TOOL FEATURES A LITHIUM BATTERY. -
Page 23: Gearbox
Gearbox Under normal operating conditions it is not necessary to re-grease the gearbox. The gearbox contains Lubcon Turmogrease Li 802 EP. Drive Square If the tool is subject to torque overload there is potential for catastrophic tool damage. To reduce this risk the output drive square has been designed, like a fuse, so it will shear first. -
Page 24: Specifications
SPECIFICATIONS NOTE: Due to continuous improvement, all specifications are subject to change without prior notice. Symbol Specifications Symbol Meaning REFER TO OPERATORS MANUAL Volt Direct current CE mark DO NOT THROW IN GENERAL WASTE Tool Specifications Torque Max Tool Speed Free Model Running* Calibrated Range... - Page 25 Dimensions (mm) Model ØD EBT-1350 198 (217) 298 (317) EBT-2700 191 (226) 298 (333) EBT-4000 250 (285) 352 (387) * = Length for 1 speed (length for 2 speed). FIGURE 21 – Tool Dimensions...
- Page 26 Angle Setting: 10° to 720° Angle Start Threshold: 10% to 100% of tool capacity Display: Colour OLED (160 x 128 pixels) Motor Voltage: 18.0 VDC Memorised readings: 2500 Vibration emission: The vibration total value does not exceed 2.5m/s² Measured tool vibration (ah) = 0.9 m/s² with uncertainty K = 0.22 m/s² Noise emission: Sound Pressure Level, L = 79.1 dB(A) uncertainty K = 3dB...
-
Page 27: Usb Bluetooth ® Smart Adapter
® USB BLUETOOTH SMART ADAPTOR SPECIFICATION (WHERE INCLUDED) FCC and IC This equipment has been tested and found to comply with the limits for a Class B digital device, pursuant to Part 15 of the FCC Rules. These limits are designed to provide reasonable protection against harmful interference in a residential installation. - Page 28 d’une typologie spécifique et d’un gain maximum (ou inférieur) approuvé pour l’émetteur par Industrie Canada. Pour réduire les éventuelles perturbations radioélectriques nuisibles à d’autres utilisateurs, le type d’antenne et son gain doivent être choisis de manière à ce que la puissance isotrope rayonnée équivalente (P.I.R.E.) n’excède pas les valeurs nécessaires pour obtenir une communication convenable.
-
Page 30: Troubleshooting
TROUBLESHOOTING The following is only a guide, for more complex fault diagnoses please contact your distributor. Problem Likely Reason Likely Solutions Sleep time active Pull trigger to wake up tool No Display Flat battery Change / charge battery Press trigger + ‘safe to start’ button at the ‘safe to start’... - Page 31 Motor Control Unit is Disconnect, then re-connect the battery to Phase Open Protection unbalanced; it is not safe for the tool. If problem persists, contact Norbar. the motor to start. Thermistor on motor is Disconnect, then re-connect the battery to Motor N.T.C.
-
Page 32: Glossary Of Terms
GLOSSARY OF TERMS Word or Term Meaning Amps Angle Limit Maximum allowed angle movement in Audit mode Audit Checking a pre-tightened joint Auto reset Tool will automatically reset ready for the next tightening operation a.c. Alternating Current Across Flats Bi-directional Clockwise and Counter Clockwise Comma Separated Values CTC123... - Page 33 Tel + 61 (0)8 8292 9777 Tel + 86 21 6145 0368 Email enquiry@norbar.com.au Email sales@norbar.com.cn NORBAR TORQUE TOOLS INDIA PVT. LTD NORBAR TORQUE TOOLS INC Plot No A-168, Khairne Industrial Area, 36400 Biltmore Place, Willoughby, Thane Belapur Road, Mahape, Ohio, 44094 Navi Mumbai –...
Need help?
Do you have a question about the EvoTorque EBT Series and is the answer not in the manual?
Questions and answers